- sales/support
Google Chat:---
- sales
+86-0755-88291180
- sales01
sales@spotpear.com
- sales02
dragon_manager@163.com
- support
tech-support@spotpear.com
- CEO-Complaints
zhoujie@spotpear.com
- Only Tech-Support
WhatsApp:13246739196
- Purchase/Shipping/Refund
WhatsApp:13424403025
- HOME
- >
- ARTICLES
- >
- Raspberry Pi
- >
- Raspberry Pi LCD
- >
- GPIO-SPI
Raspberry Pi 0.96 128x64 SSD1306 OLED User Guide
【Download】
[] Schematic
【Preparatory work】
Before you begin, you need the following items:
[] Raspberry Pi
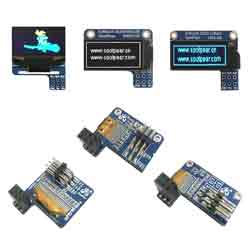
[] SSD1306 OLED Screen -I2C display interface
[] Python
Hardware connection

Run I2C interface
Restart the Raspberry Pi after ensuring that the I2C interface is turned on.
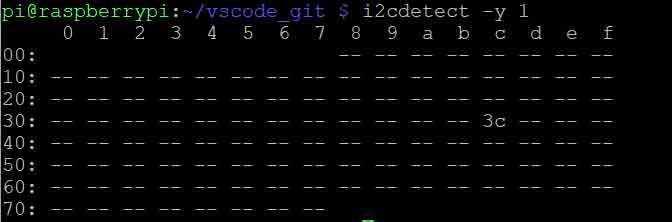
Find I2C device address
You can use the following command to find the address of the I2C device connected to the raspberry pi:
sudo i2cdetect -y 1
The running result is as shown in the figure (the default i2c address of ssd1306oled is 0x3c).
Install luma.oled library
Next, you need to install the luma.oled library on the raspberry pi. You can install in the terminal by the following command:
sudo pip3 install luma.oled
Test Python program
Before running the code, you need to create a new python file named SSD 1306 _ OLED _ 128x64 _ bad _ apple.py in Raspberry Pi (the file name can be customized).
sudo nano ssd1306_oled_128x64_bad_apple.py
Combine the above steps, and drive the SSD1306 OLED screen with luma.oled library. The following is a complete Python program for driving the SSD1306 OLED screen on Raspberry Pi:
import os
import time
import threading
from PIL import Image, ImageSequence
from PIL import ImageFont, ImageDraw
from luma.core.interface.serial import i2c
from luma.core.render import canvas
from luma.oled.device import ssd1306
serial = i2c(port=1, address=0x3C)
device = ssd1306(serial, width=128, height=64)
# Return CPU temperature as a character string
def getCPUtemperature():
res = os.popen('vcgencmd measure_temp').readline()
return(res.replace("temp=","").replace("'C\n",""))
# Return RAM information (unit=kb) in a list
# Index 0: total RAM
# Index 1: used RAM
# Index 2: free RAM
def getRAMinfo():
p = os.popen('free')
i = 0
while 1:
i = i + 1
line = p.readline()
if i==2:
return(line.split()[1:4])
# Return % of CPU used by user as a character string
def getCPUuse():
return(str(os.popen("top -n1 | awk '/Cpu\(s\):/ {print $2}'").readline().strip()))
# Return information about disk space as a list (unit included)
# Index 0: total disk space
# Index 1: used disk space
# Index 2: remaining disk space
# Index 3: percentage of disk used
def getDiskSpace():
p = os.popen("df -h /")
i = 0
while 1:
i = i +1
line = p.readline()
if i==2:
return(line.split()[1:5])
def draw_text(text, width, height, fontsize):
font = ImageFont.truetype("arial.ttf", fontsize)
with canvas(device) as draw:
draw.rectangle(device.bounding_box, outline="white", fill="black")
# Calculate the width of the text using textlength() instead of textsize()
w = font.getlength(text)
# Calculate the height of the text by subtracting the font descent from the font ascent
ascent, descent = font.getmetrics()
h = ascent - descent
# Calculate the position of the text
x = (width - w) // 2
y = (height - h) // 2
# Draw the text using the new width and height values
draw.text((10, 1), text, font=font, fill="white")
def image_gif():
# Display each image with an idea
for frame in frames:
device.display(frame)
time.sleep(0.01)
def computer_resources(flag):
while not flag.is_set():
# CPU informatiom
CPU_use = getCPUuse()
CPU_tmp = getCPUtemperature()
# RAM information
# Output is in kb, here I convert it in Mb for readability
RAM_stats = getRAMinfo()
RAM_total = round(int(RAM_stats[0]) / 1000,1)
RAM_used = round(int(RAM_stats[1]) / 1000,1)
RAM_free = round(int(RAM_stats[2]) / 1000,1)
# Disk information
DISK_stats = getDiskSpace()
DISK_total = DISK_stats[0]
DISK_used = DISK_stats[1]
DISK_perc = DISK_stats[3]
#
status_text = "CPU_use: "+CPU_use+"\nCPU_tmp: "+CPU_tmp+"\nRAM_used: "+str(RAM_used)+"\nDISK_used: "+DISK_used
draw_text(status_text, device.width, device.height, 12)
if __name__ == '__main__':
# Open a GIF file and create an Image object for each frame
frames = []
with Image.open("./bad_apple.gif") as img:
for frame in ImageSequence.Iterator(img):
frames.append(frame.convert("1").resize((128,64)))
# Create a threading.Event() object for synchronization
flag = threading.Event()
# Create a thread to compute system resources usage
t = threading.Thread(target=computer_resources,args=(flag,))
while True:
# Show some text and wait for 2 seconds
draw_text(" Spotpear\nwww.spotpear.cn\nwww.spotpear.com\n", device.width, device.height, 12)
time.sleep(2)
#Start the thread to compute system resources usage,wait for 5 seconds
t.start()
time.sleep(5)
# Set the flag to stop the thread
flag.set()
# Wait for the thread to terminate
t.join()
# Clear the flag and create a new thread for next loop
flag.clear()
t = threading.Thread(target=computer_resources,args=(flag,))
time.sleep(2)
# Display Bad Apple animation as GIF images
image_gif()
Note that we used the address "0x3C" in the i2c object, which is the default SSD1306 OLED screen address. If you are using other types of i2c devices, use the command sudo i2cdetect -y 1 to find its address and replace it with the address in the I2C object.
This program realizes the display effect of gif, so it must have a corresponding gif file, otherwise the program can't run normally.
How to convert a video into a gif refer to this tutorial: Converting MP4 video into gif
Program execution effect
Input the above code into python file, save and exit, and input the following code in Raspberry Pi terminal to execute the program:
sudo python3 ssd1306_oled_128x64_bad_apple.py