


- sales/support
Google Chat:---
- sales
+86-0755-88291180
- sales01
sales@spotpear.com
- sales02
dragon_manager@163.com
- support
tech-support@spotpear.com
- CEO-Complaints
zhoujie@spotpear.com
- Only Tech-Support
WhatsApp:13246739196
- Purchase/Shipping/Refund
WhatsApp:13424403025
- HOME
- >
- ARTICLES
- >
- Common Moudle
- >
- WIFI
USB 3.2 Gen1 5G DONGLE User Guide
Overview
Features
- Supports 5G modules with M.2 (NGFF) Key B interface, compatible with mainstream 5G modules from the brands such as SIMCom, Quectel, and Fibocom
- Supports 5G modules in 3042/3052 packages such as SIM82XX, RM5XX and FM650XX series
- Onboard Type-C port for 5G networking of Raspberry Pi or PC via USB cable, firmware updating, or external power supply input
- Onboard 4-ch IPEX Gen 4 to SMA antenna connector for direct mounting of antennas
- Onboard voltage translator circuit, supports 5~12V power supply via DC 3.5mm jack, or 5V/2A power supply via USB 3.2 port
- Onboard 1-ch standard SIM card slot and 1-ch eSIM card slot, dual SIM single standby, switchable via AT command
- Onboard power supply and network indicator, for checking the working status of the module and 5G debugging
- Aluminum alloy enclosure with oxidation dull-polish surface, CNC process opening, solid and durable, desktop or wall-mount support
Hardware Description
Interfaces
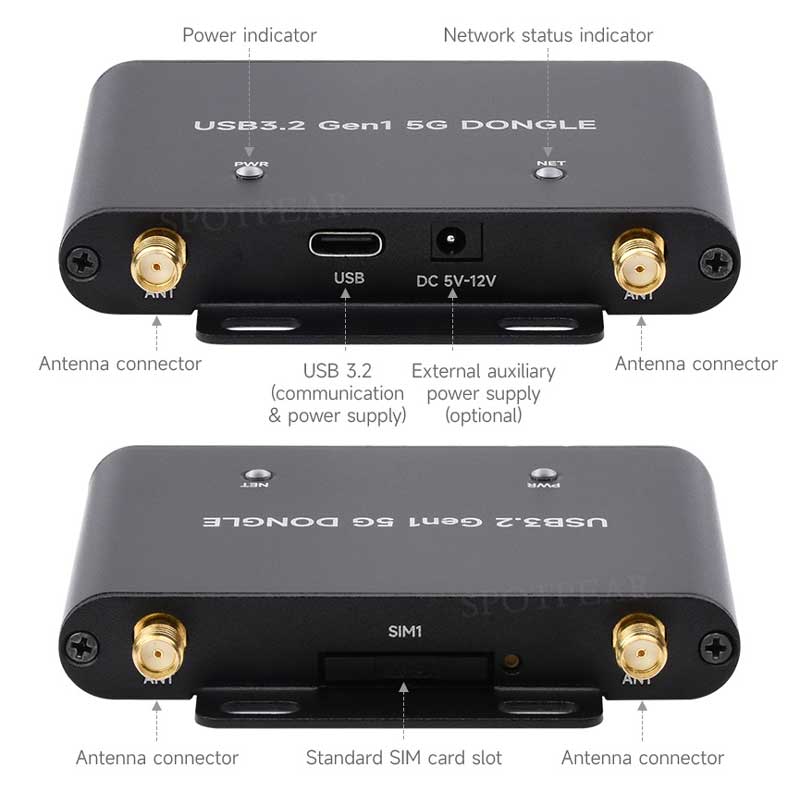
4G/5G Module Compatibility
If you need to use the USB TO M.2 B KEY for other 4G/5G modules, you can refer to the M.2 connection diagram below to check whether there is a pin conflict, and then connect it for testing: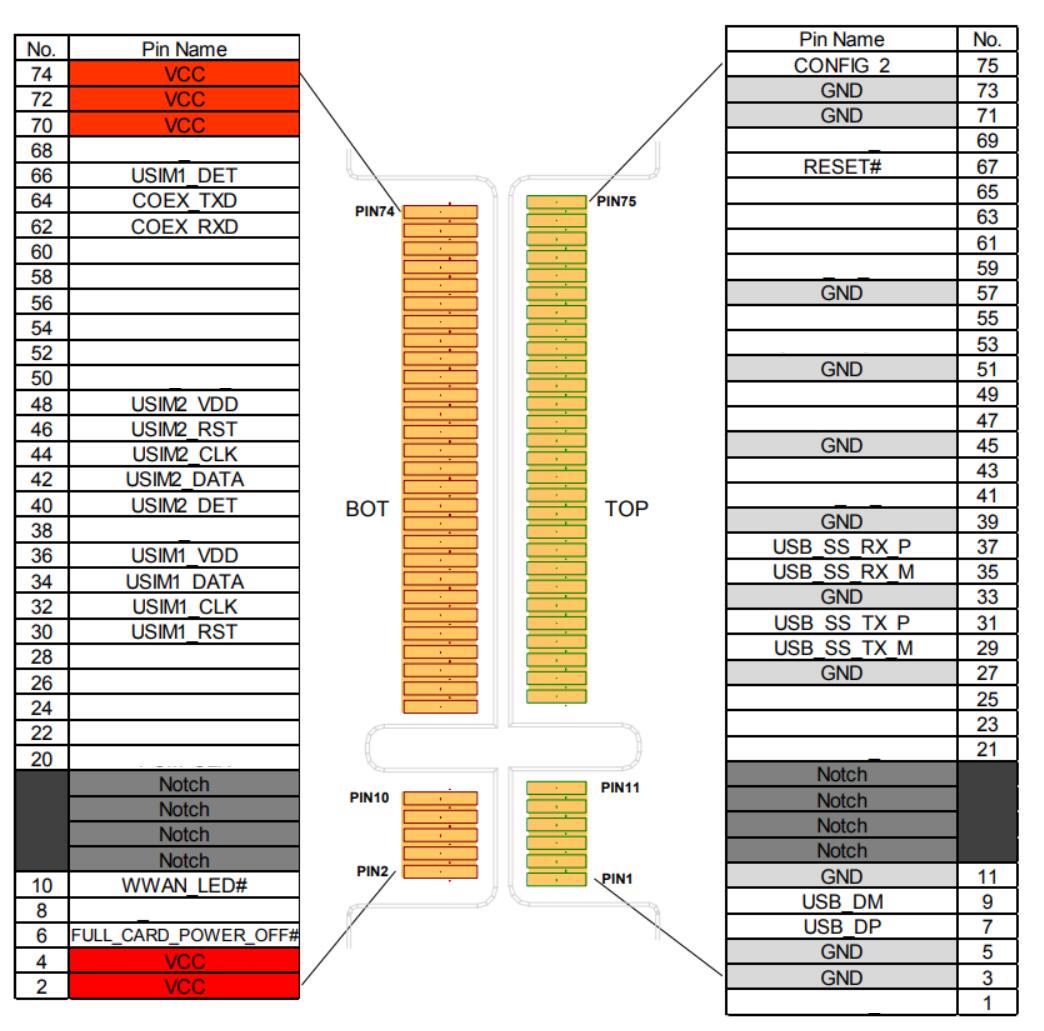
Installation Diagram
RM50XX Module Usage
Selection Guide
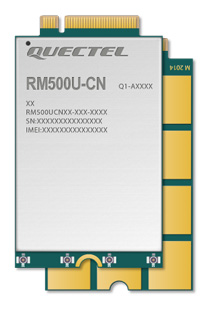
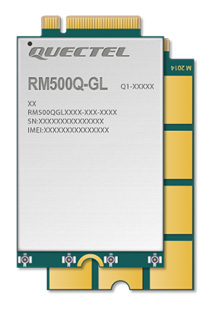
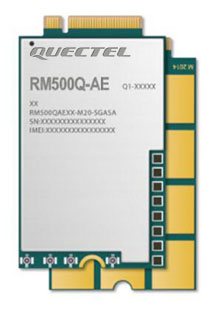
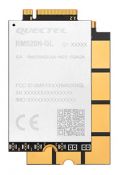
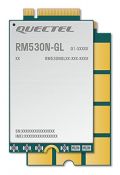
| 5G Sub-6 | RM500U-CNV | RM500Q-GL 5G HAT | RM502Q-AE 5G HAT | RM520N-GL | RM530N-GL | |
|---|---|---|---|---|---|---|
| Picture |
|
|
|
|
| |
| 5G Standard | 3GPP R15 | 3GPP R16 | ||||
| 5G Chip | UNISOC | Qualcomm | ||||
| 5G | Sub-6 GHz | Sub-6 GHz & mmWave | ||||
| Region/Operator | China, EMEA, Asia-Pacific | except Americas | except China | Global | ||
| Operating Temperature | -30°C ~ +75°C | |||||
| Extension Temperature | -40°C ~ +85°C | |||||
| Module Size | 30.0 × 52.0 × 2.3 (mm) | |||||
| Module Weight | 8.8g | 8.7g | 8.8g | |||
| Power Supply | 3.3~4.4V, Typ. 3.7V | 3.135~4.4V, Typ. 3.7V | ||||
| Power Consumption | 78μA @ shutdown; 5.1mA @ hibernate; | 70μA @ shutdown; 4.0mA @ hibernate; | 80μA @ shutdown; 4.2mA @ hibernate; | 195μA @ shutdown; 4.7mA @ hibernate; | 173μA @ shutdown; 5.1mA @ hibernate; | |
| Frequency Band | ||||||
| 5G | 5G NR | - | n257, n258, n260, n261 | |||
| 5G NR NSA | n41, n78, n79 | n41, n77, n78, n79 | n1, n2, n3, n5, n7, n8, n12, n20, n25, n28, n38, n40, n41, n48, n66, n71, n77, n78, n79 | n1, n2, n3, n5, n7, n8, n12, n13, n14, n18, n20, n25, n26, n28, n29, n30, n38, n40, n41, n48, n66, n70, n71, n75, n76, n77, n78, n79 | ||
| 5G NR SA | n1, n2, n3, n5, n8, n28, n41, n77, n78, n79 | n1, n2, n3, n5, n7, n8, n12, n20, n25, n28, n38, n40, n41, n48, n66, n71, n77, n78, n79 | n1, n2, n3, n5, n7, n8, n12, n13, n14, n18, n20, n25, n26, n28, n29, n30, n38, n40, n41, n48, n66, n70, n71, n75, n76, n77, n78, n79 | |||
| LTE | LTE-FDD | B1, B3, B5, B8 | B1, B2, B3, B4, B5, B7, B8, B12, B13, B14, B17, B18, B19, B20, B25, B26, B28, B29, B30, B32, B66, B71 | |||
| LTE-TDD | B34, B38, B39, B40, B41 | B34, B38, B39, B40, B41, B42, B43, B48 | ||||
| LAA | - | B46 | ||||
| UMTS | WCDMA | B1, B5, B8 | B1, B2, B3, B4, B5, B6, B8, B19 | B1, B2, B4, B5, B8, B19 | ||
| GNSS | - | GPS / GLONASS / BeiDou(Compass) / Galileo / QZSS (only RM520N-GL and RM530N-GL support) | ||||
| Data Rate | ||||||
| 5G mmWave | - | DL 4.0Gbps; UL 1.4Gbps | ||||
| 5G SA Sub-6 | DL 2Gbps; UL 1Gbps | DL 2.1Gbps; UL 900Mbps | DL 4.2Gbps; UL 450Mbps | DL 2.4Gbps; UL 900Mbps | ||
| 5G NSA Sub-6 | DL 2.2Gbps; UL 575Mbps | DL 2.5Gbps; UL 600/650Mbps | DL 5Gbps; UL 650Mbps | DL 3.4Gbps; UL 550Mbps | ||
| LTE | DL 600Mbps; UL 150Mbps | DL 1.0Gbps; UL 200Mbps | DL 2Gbps; UL 200Mbps | DL 1.6Gbps; UL 200Mbps | ||
| UMTS | DL 42.2Mbps; UL 11Mbps | DL 42Mbps; UL 5.76Mbps | ||||
Test Description
Common AT Commands
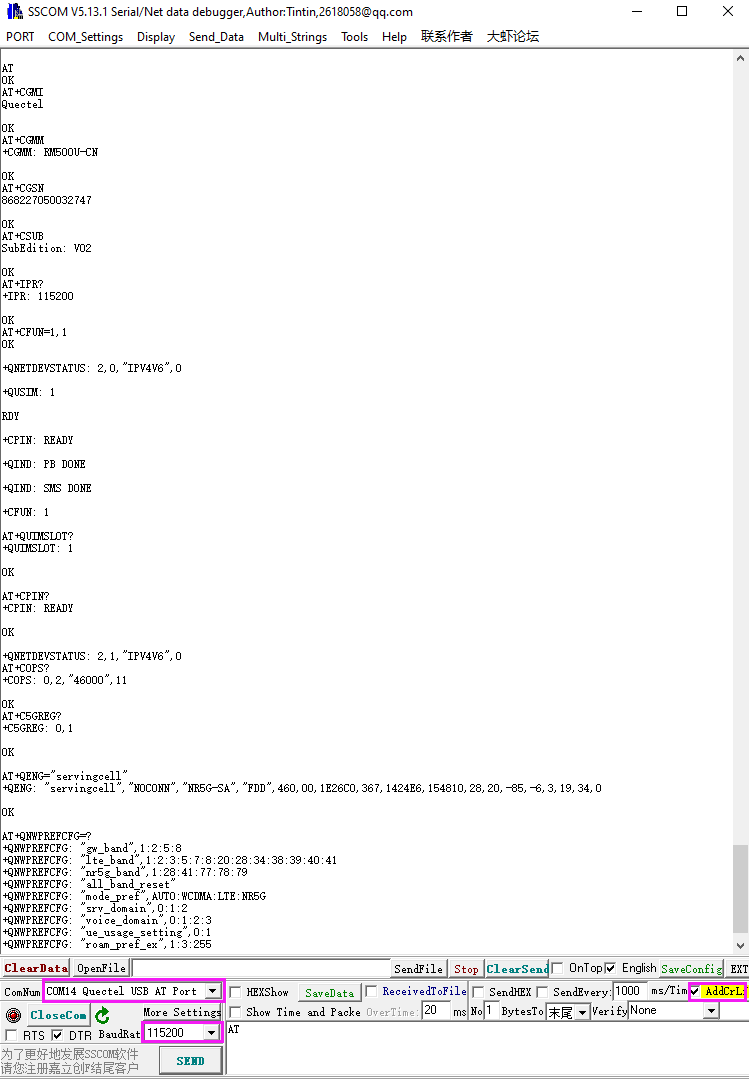
| Command | Description | Return |
|---|---|---|
| AT | AT Test Command | OK |
| ATE | ATE1 sets echo ATE0 closes echo | OK |
| AT+CGMI | Query module manufacturer | OK |
| AT+CGMM | Query module model | OK |
| AT+CGSN | Query product serial number (IMEI) | OK |
| AT+CSUB | Query module version and chip | OK |
| AT+QGMR | Query the firmware version serial number | OK |
| AT+IPR? | Set the module hardware serial port baud rate | +IPR: OK |
| AT+CFUN=1,1 | Reset module | OK |
| AT+QUIMSLOT? | Query SIM card selection: Return 1, select SIM card 1; Return 2, select SIM card 2 | +QUIMSLOT: 1/2 OK |
| AT+CPIN? | Query the status of the SIM card, return READY, the SIM card can be recognized normally | +CPIN: READY |
| AT+COPS? | Query the current operator, the operator information will be returned after normal networking | +COPS: OK |
| AT+CEREG? | Query network registration status | +CEREG: OK |
| AT+C5GREG? | Query 5G network registration status | +C5GREG: OK |
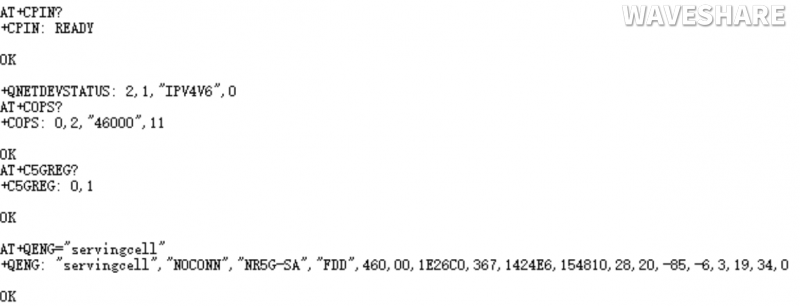
| AT+QENG="servingcell" | Query UE system information | |
| AT+QNWPREFCFG="mode_pref",AUTO | Automatic network mode | OK |
| AT+QNWPREFCFG="mode_pref",NR5G | Prioritize 5G network | OK |
| AT+QNWPREFCFG="nr5g_band",79 | Fixed N79 band | OK |
| AT+QNWPREFCFG="mode_pref",LTE | Prioritize 4G network | OK |
Working with Windows
Install Driver
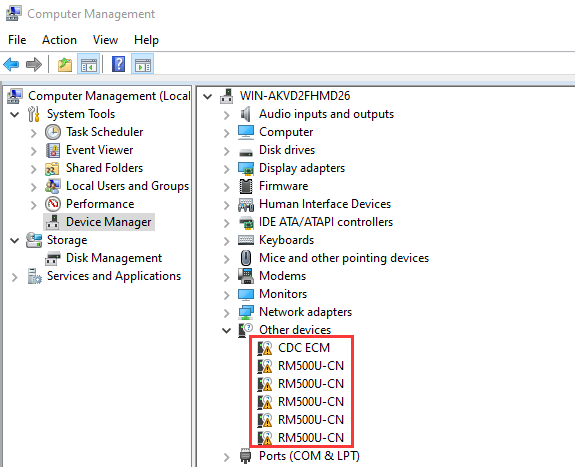
- After connecting the 5G HAT to the computer via a USB3.0 data cable, other devices appear with a list of devices without installed drivers, similar to the following:
- Enter the RM50XQ_Driver directory.
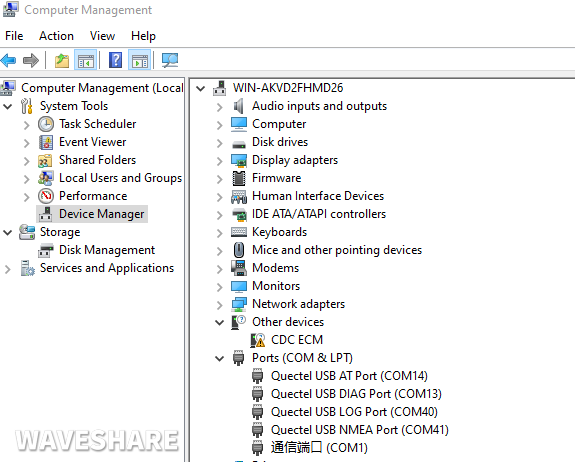
- Click on setup.exe to install the driver, and after installation, the device manager will generate the following devices:
Networking Speed Test
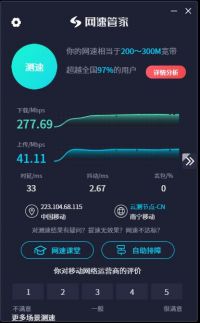
- Install the testing software. You can choose to download and install speed testing software on your own.
About the Measurement Speed
Due to many inconsistencies between actual and laboratory conditions, the 5G speed cannot be ideally maintained at 100MBPS. The following points:
- Base station distance, the closer you are to the 5G base station, the better the signal and the faster the speed;
- Base station load, the fewer people use, the faster the speed will be, and the commute will be slower during peak hours;
- Number of base stations: Due to the spectrum relationship, the same amount of 4G coverage requires double the number of 5G base stations
- Operator: You need to confirm whether your 5G card is speed-limited, you can periodically ask the operator to reset your network
- Indoors are worse than outdoors: building penetration loss and indoor diffraction loss
PS: The current number of base stations still does not have good coverage, and the speed measurement in different locations is not the same.
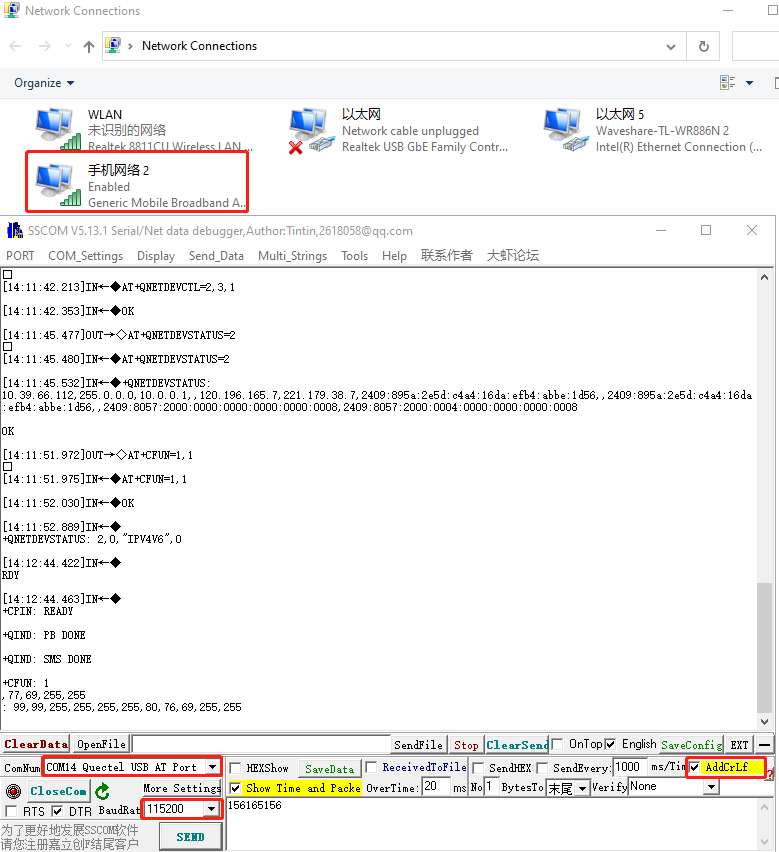
MBIM Dail-up
RM5XXQ series also can choose MBIM to surf the Internet, as shown below:
- Open RM5XXQ AT port, and send the following command for dial-up:
AT+QENG="servingcell"
AT+QCFG="usbnet",2
AT+CFUN=1,1
- After dialing and restarting, the mobile network card appears on the computer network connection interface, and the dialing is successful.
Working with Raspberry
Hardware Connection
Connect the USB 3.2 Gen1 5G DONGLE to the Raspberry Pi using a USB 3.0 data cable, as shown in the figure: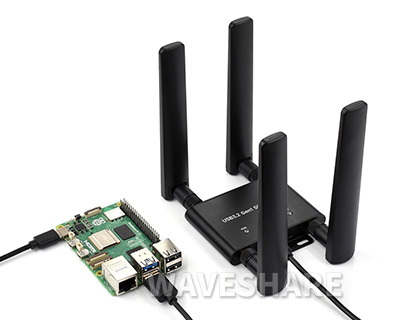
EMC Dial-up Configuration
Step 1: Uninstall "modemmanager" and "network-manager"
sudo apt purge modemmanager -y
sudo apt purge network-manager -y
Step 2: Test 5G Module
Please make sure "usb-serial" driver program is correctly upload to the module interface. Use the usb-devices command to check:
pi@raspberrypi:~ $ usb-devices
T: Bus=02 Lev=01 Prnt=01 Port=00 Cnt=01 Dev#= 3 Spd=5000 MxCh= 0
D: Ver= 3.20 Cls=00(>ifc) Sub =00 Prot=00 MxPS= 9 #Cfgs= 1
P: Vendor=2c7c ProdID=0800 Rev=04.14
S: Manufacturer=
Quectel S: Product=RM502Q-AE
S: SerialNumber=377628d2
C: #Ifs= 5 Cfg#= 1 Atr=a0 MxPwr=896mA
I: If#=0x0 Alt= 0 #EPs= 2 Cls=ff(vend.) Sub=ff Prot=30 Driver=option
I: If#=0x1 Alt= 0 #EPs= 3 Cls= ff(vend.) Sub=00 Prot=00 Driver=option
I: If#=0x2 Alt= 0 #EPs= 3 Cls=ff(vend.) Sub=00 Prot=00 Driver=option
I: If#=0x3 Alt = 0 #EPs= 3 Cls=ff(vend.) Sub=00 Prot=00 Driver=option
I: If#=0x4 Alt= 0 #EPs= 3 Cls=ff(vend.) Sub=ff Prot=ff Driver= qmi_wwan
- Execute
ls /dev/ttyUSB*to check whether "ttyUSB0~ttyUSB4" is correctly identified: - Use minicom to test the transmission of AT commands:
sudo apt-get install minicom
sudo minicom - D /dev/ttyUSB2
Welcome to minicom 2.7.1

OPTIONS: I18n
Compiled on Aug 13 2017, 15:25:34.
Port /dev/ttyUSB2

Press CTRL-A Z for help on special keys

AT
OK
Step3: Use AT Command to Configure the Network
AT+QCFG="usbnet",1
AT+CGDCONT=1,"IPV4V6","YOUR_APN"
AT+CFUN=1,1
Please wait for the modem to start up again (about 30 seconds).Once the modem restart, the minicom will be activated again.
After rebooting, open a new Linux terminal and use ifconfig or ipaddr command to check usbX in the network port.
- After rebooting the module, the NET light is on. The following commands are for checking the network status (optional).
AT+QENG="servingcell"
- The following commands are for getting IP and setting DNS:
sudo dhclient -v usb0
sudo apt-get install udhcpc
sudo udhcpc -i usb0
sudo route add -net 0.0.0.0 usb0
Step 4: Test 5G Network
After dialing up, you can see that usb0 gets ip in the Raspberry Pi through the following command, and enter the command ifconfig usb0 or ifconfig
pi@raspberrypi:~ $ ifconfig usb0
usb0: flags=4163<UP,BROADCAST,RUNNING,MULTICAST>  mtu 1500
        inet 192.168.225.60  netmask 255.255.255.0  broadcast 192.168.225.255
        inet6 fe80::8543:f6a0:e678:2e20  prefixlen 64  scopeid 0x20
        ether 4a:aa:f8:62:36:bb  txqueuelen 1000  (Ethernet)
        RX packets 73  bytes 5047 (4.9 KiB)
        RX errors 0  dropped 0  overruns 0  frame 0
        TX packets 100  bytes 15116 (14.7 KiB)
        TX errors 0  dropped 0 overruns 0  carrier 0  collisions 0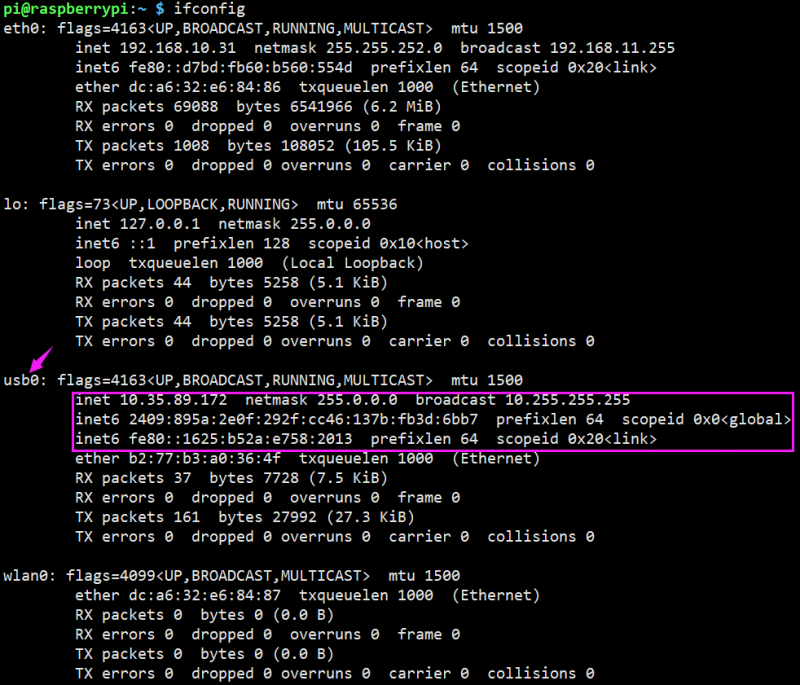
ping waveshare.com -I usb0
pi@raspberrypi:~ $ ping waveshare.com -I usb0
PING waveshare.com (104.26.11.134) from 192.168.10.27 usb0: 56(84) bytes of data.
64 bytes from 104.26.11.134 (104.26.11.134): icmp_seq=1 ttl=52 time=87 ms
64 bytes from 104.26.11.134 (104.26.11.134): icmp_seq=2 ttl=52 time=82 ms
64 bytes from 104.26.11.134 (104.26.11.134): icmp_seq=3 ttl=52 time=92 ms
64 bytes from 104.26.11.134 (104.26.11.134): icmp_seq=4 ttl=52 time=73 ms
64 bytes from 104.26.11.134 (104.26.11.134): icmp_seq=5 ttl=52 time=75 ms
5G Internet Speed Test
In the Linux system, you can install speedtest_cli to test:
## Raspberry Pi OS
sudo apt install speedtest-cli
speedtest      # or use speedtest_cli
or
## OpenWRT
opkg update
opkg install python3
opkg install python3-pip
pip install speedtest_cli
speedtest      # or use speedtest_cli
Troubleshooting
Check if the module detects SIM:
AT+CPIN? # Should return READY
Check if the module is registered to the network:
AT+CEREG? # Should return 0,1 or 0,5
Check if the APN is correct and has an IP:
AT+CGCONTRDP # Should return APN details and IP address.
Working with Jetson Nano
Hardware Connection
Connect the USB 3.2 Gen1 5G DONGLE using a USB 3.0 data cable, as shown in the figure: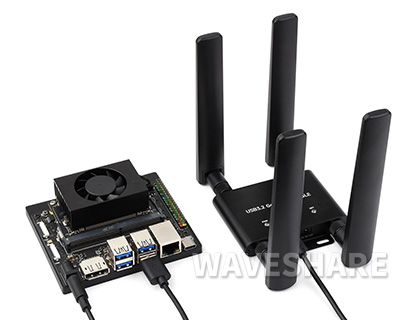
RM5XX Module Configuration
In general, the RM5XX module is connected to Jetson Nano, and the latest system defaults to having a module driver, which can be used directly without a driver. If the Linux kernel is too old to properly recognize the module, you can refer to the operation in "Load USB Device Descriptor" to operate the driver module, and then perform 5G networking.
Load USB Device Descriptor
To identify the module and add the VID and PID information of the module to the file [kernel].
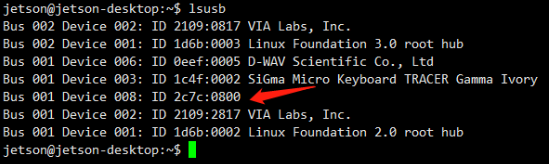
- Check the VID and PID of RM500U:
lsusb
- Add VID and PID:
sudo apt-get install unzip
wget https://files.waveshare.com/wiki/common/RM5XXQ_For_Jetson_nano.zip
unzip RM5XXQ_For_Jetson_nano.zip
sudo chmod 777 -R RM5XXQ_For_Jetson_nano
cd RM5XXQ_For_Jetson_nano
sudo ./install.sh
sudo reboot
Please do not delete or modify the three directory files of option directory, default.script and install.sh, otherwise it will affect the loading of device descriptors!
After successfully adding the PID and restarting Jetson nano, enter the following command in the command line interface to display five device symbols USB0-USB4
ls /dev/ttyUSB*

RNDIS Dail-up
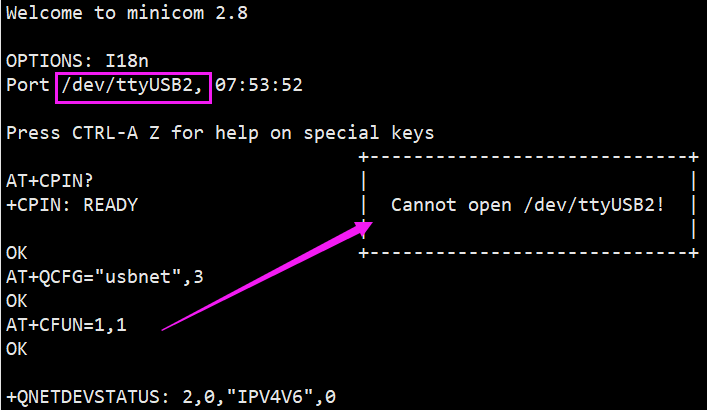
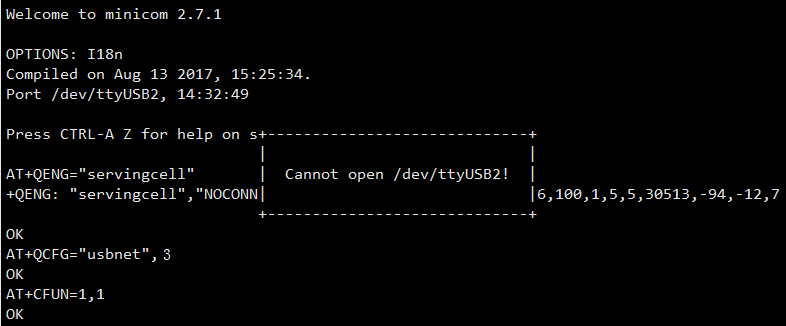
- Open minicom
sudo apt-get install minicom
sudo minicom -D /dev/ttyUSB2
- Send the following command RNDIS dial-up in minicom
AT+CPIN?
AT+QCFG="usbnet",3
AT+CFUN=1,1
- After rebooting the module, the NET light is on. The following commands are for checking the network status (optional).
AT+QENG="servingcell"
- The following commands are for getting IP and setting DNS:
sudo dhclient -v usb1
sudo apt-get install udhcpc
sudo udhcpc -i usb1
sudo route add -net 0.0.0.0 usb1
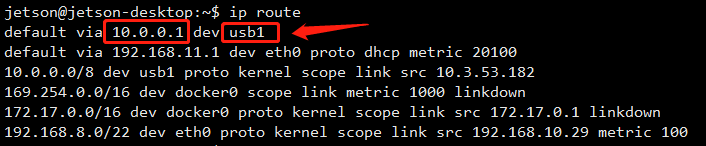
- After dialing, you can see that usb1 gets the ip through the following command:
ip route
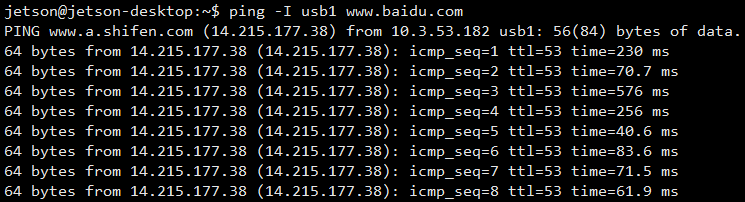
- Test usb1 networking status
ping -I usb1 www.baidu.com
SIM82XX Module Usage
5G Comparison of Module Parameters
| SIM8200EA-M2 | SIM8202G-M2 | SIM8262E-M2 | SIM8262A-M2 | |
|---|---|---|---|---|
| 5G Standard | 3GPP R15 | 3GPP R16 | ||
| Chip Scheme | Qualcomm Snapdragon X55 | Qualcomm Snapdragon X62 | ||
| Frequency Band | ||||
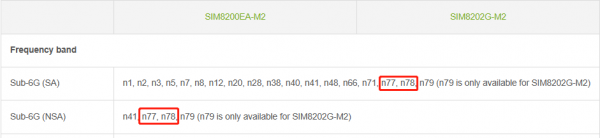
| Sub-6G | n1, n2, n3, n5, n7, n8, n12, n20, n28, n38, n40, n41, n48, n66, n71, n78 | n1, n2, n3, n5, n7, n8, n12, n20, n28, n38, n40, n41, n66, n71, n77, n78, n79 | n1, n3, n5, n7, n8, n20, n28, n38, n40, n41, n77, n78,n79 | n2, n5, n7, n12, n13, n14, n25, n30, n41, n48, n66, n71, n77, n78, n79 |
| LTE-FDD | B1, B2, B3, B4, B5, B7, B8, B12, B13, B14, B17, B18, B19, B20, B25, B26, B28, B29, B30, B32, B66, B71 | B1, B3, B5, B7, B8, B18, B19, B20, B26, B28, B32 | B2, B4, B5, B7, B12, B13, B14, B25, B26, B29, B30, B66, B71 | |
| LTE-TDD | B34, B38, B39, B40, B41, B42, B43, B48 | B38, B39, B40, B41, B42, B43 | B41, B46, B48 | |
| WCDMA | B1, B2, B3, B4, B5, B8 | B1, B5, B8 | B2, B4, B5 | |
| GNSS | GPS, GLONASS, Beidou, Galileo and QZSS | |||
| Data Rate | ||||
| Sub-6G | 2.4 Gbps (DL) / 500 Mbps (UL) | |||
| LTE | 1 Gbps (DL) / 200 Mbps (UL) | |||
| HSPA+ | 42 Mbps (DL) / 5.76 Mbps (UL) | |||
| Software Function | ||||
| Operating system | Windows/Linux/Android | |||
| Communication Protocol | TCP/IP, IPV4, IPV6, Multi-PDP, FTP, FTPS, HTTP, HTTPS, MQTTS, DNS, SSL3.0 | |||
| Dail Up | RNDIS, NDIS, PPP, MBIM | |||
| SMS | Support MT, MO, CB, Text, PDU | |||
| Firmware Upgrade | Supports firmware upgrade via USB port | |||
| Hardware Specification | ||||
| SIM Card | 1.8V/2.95V | |||
| Antenna | For 3G/4G/5G/GNSS | |||
| 6 × IPEX-4 Connectors | 4 × IPEX-4 Connectors | |||
| Power Supply | 3.135~4.4V | |||
| Form Factor | M.2 | |||
| Dimensions | 52.0 × 30.0 × 2.3mm | 42.0 × 30.0 × 2.3mm | ||
| Operating Temperature | -30℃ ~ +70℃ | |||
| Application Scenarios | ||||
| Region | China, US, Japan, and South Korea, Europe, the Middle East, the Americas | Regions other than the Americas | Americas | |
| The applicable area is for reference only, and the appropriate module should be selected according to the frequency band covered and supported by the local operator's network | ||||
| Typical Application | CPE, Smart Gateway, Drone, Live Video, Telemedicine, Smart Security | |||
Working with Windows
Install Driver Directly
Download the driver (Resources -> Softwares -> SIM8200 Driver) to your computer and unzip the package.
Enter the SIM8200_OS_Driver\Windows directory.
For most computers, enter the 1_install directory and run the setup.exe file to install.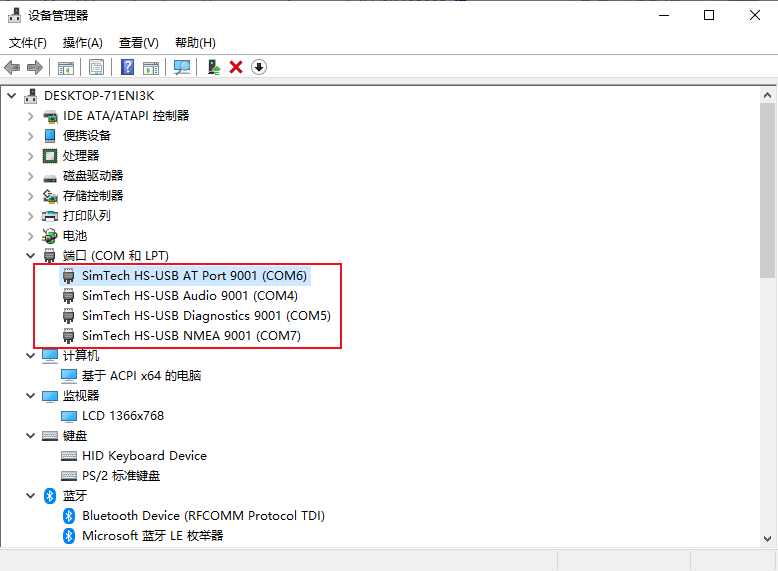
After connecting, a mobile network icon appears, you can disconnect your computer network and access the Internet without dialing up.
Install Driver Manually
For some hosts, the COM port may not appear even after installing 1_install, in this case you need to use the file in the 2_AddManully to add it manually. The way to use it is to find an unrecognized device in the device manager and right-click to add the driver, as follows:
Power on the G module, switch it ON and the module boots, and then the PC will recognize four unrecognized devices (For some motherboards, 5 or 6 devices are recognized). Here the picture only shows 5 devices.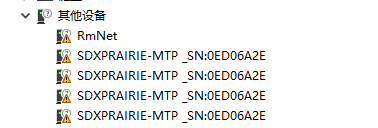
Right-click to update the driver, choose to add it manually, and select the path as SIM8200_OS_Driver\Windows. Please select it according to your system (WIN7\WIN8\WIN10), and there are up to 6 devices that can be selected, and then the PC will generate the following devices.
Four COM ports: AT is used for AT command control, Audio is used for dialing, Diagnostics is used for debugging, and NMEA is used for GPS.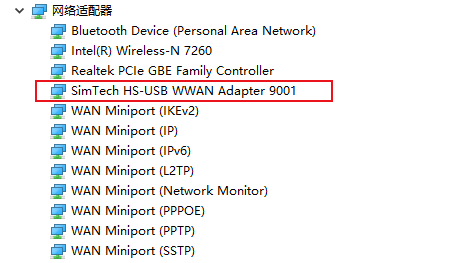

A mobile network will be set up automatically after updating, you can disconnect your computer network and access the Internet without dialing up.
Manual NDIS Dail-up
If you have performed the above two steps and Windows cannot access the Internet, you need to manually start NDIS dialing
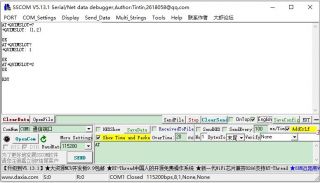
Download Serial Port Debugging Assistant, open the sim8200 AT port to send the following command:
AT$QCRMCALL=1,1 //carrier return required
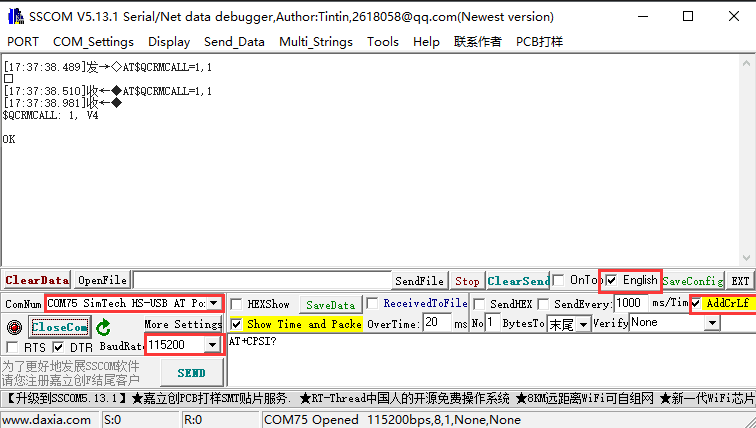
At this point, NDIS dial-up is active, and the computer can connect to the network. If it returns "No Carrier", the dial-up may have already occurred. Try accessing the Internet directly.
GPS Positioning
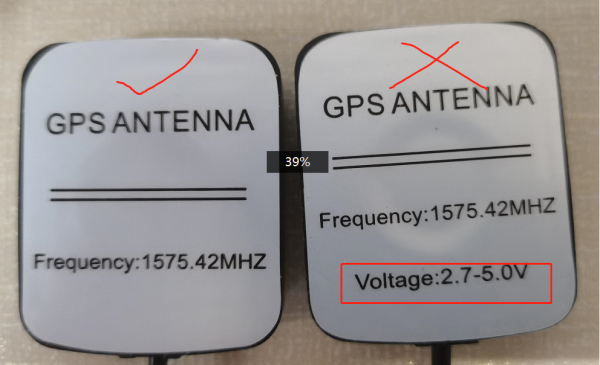
Connect the passive GPS antenna to the GNSS antenna interface of the module, note that place with printed side facing downwards, and place the antenna outdoors in an open area.
Then use the AT port to send AT commands:
AT+CGPS=1 #carriage return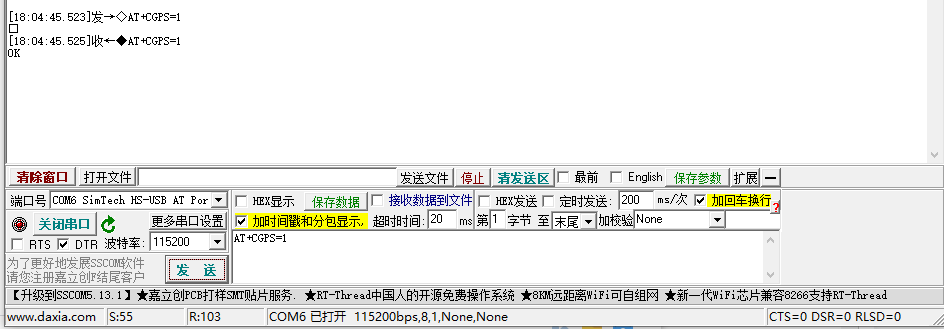
Open the NEMA port to receive satellite data: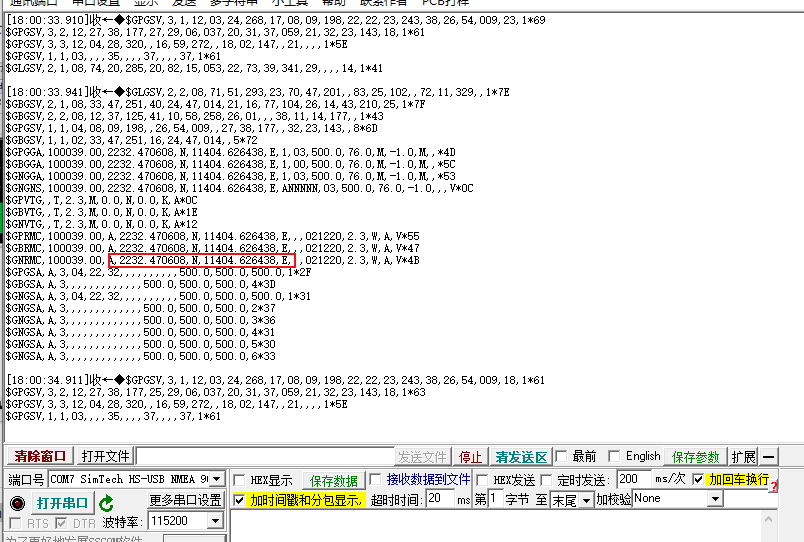
SIM Card Configuration
- SIM card 1 is used by default, and you can use the following command to switch to SIM1 when it is SIM2:
AT+SMSIMCFG=1,1
- Or you can directly switch to SIM2:
AT+SMSIMCFG=1,2
- If it still does not work, consider that the flight mode is on, and turn off the flight mode with the following command:
AT+CFUN=1
Working with Raspberry
Configuration Required for First Use
Please don't misspell the letters, it's better to copy and paste
sudo apt-get install p7zip-full
wget https://files.waveshare.com/wiki/common/SIM8200_for_RPI.7z
7z x SIM8200_for_RPI.7z  -r -o./SIM8200_for_RPI
sudo chmod 777 -R SIM8200_for_RPI
cd SIM8200_for_RPI
sudo ./install.sh
Please do not delete or modify the option directory, qmi_wwan_simcom directory, default.script, and install.sh directory files, otherwise the loading of the driver will be affected.
Running ifconfig -a shows that WWAN0 has already been created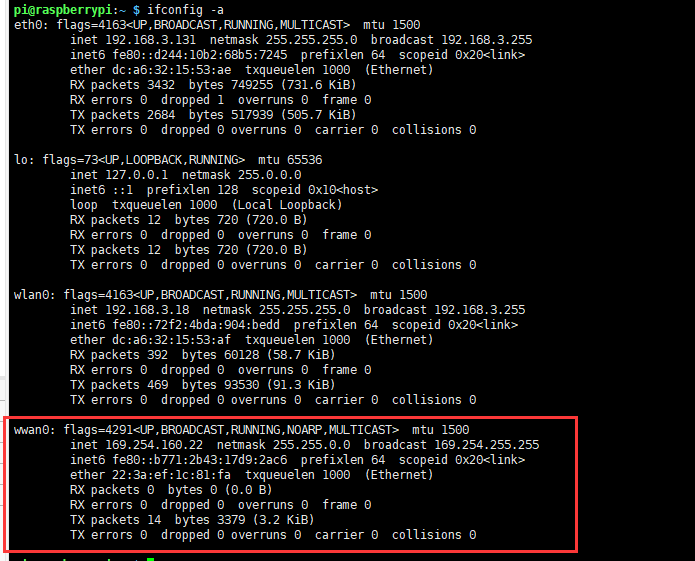
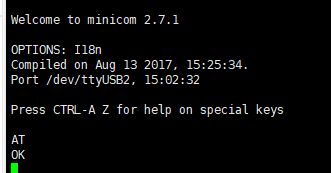
Test AT Command
sudo apt-get install minicom
sudo minicom -D /dev/ttyUSB2
NIDS Dail-up
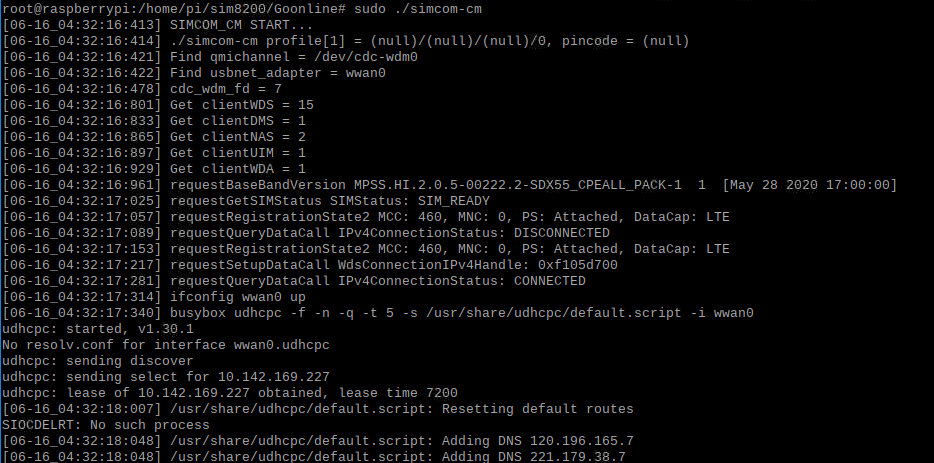
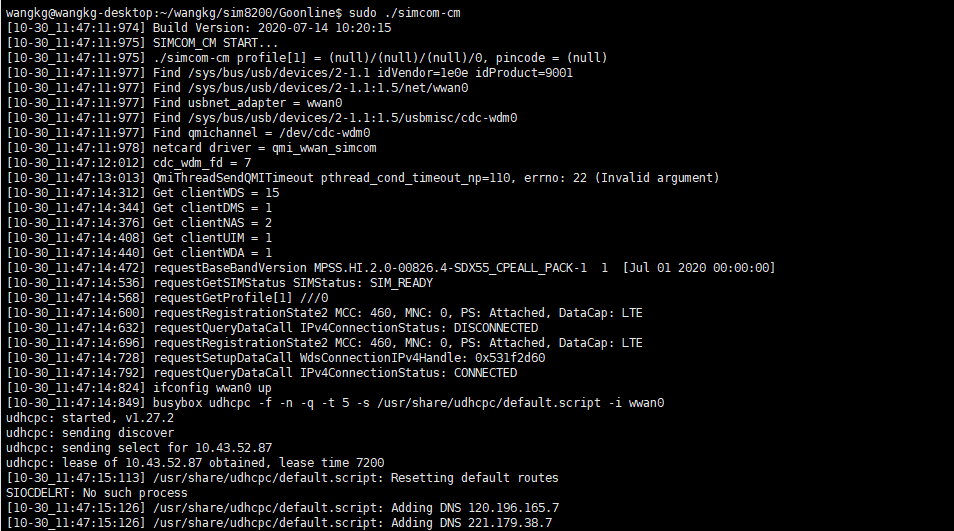
cd Goonline
make
sudo ./simcom-cm
After running codes, DNS information is shown below:
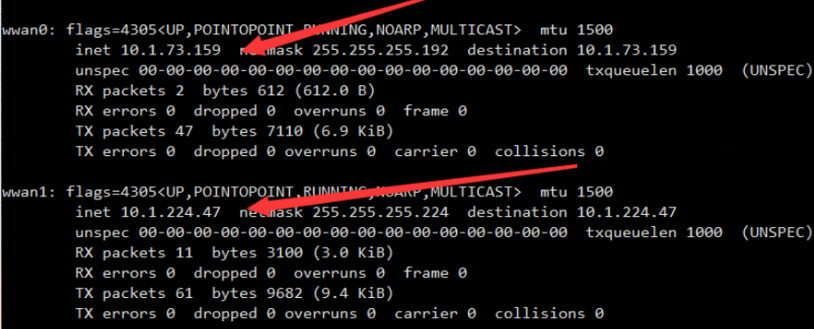
After connecting two SIM820X to Raspberry Pi through USB, two network cards—wwan0 and wwan1 can be recognized, and the two network cards can be dialed at the same time through the following commands: (The network speed cannot be superimposed)
sudo ./simcom-cm -i wwan0
sudo ./simcom-cm -i wwan1
- Note: If the IP cannot be obtained or the networking is not successful, use the following commands to obtain the IP and set the DNS networking:
sudo dhclient -v wwan0
sudo route add -net 0.0.0.0 wwan0
Auto-run
If you want to set the codes to auto-run after booting, you can open the Raspberry PI startup configuration script:
sudo nano /etc/rc.local
Add the startup command to the penultimate line, noting that it is the absolute path of your Internet-running file, which is the line above exit 0:
sudo /home/pi/SIM8200_for_RPI/Goonline/simcom-cm &
Note that you have to add "&" to the end of the command, make sure that the command can be run in the background, or the Pi may not boot normally.
Live Streaming With ffmpeg
If you are using the 2020-08-20-raspios-buster-armhf image, then you don't need to install anything as the system already comes with ffmpeg.
Going straight to the topic, assuming you already have a camera and it's properly connected to the Raspberry Pi, then proceed with the tutorial.
Working with OpenWrt
OpenWrt Introduction
Soft routing is using desktops or servers and other equipment with software. It mainly depends on the settings of the software to achieve the functions of the router. The hard routing is a unique hardware device, including a processor, power supply, and embedded software to provide router functionality.
OpenWrt is a very popular soft routing system. It is a highly modular and highly automated embedded Linux system with powerful network components and scalability. It is often used in industrial control equipment, routers, and other equipment.
Thanks to its high degree of customizability and scalability, OpenWrt soft router can not only complete the functions of general home routers, but also achieve more powerful functions such as port forwarding, intranet penetration, 4G networking, and FTP server.
Flash the System
Download the RPI OpenWrt system (minicom has been installed in this system), unzip the system in the Imgs directory, and use the flashing tool to flash the system to the TF card.
Login & Initial Settings
After the OpenWrt system is turned on, the Raspberry Pi is equivalent to a router. Therefore, you can use a network cable to connect the Raspberry Pi to the computer according to the use of the router (you can also use the mobile phone to search for WIFI, the default name is "OpenWrt"). Enter 192.168.1.1 on the webpage, the default username: root, the default password: password, and enter the Web management interface of OpenWrt.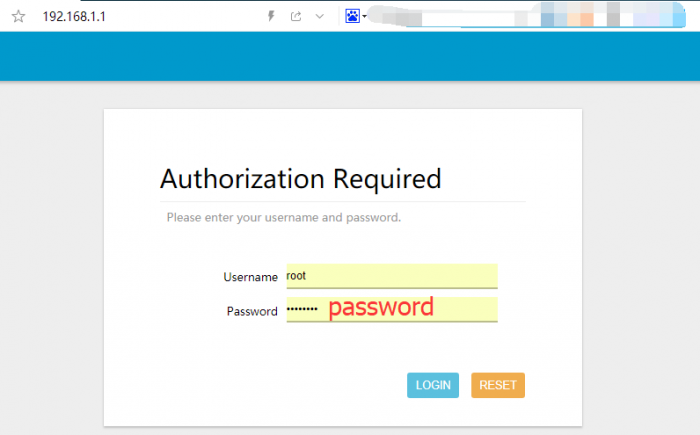
Set WIFI password: Network -> Wireless -> Modify -> Interface Configuration -> Wireless Security, as shown below: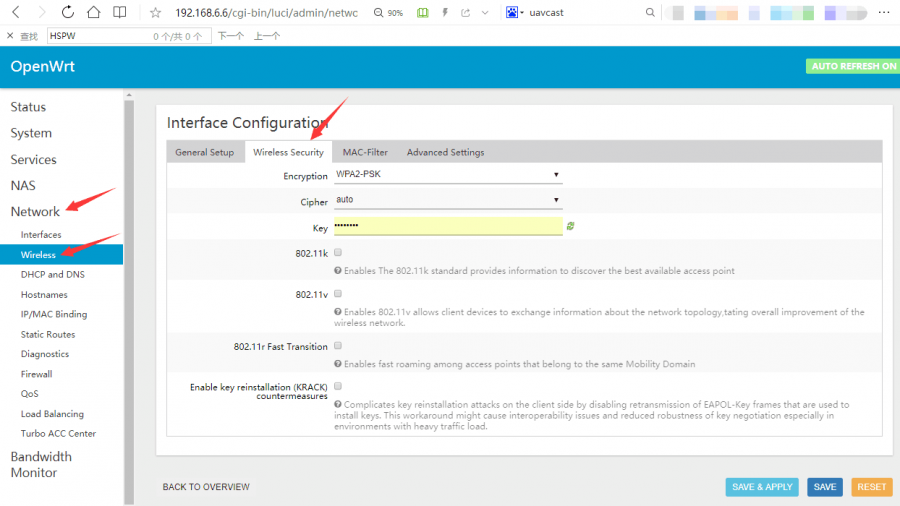
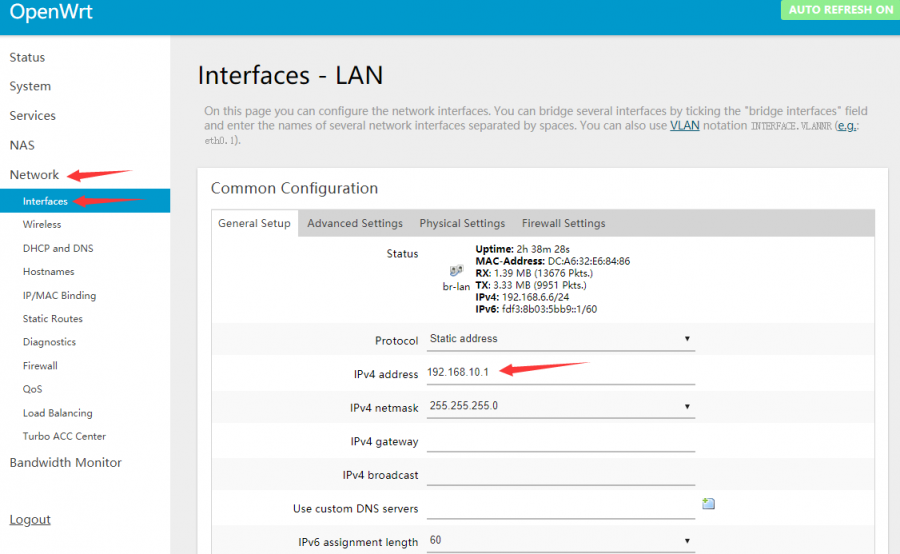
Modify the IPv4 address of the LAN port to a different IP that is not the same as the LAN port IP of other routers in your home. In this example, set the IP address to 192.168.10.1. (Many routers default the LAN port IP to 192.168.1.1. If you do not modify the IP of the OpenWrt, it will easily lead to conflicts and failure to connect to the Internet.)
In addition, it is recommended to adjust the Firewall setting to connect the OpenWrt terminal and Web management interface through the local area.
Network —>Firewall, change all "reject" to "accept", and click "Save & Apply" after modification, as shown in the picture below: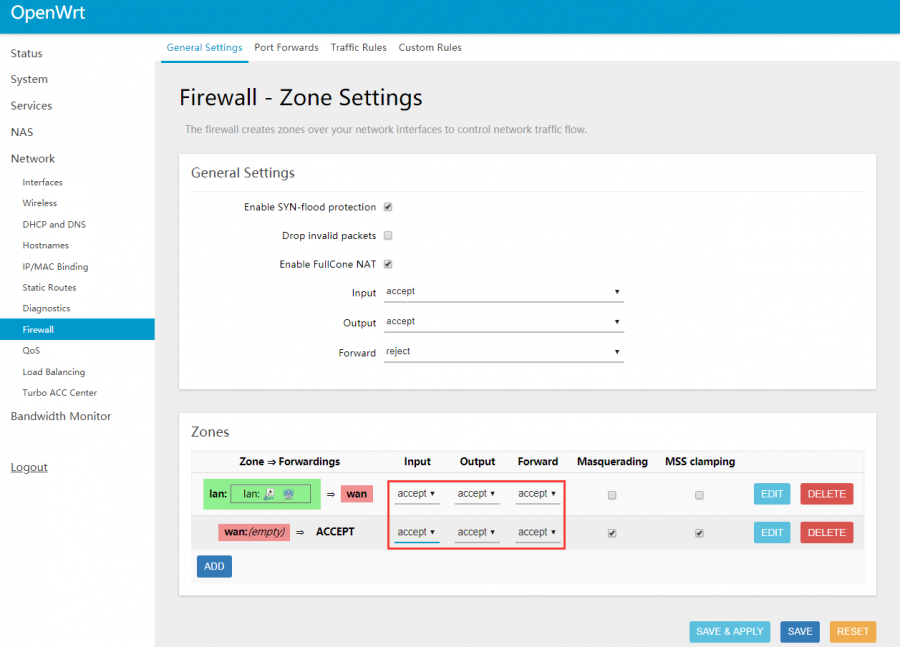
And then select System -> Administration, modify the allowed interface for SSH access to "unspecified" (that is, any interface can be accessed by ssh), check the Gateway port, and click "Save & Apply" after the modification is completed.
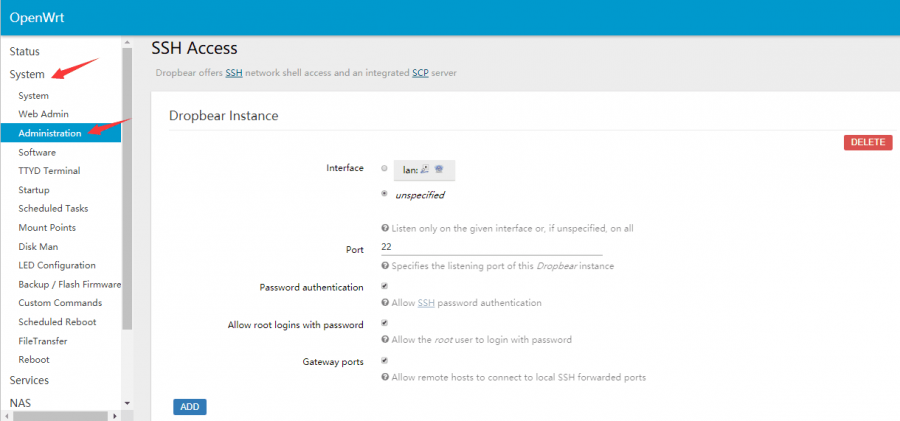
At this point, you can connect to the OpenWrt web management interface or terminal through the IP address of the LAN port or wan port.
Configure and Networking
- Insert the SIM card into the card slot of the communication module -> connect all 5G antennas, connect to the Raspberry Pi 4B via USB -> power on;
- Change the mobile communication module to RNDIS mode (USB network sharing mode), SIM8202G can be changed by sending the following commands through minicom in Openwrt:
sudo minicom -D /dev/ttyUSB2     //(Some modules need to add PID to have ttyUSB* device character)
at+cusbcfg=usbid,1e0e,9011      //(Different models of modules have different setting methods, see the module specification for details)
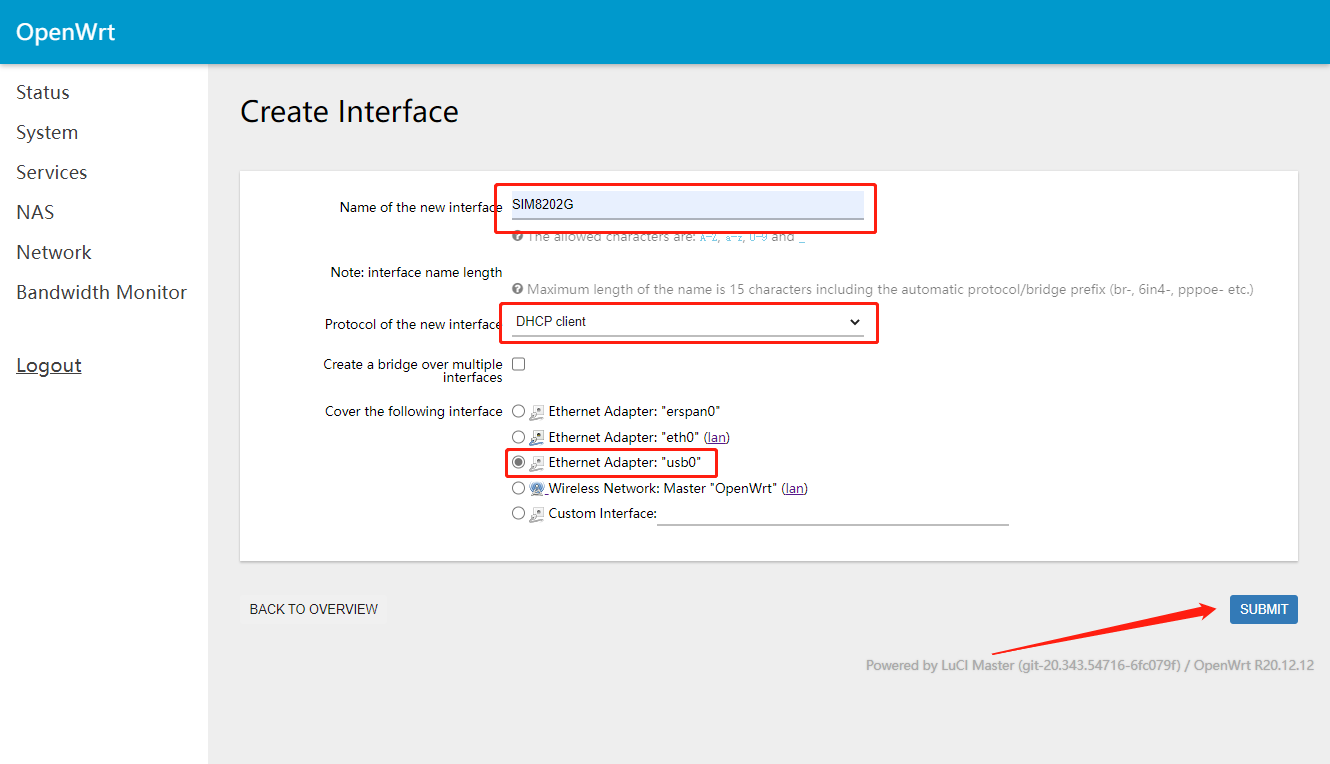
- Add new interface, click Network —> Interface —> Add new interface.
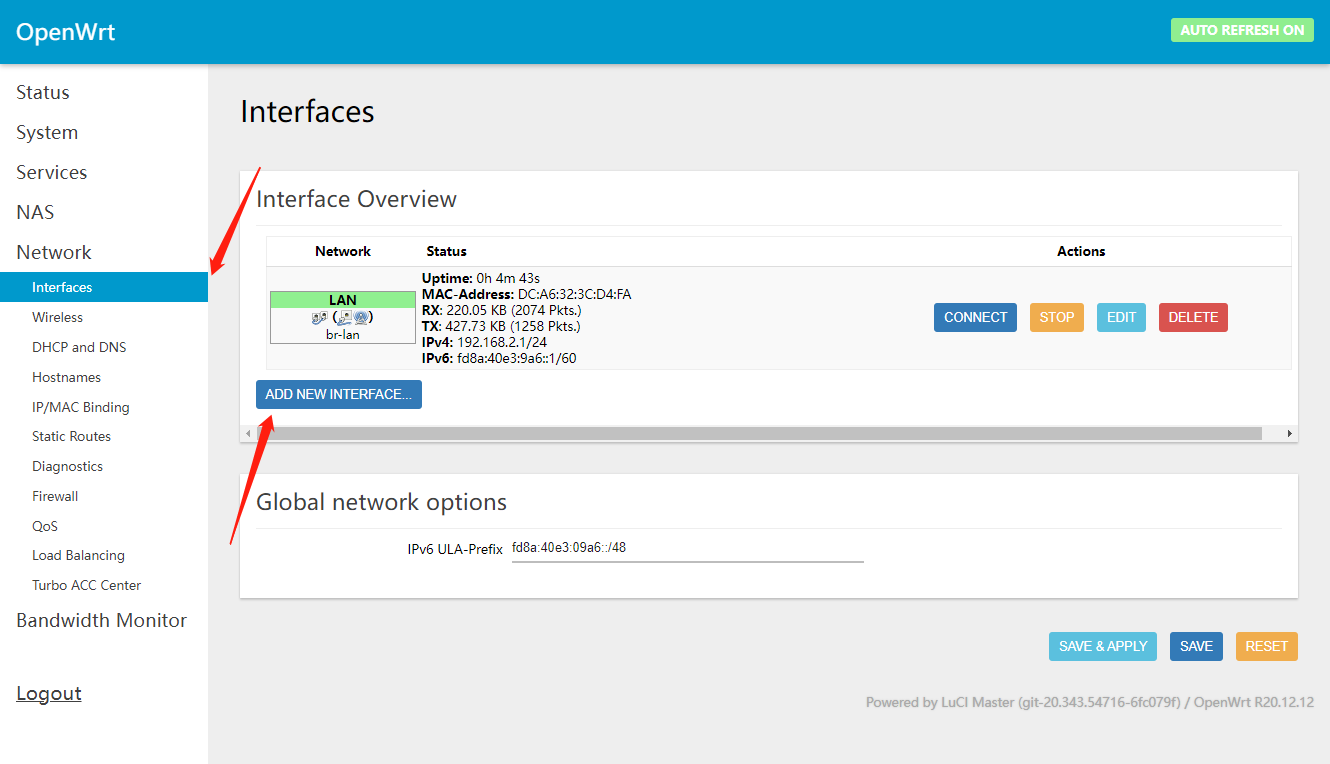
- Create new interface: name -> SIM8202G; protocol of new interface - DHCP client; include the following interfaces - ethernet adapter: "usb0", and then submit:
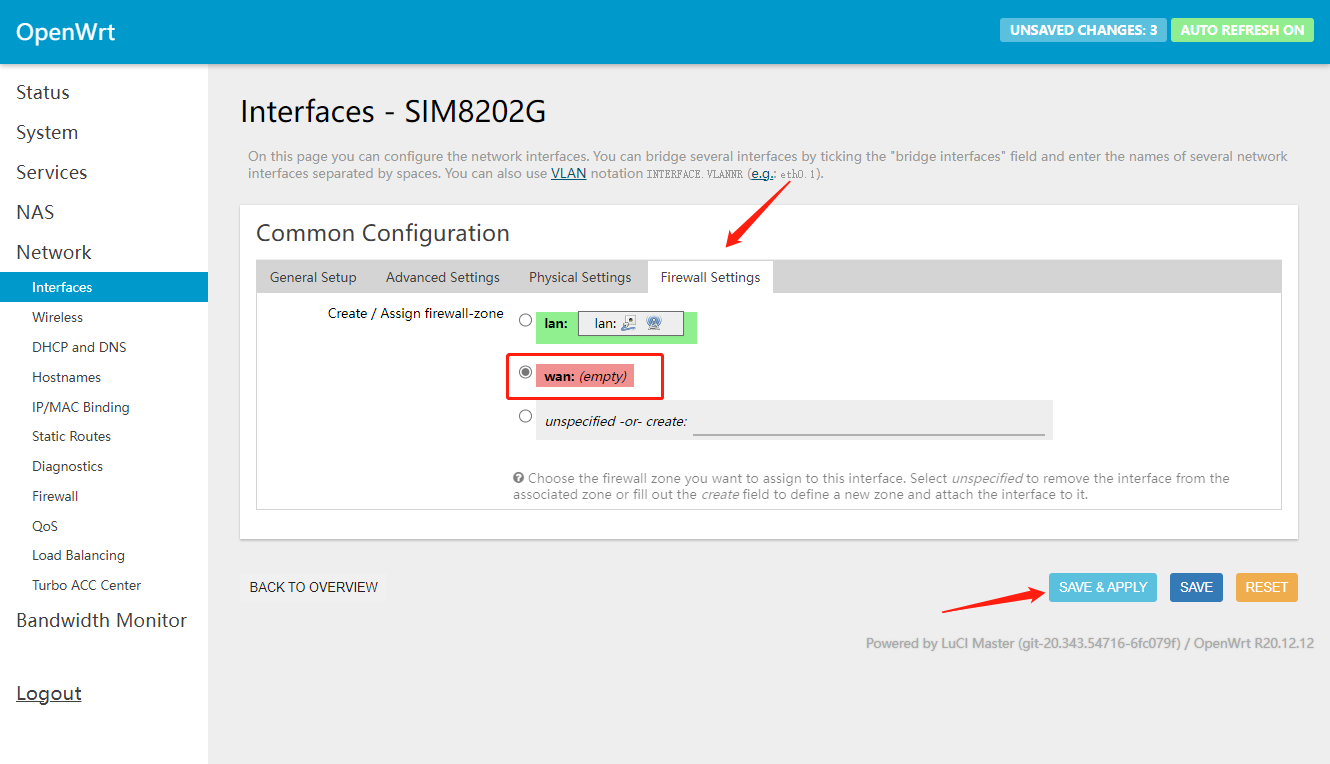
- Configure interface: Firewall settings - wan; Save & Apply
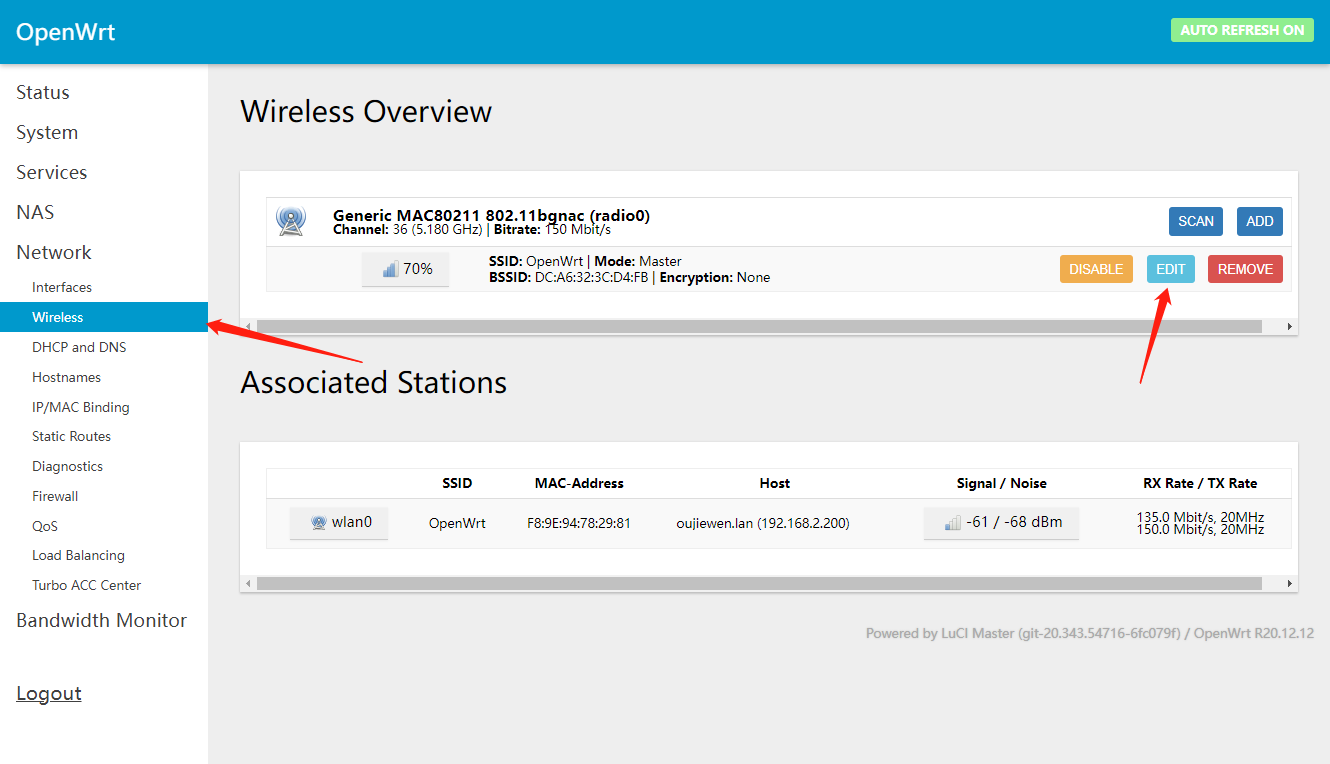
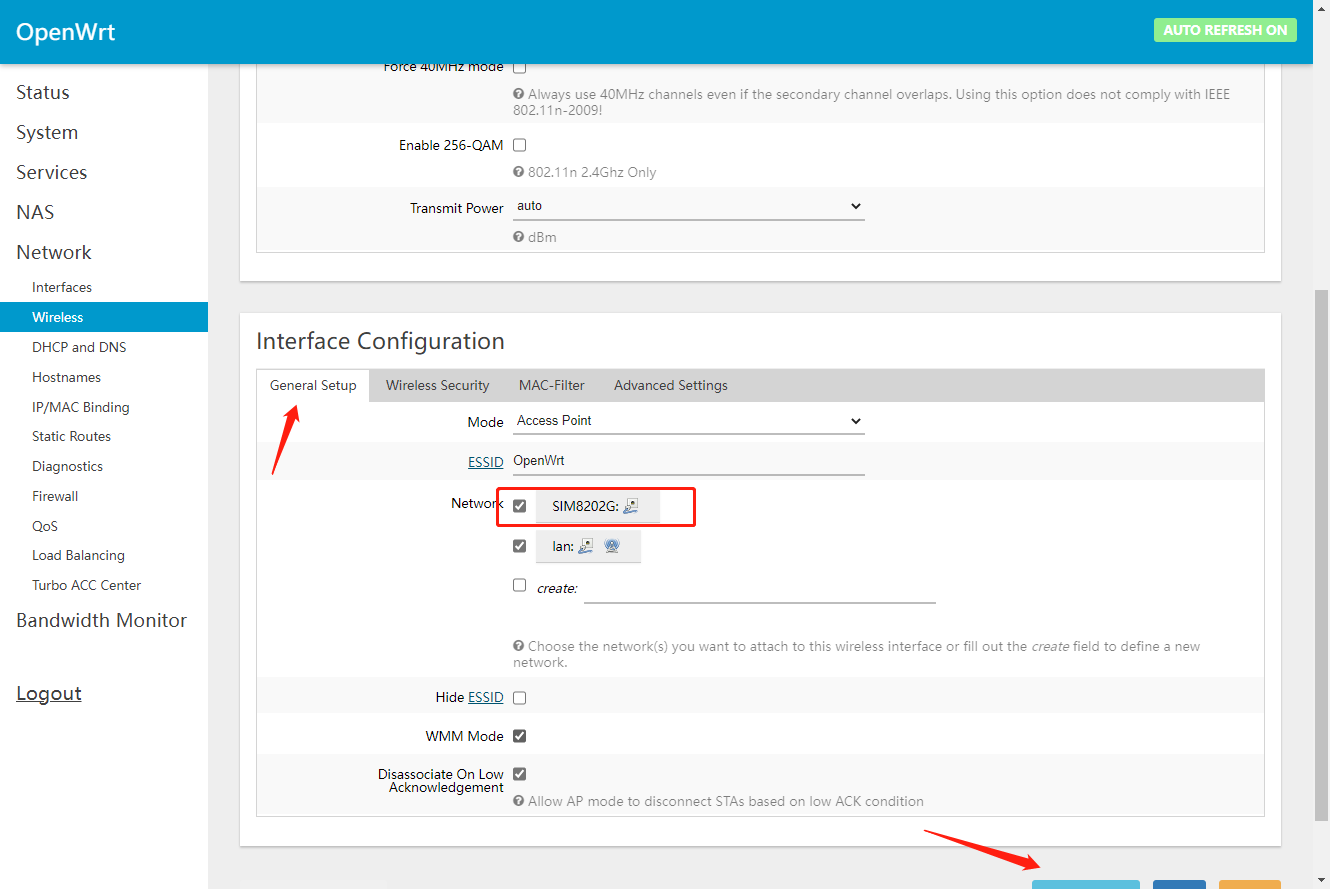
Wireless configuration: Network->Wireless->Edit->Interface Configuration->General Setup->Network, check SIM8202G and lan, Save and Apply.
5G Network Speed Test
In terms of the speed measurement, as the Raspberry Pi comes with a Gigabit Ethernet port, and there are few USB network cards above Gigabit, we use the "SpeedTest For Python" tool to test the speed with the command. Connect to the terminal of the OpenWrt, and enter the commands one by one to test:
opkg update
opkg install python3
opkg install python3-pip
pip install speedtest_cli
speedtest or speedtest_cli
Raspberry Pi minicom Serial Port Debugging
1. Insert the module into the Raspberry Pi, and turn the TXD and RXD of the SIM82XX B switch to ON: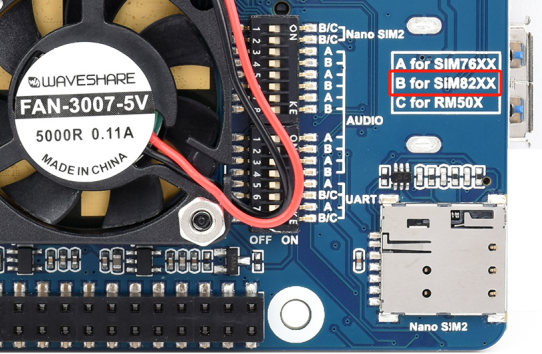
2. Install minicom, minicom is a serial debugging tool for the Linux platform:
sudo apt-get install minicom
Open ttyUSB2 through minicom
sudo minicom -D /dev/ttyUSB2
Send to enable UART port:
AT+CCUART=1
3. Open ttyS0 through minicom——ttyS0 is the serial port of Raspberry Pi 3B/3B+/4B, the default baud rate is 115200;
sudo minicom -D /dev/ttyS0
4. For Raspberry Pi 2B/zero, the user serial device number is ttyAMA0; you can use the following command line to confirm, serial0 is the selected serial device number, as shown below:
ls -l /dev/serial*

Working with Jetson Nano
It is recommended that you use the system image jetson-nano-sd-card-image (updated in October 2020). The Linux kernel version of this system is 4.9.140-tegra. The previous system is 4.4. This tutorial is based on the 4.9 kernels. If there is a difference, please update to the same version as this one, which will minimize the chance of your using it incorrectly.
If you are using other Linux systems, please download the driver under SIM8200_OS_Driver\linux and port it according to the documentation under it.
Configuration Required for First Use
Please don't misspell the letters, it's better to copy and paste:
sudo apt-get install p7zip-full
wget https://files.waveshare.com/wiki/common/Sim8200_for_jetsonnano.7z
7z x Sim8200_for_jetsonnano.7z -r -o./Sim8200_for_jetsonnano
sudo chmod 777 -R Sim8200_for_jetsonnano
cd Sim8200_for_jetsonnano
sudo ./install.sh
Please do not delete or modify the option directory, qmi_wwan_simcom directory, default.script, and install.sh directory files, otherwise the loading of the driver will be affected.
If there is an error, please confirm whether the system kernel is 4.9.140-tegra, and take a screenshot of the error message so that engineers can help you analyze and solve the problem.
Running ifconfig -a shows that WWAN0 has already been created
Test AT Command
sudo apt-get install minicom
sudo minicom -D /dev/ttyUSB2
5G Network
cd Goonline
make
sudo ./simcom-cm
After running codes, DNS information is shown below:
Other Usage
If you want to use this product on other systems, please download SIM8200_OS_Driver file and add it according to SIMCOM official tutorials.
About the Speed
Due to many inconsistencies between actual and laboratory conditions, the 5G speed cannot be ideally maintained at 100MBPS. Please see the following points:
- Base station distance, the closer you are to the 5G base station, the better the signal and the faster the speed;
- Base station load, the fewer people use, the faster the speed will be, and the commute will be slower during peak hours;
- Number of base stations: Due to the spectrum relationship, the same amount of 4G coverage requires double the number of 5G base stations;
- Operator: You need to confirm whether your 5G card is speed-limited, you can periodically ask the operator to reset your network;
- Indoors are worse than outdoors: building penetration loss and indoor diffraction loss.
PS: The current number of base stations still does not have good coverage, and the speed measurement in different locations is not the same.
FM650 Module Usage
Working with Windows
Install Driver
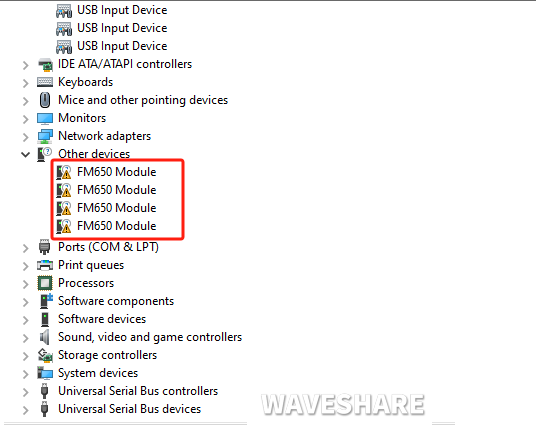
- After connecting the USB 3.2 Gen1 5G DONGLE to the computer via a USB3.0 data cable, a series of unknown devices with no driver installed appear on other devices:
- Enter the FIBOCOM_Fx650_Series_USB_Driver_Windows directory.
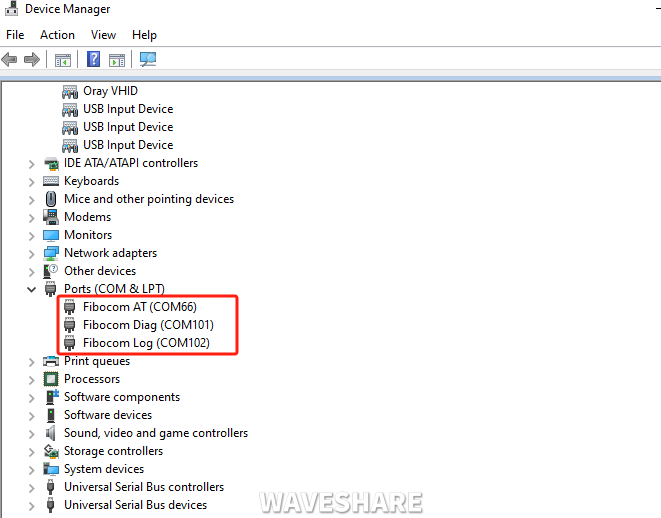
- Click on DPInst64.exe to install the driver (if it is a 32-bit computer, click DPInst32.exe), and after installation, the device manager will generate the following devices:
RNDIS Dail-up
- Install the SIM card and antenna on the device, use USB to connect to the computer, and provide power supply
- Install USB driver
- If the network registration is successful, the SIM7600X sends AT commands to enable USB dial-up Internet access:
AT+GTAUTOCONNECT=1
AT+GTUSBMODE=39
AT+GTRNDIS=1,1
AT+GTRNDIS?
Observe the Device Manager and find some unidentified devices, such as RNDIS (with an exclamation mark):
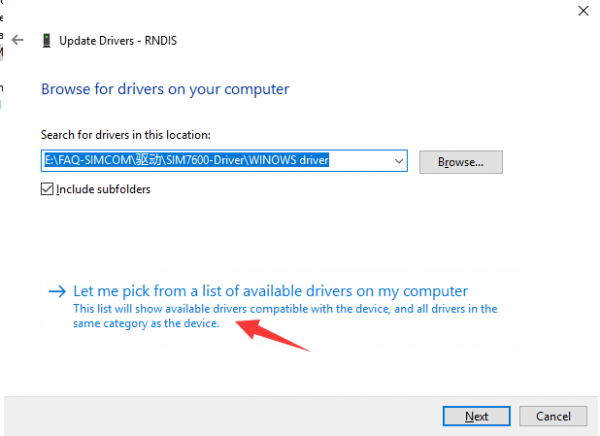
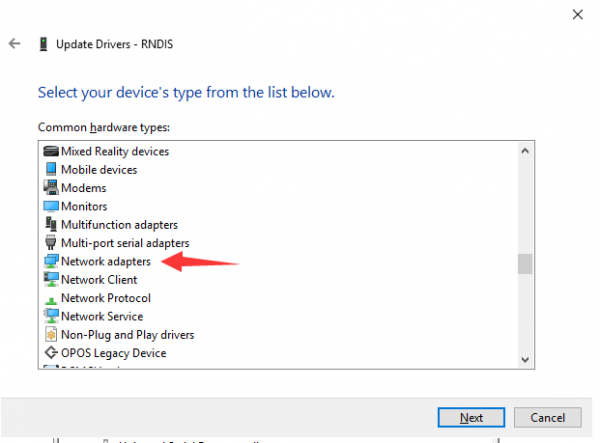
- Right-click RNDIS, search for device software in the prompt window, choose "Browse My Computer". Choose "Network Adapter" from the device list.
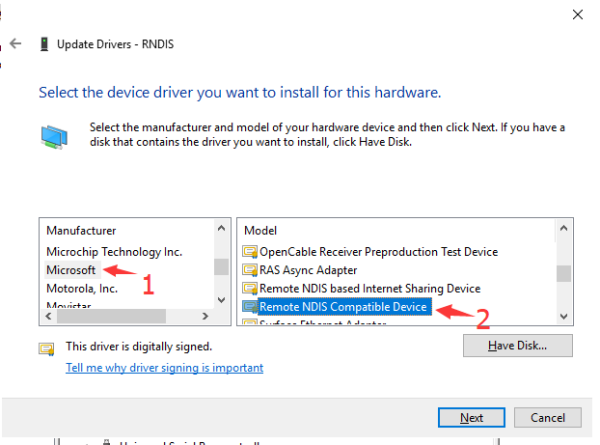
- Select Microsoft Corporation in the Manufacturer list of the Network Adapters window, and then select "Remote NDIS Compatible Device" in the list on the right-hand list, which is a remote NDK compatible device.
Click Next and wait for the installation to finish, the RNDIS Kitl device will be installed successfully. At this point, the dial-up feature is set up and you can see that the PC can access the Internet through Dongle.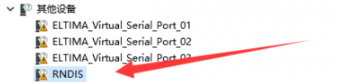
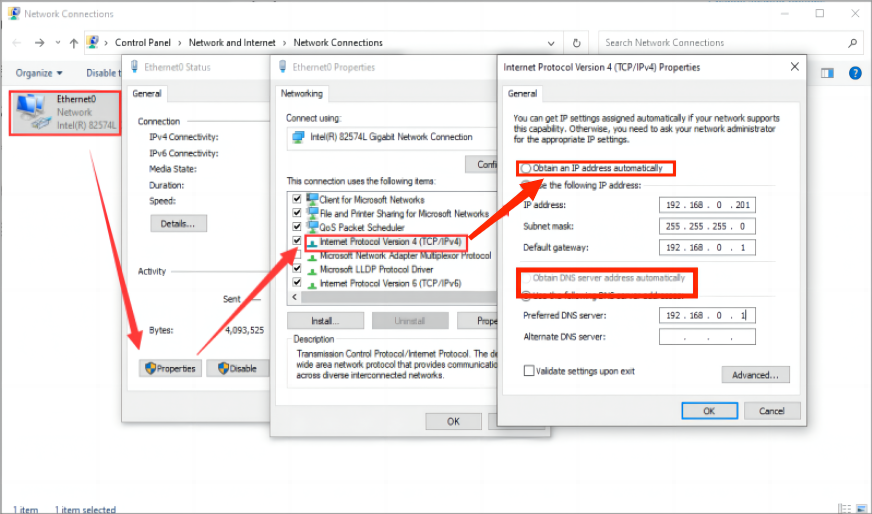
- If you cannot access the Internet, please set it to obtain IP address automatically.
RM50XX Resources
Demos
Softwares
Datasheets
Related Resource
SIM82XX Resources
Demos
Softwares
Datasheets
- SIM8200_Series_AT_Command_Manual_V1.01
- SIM8200EA-M2 Hardware Design V1.03
- SIM8200EA-M2 official documentation links: SIM8200EA and SIM8202X
Related Application Cases
FAQ
Softwares
Question: What should I do if the driver installation of Quectel series modules is abnormal?
- Install Driver using the manual update method for RM500U-CNV, RM500U-CN and other UNISOC modules
- Install Driver manually for RM520N-GL, RM530N-GL, RM5XXQ and other Qualcomm modules
- Ensure that the module has been properly powered on ->Open Device Manager ->Other Devices ->"Corresponding driver decompressed folder" ->Update driver ->Browse my computer to find driver files ->Select the path where the driver files are stored based on the system ->Installation complete.
Question: How to set the corresponding APN for the operator?
Different operators have different APNs, so it's important to distinguish and set them correctly. The configuration steps for some operators are shown below:
*China Mobile: AT+CGDCONT=1,"IPV4V6","CMNET"
*China Unicom: AT+CGDCONT=1,"IPV4V6","3GNET"
*China Telecom: AT+CGDCONT=1,"IPV4V6","CTNET"
*AT&T:   AT+CGDCONT=1,"IPV4V6","PHONE"
*Vodafone: AT+CGDCONT=1,"IPV4V6","portalnmms
Question: What are the dialing types for RM5XXX?
There are the following dialing types:
AT+QCFG="usbnet",0 The drive type is NDIS(QMI);
AT+QCFG="usbnet",1 The drive type is ECM;
AT+QCFG="usbnet",2 The drive type is MBIM; (RM5XXQ support)
AT+QCFG="usbnet",3 The drive type is RNDIS;
AT+QCFG="usbnet",5 The drive type is NCM.
Question: Can the RM500U-CN 5G HAT module achieve transparent transmission between two clients?
- No, this is a cellular module, and you have to use the base station to communicate.
- The cellular module also has to go through the base station, and it cannot communicate point-to-point.
- For example, the RM500U-CN 5G HAT A module Raspberry Pi dial-up Internet access, after connecting to the base station, you can use TCP, MQTT, email or WeChat to communicate with B Raspberry Pi
Hardware
Question: What should I do if the USB TO M.2 B KEY loses power?
The power consumption of 5G is relatively high, and the host's USB port may not be able to provide enough power. Please use a USB dual cable to supply sufficient power to the module, as shown in the figure: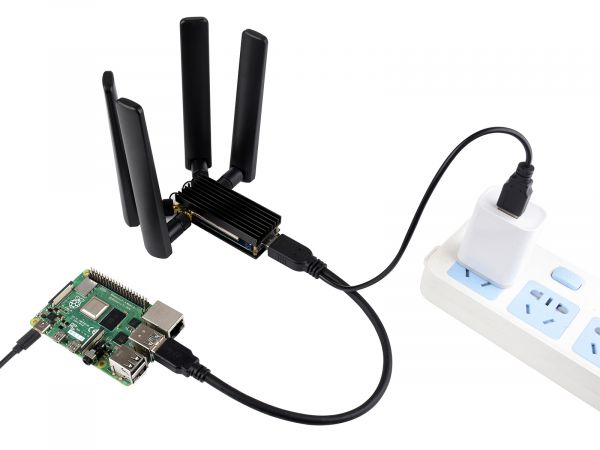
Question: How can I switch the SIM card?
As RM500U-CN and RM500Q-GL modules support simultaneous access to two SIM cards, dual-card single standby, can be switched to enable one of the SIM cards to work through the AT command:
*SIM card 1 is used by default, you can use the following commands to check:
 AT+QUIMSLOT?
*Switch to SIM card 2 using the following command:
 AT+QUIMSLOT=2
*Switch back to SIM card 1 using the following command:
 AT+QUIMSLOT=1
*Query whether the corresponding card slot identifies the SIM card:
 AT+CPIN?
If the corresponding SIM card is still not recognized, consider that the dip switches do not enable the corresponding module, please see if C corresponding dip switches are turned ON: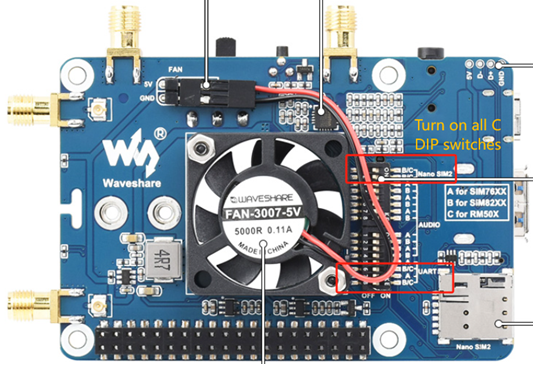
Question: What should I do if the IPX4 antenna socket of the 5G module is removed?
- ANT 0 and 1 functions can replace each other, and 2 and 3 functions can replace each other. Usually, if one antenna is missing, it does not affect the basic functions.
- If the copper foil has also come off, it usually cannot be repaired.
- When removing it, please wiggle it gently from side to side and pull it out evenly, avoiding forceful pulling.
- The IPEX4 generation connectors are relatively fragile, so please handle them with extra care.
Question: What is the power consumption of the 5G module?
For different work states, power consumption varies. With 5V power supply, the current generally ranges from 0.5 to 2.5A after successful networking, with an average of about 1.2A (this is for reference; the actual value depends on the network environment and networking work state).
Question: Can the 5G board be used with other M.2 B KEY interface modules?
- We cannot guarantee support for modules that have not been validated. The following modules have been validated and are supported:
Fibocom: FM650-CN FM160-EAU
SIMCOM: SIM8202G-M2 SIM8262E-M2 SIM8262A-M2
Quectel (AP not supported—PCIe version only): RM500U-CNV RM500Q-GL/RM502Q-AE RM520N-GL RM530N-GL
- 5G modules need to be purchased separately; If used for other modules, pin compatibility must be confirmed, and actual testing shall prevail.
- This is a USB 3.0 protocol module that does not support PCIe protocol (RM520 AP~~). For most WIFI modules, it is not recommended to use modules purchased from the second-hand market, and we also do not support them. It is suggested to choose modules that have been verified and listed, which are more reliable:
- If you need to use M.2 TO 4G/5G HAT for other 4G/5G modules, you can refer to the M.2 connection diagram below, check for pin conflicts by yourself, and then connect it for testing:
Network
Question: Why is my 5G speed not as fast as it says online?
- First of all, there are slight differences between laboratory data and actual data. In practice, due to insufficient base stations, poor signal coverage, and many 5G coverage holes, the network speed may not reach the highest peak. Under normal circumstances, the 4G upload speed is stable at 20-40Mbps, and the 5G upload speed is stable at 100Mbps (the fewer people, the faster the speed is closer to the base station.)
- Secondly, it is necessary to confirm whether the module is registered to the 5G network. If there is no 5G network coverage in some areas, you can only use 4G speeds.
- You should also avoid network congestion. Actually, the total traffic that the base station emits is limited. If many users around are online at the same time, it is not surprising that the Internet speed is slow.
If you want to obtain high Internet speed, it is recommended to avoid peak periods and take the equipment to subway stations, squares and other places with open signals and dense base stations to measure speed during idle hours.
- Moreover, the antenna layout and gain are also crucial. It is recommended to keep the antenna as far away as possible and place it under visible sky. Using high-gain antennas can help achieve better Internet speeds.
Question: Why is the downlink more than 10 times faster than the uplink?
- Uneven distribution of spectrum resources: The network design optimization is biased towards the downlink, and most of the traffic demand is concentrated on receiving content; There are few uplink spectrum resources;
- Antenna transmission power limit: The uplink signal of the 5G module needs to be transmitted through the antenna of the device. SIM8202, for example, can be received by four antennas, and only two antennas can transmit data. The lower transmission power leads to a slower uplink speed.
- Network design priority level: The design of 5G networks usually gives priority to download traffic requirements. Most users' Internet usage behavior is mainly focused on receiving content, such as watching videos, browsing the Web, downloading files, etc.
Question: SIM820X-M2 5G HAT does not recognize the SIM card, what should I do?
- It may be switched to SIM card 2, please use the following command to switch to SIM card 1:
AT+SMSIMCFG=1,1
- To switch to SIM card 2, use the following command: (Some HATs have SIM2)
AT+SMSIMCFG=1,2
If it still does not work, consider that the flight mode is on, and turn off the flight mode with the following command:
AT+CFUN=1
Question: What should I do if my SIM820X Internet connection is slow?
After confirming that the SIM card is activated with a 5G package and has sufficient balance and local 5G network coverage, follow the steps below to fix 5G (boost network speed):
AT+CNBP?     //(You can copy the frequency band to Notepad) Backup the frequency band
AT+CNBP=0x100600000FC00000,0x00000000000000460000A7E2BB0F38DF,0x0000000000000000,0x00000000003FFE63000681E2090828D7,0x00000000003FFE63000681E2090828D7     //Assign the frequency band to SIM820X
or
AT+CNBP=0x100600000FC00000,0x0000000000000046000001E2000908DD,0x0000000000000000,0x0000000000007042000081A0080808D7,0x00000000000070000000010000000000         //Assign the frequency band to SIM820X
AT+CNMP=71     // Fixed 5G
Question: Why does the NET light not flash after powering on for a while and cannot access the Internet?
In this case, the network connection may not be successful. Follow the steps below to troubleshoot:
1. First, check the hardware:
- Check whether the connected SIM card can communicate and surf the Internet normally on mobile phones and other devices. It is recommended to test with SIM cards from several different operators to rule out issues related to SIM card frequency bands;
- Check whether the antenna is connected properly;
- Check that the NET light is flashing, and it is always on, indicating that it is not registered to the network.
2. After confirming that the hardware is OK, you can use the following command (AT LOG) to further confirm the network situation:
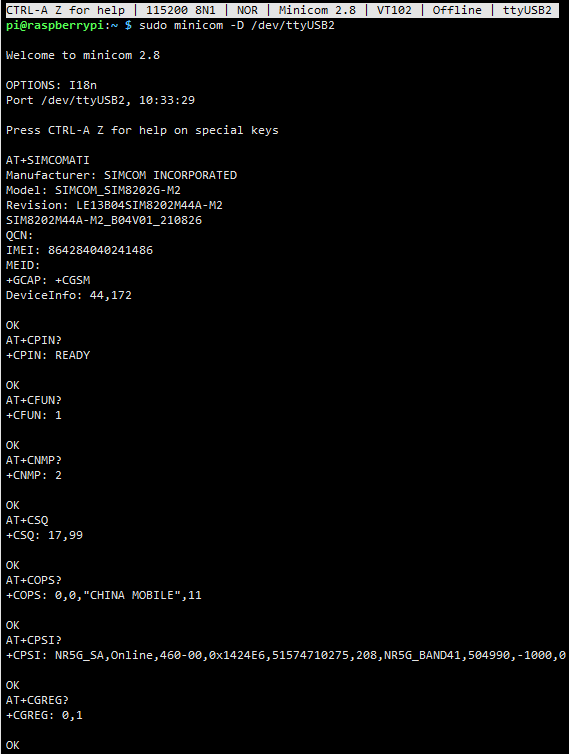
*Open ttyUSB2 through minicom:
 ls /dev/ttyUSB*
 sudo apt-get install minicom
 sudo minicom -D /dev/ttyUSB2
*Check the firmware version information:
AT+SIMCOMATI
*Check if the sim card is in good contact:
AT+CPIN?
*Turn the radio on (turn off airplane mode):
AT+CFUN=1
*Check that the network mode is set to auto-seek:
AT+CNMP=2
*Check the signal quality of the current environment:
AT+CSQ
*Check if the registration to the network is successful:
AT+CGREG?
*Check internet connection:
AT+CPSI?
*Check if the APN corresponds to the operator of the SIM card:
AT+CGDCONT?
*Check operator access:
AT+COPS?

Question: You can register to 4G, but you can't register to 5G. There is no service on a fixed 5G network. Can the SIM card be registered to the 5G network when it is connected to the mobile phone?
- It is recommended to replace the SIM card of different operators to test: different operators support different 5G frequency bands, change the card at the same time can also solve other problems with the card;
- There is no configuration of APN. APN determines the way to enter the network. It is the agent of the operator and the cellular module. Sometimes APN can be obtained automatically, but many times it needs to be obtained manually. You can set it through the following command:
AT+CGDCONT=1,"IP","APN"   //The APN of different operators is different. Here the APN is changed to that of the corresponding operator, for example:
China Mobile APN: CMNET; China Unicom APN: 3GNET; China Telecom APN: CTNET
You can check the APNS of major operators on the following website: APN query website
- You can switch to a different neighborhood or go to another district to test: Different areas cover different operators' networks, leading to different 5G frequency bands in different places.
- To ensure the module registers on the power-efficient LTE 4G network, it must have adequate power supply; insufficient power can also cause the module to register on the LTE 4G network.
- Although it shows 4G LTE network, 5G speed is already available, which do not affect usage, and you can also send the following command:
AT+CNMp=109
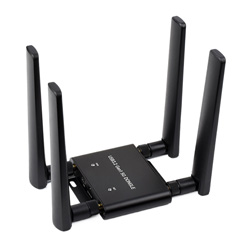
- It may be that the antenna's band does not cover the band of the operators you are using, please change to a full band high gain antenna suitable for your local area to test, and connect all antennas, all antennas are useful, otherwise it may also cause network problems;
- If you are using an IoT card, it is recommended to switch to a regular mobile SIM card (one that can make calls and send messages) for testing. Some pure data cards or IoT cards may be restricted on other devices or after switching devices and cannot register to the 5G network. You can also check the status of the card with the IoT card provider.
- The SIM card bands of 5G operators should cover the bands of SIM820X; sometimes, when querying 4G networks, speeds have reached 5G, and direct speed testing can confirm whether 5G speeds are available.
- Plug the SIM card into the phone to test if it can register to the 5G network. If the phone cannot register, it means the SIM card has not been activated for a 5G data package, or there is insufficient balance, etc.
- Confirm if there is 5G network coverage in the test environment and what frequency band it is registered to (whether the registered frequency band is one of the bands supported by the 5G module).
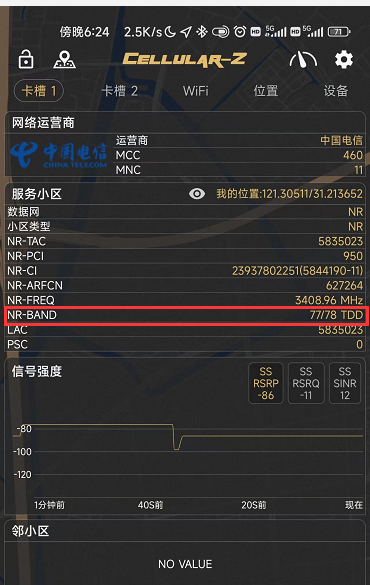
- Android phones can be installed with 5G phones to install Cellular-Z (available in major App stores) to view detailed network information:
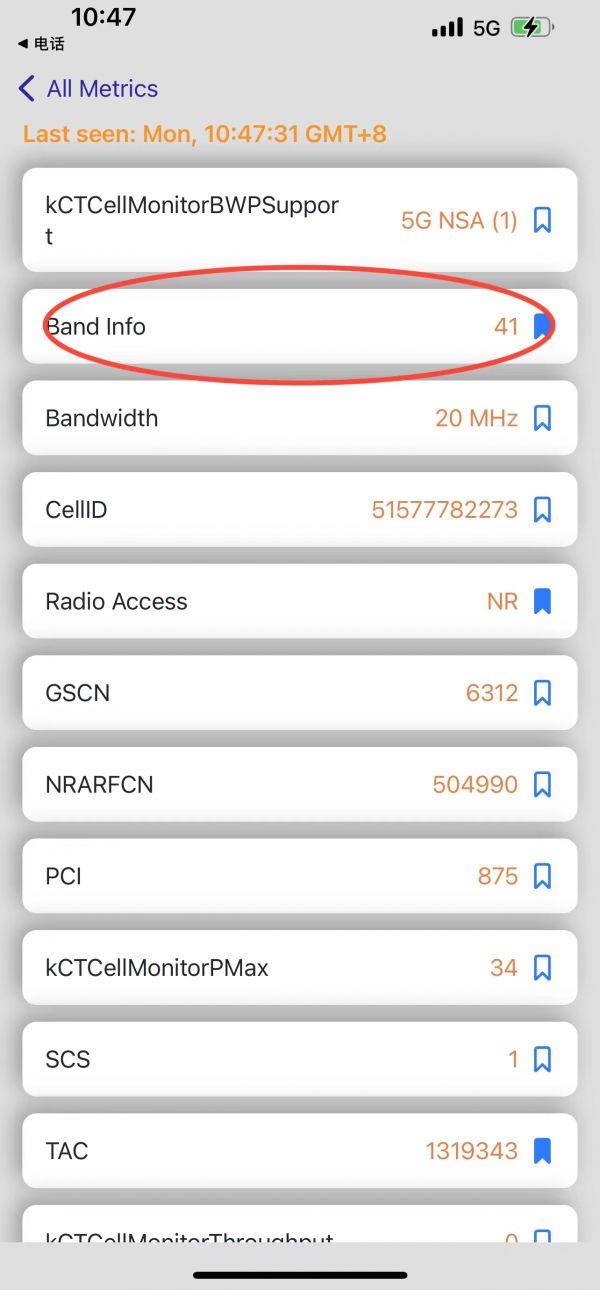
- iPhone can get band information by following these steps:
- Turn on your phone dialer, enter *3001#12345#*, and tap the dial button
- In the pop-up page, find and click on "Serving Cell Info", then find and click on "Freg Band Indicato."
- You can find out by making an inquiry according to the form sent by the operator
- iPhone can get band information by following these steps:
Question: How to fix a specific frequency band?
AT+CSYSSEL="nr5g_band",41:78
Question: What should I do if the SIM820X module NDIS dial-up fails and the driver cannot be installed?
- It is recommended to use the more convenient SIM820X RNDIS Dial Up.
- You can flash the latest Raspberry Pi Raspbian system and reconfigure the NDIS dial-up.
Question: How can check the 4G/5G module is successfully connected to the devices such as Raspberry Pi?
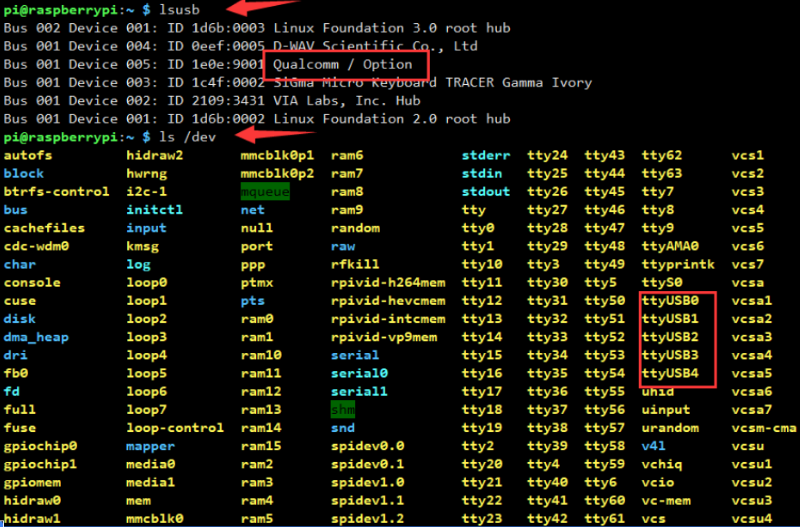
- You can use the following commands to check if the SIM820X and the Raspberry Pi are well connected. If the connection is OK, you can see Qualcomm device and ttyUSB0-USB4:
lsusb
ls /dev
Question: Why is the module never registered with any local operator when trying to use the SIM card?
- 1) It is recommended to replace the SIM card of different operators to test: different operators support different 5G frequency bands, change the card at the same time can also solve other problems with the card; If you are using an IoT card, it is recommended to switch to a regular mobile SIM card (one that can make calls and send messages) for testing. Some pure data cards or IoT cards may be restricted on other devices or after switching devices and cannot register to the 5G network. You can also check the status of the card with the IoT card provider.
- 2) Please configure the APN correctly. There is no configuration of APN. APN determines the way to enter the network. It is the agent of the operator and the cellular module. Sometimes APN can be obtained automatically, but many times it needs to be obtained manually. You can set it through the following command:
AT+CGDCONT=1,"IP","Your_APN"   //The APN of different operators is different. Here the APN is changed to that of the corresponding operator.
For example: China Mobile APN: CMNET; China Unicom APN: 3GNET; China Telecom APN: CTNET
- 3) It may be that the antenna's band does not cover the band of the operators you are using, please change to a full band high gain antenna suitable for your local area to test, and connect all antennas, all antennas are useful, otherwise it may also cause network problems;
- 4) If it still doesn't work, please refer to the following steps to print the network AT log and give the log to our service support team for analysis.
*Check the firmware version information:
AT+SIMCOMATI
*Check if the sim card is in good contact:
AT+CPIN?
*Turn the radio on (turn off airplane mode):
AT+CFUN=1
*Check that the network mode is set to auto-seek:
AT+CNMP=2
*Check the signal quality of the current environment:
AT+CSQ
*Check if the registration to the network is successful:
AT+CGREG?
*Check internet connection:
AT+CPSI?
*Check if the APN corresponds to the operator of the SIM card:
AT+CGDCONT?
*Check operator access:
AT+COPS?
- Open ttyUSB2 through minicom:
ls /dev/ttyUSB*
sudo apt-get install minicom
sudo minicom -D /dev/ttyUSB2
Location
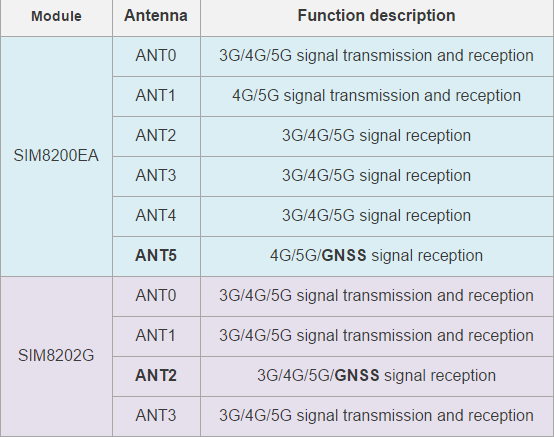
Question: The SIM820X has so many antenna ports, do they have to be connected? What is the function?
Question: What should I do if I can't receive the GPS signal and get the location information?
- Plug the GPS antenna into the GNSS antenna socket (SIM8200EA is ANT5; SIM8202G is ANT2), and place the receiver in the open air (note that it cannot be tested in rainy weather). It takes about 1 minute to receive the positioning signal after power-on.
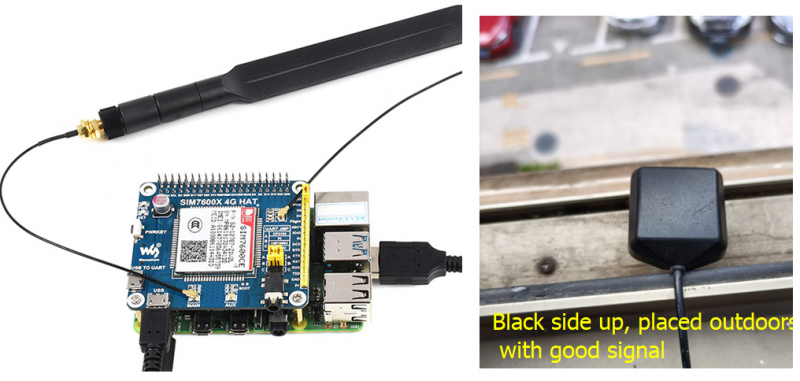
- M2 module needs to use a passive antenna to obtain positioning information. If you do not have a passive positioning antenna, a 5G antenna can also be used. Replace the 5G antenna and place the module outdoors for positioning (the 5G antenna does not come with an extension cable):
Comprehensive
Question: How to set the network port mode and change back to USB mode?
- Quectel Qualcomm
Change the ETH mode
AT+QENG="servingcell"
at+qcfg="pcie/mode",1
at+qcfg="data_interface",1,0
at+qeth="eth_driver","r8125",1
AT+QMAPWAC=1
at+qmap="mpdn_rule",0,1,0,1,1,"FF:FF:FF:FF:FF:FF"
AT+CFUN=1,1
Change back to USB mode
at+qcfg="data_interface",0,0
at+qcfg="pcie/mode",0
AT+QCFG="usbnet",2
AT+CFUN=1,1
- Quectel Unisoc
Set network port mode
AT+QCFG="pcie/mode",1
AT+QCFG="ethernet",1
AT+QNETDEVCTL=1,3,1
AT+QCFG="usbnet",5
AT+QCFG="ethernet",1
AT+QCFG="nat",0
AT+CFUN=1,1
Change back to USB mode
AT+QCFG="ethernet",0
at+qcfg="pcie/mode",0
AT+QCFG="usbnet",2
AT+CFUN=1,1
Set USB+ETH mode (some firmware support, after the configuration is completed, unplug and enable the USB port), RM500UCNVAAR03A05M2G_01.001.01.001 firmware, and China Unicom mobile phone card as an example to test:
AT+QCFG="pcie/mode",1
AT+QCFG="ethernet",1
AT+QNETDEVCTL=1,3,1
AT+QCFG="usbnet",3
AT+QCFG="nat",2
AT+CGDCONT=1,"IPV4V6","3gnet"
AT+CFUN=1,1
Question: What should I do if I have an unstable network with severe packet loss after dial-up?
Please use the following command to configure the dial-up mode to a stable routing mode:
AT+QCFG="nat",1
Question: What should I do if the NET light does not light up and I am not registered to the network?
- It is recommended to replace the SIM cards of different operators. Under the comparative test, the network frequency bands and base station layout supported by different operators are different. Changing the card can also eliminate problems such as card arrears.
- Check whether the SIM card and antenna are connected, all four antennas must be connected.
- After confirming that the hardware connection is correct, please use the following AT Log to check the network:
AT+CMEE=2
AT+CPIN?
AT+COPS?
AT+QCSQ
AT+QENG="servingcell"
AT+CGDCONT?
AT+QNWPREFCFG="mode_pref"
Question: What platforms are the RM50X module based on?
RM500Q-GLbased on the Qualcomm platform, supports GNSS positioning, mainly for China
RM500Q-AE/RM502Q-AE: based on the Qualcomm platform, supports GNSS positioning, mainly for countries and regions except for China.
Question: After connecting to the Raspberry Pi, it keeps restarting, what is the reason?
Question: Unable to access the internet after restarting the Raspberry Pi?
When using external power supply, after restarting the Raspberry Pi, the RM500U does not restart. At this time, you can use commands to restart the RM500U.
Question: The module has been powered on, why does the input command not respond?
Use the following command to turn on the echo, and press Enter after entering: (Blind typing is required here)
ATE1
Question: How to check the frequency band of the operator?
It can be inquired at the following website:
https://www.frequencycheck.com
Question: How to confirm whether the Raspberry Pi hardware serial port is ttyS0 or ttyAMA0?
- Raspberry Pi 2B/zero, with user serial device number ttyAMA0;
ls -l /dev/serial*
- You can confirm that serial0 is the selected serial device number with the following command line, as follows:

Question: Why does the USB power supply fail to power off when the computer is used, but the power goes off when the Raspberry Pi is used, and the NET light does not light up for a while?
The USB power supply capability of the Raspberry Pi is worse than that of the computer. It needs to be connected to an external power supply. Please set the switch to EXT PWR, and connect the HAT interface to a 5V 3A power supply: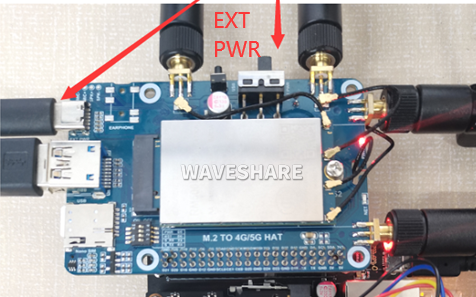
Question: Is the RM530 a Qualcomm platform?
Yes, it is a Qualcomm X62 platform like RM520.
Question: Can I change the IMEI of the module?
Question: Is there a 3D structure file?
The PCBA has 3D file, but the casing does not.
Support
Monday-Friday (9:30-6:30) Saturday (9:30-5:30)
Email: services01@spotpear.com
[Tutorial Navigation]
- Overview
- RM50XX Module Usage
- Selection Guide
- Test Description
- Working with Windows
- Working with Raspberry
- Hardware Connection
- EMC Dial-up Configuration
- Step 1: Uninstall "modemmanager" and "network-manager"
- Step 2: Test 5G Module
- Step3: Use AT Command to Configure the Network
- Step 4: Test 5G Network
- 5G Internet Speed Test
- Troubleshooting
- Working with Jetson Nano
- SIM82XX Module Usage
- 5G Comparison of Module Parameters
- Working with Windows
- Install Driver Directly
- Install Driver Manually
- Manual NDIS Dail-up
- GPS Positioning
- SIM Card Configuration
- Working with Raspberry
- Configuration Required for First Use
- Test AT Command
- NIDS Dail-up
- Auto-run
- Live Streaming With ffmpeg
- Working with OpenWrt
- OpenWrt Introduction
- Raspberry Pi minicom Serial Port Debugging
- Working with Jetson Nano
- Other Usage
- About the Speed
- FM650 Module Usage
- RM50XX Resources
- SIM82XX Resources
- FAQ
- Softwares
- Question: What should I do if the driver installation of Quectel series modules is abnormal?
- Question: How to set the corresponding APN for the operator?
- Question: What are the dialing types for RM5XXX?
- Question: Can the RM500U-CN 5G HAT module achieve transparent transmission between two clients?
- Hardware
- Question: What should I do if the USB TO M.2 B KEY loses power?
- Question: How can I switch the SIM card?
- Question: What should I do if the IPX4 antenna socket of the 5G module is removed?
- Question: What is the power consumption of the 5G module?
- Question: Can the 5G board be used with other M.2 B KEY interface modules?
- Network
- Question: Why is my 5G speed not as fast as it says online?
- Question: Why is the downlink more than 10 times faster than the uplink?
- Question: SIM820X-M2 5G HAT does not recognize the SIM card, what should I do?
- Question: What should I do if my SIM820X Internet connection is slow?
- Question: Why does the NET light not flash after powering on for a while and cannot access the Internet?
- Question: You can register to 4G, but you can't register to 5G. There is no service on a fixed 5G network. Can the SIM card be registered to the 5G network when it is connected to the mobile phone?
- Question: How to fix a specific frequency band?
- Question: What should I do if the SIM820X module NDIS dial-up fails and the driver cannot be installed?
- Question: How can check the 4G/5G module is successfully connected to the devices such as Raspberry Pi?
- Question: Why is the module never registered with any local operator when trying to use the SIM card?
- Location
- Question: The SIM820X has so many antenna ports, do they have to be connected? What is the function?
- Question: What should I do if I can't receive the GPS signal and get the location information?
- Comprehensive
- Question: How to set the network port mode and change back to USB mode?
- Question: What should I do if I have an unstable network with severe packet loss after dial-up?
- Question: What should I do if the NET light does not light up and I am not registered to the network?
- Question: What platforms are the RM50X module based on?
- Question: After connecting to the Raspberry Pi, it keeps restarting, what is the reason?
- Question: Unable to access the internet after restarting the Raspberry Pi?
- Question: The module has been powered on, why does the input command not respond?
- Question: How to check the frequency band of the operator?
- Question: How to confirm whether the Raspberry Pi hardware serial port is ttyS0 or ttyAMA0?
- Question: Why does the USB power supply fail to power off when the computer is used, but the power goes off when the Raspberry Pi is used, and the NET light does not light up for a while?
- Question: Is the RM530 a Qualcomm platform?
- Question: Can I change the IMEI of the module?
- Question: Is there a 3D structure file?
- Support