


- sales/support
Google Chat:---
- sales
+86-0755-88291180
- sales01
sales@spotpear.com
- sales02
dragon_manager@163.com
- support
tech-support@spotpear.com
- CEO-Complaints
zhoujie@spotpear.com
- Only Tech-Support
WhatsApp:13246739196
- Purchase/Shipping/Refund
WhatsApp:13424403025
SIM7600G-H-M.2 4G for Jetson Orin User Guide
Overview
Features
- Supports dial-up, telephone call, SMS, TCP, UDP, MQTT, HTTP(S), FTP(S), etc.
- Supports GPS, BeiDou, GLONASS, Galileo, QZSS, and LBS base station positioning
- USB 3.1 port (USB 2.0 compatible) for connecting to Jetson Nano, PC or Raspberry Pi to enable high speed 4G network
- Onboard standard M.2 B KEY slot and module selection switches, compatible with SIM8260X-M2 / SIM8262X-M2 / RM5XX / SIM7600 modules
- Onboard 4x SMA to IPEX antenna connectors, easy to install the antennas
- Reserved UART solder pads for convenient data transmission and other functions with certain modules
- Onboard audio interface and audio decoding chip, enabling voice operations such as making calls by using SIMXXX series modules
- Onboard power switch, reset button, and LED indicator for convenient power control and status monitoring
- Onboard high-efficiency power supply circuit, up to 3A output current
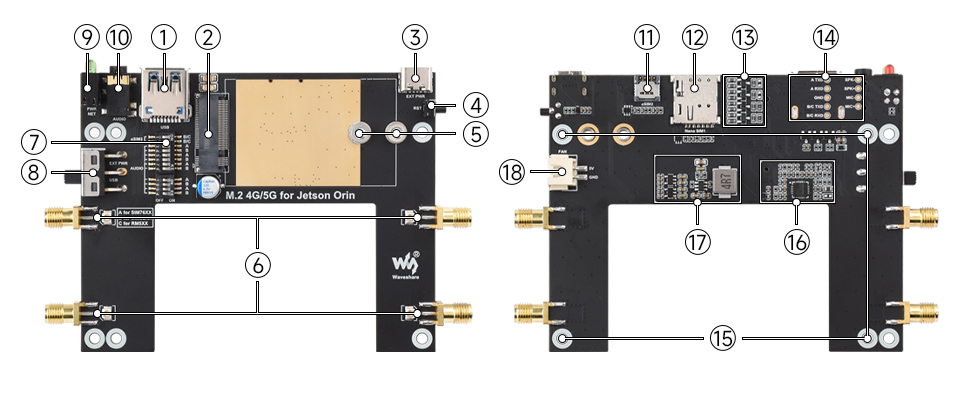
Onboard Resources
| Item | Description |
|---|---|
| ① USB3.1 port | USB 2.0 compatible, for connecting with different hosts |
| ② M.2 interface | Compatible with most SIMCom and QUECTEL 4G/5G modules in M.2 form factor |
| ③ USB Type-C port | 5V 3A input, stable and flexible power supply |
| ④ Reset switch | One-click reset |
| ⑤ Module fixing holes | Supports 3042 / 3052 package modules |
| ⑥ Antenna interface | Onboard four antennas |
| ⑦ Module settings switch | Switch A to ON for SIM7600X / A7906X / SIM7906X / SIM7912X series 4G M.2 modules |
| ⑧ Power supply switch | When set to USB, the module is powered via the "① USB3.1 port" |
| ⑨ LED indicators | Convenient to check the operating status of the module |
| ⑩ Audio jack | The SIM82XX and SIM7600X series support audio function, which is not currently supported by the RM5XX series |
| ⑪ eSIM card slot | Package QFN-8 (5 × 6), selectable via AT command configuration |
| ⑫ Nano SIM card slots | Onboard dual SIM card slots, dual card single standby |
| ⑬ Level conversion circuit | Used for compatibility between different voltage logic, ensuring stable operation of peripheral interfaces |
| ⑭ Reserved UART and audio interface pads | Convenient for users to expand debugging and external audio connection |
| ⑮ Mounting hole | Install with screws to Jetson Orin |
| ⑯ Audio driver circuit | Provides amplification and processing capabilities for audio output and input |
| ⑰ Power circuit | Provides stable power supply for the entire board and modules, supports current protection and voltage stabilization functions |
| ⑱ Fan interface | Can be used to connect to a 5V cooling fan |
Tested with "4G/5G Module" Function
| Category | Module model | Internet access | GNSS positioning | Voice call | Dual SIM cards | UART interface | Is external power supply required |
|---|---|---|---|---|---|---|---|
| 5G | SIM8202G-M2 | 5G/4G/3G Internet access | Supported | Supported | Supported | Supported | Optional, recommended to use external power supply |
| 5G | SIM8262E-M2 | 5G/4G/3G Internet access | Supported | Supported | Supported | Supported | Optional, recommended to use external power supply |
| 5G | SIM8200EA-M2 | 5G/4G/3G Internet access | Supported | Supported | Supported | Supported | Optional, recommended to use external power supply |
| 5G | RM500U-CNV | 5G/4G/3G Internet access | - | - | Supported | Supported | Requires external power supply |
| 5G | RM520N-GL | 5G/4G/3G Internet access | Supported | - | Supported | - | Requires external power supply |
| 5G | RM530N-GL | 5G/4G/3G Internet access | Supported | - | Supported | - | Requires external power supply |
| LTE-A | EM06-E | LTE-A/4G/3G Internet access | - | - | - | - | Optional, generally does not require external power supply |
| LTE-A | EM060K-GL | LTE-A/4G/3G Internet access | - | - | Supported | - | Optional, generally does not require external power supply |
| LTE-A | A7906E | LTE-A/4G/3G Internet access | - | - | - | - | Optional, generally does not require external power supply |
| 4G | SIM7600G-H-M2 | 4G/3G/2G Internet access | Supported | Supported | - | Supported | Optional, generally does not require external power supply |
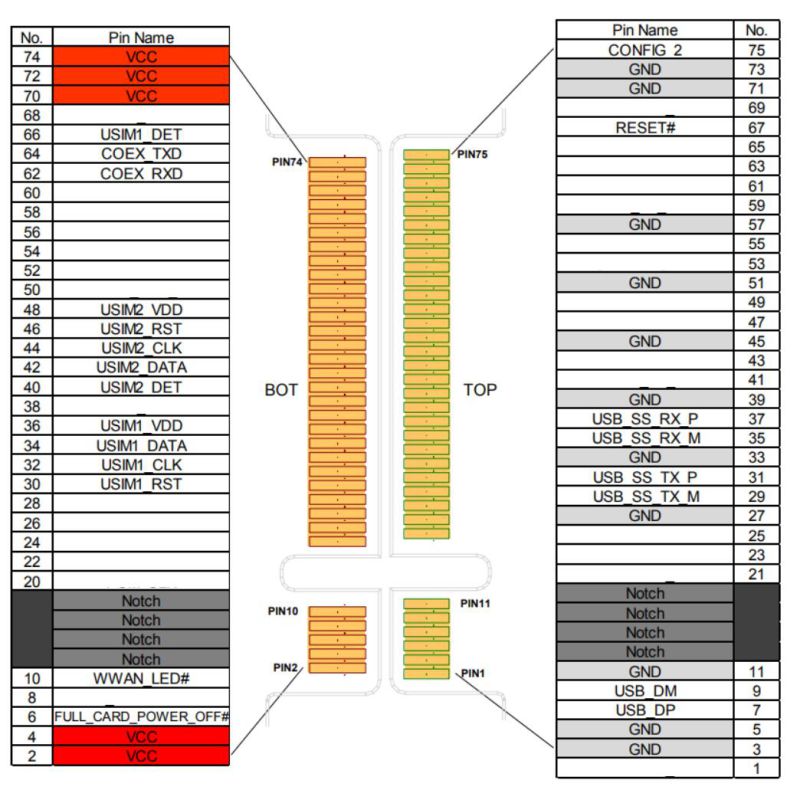
4G/5G Module Compatibility Description
- If you need to use the 4G 5G for Jetson Orin driver board with other 4G/5G modules, you can refer to the M.2 connection diagram below to check whether there is a pin conflict, and then connect it for testing:
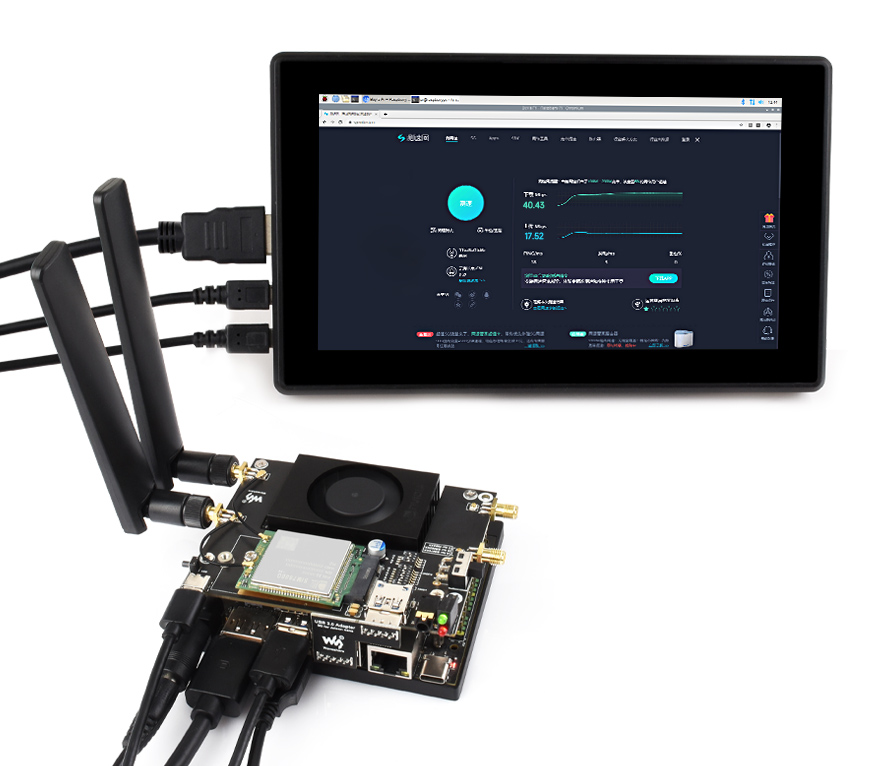
Working with Jetson Orin
Dial-up Internet Access
Hardware Connection
1. 4G module jumper cap connects PWR and 5V for automatic power-on
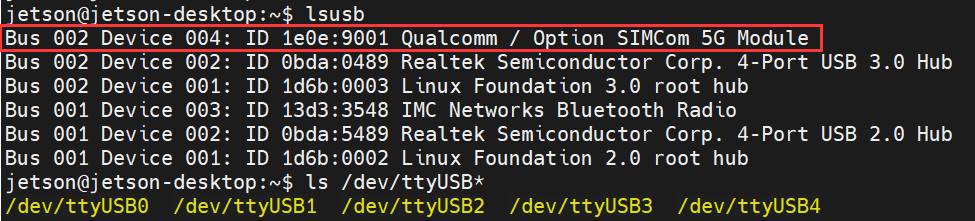
2. The 4G module USB port needs to be connected to the Jetson Nano. Check if the port is installed correctly by entering `ls /dev/ttyUSB*` or `lsusb` in the terminal
RNDIS Dail-up
- You can use the following commands to check if devices such as SIM820X and Orin nano are well connected. If there are no issues, you can see Qualcomm device and ttyUSB0-USB4:
lsusb
ls /dev
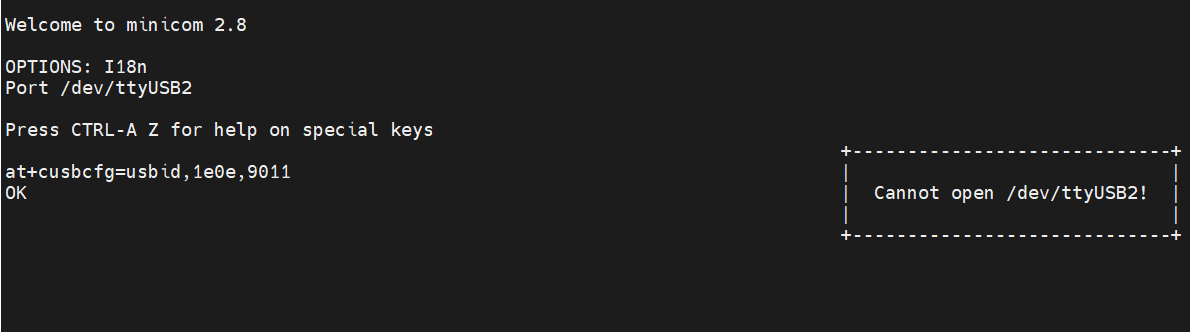
- Open ttyUSB2 through minicom:
ls /dev/ttyUSB*
sudo apt-get install minicom
sudo minicom -D /dev/ttyUSB2
- Send the following command via minicom, then wait for the module to restart
at+cusbcfg=usbid,1e0e,9011
GNSS Positioning
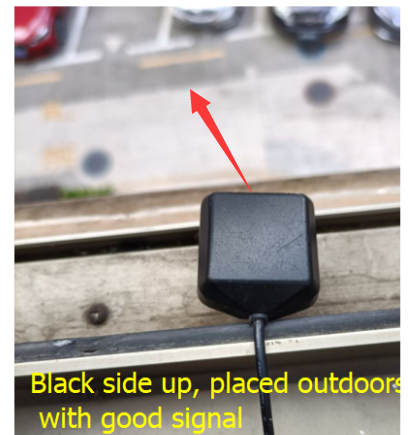
Please plug the passive GPS antenna into the GNSS antenna mount, and place the receiver tag face down in the open outdoor visual sky (note that the test cannot be done in overcast or rainy weather). It takes about 1-5 minutes to power on and receive the positioning signal (the specific time depends on the test environment)

- Open the serial port assistant tool, open the GPS in the AT Port debug serial port (Linux defaults to ttyUSB2), and then open the NMEA port (Linux defaults to ttyUSB1) to obtain dynamic information:
 AT+CGPS=1	    //Turn on GPS
 AT+CGPSINFO        //Print GPS information to serial port
 AT+CGPSAUTO=1      //Enable auto-location on power-on

Demo
Software Installation
Install the corresponding serial port library and download program
sudo apt-get update
sudo apt-get install python3-pip
sudo pip3 install pyserial
wget https://files.waveshare.com/wiki/4G-5G-for-Jetson-Orin/Demo/SIMXXX-for-Jetson-Orin.zip
sudo unzip SIMXXX-for-Jetson-Orin.zip
sudo chmod 777 -R SIMXXX-for-Jetson-Orin
Python Demo
tree
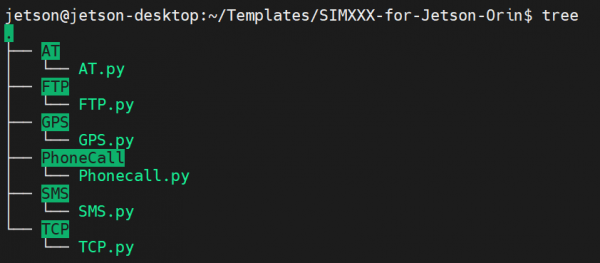
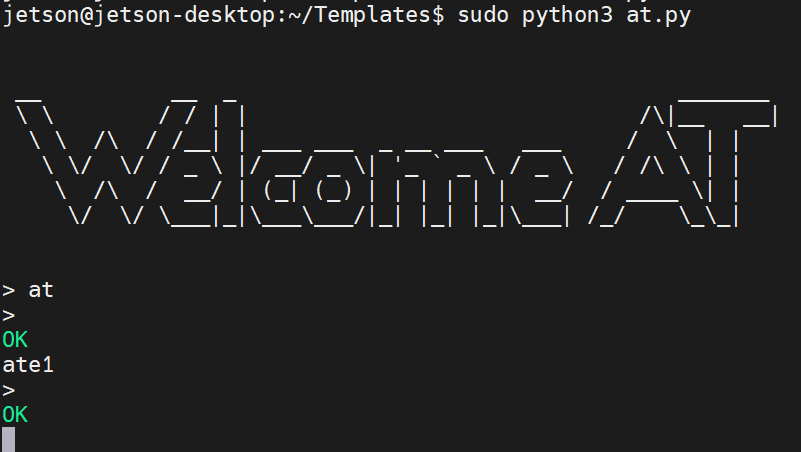
AT
cd SIMXXX-for-Jetson-Orin/AT/
sudo python3 AT.py
GPS
cd SIMXXX-for-Jetson-Orin/GPS/
sudo python3 GPS.py
PhoneCall
cd SIMXXX-for-Jetson-Orin/PhoneCall/
sudo python3 PhoneCall.py
SMS
cd  SIMXXX-for-Jetson-Orin/SMS/
sudo python3 SMS.py
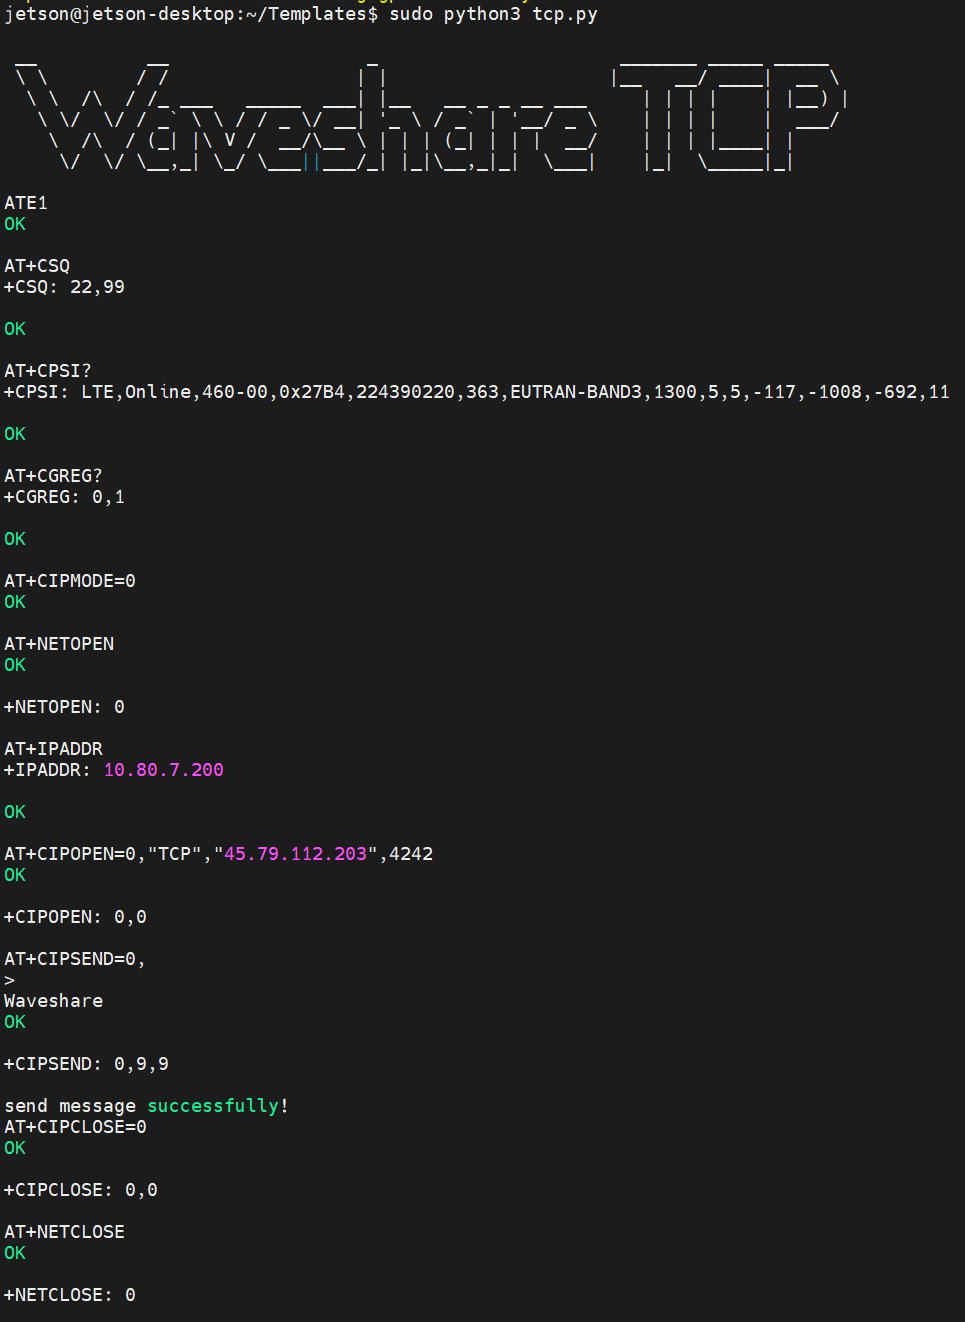
TCP
cd SIMXXX-for-Jetson-Orin/TCP/
sudo python3 TCP.py
Working with Windows
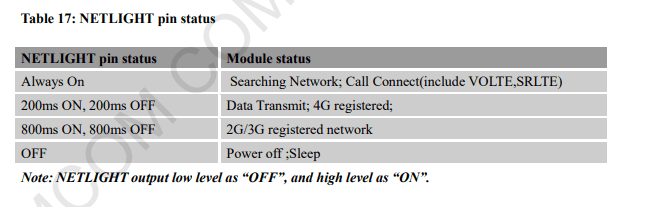
NET Indicator Working Status Description
- The working status of NET indicator is described as follows:
Software Environment
- Test environment: Windows operating system
- Test software: SIM7600 Serial Port Debugging Assistant
- Driver file: SIM7600X driver file
Driver Installation
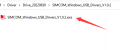
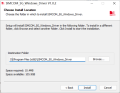
1. Download SIM7600X driver file
2. Insert the 4G HAT as shown in the hardware connection diagram above into a Windows computer (taking Windows 10 operating system as an example in the following text)
3. Ensure the module is properly powered on
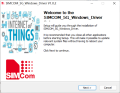
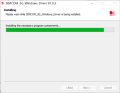
4. Extract the driver file --> Double-click the exe driver file with the left mouse button --> Select the installation path --> NEXT --> Wait for the installation to complete --> Restart the computer --> Complete the driver installation

5. Install all detected devices according to the method mentioned above. The effect after installing the drivers is as follows: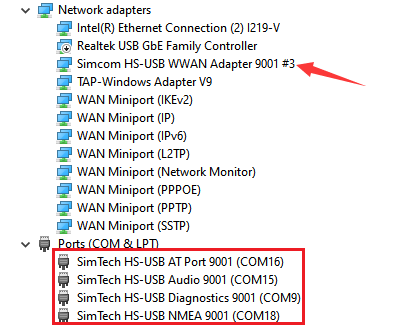
Description of Common AT Commands
- SIM7600X module supports AT command control, some basic AT commands are shown in the table below:
(For the complete AT command set, please see: SIM7600X Series_AT Command Manual)
| Command | Description | Return |
|---|---|---|
| AT | AT Test Command | OK |
| ATE | ATE1 sets echo ATE0 closes echo | OK |
| AT+CGMI | Query module manufacturer | OK |
| AT+CGMM | Query module model | OK |
| AT+CGSN | Query product serial number | OK |
| AT+CSUB | Query module version and chip | OK |
| AT+CGMR | Query the firmware version serial number | OK |
| AT+IPREX | Set the module hardware serial port baud rate | +IPREX: OK |
| AT+CRESET | Reset module | OK |
| AT+CSQ | Check network signal quality, return signal value | +CSQ: 17,99 OK |
| AT+CPIN? | Check SIM card status, return READY, indicating that the SIM card can be recognized normally | +CPIN: READY |
| AT+COPS? | Query the current operator, the operator information will be returned after normal networking | +COPS: OK |
| AT+CREG? | Query network registration status | +CREG: OK |
| AT+CPSI? | Query UE system information | |
| AT+CNMP? | Network mode selection command: 2: Automatic 13: GSM only 38: LTE only 48: Any modes but LTE ... .... | OK |
AT Command Send and Receive Test
- Download SIM7600 Serial Port Debugging Assistant
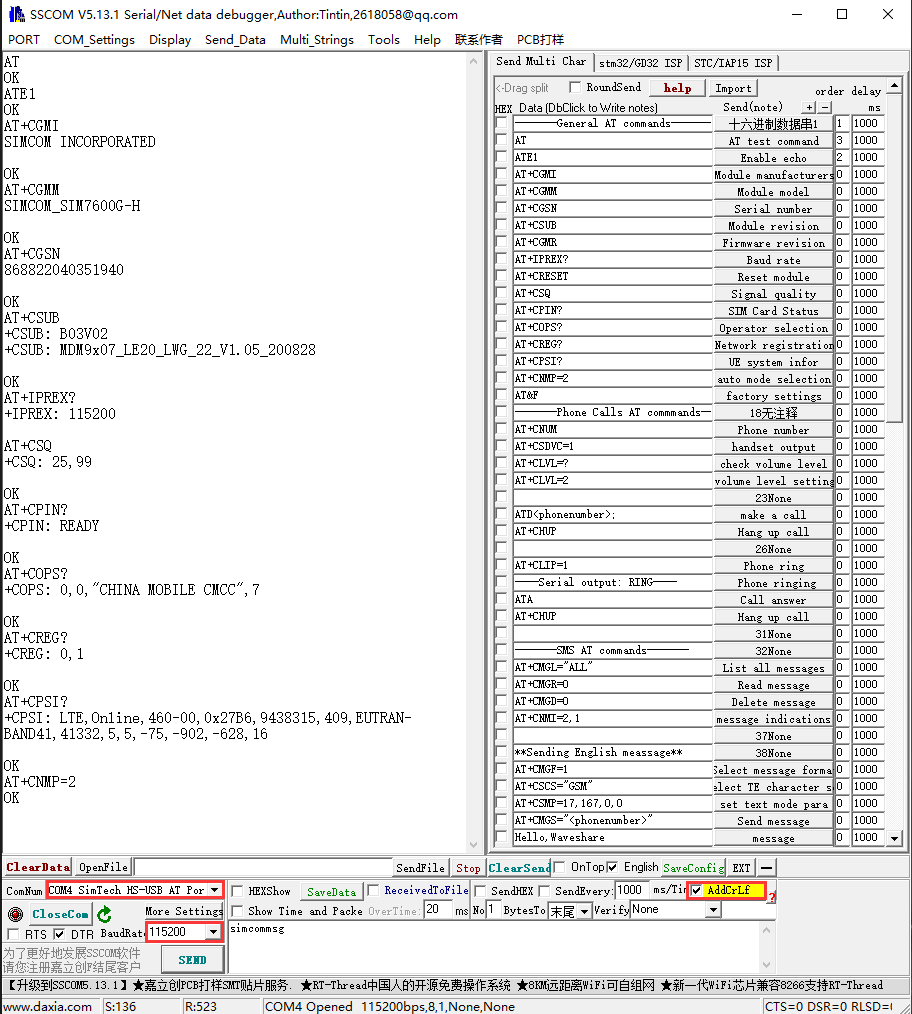
- Open Device Manager, find the port number corresponding to the AT Port; then open the sscom software, select the corresponding port and baud rate, check "AddCrLf"; click the "Expand" button on sscom to pull out the preset AT commands; it's best to open the serial port, send the corresponding AT command, and then you can perform the test. The test screenshot is shown as follows:

Dial-up Internet Access
Note: A SIM card with 4G networking enabled and not downtime is required.
Computer Windows Internet Access
- Usually when we connect to the Windows 10 operating system, confirm that the hardware and software drivers are installed. After the module is powered on, the PWR indicator will light up normally and the NET indicator will flash normally, and it will automatically connect to the Internet. If it cannot connect to the network automatically, we can also use NDIS or RNDIS to dial up and connect to the network.
NDIS Dail-up
The steps for Windows NDIS dialing operation are as follows:
1. Open the SIM7600 AT port and send the command (when using SSCOM to send AT commands, you must check "AddCrLf" box)
AT$QCRMCALL=1,1 //carrier return required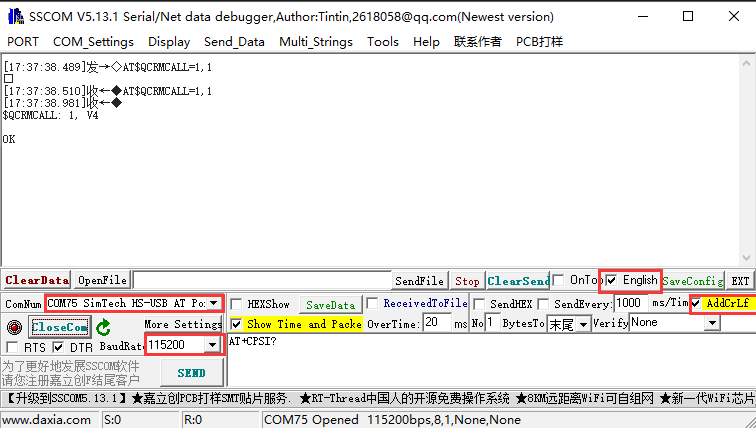
2. Now the NDIS dial-up takes effect, and the computer can connect to the network.
RNDIS Dail-up
Remote NDIS (RNDIS) does not require hardware vendors to write NDIS miniport device drivers for network devices attached to the USB bus. Remote NDIS achieves this by defining a message set independent of the bus and specifying how this message set operates over the USB bus. Since this remote NDIS interface is standardized, a set of host drivers can support any number of network devices attached to the USB bus. This greatly reduces the development burden on device manufacturers, improves the overall stability of the system, as no new drivers are required, and enhances the end-user experience:
- Install the SIM card and antenna on the device, use USB to connect to the computer, and provide power supply
- Install USB driver
- Open the serial port assistant, find the serial number corresponding to the AT serial port, and send:
AT+CPSI? //Check whether you are registered to the Internet
- If the network registration is successful, the SIM7600X sends AT commands to enable USB dial-up Internet access:
at+Cusbpidswitch=9011,1,1
- SIM820X sends AT command to enable USB dial-up Internet access:
at+cusbcfg=usbid,1e0e,9011
- Sent successfully, returns OK, and the Dongle will automatically restart.
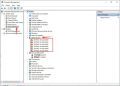
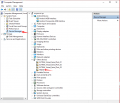
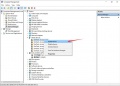
- Observe the Device Manager and find some unidentified devices, such as RNDIS (with an exclamation mark):
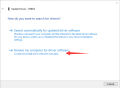
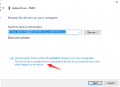
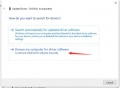
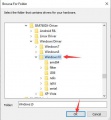
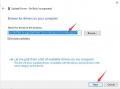
- Right-click RNDIS, search for device software in the prompt window, choose "Browse My Computer". Choose "Network Adapter" from the device list.
- Select Microsoft Corporation in the Manufacturer list of the Network Adapters window, and then select "Remote NDIS Compatible Device" in the list on the right-hand list, which is a remote NDK compatible device.
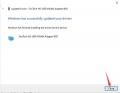
Click Next and wait for the installation to finish, the RNDIS Kitl device will be installed successfully. At this point, the dial-up feature is set up and you can see that the PC can access the Internet through Dongle.

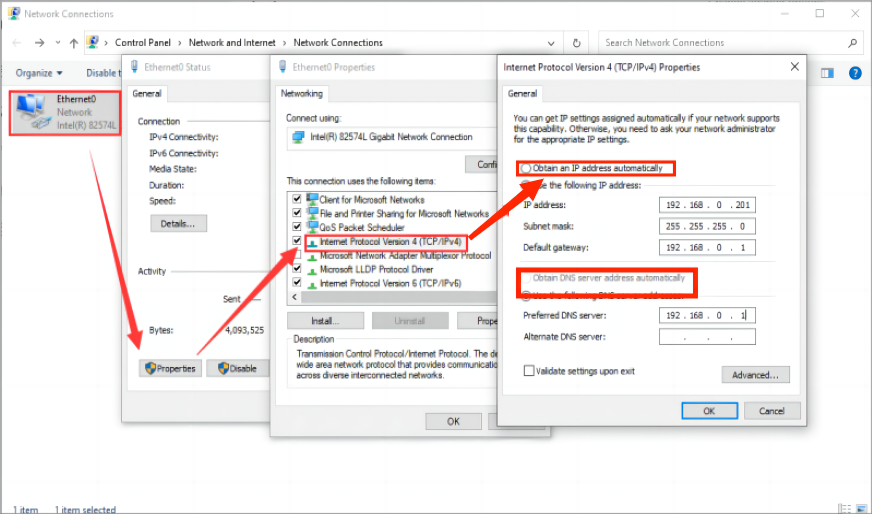
- If you cannot access the Internet, please set it to obtain IP address automatically.
GNSS Control Instance
- Plug in the GPS antenna, and place the receiver tag face down in an open outdoor area (note that the test cannot be done in overcast or rainy weather). It takes about 1 minute to receive the positioning signal after power-on.
- Detailed test instructions and screenshots are as follows:
AT+CGPS=1	   //Turn on GPS
AT+CGPSINFO        //Print GPS information to serial port
AT+CGPS=0          //Turn off GPS

Telephone Voice
Make a Phone Call
- Refer to the "Hardware Connection" chapter to connect the LTE antenna, SIM card (phone function must be enabled) and headphone cable with microphone, and turn on the module.
- Common commands for making phone calls:
| AT+CNUM | Check the local number (not all SIM cards support this command) | +CNUM OK |
| AT+CSDVC | AT+CSDVC=1: Switch to headphone output AT+CSDVC=3: Switch to speaker output | OK |
| AT+CLVL=? | Query volume range | OK |
| AT+CLVL=2 | Set the volume to 2 | OK |
| ATD<phone_number>; | ATD10086; : Call the China Mobile customer service number 10086 | OK |
| AT+CHUP | Hang up the call | OK |
| AT+CLIP=1 | Set up caller ID | OK |
| ATA | Answer the phone | OK |
- The detailed operation screenshot is shown below:
Note: When using SSCOM serial assistant to send and receive AT commands, you must check "AddCrLf"
Voice Output Mode and Volume Adjustment
AT+CSDVC=1 		//Switch to headphones
AT+CSDVC =3 	        //Switch to speaker
AT+CLVL =?		//Query the volume range, return +CLVL: (0-5)   //The volume can be adjusted from 0 to 5
AT+CLVL=2     	        //Set the volume to 2, return OK
Answer the Phone
Serial port display for incoming calls: RING
Send "ATA"		//Answer the call
Send "AT+CHUP"      	//Hang up the phone
Audio Parameter Debugging
AT+CACDBFN=?
+CACDBFN: (Handset_cal.acdb,Handset_tianmai.acdb)	//Suggest considering setting this set of parameters
OK
A. In the power-on initialization stage of module, before making a call, add the following:
AT^PWRCTL=0,1,3		//Mainly improve the TDD noise effect
OK
B. During the process of establishing a voice call in the module
VOICE CALL:BEGIN  	//Module call establishment and execution to improve call effectiveness
AT+CECM=1      		//Echo suppression processing
OK
AT+CECH=0x500 		//Improve the volume effect on mobile phones
OK
SMS Sending and Receiving
Send English SMS
- Properly install the SIM card and LTE antenna, connect the module USB interface to the computer with a USB cable, and power on the module;
- Check if the indicators are normal, PWR indicator is always on, NET indicator is blinking;
- Set the local SMS center (non-essential operation, the SMS center of the SIM card is set)::AT+CSCA="+8613800755500" + Enter, return to OK.
Note: The SMS service center number for China Mobile is +861380xxxx500, where xxxx is the long-distance area code of your location. The SMS center may vary by place, and you can check it specifically by Baidu search or by calling the customer service of China Mobile or Unicom. This SMS center is in Shenzhen (0755); - AT+CMGF=1: Set the SMS mode to TEXT;
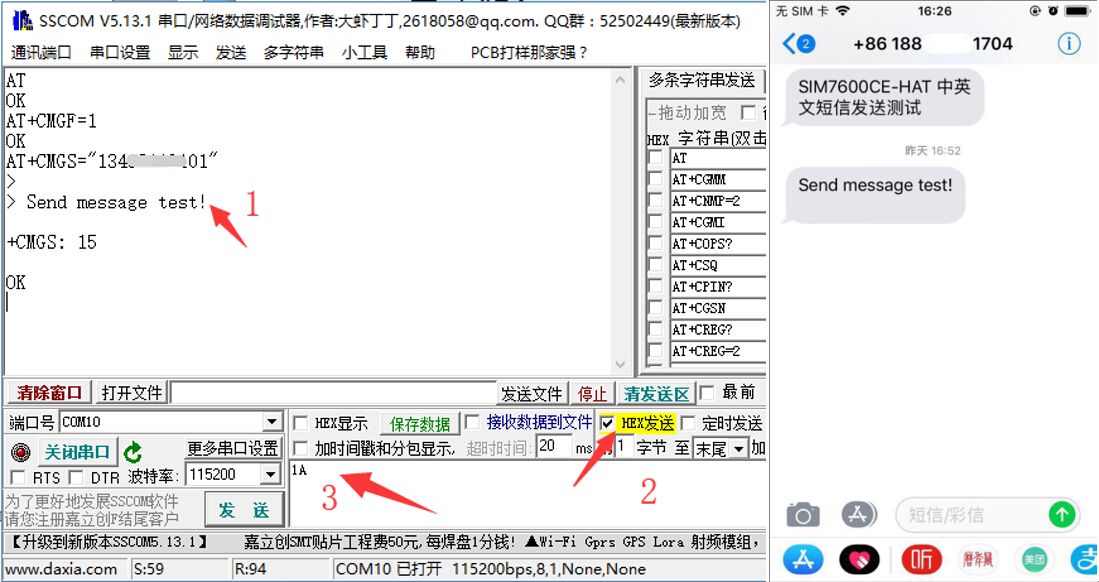
- AT+CMGS="phone number"<Enter> , set the recipient's phone number, and then return: ">", send the required content, such as "Send massage test!" no return is needed at the end. After editing the message, send it in hexadecimal format with 1A to send the message (1A is the key value of "CTRL+Z", used to tell the module to execute the send operation, and you can also send 1B, which is "ESC", to cancel the operation). After sending successfully, the module returns +CMGS:15 to confirm the successful send. As shown in the figure below:
Receive English SM
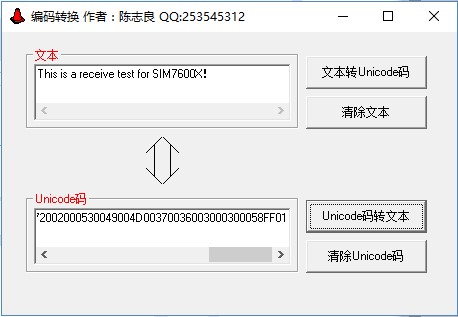
- Send a message on the phone: "This is a receive test for SIM7600X!" to the test module
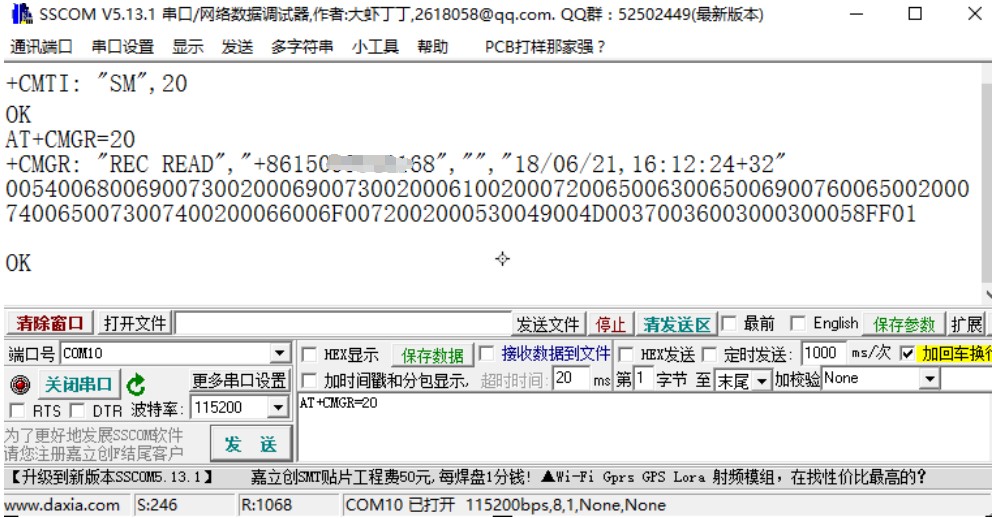
- When receiving a message, the serial port will automatically report the message, "SM", 20, which means that there are 20 messages in the SM, and the message just sent is the 20th message
- Read message: AT+CMGR=20 to read the 20th message (AT+CMGL="ALL" to read all messages)
- Delete message: AT+CMGD=20, as shown in the figure below
- Convert the displayed message into text using an encoder converter.
Send Chinese SMS
1. Set SMS sending parameters
AT+CMGF=1             //Set as text mode
AT+CSCS="UCS2"           //Set message text to UCS2 encoding set
AT+CSMP=17,167,2,25          //Set text mode parameters
AT+CMGS="00310033003400330032003100310039003100300031"          //Set the UCS2 set for the recipient's phone number;
2. Wait for the return >, at this time send the converted message content (00530049004D003700360030003000584E2D658777ED4FE16D4B8BD5), no carriage return is needed at the end. After editing the SMS, send it in hexadecimal format with 1A, as shown in the following figure: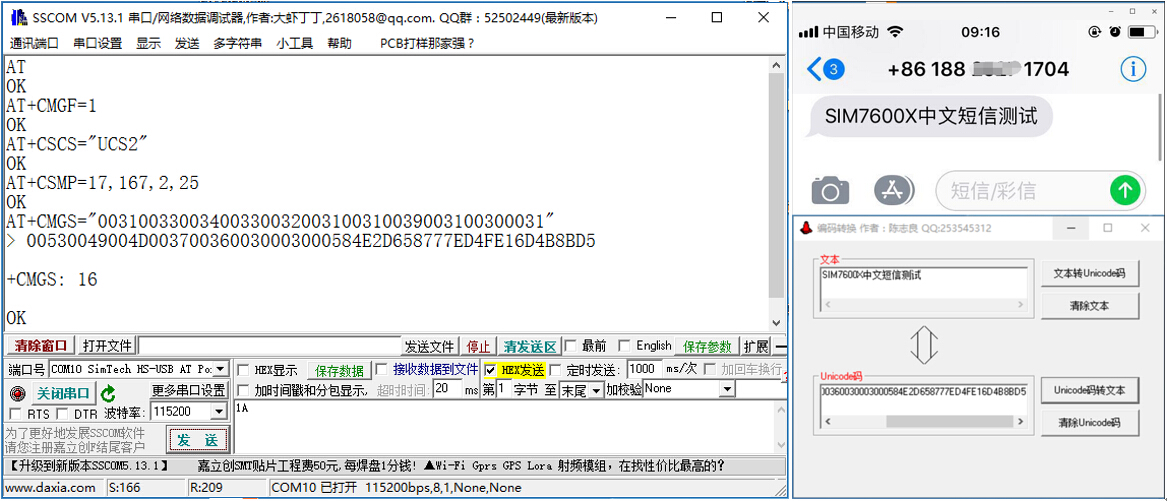
Resources
Documents
Demo
Software
- SIM7600 Driver
- CP2102 Driver
- SIM7600-AT-SSCOM
- GPS Test Tool
- TCP Test Tool
- Xshell Tool
- VLC media player
- Unicode Software
Datasheets
3D Drawing
Related Application Cases
FAQ
Question: Can the SIM7600G-H 4G for Jetson Nano be used on Nano NX or Orin nano?
- Yes, you need to use a USB cable to connect for use;
- Because the position of the USB interface changes after connecting through the pin header, you cannot use the matching USB adapter, please use a USB cable to connect
Question: Unable to access the Internet after RNDIS dialing?
- RNDIS dialing (9011) sometimes does not show the corresponding network card after dialing up the Internet on the Jeison Nano's Ubuntu system; you can use ECM dialing (9018) to obtain the usb1 network card, and the specific ECM dialing method is as follows:
Question: Why does minicom return OK when sending an AT command but not display the sent command?
- It is due to the display not being turned on. The SIM7600X can send the following commands followed by Enter (here, sending ATE1 is also not visible, similar to entering a password; please confirm and type blindly after pressing the key), and after displaying OK, the display is successfully turned on.
ATE1
- Alternatively, you can use a shell command line to directly send commands to enable echo display
cat /dev/ttyUSB2 &
echo -e "ATE1\r" > /dev/ttyUSB2
Question: The module can be used normally when connected to a computer, but NET indicator doesn't blink when connected to Jetson Nano, and it can't connect to the Internet. What should I do?
Generally, it's in flight mode. You can use a cable to connect D13 and GND to turn off the flight mode, as shown in the figure: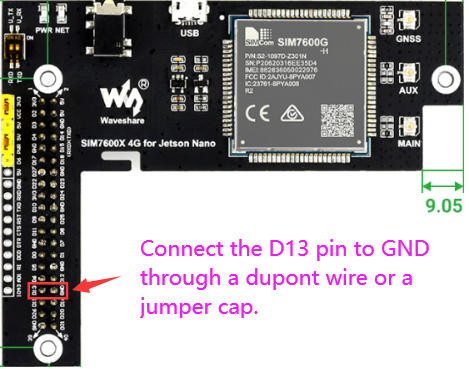
Question: What should I do if it prints some useless information after entering minicom?
Close the ModemManager process to prevent useless data from being displayed when debugging the AT serial port with minicom
sudo su
killall ModemManager
Question: Why doesn't the NMEA port print the corresponding GPS information after turning on GPS?
Restart after sending the following command:
AT+CGPSNMEAPORTCFG=3
Question: Why does it automatically print AT logs and display useless data after opening the serial port assistant on a Linux system?
Close the ModemManager process to prevent useless data from being displayed when debugging the AT serial port with minicom
sudo su
killall ModemManager
Dial-up Internet Access
Question: What should I do if the NET indicator does not blink after the SIM7600X is turned on and dialing is abnormal?
In this case, the network connection may not be successful. Follow the steps below to troubleshoot:
1. Firstly, check the hardware connection:
- Please check if the MAIN antenna is properly connected, the SIM card does not support hot swapping. Please install the SIM card and antenna with the power off, and after registering the network, the NET indicator will blink;
- Confirm whether the connected SIM card can make normal calls and surf the Internet on mobile phones and other devices, and try to avoid using IoT cards with many restrictions during the test stage, please give priority to using ordinary mobile phone SIM cards;
- It is recommended to replace the SIM cards of different operators. Under the comparative test, the network frequency bands and base station layout supported by different operators are different. Changing the card can also eliminate problems such as card arrears.
2. After confirming that there is no problem with the hardware, use the following command to debug the network:
- Since all cellular modules are shipped only after passing SIM card testing without issues, they are default assigned with an APN. Different operators have different APNs, so please configure the APN for distinction. APNs for some operators are as follows:
 China Mobile:  AT+CGDCONT=1,"IP","CMNET"
 China Unicom:  AT+CGDCONT=1,"IP","3GNET"
 China Telecom: AT+CGDCONT=1,"IP","CTNET"
 AT&T:          AT+CGDCONT=1,"IP","PHONE"
 Vodafone:      AT+CGDCONT=1,"IP","portalnmms
- Sometimes you also need to set the APN username and password:
AT+CGAUTH=1,1,"<your username>","<your password>"
- Set to automatic network search:
AT+CNMP=2
- Turn on radio, turn off flight mode:
AT+CFUN=1
- Save configuration:
AT&W0
3. After confirming that the hardware is correct and there is no problem, you can use these commands to check the network status:
Check if the SIM card is in good contact: AT+CPIN?
Check if the RF is turned on (turn off flight mode): AT+CFUN?
Check operator access status: AT+COPS?
Check network status: AT+CPSI?
Check if successfully registered to the network: AT+CGREG?
Check the signal quality of the current environment: AT+CSQ
Check if the network mode settings are correct: AT+CNMP?
Check if the APN configuration is done: AT+CGDCONT?
Check firmware version: AT+SIMCOMATI
Please check the Enter key for line breaks, default 115200 baud rate, AT PORT COM port, send one command at a time. After correctly registering to the network, it will be as shown below: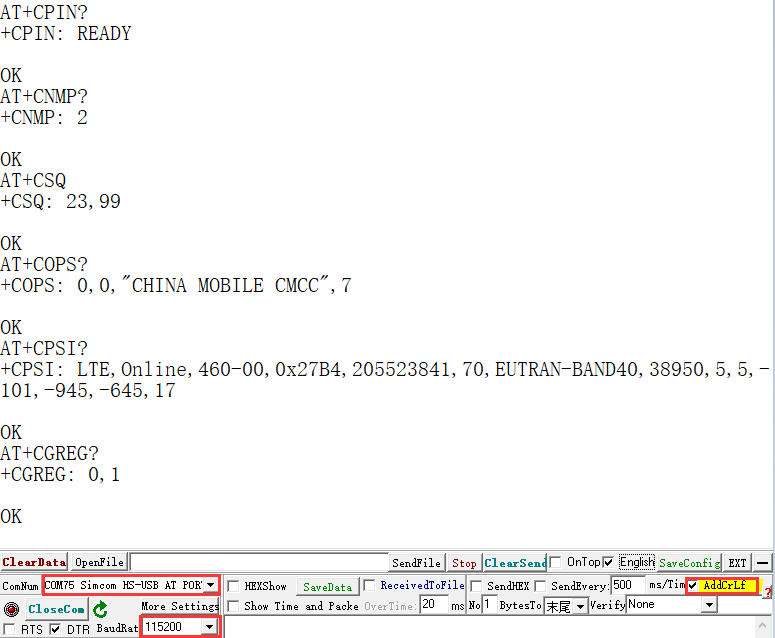
If not registered to the network, configure the network
- Check if the network mode settings are correct:
AT+CNMP=2
- Turn off flight mode:
AT+CFUN=1
If it is a Linux system, you can use a tool such as minicom to view: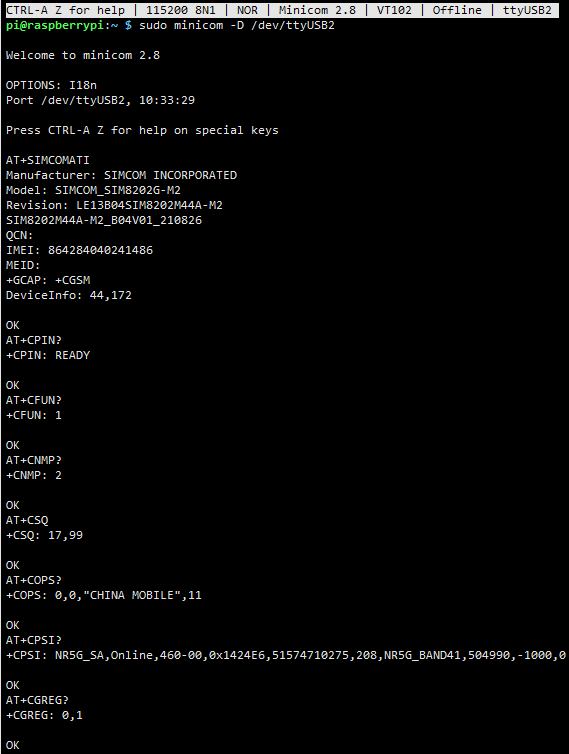
Question: Why can a regular SIM card that can make calls access the Internet, but an IoT SIM card (data card) cannot?
To save valuable R&D time, it is recommended to use a phone card that supports making calls during the testing and validation phase, and confirm that there are no hardware issues before using the IoT card that requires troubleshooting. The IoT card has many restrictions, mainly including the following points:
- Account suspended, IoT cards (data cards) that do not support calling and SMS functions will bind the cellular module and the SIM card's IMEI, allowing only one card per device (policy stipulation); if you change the device, you can ask the IoT card operator to check the card status and unlock it, but it is not recommended to frequently change devices for use
- Some private (personally built base stations) IoT cards may not be supported. It is recommended to apply for guaranteed IoT cards at the branches of the major operators
- Confirm if the frequency bands supported by the IoT card cover the frequency bands supported by the module
- If you do not have an APN set, please configure the APN with the following command.
AT+CGDCONT=1,"IP","Your_APN"
Sometimes, you also need to set the APN username and password:
AT+CGAUTH=1,1,"<your username>","<your password>"
Question: What is the difference between RNDIS, NDIS, PPP and ECM dialing methods?
Different dial-up methods result in different IP addresses, each with its own characteristics. Please refer to the table below for details: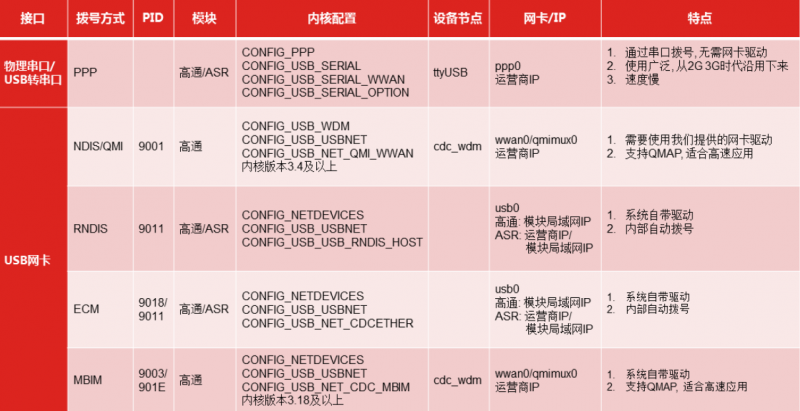
Question: Why does minicom return OK when sending an AT command but not display the sent command?
It is due to the echo not being turned on. The SIM7600X can send the following commands followed by Enter (here, sending ATE1 is also not visible, similar to entering a password; please confirm and type blindly after pressing the key), and after displaying OK, the echo is successfully turned on.
ATE1
Question: What should I do if it prints some useless information after entering minicom?
- Usually, the CSQ signal value is automatically printed continuously. You can turn it off using the following command; change the parameter to 1,0 to turn it on:
AT+AUTOCSQ=0,0
- Close the ModemManager process to prevent useless data from being displayed when debugging the AT serial port with minicom
sudo su
killall ModemManager
Question: Why can't I control the module with UART on the Raspberry Pi, can't open ttyS0 through minicom, and get a prompt saying there is no ttyS0?
Open the Raspberry Pi terminal and enter the following command to enter the configuration interface
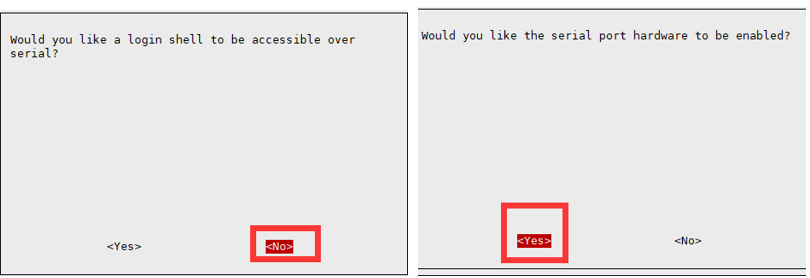
sudo raspi-config
- Select Interfacing Options -> Serial, disable shell access, and enable the hardware serial port as shown below: <br/
The serial device number for Raspberry Pi 5/2B/ZERO is ttyAMA0; you can confirm this with the following command line, serial0 is the selected serial device number, as shown in the figure:
ls -l /dev/serial*

- If you want to swap the mapping of ttyAMA0 and ttyS0, assign serial0 to ttyAMA0, and select ttyAMA0 serial port, you can modify the system configuration file /boot/config.txt
sudo nano /boot/config.txt
Add in the file:
dtoverlay=pi3-disable-bt
Question: What if you register to the network, successfully dial and get an IP, but cannot access the Internet and cannot ping?
Sometimes you can ping an IP but not a domain name, which is a DNS server issue. Please refer to the following steps to configure the DNS server Check the current DNS
cat /etc/resolv.conf
- Back up the original DNS configuration file first
sudo mv /etc/resolv.conf resolv_bk.conf
- Re-edit a DNS configuration file
sudo nano /etc/resolv.conf
- Add Alibaba Cloud DNS server:
nameserver 223.5.5.5
- Or Google DNS server
nameserver 8.8.8.8
- Go ping the domain name for testing, use the corresponding network card, here usb0
ping qq.com -I usb0
- Lock the file to prevent tampering, unlock and change to - i
sudo chattr +i /etc/resolv.conf
Question: How to make the SIM7600X switch to IPv6 after dialing up?
You can set it using the following commands:
AT+CGDCONT=1,"IPV6","Your_APN" //Switch to IPV6
AT+CGDCONT=1,"IP","Your_APN"        //Switch back to IPV4
Different operators have different APNs, so attention should be paid to setting them correctly. Common APNs are as follows:
China Mobile: cmnet
China Unicom: 3gnet
China Telecom: ctnet
Verizon: Wireless vzwinternet
AT&T: phone
T-Mobile: fast.t-mobile.com
Vodafone: portalnmms
Orange: orange.fr
Question: Can the SIM7600X perform PPP dial-up via UART?
Sure, the detailed steps for UART dialing are as follows:
SIM7600X PPP Dail-up
Question: Why does the computer return to "NO CARRIER" after dialing the NDIS, and I can access the Internet but the network shows off?
AT$QCRMCALL=1,1
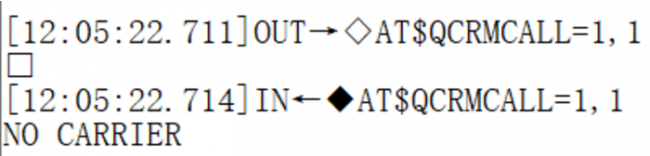
- Under normal circumstances, SIM7600X is automatically dialed when connected to the Windows system, so there is no need to redial. Redialing will return NO CARRIER
- If you still can't dial up to access the Internet, please use the following command to change to the Windows default dial-up mode
AT+CUSBPIDSWITCH=9001,1,1
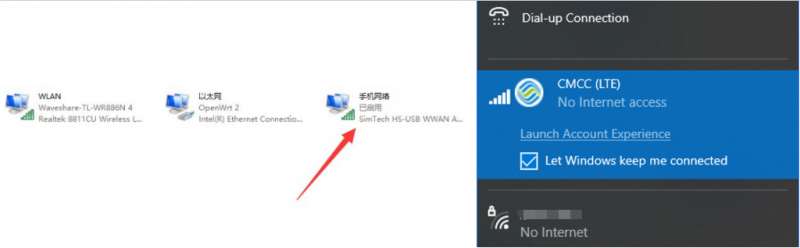
- Display as turned off and mobile network not enabled, you can ignore it and go online directly;
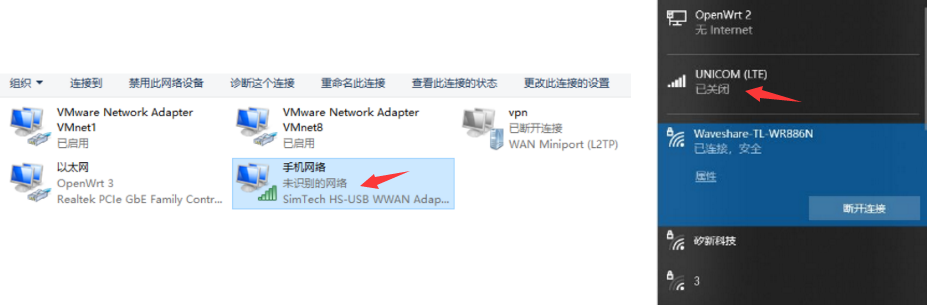
- You can also install the driver SIM7600X dial-up Driver to update the network card
- After installing the driver, the network card shows as enabled
Question: Why is my dial-up Internet connection so slow?
- Generally, the default configuration of SIM7600 is to automatically select the network standard, and it is likely to choose 2G Internet access; if you need to force the use of 4G mode, you need to enter the following AT command configuration:
AT+CNMP=38 //Fixed 4G LTE, if there is no local 4G coverage, you may not be able to register to the network
 If 4G has been fixed and the speed is still not ideal, it may be a frequency band problem;
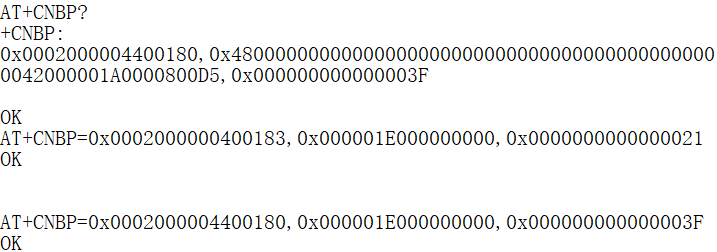
AT+CNBP? //Backup the current band (the returned band information can be copied to Notepad, etc.)
AT+CNBP=0x0002000000400183,0x000001E000000000,0x0000000000000021 //After returning OK, measure the speed
AT+CNBP=0x0002000004400180,0x000001E000000000,0x000000000000003F //If the speed doesn't improve, try this
- Different operators have different APNs (similar to network addresses), please set the operator's APN
AT+CGDCONT=1,"IP","Your_APN"
- Different operators have varying coverage ranges for their base stations, usually with major mainstream operators having wider coverage areas
It is recommended to use a SIM card from a mainstream operator
- The module may not cooperate with some niche operators, so it does not have its certification. Please use a SIM card from a certified mainstream operator instead, and make sure that the card has sufficient tariffs to make normal calls and surf the Internet.
Question: After dialing up via SIM7600X, how to access Raspberry Pi and other motherboards via SSH ?
- After the host dials up using SIM7600X, it obtains a local network IP or an Internal network IP assigned by the operator (with IPv4 public addresses becoming increasingly scarce, more and more users are using Internal networks, and most operators only provide Internet access functionality; public network IPs are categorized as commercial packages that require additional application). Intranet penetration is a viable solution.
Question: Can a Raspberry Pi connect to the Internet via both a network cable and Wi-Fi after it is connected to a cellular module?
- Yes, hosts like the Raspberry Pi can connect to multiple networks simultaneously
- The operating system decides the transmission path of data packets based on the priority of the routing table, so the Internet speed usually cannot be increased by adding multiple network cards
Question: Why is the network speed of the customer's SIM7600 very slow?
- 1) It is recommended to test with a SIM card from a different operator: different operators support different 5G bands, and changing the card can also eliminate other card issues
- 2) Confirm the 4G signal strength at this location. Weak signals can lead to a decrease in network speed. You can switch to a different network sector or go to other city areas for testing: Different regions are covered by different carrier networks, resulting in different 5G bands in different places.
- 3) Please check if the APN settings are correct. Different operator APN parameters can affect network speed performance:
AT+CGDCONT?
- 4) Please provide sufficient power for the module. Insufficient power supply can lead to network instability. Sufficient power can ensure stable Internet speed
- 5) It could be that the antenna frequency band does not cover the frequency band used by your operator. Please replace with the full-band high-gain antenna suitable for local testing and connect all antennas. All antennas are useful, otherwise they may also cause network issues
Positioning Commands
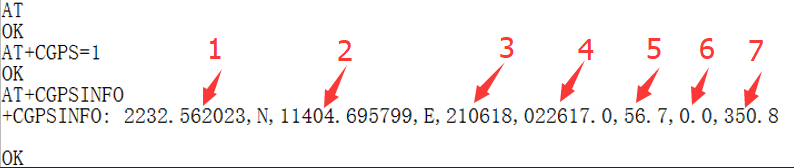
Question: What does the positioning information obtained through AT+CGPSINFO on SIM7600X represent?
Question: What should I do if I can't receive the GPS signal and get the location information?
Please plug the GPS antenna into the GNSS antenna mount, and place the receiver tag face down in the open outdoor visual sky (note that the test cannot be done in rainy weather), and wait for about 1-5 minutes (the specific time depends on the test environment) to receive the positioning signal;
- If the positioning is slow, it is recommended to use the following command to enable the module to power the antenna and accelerate positioning:
AT+CVAUXS=1
Question: AT PORT did not obtain location information, the HS-USB NMEA port can, what is the issue?
AT+CGPSNMEA=197119
Or use the following command to obtain location information
AT+CGPSINFOCFG=1,31
AT+CGPSAUTO=1
Question: Why is the positioning inaccurate, and why do the coordinates obtained differ from those found online?
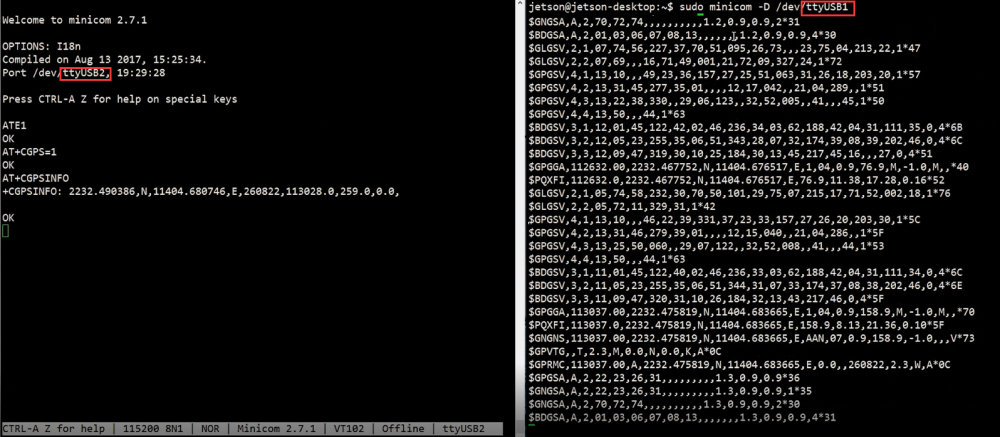
- After turning on GPS on the AT Port debugging serial port (Linux default ttyUSB2), then open the NMEA port (Linux default ttyUSB1) to obtain dynamic information:
AT+CGPS=1	      //Turn on GPS
AT+CGPSINFO           //Print GPS information to serial port
AT+CGPSAUTO=1         //Enable auto-location on startup
AT+CGPSNMEAPORTCFG=3  //Enable NMEA print GPS information

For more detailed steps, please refer to the following link:
The longitude and latitude obtained by the SIM7600X module are in units of minutes, whereas the commonly used format is in degrees. For more details, please refer to the section below.
Question: How does the SIM7600X perform base station positioning? What is the command?
The common commands for the LBS base station positioning function of the SIM7600X are as follows:
AT+CLBS=?  //View the range of parameters that can be set
AT+CNETSTART//Open the network; If the network fails to open, you can use the command AT+CNETSTOP to close it and then open it
AT+CLBS=1 //Get the current latitude and longitude
AT+CLBS=2 //Get the detailed address
Question: What are the common AT commands for the SIM7600X module, such as for reset, enabling flight mode, and querying the IP address?
Please click the link below:
SIM7600X Common Commands
Call and SMS
Question: Some SIM card operators require the VOLTE function to make calls. How to turn it on or off?
You can use the following command to enable VOLTE function:
 at+voltesetting=1
 at+cnv=/nv/item_files/modem/mmode/ue_usage_setting,1,01,1
You can use the following command to disable VOLTE function:
 at+voltesetting=0
 at+cnv=/nv/item_files/modem/mmode/ue_usage_setting,0,01,1
Question: What are the commands for SIM7600X call recording and playback?
SIM7600X makes a phone call and answer it on your phone
ATD131xxxxx816;

Record the sound of SIM7600 and mobile phone to the module memory E drive (change recording to memory card to D)
AT+CREC=3,"e:/rec.wav"

End recording
AT+CREC=0

Play the sound to the mobile phone
AT+CCMXPLAYWAV="E:/rec.wav",1

Play the sound to the SIM7600
AT+CCMXPLAYWAV="E:/rec.wav",2

End playback
AT+CCMXSTOPWAV
Question: How many SMS messages can be saved on SIM7600CE 4G HAT?
If the text message is saved on the SIM card, the general limit is usually 50, and it can be queried through the command: AT+CPMS?
Question: How to set the SMS center number? (SMS center number is a kind of short message server. The SMS messages sent by cell phones need to be sent to the SMS center number first, and then forwarded to the other phone by the SMS center number, which is equivalent to an SMS relay station.)
AT+CSCA="+8613800755500"
The command needs to be added with + Enter, return OK. Note: The SMS service center number for China Mobile is +861380xxxx500, where xxxx is the long-distance area code of your location. The SMS center may vary by place, and you can check it specifically by Baidu search or by calling the customer service of China Mobile or Unicom. This SMS center is in Shenzhen (0755)
Question: SIM7600X SMS sending failed, prompted with +CMS ERROR? or CME ERROR and other errors
- Confirm that the SIM7600X is registered to the network and that the SIM card can send and receive text messages normally on phones and other devices;
- Set the correct SMS center number;
- Initialize the SMS settings with the following commands:
AT+CSCS="IRA"
AT+CSMP=17,167,0,0
Hardware Issues
Question: What's the type of SIM card ?
It supports SIM Standard cards, as shown in the figure below. If it's a Micro or Nano card, a card sleeve is required.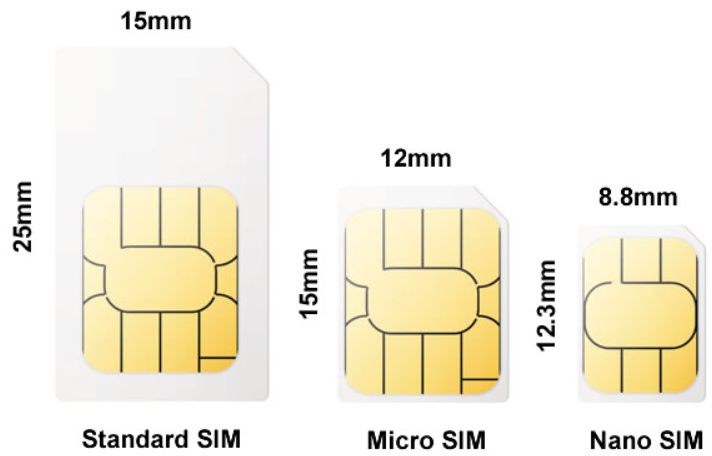
Question: When sending AT+CPIN?, an ERROR is returned
This issue is generally caused by poor contact between the SIM card and the module's SIM card slot.
Question: What is the working current when connected to the network?
Using USB 5V power supply, after successful networking, the current is generally in the range of 50~300mA, with an average of about 150mA (for reference only, depending on the network environment and networking working status).
Question: What is the power consumption of SIM7600CE 4G HAT when simultaneously loaded with 4G and GPS?
If enabled simultaneously, average: 110~170mA
Question: What are the antenna parameters of SIM7600CE 4G HAT?
- Frequency: 700m 800m 900m 1710-1920M 2010-2100M 2300-2400M 2500-2690M-5800MHZ
- Gain: 9dbi ± 0.7dbi
Question: How to debug SIM7600X via USB TO UART serial port?
Please put the jumper cap on C and connect the USB TO UART interface of SIM7600X to the USB port of a computer or Linux board such as Raspberry Pi through USB type-A to micro USB to send commands to debug: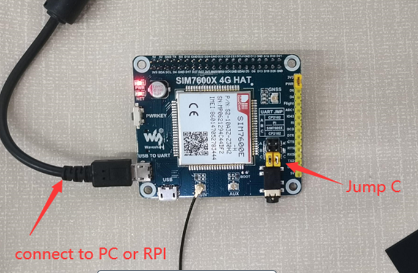
Question: What are the models in the SIM7600X series?
SIM7600X mainly includes but is not limited to the following models: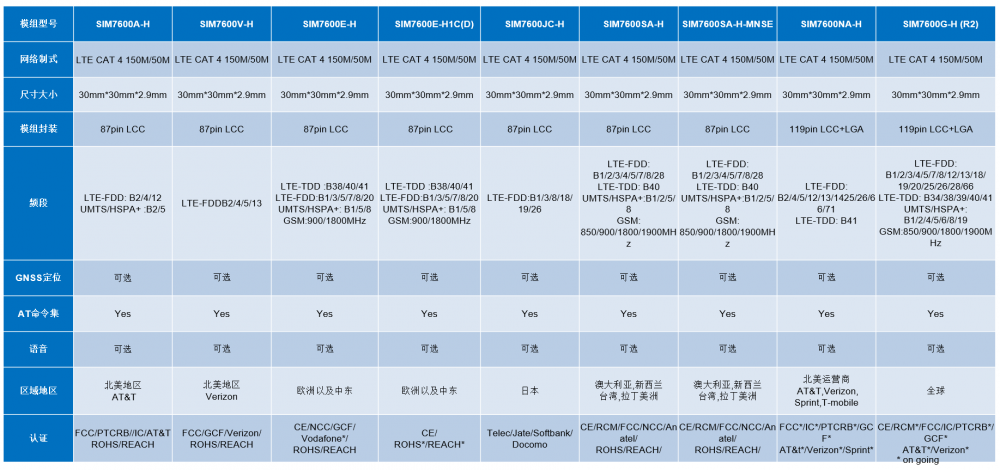
Question: What is the function of the AUX antenna, can I only connect the AUX antenna without the MAIN antenna?
1) The AUX auxiliary antenna is a diversity antenna. If the main antenna signal is poor, the receiving antenna is used to receive the signal. They are in different physical locations, so one will always be better. After connecting the diversity antenna, the bandwidth and sensitivity of the rate will be improved by about 20%.
2) It is not recommended to only use the AUX antenna. If the main antenna is damaged, you can also connect the AUX antenna to try using it. Diversity antennas allow the receiver to obtain a maximum diversity gain of up to 3 dB, but diversity antennas do not have transmission capabilities. Therefore, you need to connect the main antenna to transmit signals to the base station to register on the network, and only then will the auxiliary antenna take effect.
Question: How to determine if a module is recognized when using Linux?
You can use the following command to check if there is a Qualcomm device. If the COM driver has already been loaded (which is usually included in Raspberry Pi systems), a series of ttyUSB * will also appear:
lsusb
ls /dev/ttyUSB*

Question: What should I do if it prints some useless information after entering minicom?
Close the ModemManager process to prevent useless data from being displayed when debugging the AT serial port with minicom
sudo su
killall ModemManager
Question: What is the function of the com port for ttyUSB0-ttyUSB5 that appears under the Linux system?
The details are as follows:
1) /dev/ttyUSB0-diag port for output developing messages
2) /dev/ttyUSB1- NMEA port for GPS NMEA data output
3) /dev/ttyUSB2-AT port for AT commands
4) /dev/ttyUSB3-Modem port for ppp-dial
5) /dev/ttyUSB4-Audio port
Question: How to initialize the power-on and power-off control pins of SIM7600?
- You can initialize using the following commands:
echo "4" > /sys/class/gpio/export
echo "out" > /sys/class/gpio/gpio4/direction
echo "0" > /sys/class/gpio/gpio4/value
echo "6" > /sys/class/gpio/export
echo "out" > /sys/class/gpio/gpio6/direction
echo "0" > /sys/class/gpio/gpio6/value
- If using the Bookworm system, please use the py script to initialize the pin
Question: No response when using SIM7600X on an Arduino or other main controller?
Generally, it is the problem of baud rate, TTL level, and wiring, the details are as follows:
SIM7600X connect Arduino
Question: Can it be used without connecting USB?
- Without USB, some functions are restricted, and you can use AT command control and PPP to access the Internet at low speed using AT command control and PPP only by connecting UART through a pin header
- Because the communication speed of GPIO (UART) is very limited, if you want to achieve 4G high-speed Internet access, please connect to USB to realize point-to-point dial-up Internet access
Question: What is the P/N or SN code on this module?
SN is the manufacturer's production information, P/N is the module's version information; these codes are not fixed, used for distinguishing production information, and may vary between batches; users do not need to pay attention to them
System Firmware
Question: What should I do if the SIM820X module NDIS dial-up fails and the driver cannot be installed?
- Ensure your system kernel is 5.4 or higher. Do not use sudo update to upgrade to the latest version on Raspberry Pi, as this will upgrade the kernel version to a level higher than the current firmware, causing it to be unrecognizable.
- It is recommended to use the more convenient RNDIS dial
- You can flash the latest Raspberry Pi Raspbian system and reconfigure the NDIS dial-up
Question: If you are using WIN7 system, what should I do if the driver installation fails?
The new driver may not be compatible with some Windows 7 systems; you can try using the old driver:
- SIM7600 old driver
- SIM7600 new driver
- Follow the steps below to install the driver:
1. Download the driver: SIM7600X driver file
2. Insert the 4G HAT as shown in the hardware connection diagram above into a Windows computer (taking Windows 10 operating system as an example in the following text)
3. Ensure the module is properly powered on
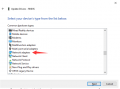
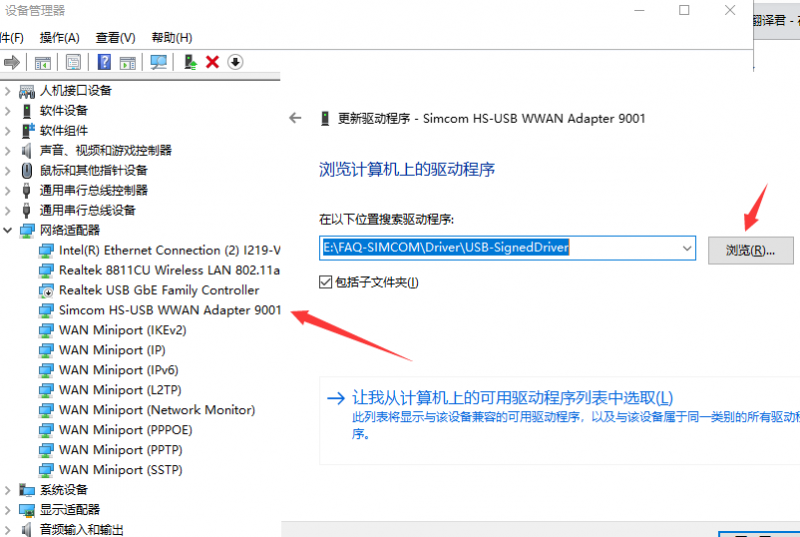
4. Open Device Manager ->Other Devices ->"SimTech,Incorporated" ->Update driver ->Browse my computer to find driver files ->Select the path where the driver files are stored based on the system ->Installation complete.

4. Install all detected devices according to the method mentioned above. The effect after installing the drivers is as follows: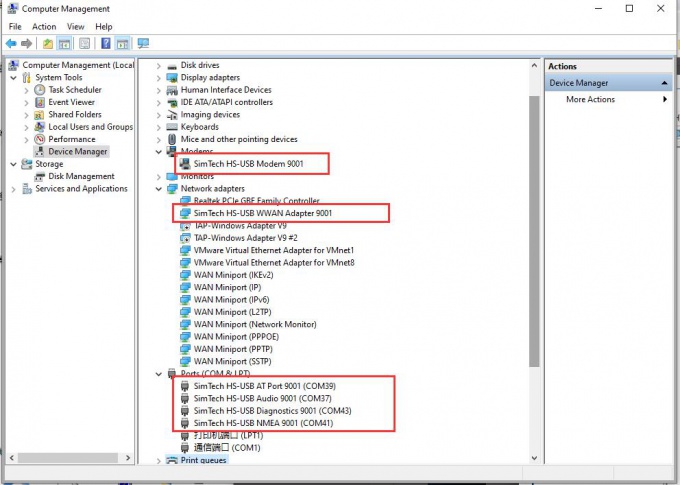
Question: How to enable a hotspot when connecting the SIM7600X to a Raspberry Pi without flashing an Openwrt image?
You can refer to the below method, detailed steps are as follows:
Question: SIM7600 firmware upgrade failed, as shown in the figure below. How to resolve it?
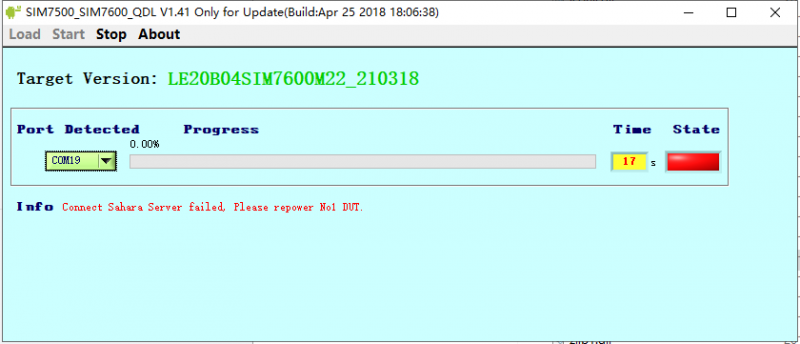
1. Pay attention to check the device manager, the upgrade process will prompt the new device inserted, and the first upgrade will not have a device driver;
2. Pay attention to the USB cable, the USB cable rate is high during the upgrade process, so you need to choose a better quality USB cable to avoid poor contact.
3. Run the upgrade tool (SIM7500_SIM7600_QDL V1.41 only for Update) with administrative privileges
4. Uninstall and reinstall the update tool (SIM7500_SIM7600_QDL V1.41 only for Update)
5. For more operation details, please refer to this video: SIM7600 firmware upgrade
Demo Code
Question: When executing the chmod 777 sim7600_4G_hat_init command, an error is reported: "chmod: cannot access 'sim7600_4G_hat_init': No such file or directory"

How to deal with it?
Please confirm that the file sim7600_4G_hat_init exists in the current directory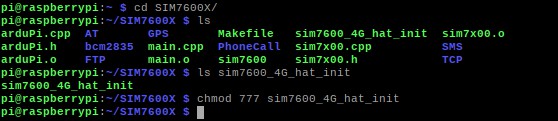
The general operation is: download the demo, unzip it, rename the c folder under the Raspberry folder to SIM7600X, and then copy the entire SIM7600X folder to the /home/pi directory on the Raspberry Pi Navigate to the /home/pi/SIM7600X directory via the command line, and then execute the chmod 777 sim7600_4G_hat_init command.
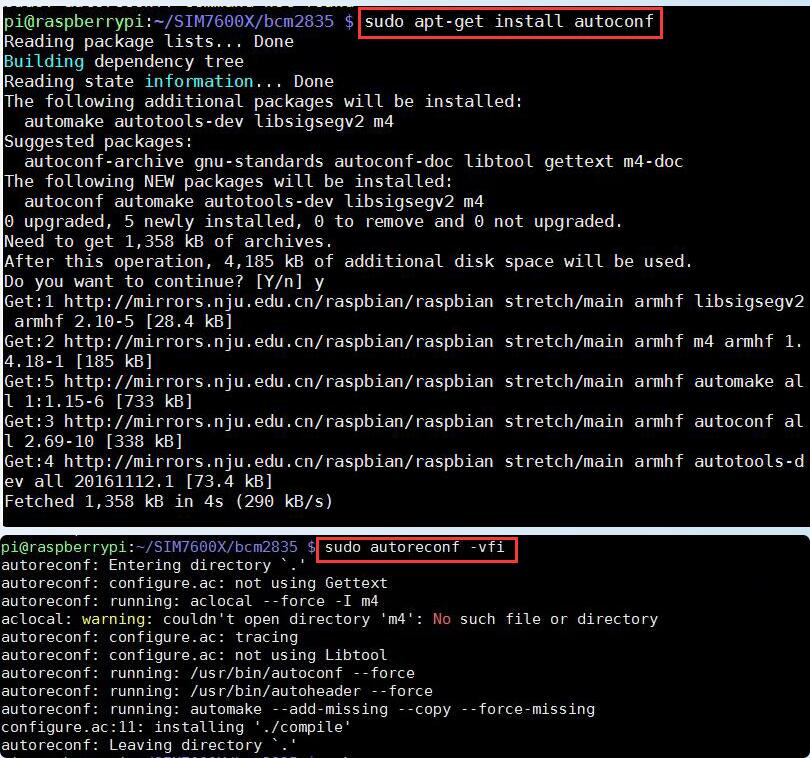
Question: An error occurred while compiling the BCM2835 library: Makefile:327:recipe for target 'aclocal.m4' failed
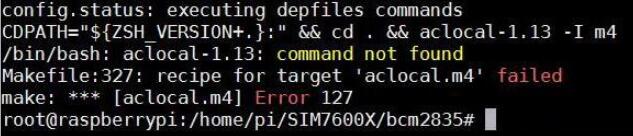
- Execute: autoreconf -vfi, then recompile, see the figure below:
Question: Can the module IP be changed?
No, modules can only be obtained passively, and the IP address cannot be actively modified
Support
[Tutorial Navigation]
- Overview
- Working with Jetson Orin
- Working with Windows
- NET Indicator Working Status Description
- Software Environment
- Dial-up Internet Access
- GNSS Control Instance
- Telephone Voice
- SMS Sending and Receiving
- Resources
- FAQ
- Question: Can the SIM7600G-H 4G for Jetson Nano be used on Nano NX or Orin nano?
- Question: Unable to access the Internet after RNDIS dialing?
- Question: Why does minicom return OK when sending an AT command but not display the sent command?
- Question: The module can be used normally when connected to a computer, but NET indicator doesn't blink when connected to Jetson Nano, and it can't connect to the Internet. What should I do?
- Question: What should I do if it prints some useless information after entering minicom?
- Question: Why doesn't the NMEA port print the corresponding GPS information after turning on GPS?
- Question: Why does it automatically print AT logs and display useless data after opening the serial port assistant on a Linux system?
- Dial-up Internet Access
- Question: What should I do if the NET indicator does not blink after the SIM7600X is turned on and dialing is abnormal?
- Question: Why can a regular SIM card that can make calls access the Internet, but an IoT SIM card (data card) cannot?
- Question: What is the difference between RNDIS, NDIS, PPP and ECM dialing methods?
- Question: Why does minicom return OK when sending an AT command but not display the sent command?
- Question: What should I do if it prints some useless information after entering minicom?
- Question: Why can't I control the module with UART on the Raspberry Pi, can't open ttyS0 through minicom, and get a prompt saying there is no ttyS0?
- Question: What if you register to the network, successfully dial and get an IP, but cannot access the Internet and cannot ping?
- Question: How to make the SIM7600X switch to IPv6 after dialing up?
- Question: Can the SIM7600X perform PPP dial-up via UART?
- Question: Why does the computer return to "NO CARRIER" after dialing the NDIS, and I can access the Internet but the network shows off?AT$QCRMCALL=1,1
- Question: Why is my dial-up Internet connection so slow?
- Question: After dialing up via SIM7600X, how to access Raspberry Pi and other motherboards via SSH ?
- Question: Can a Raspberry Pi connect to the Internet via both a network cable and Wi-Fi after it is connected to a cellular module?
- Question: Why is the network speed of the customer's SIM7600 very slow?
- Positioning Commands
- Question: What does the positioning information obtained through AT+CGPSINFO on SIM7600X represent?
- Question: What should I do if I can't receive the GPS signal and get the location information?
- Question: AT PORT did not obtain location information, the HS-USB NMEA port can, what is the issue?
- Question: Why is the positioning inaccurate, and why do the coordinates obtained differ from those found online?
- Question: How does the SIM7600X perform base station positioning? What is the command?
- Question: What are the common AT commands for the SIM7600X module, such as for reset, enabling flight mode, and querying the IP address?
- Call and SMS
- Question: Some SIM card operators require the VOLTE function to make calls. How to turn it on or off?
- Question: What are the commands for SIM7600X call recording and playback?
- Question: How many SMS messages can be saved on SIM7600CE 4G HAT?
- Question: How to set the SMS center number? (SMS center number is a kind of short message server. The SMS messages sent by cell phones need to be sent to the SMS center number first, and then forwarded to the other phone by the SMS center number, which is equivalent to an SMS relay station.)
- Question: SIM7600X SMS sending failed, prompted with +CMS ERROR? or CME ERROR and other errors
- Hardware Issues
- Question: What's the type of SIM card ?
- Question: When sending AT+CPIN?, an ERROR is returned
- Question: What is the working current when connected to the network?
- Question: What is the power consumption of SIM7600CE 4G HAT when simultaneously loaded with 4G and GPS?
- Question: What are the antenna parameters of SIM7600CE 4G HAT?
- Question: How to debug SIM7600X via USB TO UART serial port?
- Question: What are the models in the SIM7600X series?
- Question: What is the function of the AUX antenna, can I only connect the AUX antenna without the MAIN antenna?
- Question: How to determine if a module is recognized when using Linux?
- Question: What should I do if it prints some useless information after entering minicom?
- Question: What is the function of the com port for ttyUSB0-ttyUSB5 that appears under the Linux system?
- Question: How to initialize the power-on and power-off control pins of SIM7600?
- Question: No response when using SIM7600X on an Arduino or other main controller?
- Question: Can it be used without connecting USB?
- Question: What is the P/N or SN code on this module?
- System Firmware
- Question: What should I do if the SIM820X module NDIS dial-up fails and the driver cannot be installed?
- Question: If you are using WIN7 system, what should I do if the driver installation fails?
- Question: How to enable a hotspot when connecting the SIM7600X to a Raspberry Pi without flashing an Openwrt image?
- Question: SIM7600 firmware upgrade failed, as shown in the figure below. How to resolve it?
- Demo Code
- Question: When executing the chmod 777 sim7600_4G_hat_init command, an error is reported: "chmod: cannot access 'sim7600_4G_hat_init': No such file or directory"How to deal with it?
- Question: An error occurred while compiling the BCM2835 library: Makefile:327:recipe for target 'aclocal.m4' failed
- Question: Can the module IP be changed?
- Support