


- sales/support
Google Chat:---
- sales
+86-0755-88291180
- sales01
sales@spotpear.com
- sales02
dragon_manager@163.com
- support
tech-support@spotpear.com
- CEO-Complaints
zhoujie@spotpear.com
- Only Tech-Support
WhatsApp:13246739196
- Purchase/Shipping/Refund
WhatsApp:13424403025
Raspberry Pi USB 3.2 Gen1 HUB HAT User Guide
Overview
This is a driver-free 4 port USB 3.2 Gen1 Hub HAT for Raspberry Pi, provides more USB capability to your Pi, make it easy to connect more USB devices.
The HAT features a standard Raspberry Pi 40PIN GPIO extension header, when working with Raspberry Pi 4, the USB 3.2 Gen1 ports are able to provide up to 5 Gbps data rate, which means 10 times faster than USB 2.0.
Feature
- 4x USB 3.2 Gen1 ports, compatible with USB 3.0 / 2.0 /1.1
- Onboard external USB-C 5V DC power port, ensures more stable power supply
- 1x power indicator and 4x USB port indicators, easy to check the operating status
- Driver-free, plug, and play, compatible with OS including Windows, Mac OS, Linux, and Android
- Purpose-made for Raspberry Pi 4, compatible with other Raspberry Pi versions as well
- Comes with development resources and manual
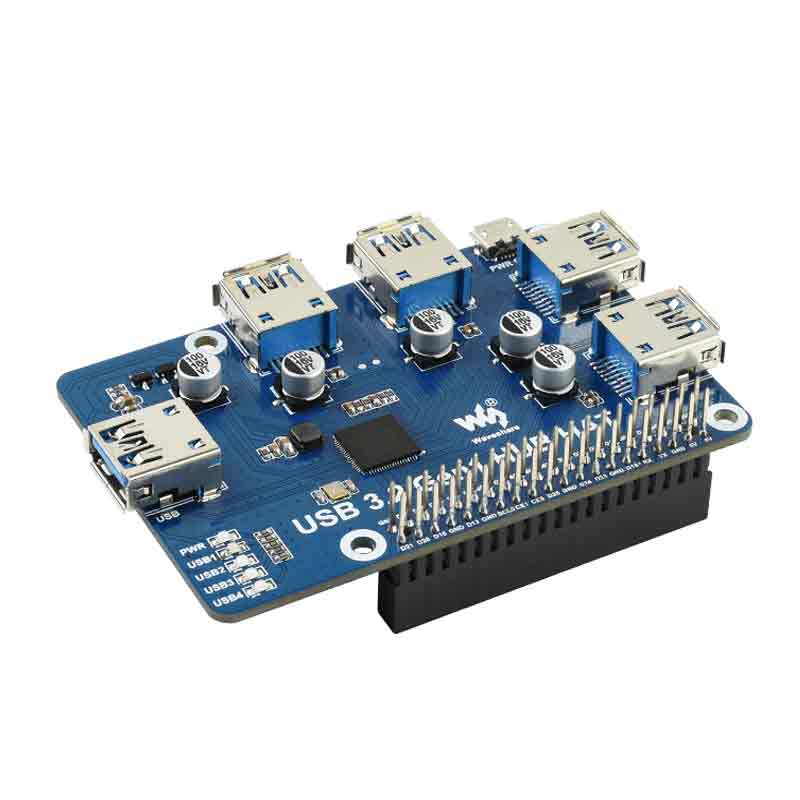
What's on board
1、Raspberry Pi GPIO : Standard Raspberry Pi 40PIN GPIO Header, customized for Raspberry Pi series boards.
2、USB 3.2 Gen1 HUB Interface: It should be connected to USB interface of the Raspberry Pi.
3、USB 3.2 Gen1 Ports: Four USB3.0 ports are extended (USB1~UBS4)
4、PWR ONLY Interface: It is used for connecting external 5V DC power supply.
5、VL817-Q7:USB HUB chip
6、MX25L512EOI-10G:FLASH chip
7、PWR: Power indicatoes.
8、USB1~USB4:Indicators of USB ports

Expected Result
Take Raspberry Pi 4B as example
- Insert the module to 40PIN GPIOof Raspberry Pi 4B. Connect the USB interface of USB HUB to Raspberry Pu by the USB 3.0 Adapter.
- Connect 5V power supply to the POWER ONLY port.
- Connect USB devices to USB ports *USB1~UBS4), the corresponding LED will turn on for indicating.
Working with Raspberry Pi
1. Hardware preparation
- Raspberry Pi 4B x1
- USB 3.2 Gen1 HUB HAT x1
- USB 3.0 Adapter x1 (You also use USB3,0 cable)
- USB 3.0 SSD x1
=2.Configure Rasberry Pi
- Enter the root directory of Pi
cd ../..
- Enter the directory of USB3.0 SSD
cd media/pi/xxx (xxx is the name of the disk)
- Free memory
sudo sh -c "sync && echo 3 > /proc/sys/vm/drop_caches"
- Copy 2G data to the SSD disk.
dd if=/dev/zero of=./test_write count=2000 bs=1024k

- Copy 2G data to the Raspberry Pi
dd if=./test_write of=/dev/null count=2000 bs=1024k

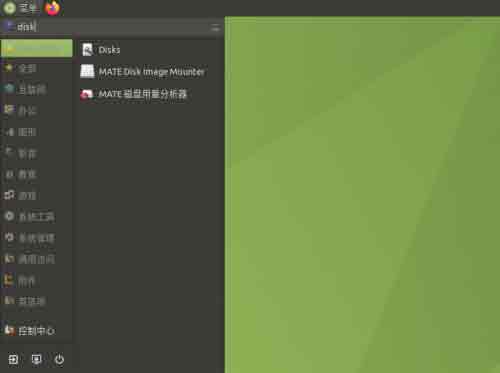
3.Working with Ubuntu (Raspberry Pi)
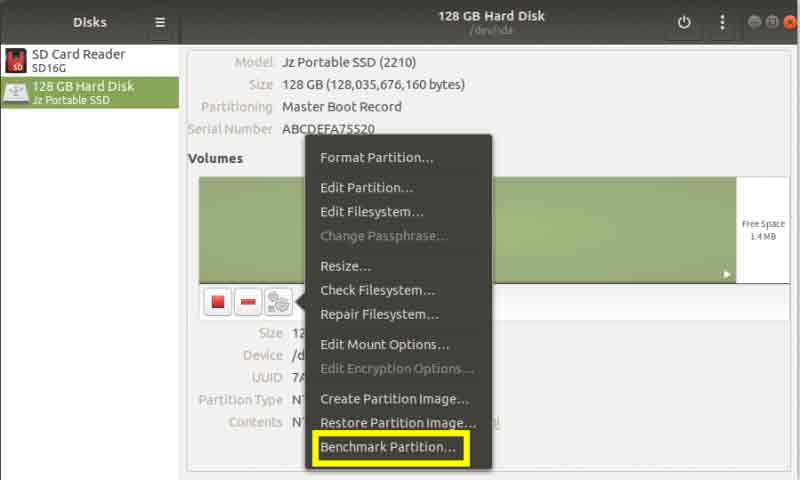
- Search disk in menu->Enter->Open the disk
- Choose the correct disk and click the Benchmark Partition option in the Menu
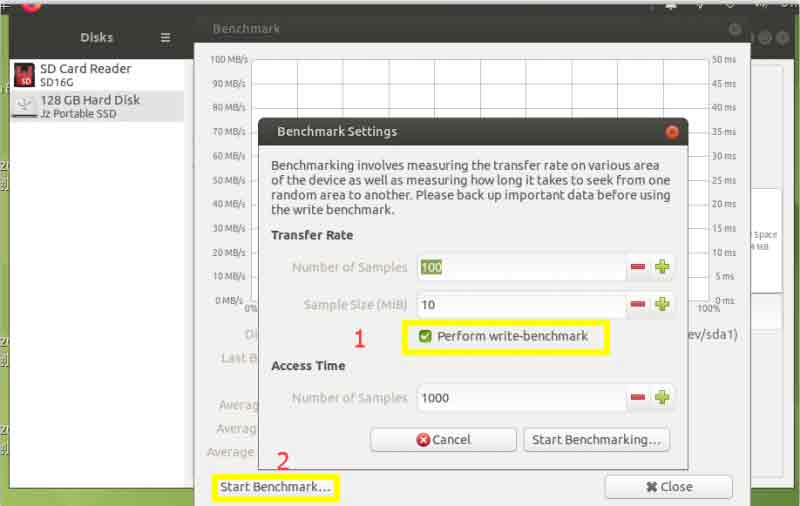
- Click Start Benchmark,Check Perform write-benchmark. and keep other default settings.
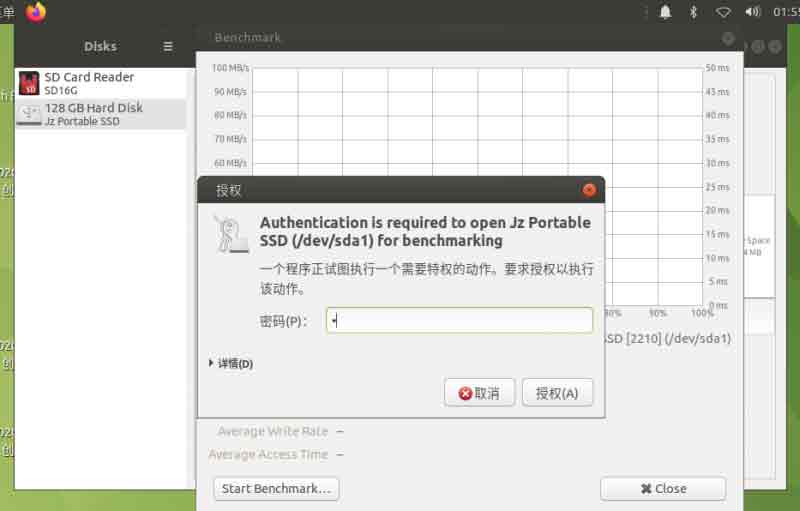
- Input the user password and authorize.
- Test

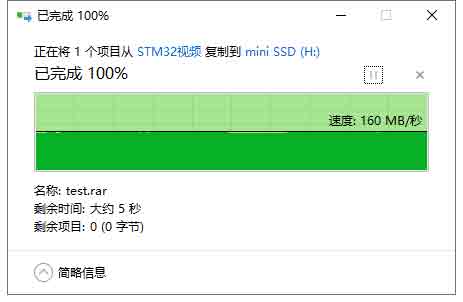
Working in Windows PC
1.Connect the USB port ot USB3.0 of PC, and you can copy file to SSD
- Copy file to the PC
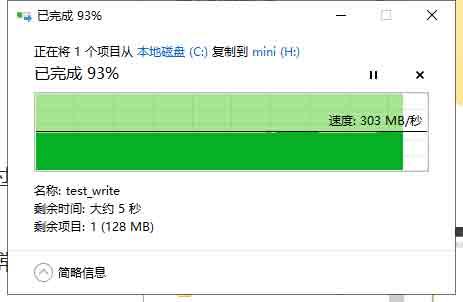
- Copy file to the portable SSD


