


- sales/support
Google Chat:---
- sales
+86-0755-88291180
- sales01
sales@spotpear.com
- sales02
dragon_manager@163.com
- support
tech-support@spotpear.com
- CEO-Complaints
zhoujie@spotpear.com
- Only Tech-Support
WhatsApp:13246739196
- Purchase/Shipping/Refund
WhatsApp:13424403025
Raspberry Pi Pico UPS Module User Guide
Overview
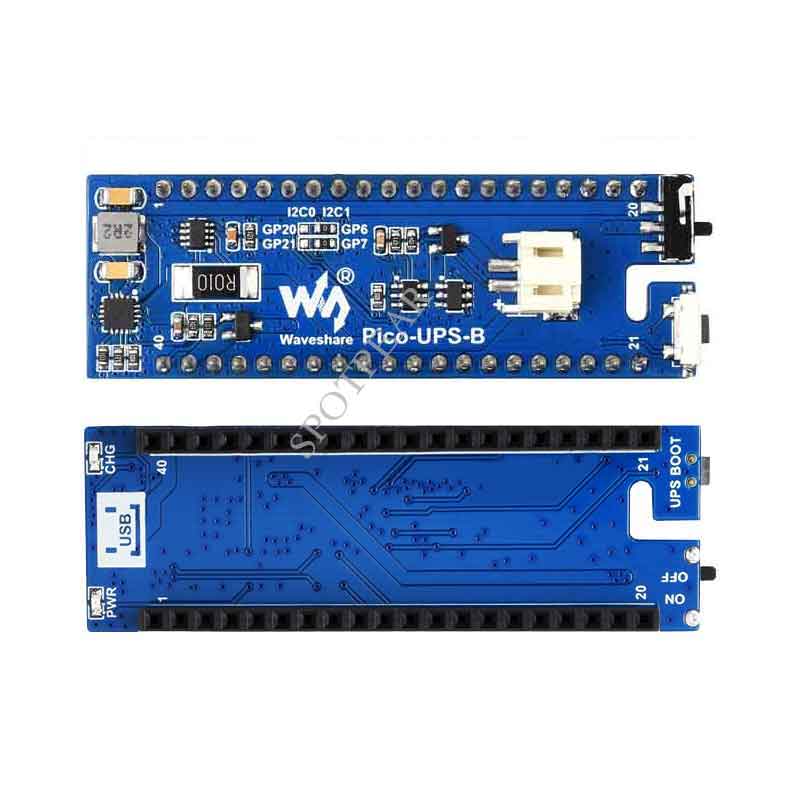
The Pico-UPS-B is a dedicated UPS (Uninterruptible Power Supply) module designed for Raspberry Pi Pico. It incorporates a Li-po battery switching charger with power path management, and a voltage/current monitoring chip that allows monitoring the battery operating status via the I2C bus. What's more, the male pin header makes it possible to "stack" other modules on top.
Features
- Standard Raspberry Pi Pico header supports Raspberry Pi Pico series boards
- Incorporates Li-po battery switching charger with dynamic power path management, more stable power supply
- I2C bus communication, monitoring the battery voltage, current, power, and remaining capacity in real-time
- Multi battery protection circuits: over charge/discharge protection, over current protection, short circuit protection, and reverse protection, more safe and stable
- Onboard recharging indicator, power indicator, easy to check the battery status
Specifications
- Recharge voltage: 5V
- Control bus: I2C
- Battery support: 600mAh 3.7V Li-po battery
- Dimensions: 60 × 21mm
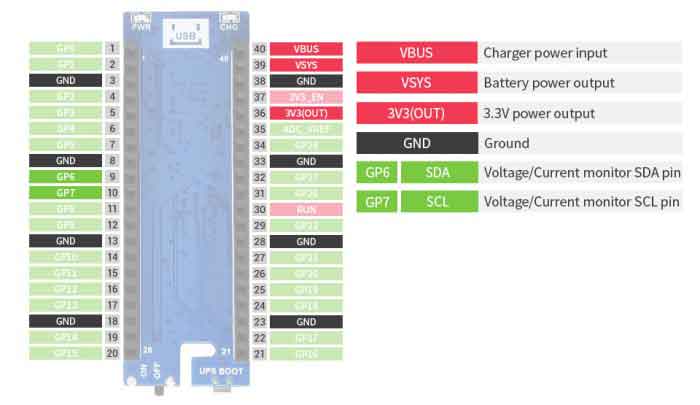
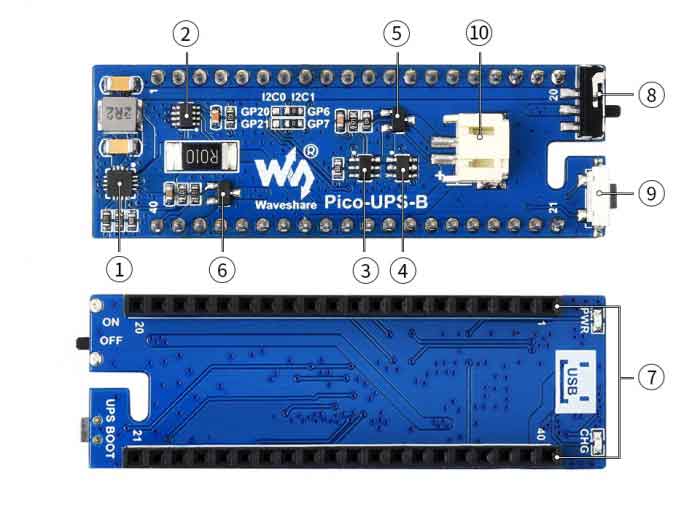
Pinout
Dimension
Setup Environment
You can refer to the guides of Raspberry Pi: https://www.raspberrypi.org/documentation/rp2040/getting-started/
Working with Raspberry Pi
- Access Raspberry Pi and open the terminal
- Download the download and unzip it to the Pico C/C++ directory. You need to follow the guides of Raspberry Pi to install SDK first.
wget -P ~/pico https://www.waveshare.com/w/upload/9/92/Pico-UPS-A.zip
cd ~/pico
unzip Pico-UPS-A.zip
C examples
- Press the BOOTSEL button of Pico and connect the Pico to your Raspberry Pi by USB cable and then release it.
- Build and run the C examples
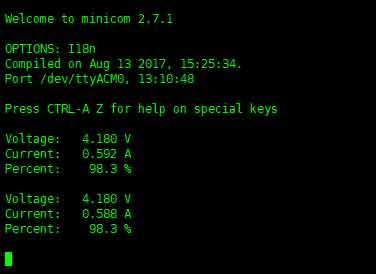
cd ~/pico/Pico-UPS-A/c/build/
cmake ..
make
sudo mount /dev/sda1 /mnt && sudo cp Pico_UPS.uf2 /mnt && sudo sync && sudo umount /mnt && sleep 2 && sudo minicom -b 115200 -o -D /dev/ttyACM0
- The expected result should be as figure below:
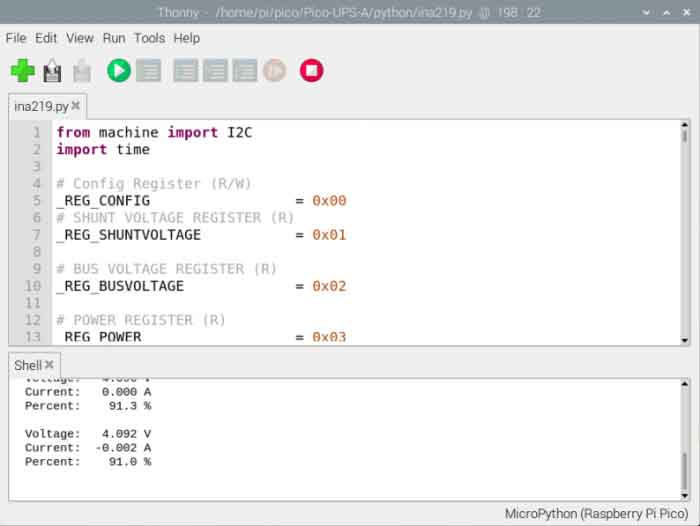
Python examples
- Access Raspberry Pi and open the Thonny.
- Open the example by the IDE and save
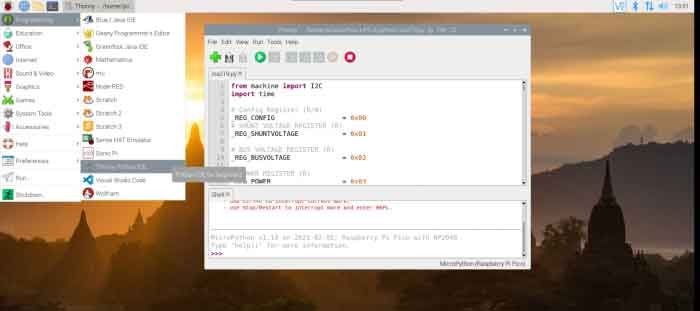
- Click the Run button to run the codes
TAG:
ESP32-S3 A7670E 4G development board supports LTE Cat-1/2G/GNSS positioning/WiFi/Bluetooth
Sipeed Lichee Tang Nano1K FPGA MINI Development Board GW1NZ-1
Raspberry Pi IR Thermal Imagi
0.85inch LCD
Type-C Power Adapter
Raspberry Pi WatchDog
Milk V Duo
ESP32-S3 GC9A01A
ESP32-S3 Development Board 4 inch LCD TouchScreen Display 480x480 RS485 /SHT20 /Relay For Arduino LVGL 86 TVbox
Raspberry Pi Mipi display
SIM8230G M2 3G/4G/5G/GNSS/GPS Sub-6G PCIe M.2 Moudle For LTE-A/NSA/SA For DFOTA /VoLTE For SIMCOM
CAM-GC2083
Raspberry Pi 5 Terminal
Spotpear
1.3inch LCD
Arduino MLX90640
2.13 inch Passive NFC e-Paper ink (G) RYBW Display Screen No Need Battery Wireless Power & Data Transfer
waveshare
Pi5
800×480
TAG:
Raspberry Pi Fisheye Camera IMX378 12.3MP 190° Wide Angle Roller shutter
DeepSeek AI Voice Chat Robot BOX ESP32-S3 Development Board 3.5 inch LCD N16R8 Touchscreen Display 6-Axis /Camera /SD
SpotPear
E-Ink
Arducam
X1200 Raspberry Pi 5 UPS
Raspberry Pi Pico 2 RP2350B 2.1 inch Round LCD Touch Display 480x480 HMI LVGL QMI8658 6-axis 65K Colors
0.49inch OLED Screen Display 64×32 SSD1315 Arduino Raspberry Pi ESP32 Pico STM32
RS232 to Ethernet
SpeedyBee BLS 60A ESC Controller Motor Driver Board DJI FPV Drone
Jetson Orin 5G/4G/3G expansion board GNSS GPS SIM8260G-M2 SIM8262E-M2
Raspberry Pi LCD display screen 1.3inch ST7789 with
ESP32-C6 WiFi 6 ESP32-C6-Zero Super-Mini ESP32-C6FH4 WiFi 6 Bluetooth 5
Lazy Keyboard
Raspberry Pi 64MP Camera
AV to TTL
Raspberry Pi 8 inch DSI MIPI LCD TouchScreen Display 8inch 800x1280 For Luckfox Lyra RK3506/ESP32-P4/Luckfox Omni3576
Raspberry Pi 5 PCIe to SSD
AI Machine Vision Kit OAK D Pro JPEG Encoder 12MP 4TOPS OpenCV Depth measurement Camera
Luckfox Omni3576 Rockchip RK3576 Core3576