


- sales/support
Google Chat:---
- sales
+86-0755-88291180
- sales01
sales@spotpear.com
- sales02
dragon_manager@163.com
- support
tech-support@spotpear.com
- CEO-Complaints
zhoujie@spotpear.com
- Only Tech-Support
WhatsApp:13246739196
- Purchase/Shipping/Refund
WhatsApp:13424403025
- HOME
- >
- ARTICLES
- >
- Common Moudle
- >
- LCD
1.8inch TFT display User Guide
Product Description
- 1.8-inch color screen,support 65K color display,display rich colors
- 128X160 resolution, clear display
- Using the SPI serial bus, it only takes a few IOs to illuminate the display
- With SD card slot for convenient function expansion
- Provide underlying libraries and rich sample programs for Arduino, C51, and STM32 platforms
- Military-grade process standards, long-term stable work
- Provide underlying driver technical support
Product Parameters
| Name | Parameter |
| Display Color | 16BIT RGB 65K color |
| SKU | MAR1801 |
| Screen Size | 1.8(inch) |
| Type | TFT |
| Driver IC | ST7735S |
| Resolution | 128*160 (Pixel) |
| Module Interface | 4-wire SPI interface |
| Backlight | 2 White Led |
| Active Area | 28.03x35.04 (mm) |
| Module PCB Size | 38.30x62.48 (mm) |
| Operating Temperature | -20℃~60℃ |
| Storage Temperature | -30℃~70℃ |
| Operating Voltage | 5V/3.3V |
| Power Consumption | TBD |
| Rough Weight(Package containing) | 18 (g) |
Interface Definition
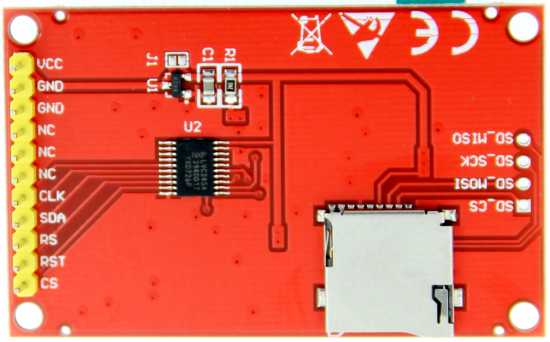
| Serial number | Pin label | Description |
| 1 | VCC | LCD power supply positive (3.3V ~ 5V) |
| 2 | GND | LCD power supply |
| 3 | GND | LCD power supply |
| 4 | NC | None definition, retain |
| 5 | NC | None definition, retain |
| 6 | NC | None definition, retain |
| 7 | CLK | LCD screen SPI bus clock signal |
| 8 | SDA | LCD screen SPI bus write data signal |
| 9 | RS | LCD register / data selection signal, low level: register, high level: data |
| 10 | RST | LCD recharge signal, low level reset |
| 11 | CS | LCD screen selection signal, low level enable |
Connection Arduino
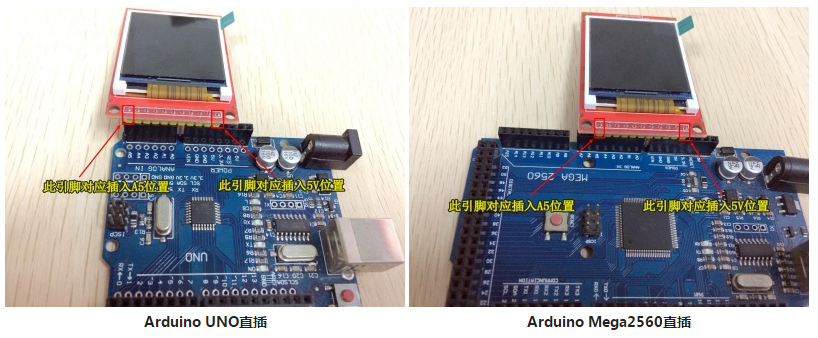
How to use on Arduino
- Step 1: Download the test program
- Download the Arduino test program from the program download bar
- For related test program descriptions, please refer to the test program description documents in the program package
- Step 2: Connect the Arduino development board
- Plug the module straight into the Arduino development board
- After the module is plugged in, power on the Arduino development board
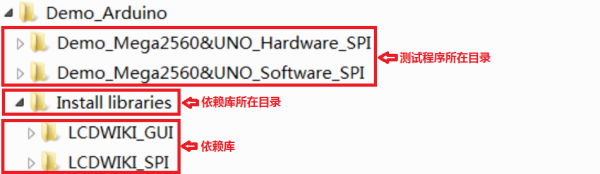
- Step 3: Copy dependent libraries
- Make sure that Arduino IDE has been installed on the computer (if not installed: Arduino IDE download website)
- After installing the Arduino IDE, you need to copy the dependent libraries to the Arduino project directory, as follows:
- (1) Unzip the downloaded test package
- (2) Copy the dependent libraries in the Install libraries directory of the program package (as shown in the figure below) to the libraries folder of the Arduino project directory (Arduino project directory)
- Step 4: Compile and download the program to the development board
- Open the sample to be tested in the Example directory of the package, compile and download (compile and download)
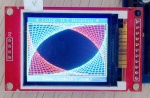
- Step 5: Observe the operation of the program
- After the program is downloaded, run it directly and observe the running status. If it can be displayed normally, the program has run successfully, as shown in the following figure (take the colligate_test test program as an example):

TAG:
Jetson Nano
Arduino IR Thermal Imaging Camera
Raspberry Pi RTC WatchDog HAT (B) Real time clock Onboard DS3231SN High Precision RTC Chip
Raspberry Pi Industrial 10.1 inch DSI LCD HMI TouchScreen MIPI Display 1280x800 10.1inch One-Body PC With Front Camera For Pi 4/5
ADXL354C Development Board
Raspberry Pi UPS
Arduino 1.54inch OLED
ESP32-S3 Industrial 8-CH Relay IOT LAN WiFi /Bluetooth /RS485 /RJ45 Ethernet /POE
ESP32 1.44inch LCD
7.5 inch Passive NFC e-Paper BW Display 7.5inch E-ink Screen No Need Battery Wireless Powered Data Transfer
JETSON-IO-BASE-A
ESP32 S3 Development Board 1.85 inch Round LCD Display 360×360 QMI8658 Sensor / MIC / SD /MP3 Audio /Battery Port LVGL/HMI For Arduino
Raspberry Pi Pico 2 RP2350B 3.49-inch capacitive TouchCcree 3.49inch LCD display development board 172×640
Raspberry Pi Pico 2 RP2350 2.8 inch LCD Capacitive TouchScreen Development Board 240x320 Display QMI8658 6-Axis /PCM5101 Audio /SD /RTC /Battery Port
Raspberry Pi 5 Case
Raspberry Pi 10.1 inch QLED Quantum Dot Display 1280x720 Capacitive Touchscreen For Computer PC/Jetson/Game
Sipeed NanoKVM-USB Finger-sized 4K USB KVM for Server/SBCs
GPU Monitor Display
Raspberry Pi AF Camera
CAN FD
TAG:
Spotpear
ESP32‑S3 LoRa Development Board with LR1121 3rd Generation RF Chip USB Stamp Hole
Raspberry Pi 8.8 inch DSI MIPI LCD TouchScreen Display 8.8inch 480x1920 For Luckfox Lyra RK3506/ESP32-P4/Luckfox Omni3576
Arduino MEGA2560 R3
ESP32-S3 GC9A01A
Mini TOF Time-of-Flight Laser Ranging Radar Sensor Compatible with Arduino Raspberry Pi ESP32 and Pico
ESP32 1.54 inch ePaper Watch
AI Board
ESP32-S3 7inch LCD Display 7 inch TouchScreen 7B 1024×600 N16R8 CAN RS485 Sensor
Raspberry Pi 15.6 inch TypeC Monitor DisplayScreen Computer PC 1920x1080
EchoEar 3D Printed Rotating Cat Case Shell For Xiaozhi AI 1.85 inch LCD
Jetson Nano Cooler
NVIDIA Jetson
Raspberry Pi 5
Raspberry Pi Compute Module 5 CM5 IO Board
Pi5 Pure-Copper Active Cooler
Raspberry Pi 1.5inch LCD
Radxa-Zero
Raspberry Pi 5 Official Original PCIe to M.2 NVMe SSD HAT+ Board Pi5
ESP32 C6 AI 1.54inch Development Board 1.54 inch TouchScreen Display DeepSeek