


- sales/support
Google Chat:---
- sales
+86-0755-88291180
- sales01
sales@spotpear.com
- sales02
dragon_manager@163.com
- support
tech-support@spotpear.com
- CEO-Complaints
zhoujie@spotpear.com
- Only Tech-Support
WhatsApp:13246739196
- Purchase/Shipping/Refund
WhatsApp:13424403025
- HOME
- >
- ARTICLES
- >
- Common Moudle
- >
- LCD
LCD1602-I2C-Module User Guide
Overview
Introduction
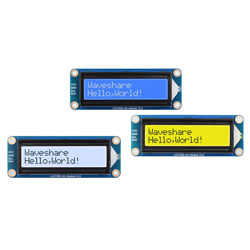
- Our LCD1602 module is controlled via the I2C protocol and is available for platforms such as Raspberry Pi, Raspberry Pi Pico, ESP32, Arduino and Jetson nano. Compared to traditional parallel interfaces, I2C greatly simplifies wiring and saves GPIO pins, making it ideal for embedded projects and rapid prototyping design.
- The display has three optional backlight colors: blue, green, and gray, and users can choose the appropriate background color according to their needs to enhance the display effect or match the project theme.
Features
- I2C interface, only two wires are needed for direct control, making it easy to connect to multiple control boards
- Up to 16 X 2 characters can be displayed, supporting functions such as screen scrolling and cursor movement
- Exquisite appearance, fine workmanship, high integration design, stable performance, compact size of 87 * 32 * 13 (mm)
- Onboard AiP31068L LCD driver and SN3193 backlight driver IC
- Complete supporting materials and manuals (demos / user manuals)
Specifications
| Parameter Name | Parameter |
| Operating Voltage | 3.3V/5V |
| Operating Current | 5V: 26mA |
| 3.3V: 13mA | |
| Communication Interface | I2C |
| I2C Address | LCD: 0x7C |
| LED: 0x6B | |
| Screen Type | LCD |
| Controller Chip | LCD: AiP31068L |
| LED: SN3193 | |
| Dimensions | 87.0 x 32.0 x 13.0 (mm) |
Pinout Definition
| Pin | Description |
| VCC | 3.3V/5V power positive |
| GND | Ground |
| SCL | I2C clock pin |
| SDA | I2C data pin |
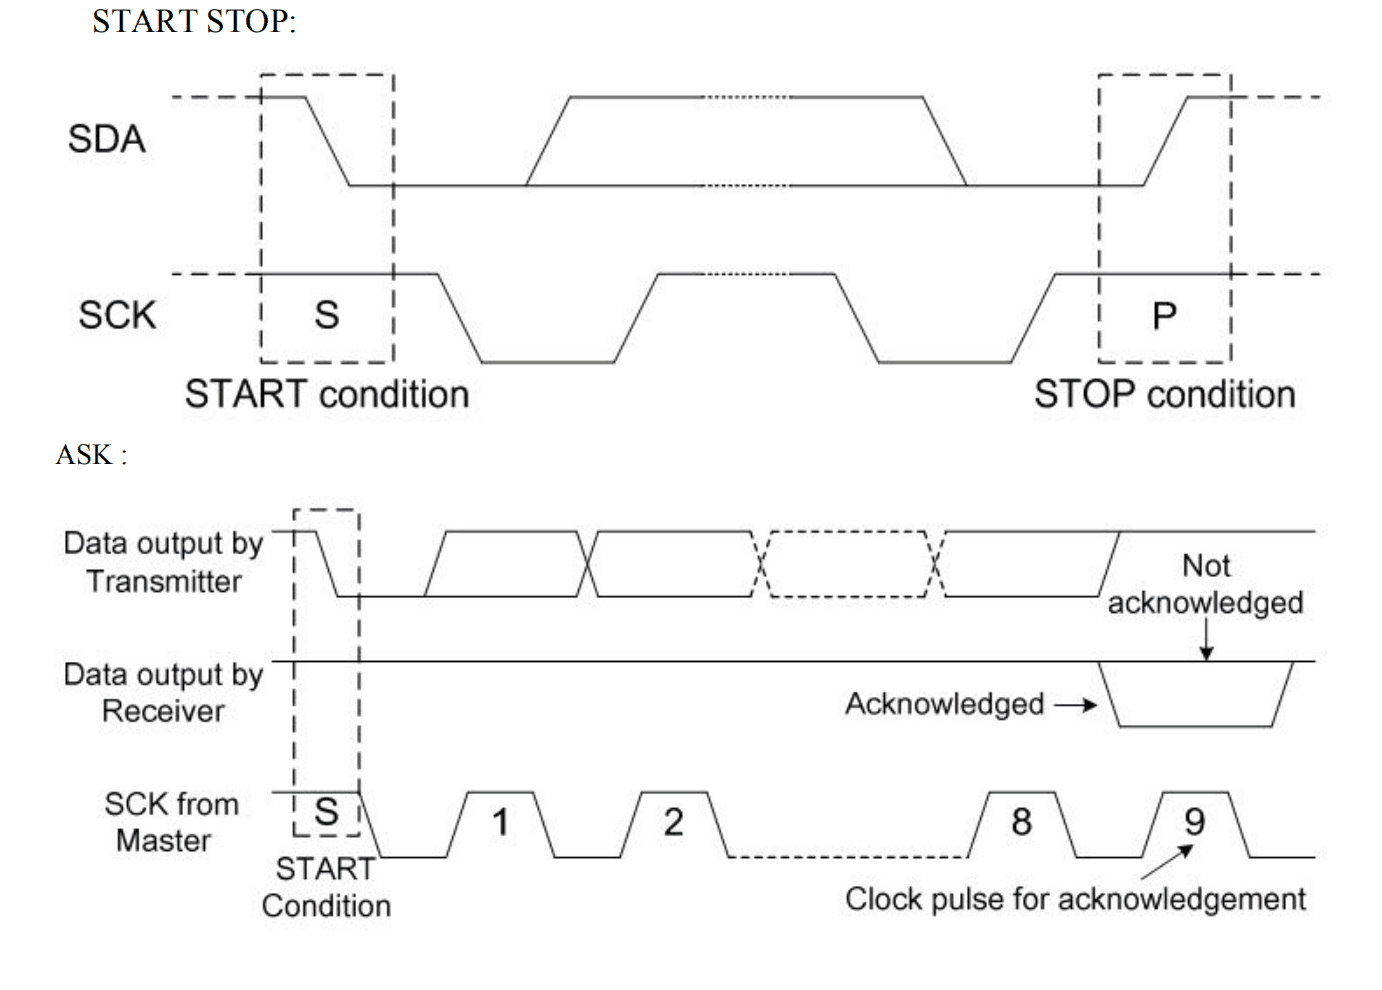
Communication Protocol
Usage Instructions
- LCD1602 I2C Module currently provides 5 main control examples, including both C and Python. You can choose the appropriate example for reference according to project
Working with Raspberry Pi
- Prepare a Raspberry Pi that can start normally, if it doesn't, please refer to the official Startup Tutorial
- After entering the system, run the following command to turn on the I2C device:
sudo raspi-config nonint do_i2c 0
Hardware Connection
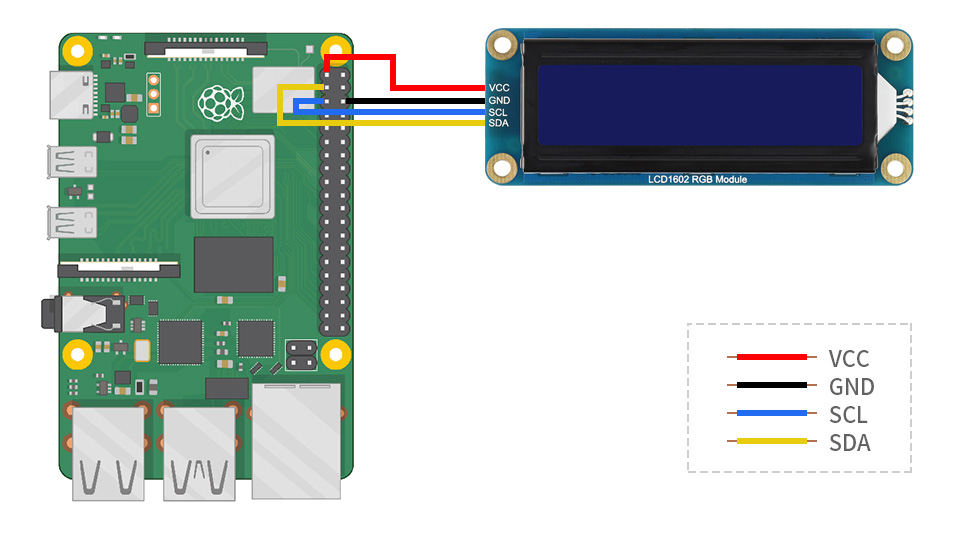
When connecting the Raspberry Pi, choose to use a 4PIN cable. Please refer to the pin correspondence table below
We are using a pin or PH2.0 4PIN interface, please refer to the following table for wiring
| LCD | Raspberry Pi | |
| BCM2835 encoding | Board physical pin number | |
| VCC | 3.3V | 3.3V |
| GND | GND | GND |
| SCL | SCL.1 | 5 |
| SDA | SDA.1 | 3 |
Take the LCD1602 Module using the PH2.0 4PIN interface as an example, and connect it to the Raspberry Pi according to the above table: (Please connect according to the pin definition table. The color of the wiring in the diagram is for reference only, and the actual color shall prevail.)
Demos
C
【Install the library and download the demo】
- wiringpi
cd ~
git clone https://github.com/WiringPi/WiringPi.git
cd WiringPi/
./build debian
mv debian-template/wiringpi-3.0-1.deb .
sudo apt install ./wiringpi_3.10_arm64.deb
- lgpio
cd ~
wget https://files.waveshare.com/wiki/LCD1602-I2C-Module/Lg-master.zip
unzip Lg-master.zip
cd lg-master
make
sudo make install
- Download the demo, unzip and compile it
cd ~
wget https://files.waveshare.com/wiki/LCD1602-I2C-Module/LCD1602_I2C_Module_Demo.zip
unzip LCD1602_I2C_Module_Demo.zip
cd ~/LCD1602_I2C_Module_code/Raspberry/c
sudo make
【Run Character display demo】
- Character display
cd ~/LCD1602_I2C_Module_code/Raspberry/c
sudo ./main 1
【Run Custom char demo】
- Custom char
cd ~/LCD1602_I2C_Module_code/Raspberry/c
sudo ./main 2
【Run Direction control demo】
- Direction control
cd ~/LCD1602_I2C_Module_code/Raspberry/c
sudo ./main 3
【Run Display time demo】
- Display time
cd ~/LCD1602_I2C_Module_code/Raspberry/c
sudo ./main 4
【Run Scroll display demo】
- Scroll display
cd ~/LCD1602_I2C_Module_code/Raspberry/c
sudo ./main 5
Python
【Install the library and download the demo】
- python
sudo apt install python3-smbus
- Download the demo, unzip and compile it
cd ~
wget https://files.waveshare.com/wiki/LCD1602-I2C-Module/LCD1602_I2C_Module_Demo.zip
unzip LCD1602_I2C_Module_Demo.zip
cd ~/LCD1602_I2C_Module_code/Raspberry/python/examples
【Run Character display demo】
- Character display
sudo python Character_display.py
【Run Custom char demo】
- Custom char
sudo python Custom_char.py
【Run Direction control demo】
- Direction control
sudo python Direction_control.py
【Run Display time demo】
- Display time
sudo python Display_time.py
【Run Scroll display demo】
- Scroll display
sudo python Scroll_display.py
Working with Pico
Environment Setup
- Please click Pico Getting Started for environmental settings.
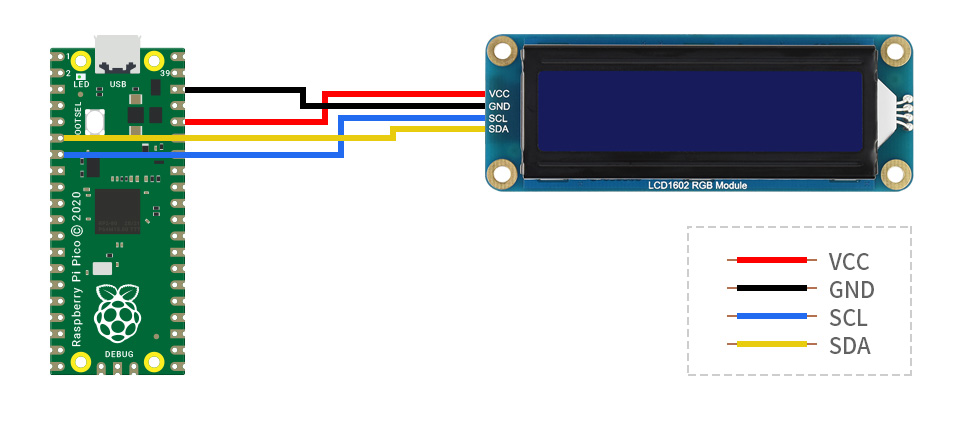
Hardware Connection
| Module Interface | Pico Pin |
| VCC | 3.3V |
| GND | GND |
| SCL | GP5 |
| SDA | GP4 |
The physical connection diagram is as follows
Demos
- Download the Demo and unzip it
- The following usage methods can only be implemented when the development environment is saved normally.
C
- Go to the folder *\LCD1602_I2C_Module_Demo\Pico\c, use vs code to open all files, and wait for the environment to load the tool
- Start compiling and running the demo after loading
【Main function description】
- There are five examples in the main function, and you can switch between different demos by commenting/uncommenting these lines
【Demo flashing】
- Put the Pico device into boot disk mode by pressing the boot button to connect to the computer and then releasing the boot button
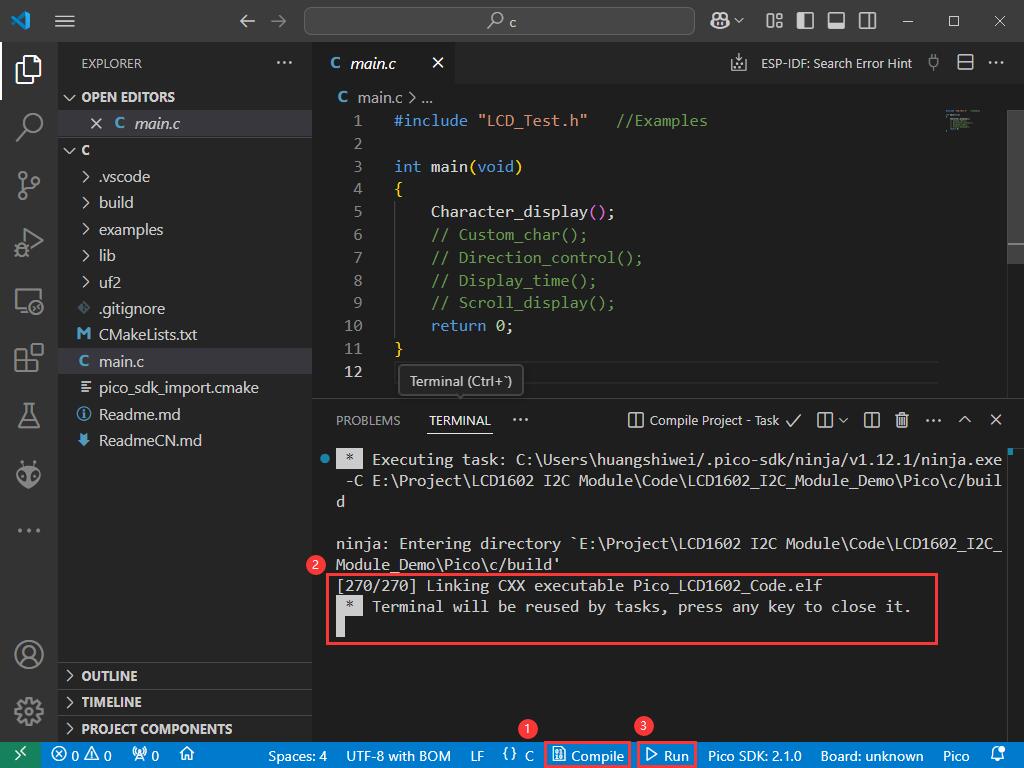
- Compile, flash, and run as shown in the figure:
- Click (1) to start compiling
- If ② appears, the compilation is successful
- Click (3) to flash (if you do not enter the boot disk, you will get an error when flashing: No accessible RP-series devices in BOOTSEL mode were found.)
Micropython
【Flash Micropython firmware】
- Put the Pico device into boot disk mode by pressing the boot button to connect to the computer and then releasing the boot button
- Go to the folder *\LCD1602_I2C_Module_Demo\Pico\python and copy the uf2 firmware of the corresponding device to the boot disk
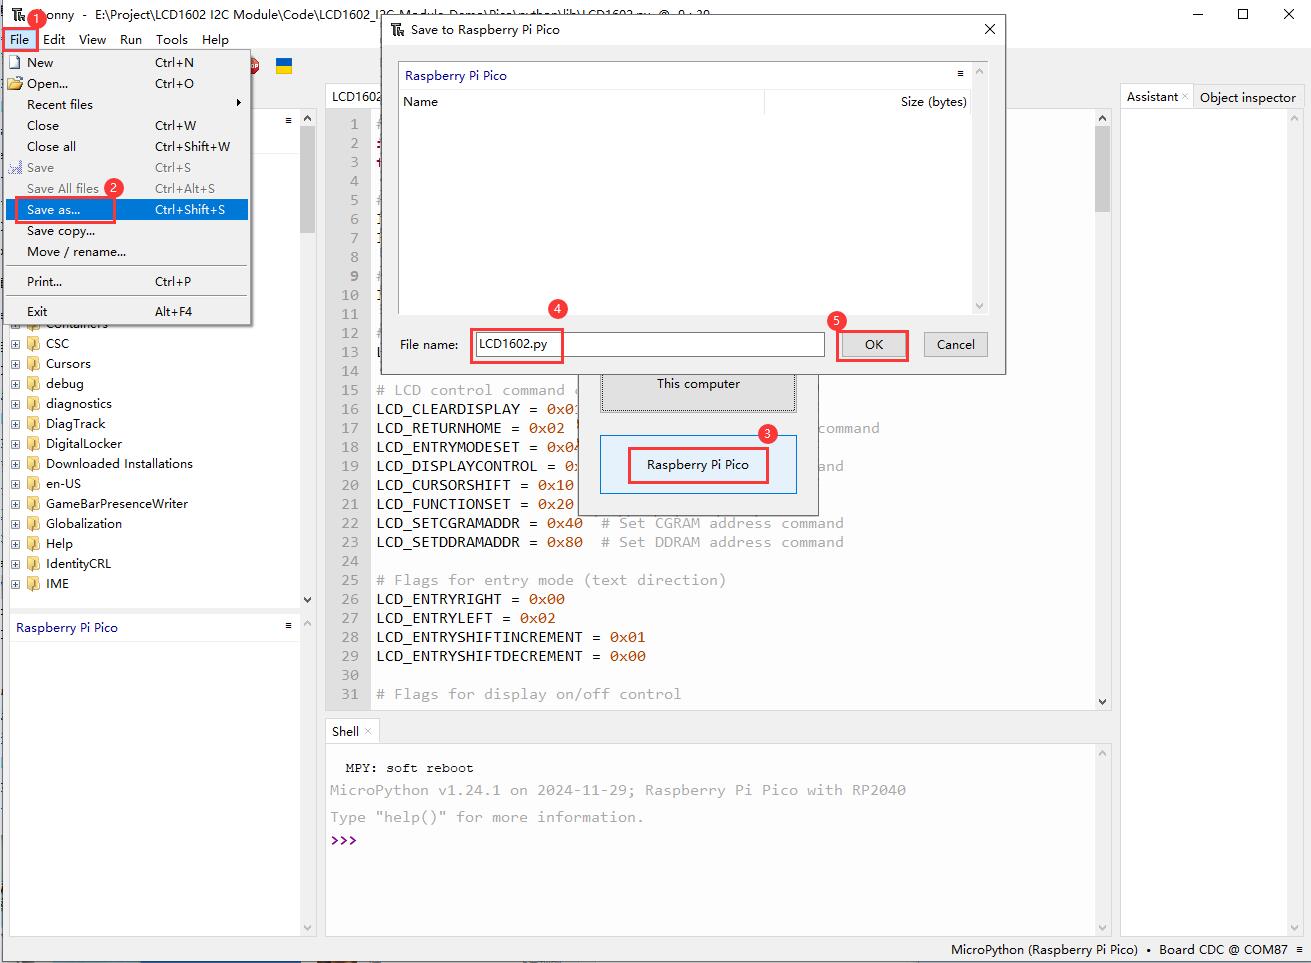
【Save driver library】
- Open Thonny, connect to pico device
- Open the LCD1602.py file in *\LCD1602_I2C_Module_Demo\Pico\python\lib, and save it to pico
- The specific steps are as follows:
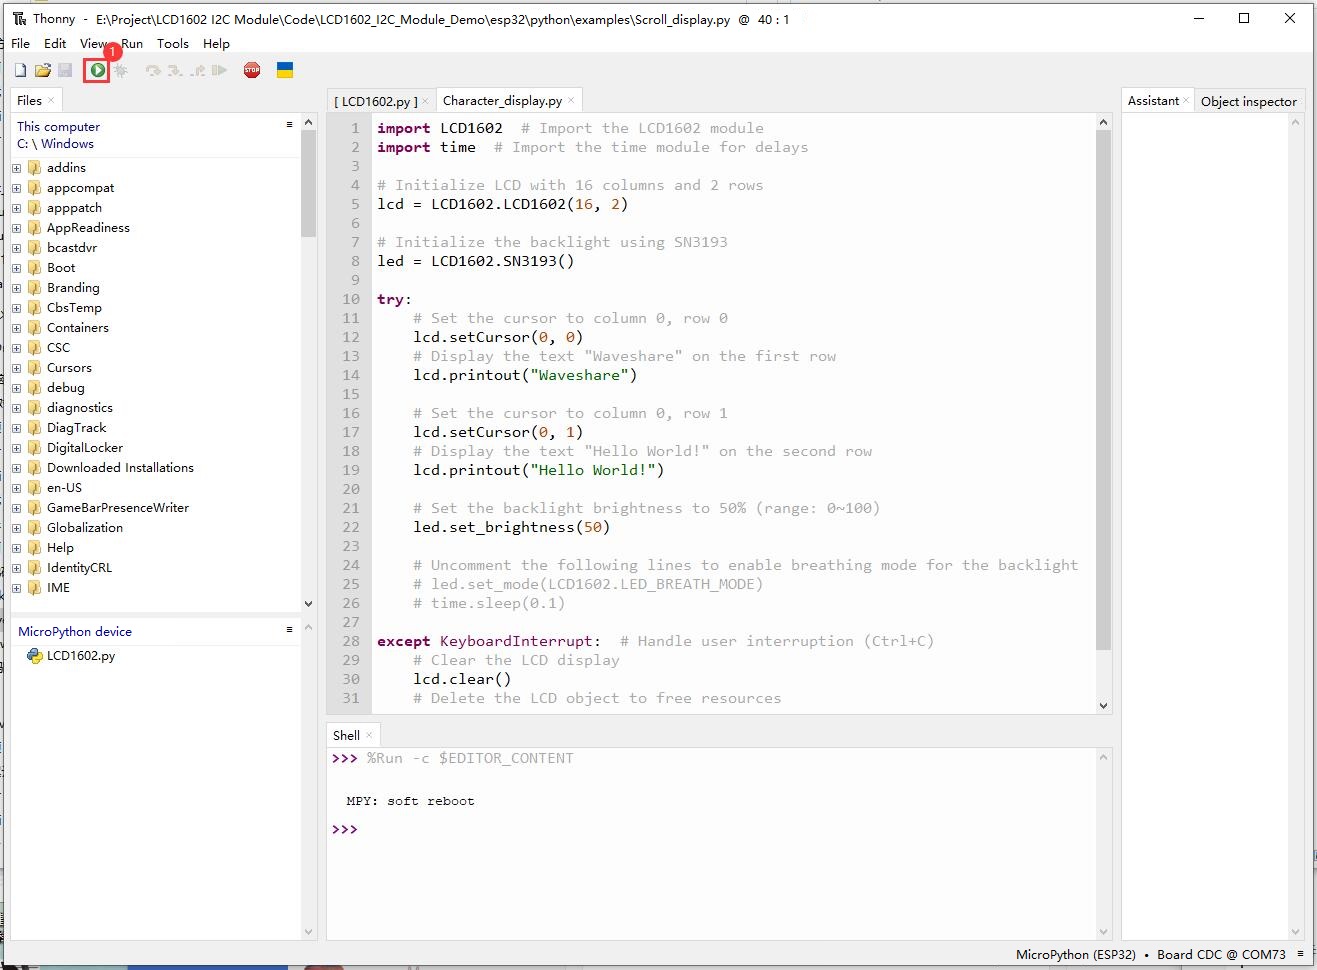
【Run demo】
- Use thonny to open the demo in *\LCD1602_I2C_Module_Demo\esp32\python\examples file, and run it as follows:
Arduino-Pico
【Install library】
- Go to the folder *\LCD1602_I2C_Module_Demo\Pico\arduino, copy the files inside to the libraries folder of the project folder. If you are still unsure, you can refer to this link
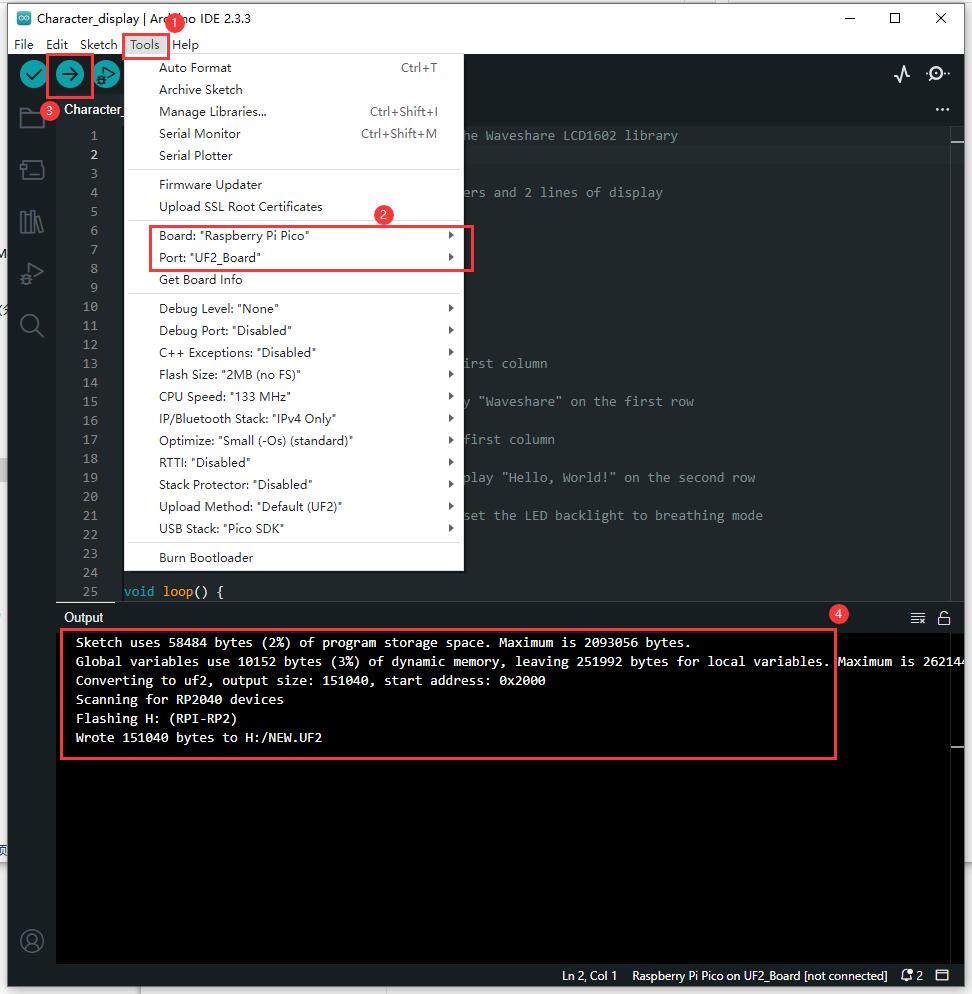
【Run demo】
- Put the Pico device into boot disk mode by pressing the boot button to connect to the computer and then releasing the boot button
- Use Arduino IDE to open the demo in *\LCD1602_I2C_Module_Demo\Pico\arduino\Waveshare_LCD1602\examples file
- The specific steps are as follows:
- ① and ② are for choosing the corresponding development board model and port
- ③ Compile and flash
- ④ Flashing completed
Working with Arduino
- Install Arduino IDE, click this link to download the development software for your system
- If it is UNO R4, refer to the tutorial here for installation: link
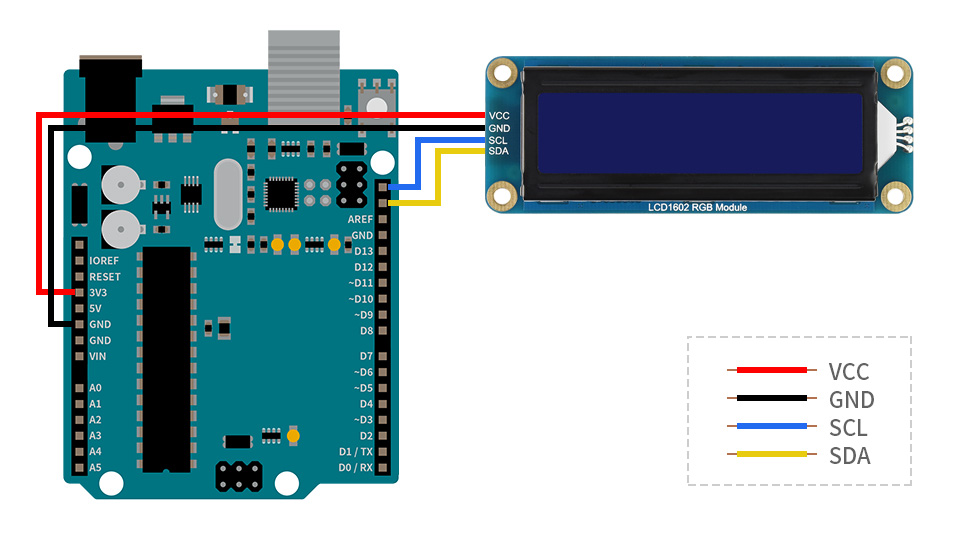
Hardware Connection
| Module Interface | Arduino Pin |
| VCC | 5V/3.3V |
| GND | GND |
| SCL | SCL |
| SDA | SDA |
The physical connection diagram is as follows
Demos
【Install library】
- Go to the folder *\LCD1602_I2C_Module_Demo\Arduino, copy the files inside to the libraries folder of the project folder. If you are still unsure, you can refer to this link
【Run demo】
- Use Arduino IDE to open the demo in *\LCD1602_I2C_Module_Demo\Arduino\Waveshare_LCD1602\examples file
- The specific steps are as follows:
- ① and ② are for choosing the corresponding development board model and port
- ③ Compile and flash
- ④ Flashing completed
Working with ESP32
Environment Setup
- Arduino environment setup reference: Click to view
- Micropython environment setup reference: Click to view
- To flash the firmware of Micropython, you need to use the corresponding ESP32 development board. I use ESP32S3 here, and store it here: *\LCD1602_I2C_Module_Demo\esp32\python\bin
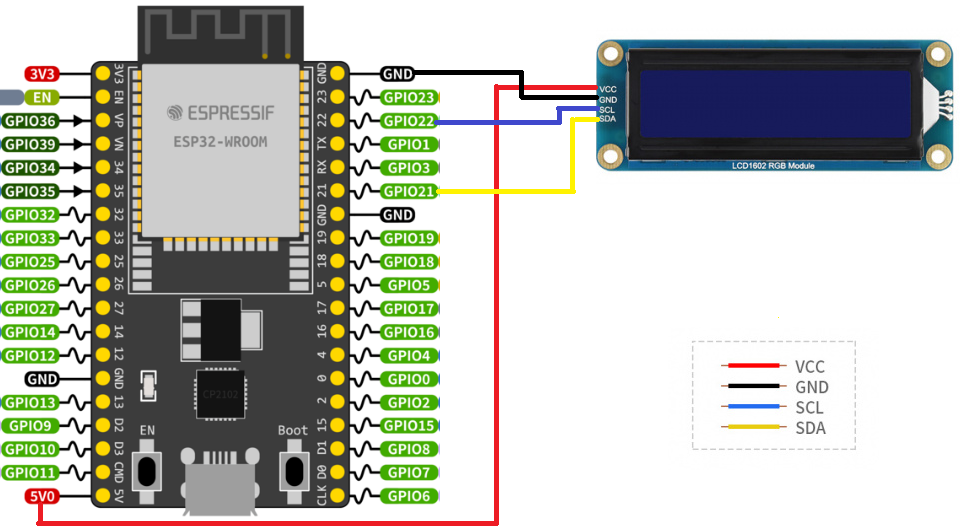
Hardware Connection
When connecting the ESP32, choose to use a 4PIN cable. Please refer to the pin correspondence table below
We are using a pin or PH2.0 4PIN interface, please refer to the following table for wiring
| LCD | ESP32 | |
| Pin number | ||
| VCC | 5V/3.3V | |
| GND | GND | |
| SCL | GPIO5 | |
| SDA | GPIO4 | |
Take the LCD1602 Module using the PH2.0 4PIN interface as an example, and connect it to the ESP32 according to the above table: (Please connect according to the pin definition table. The color of the wiring in the diagram is for reference only, and the actual color shall prevail.)
Connect to ESP32 as shown in the figure.
Demos
Arduino-ESP32
【Install library】
- Go to the folder *\LCD1602_I2C_Module_Demo\esp32\arduino, copy the files inside to the libraries folder of the project folder. If you are still unsure, you can refer to this link
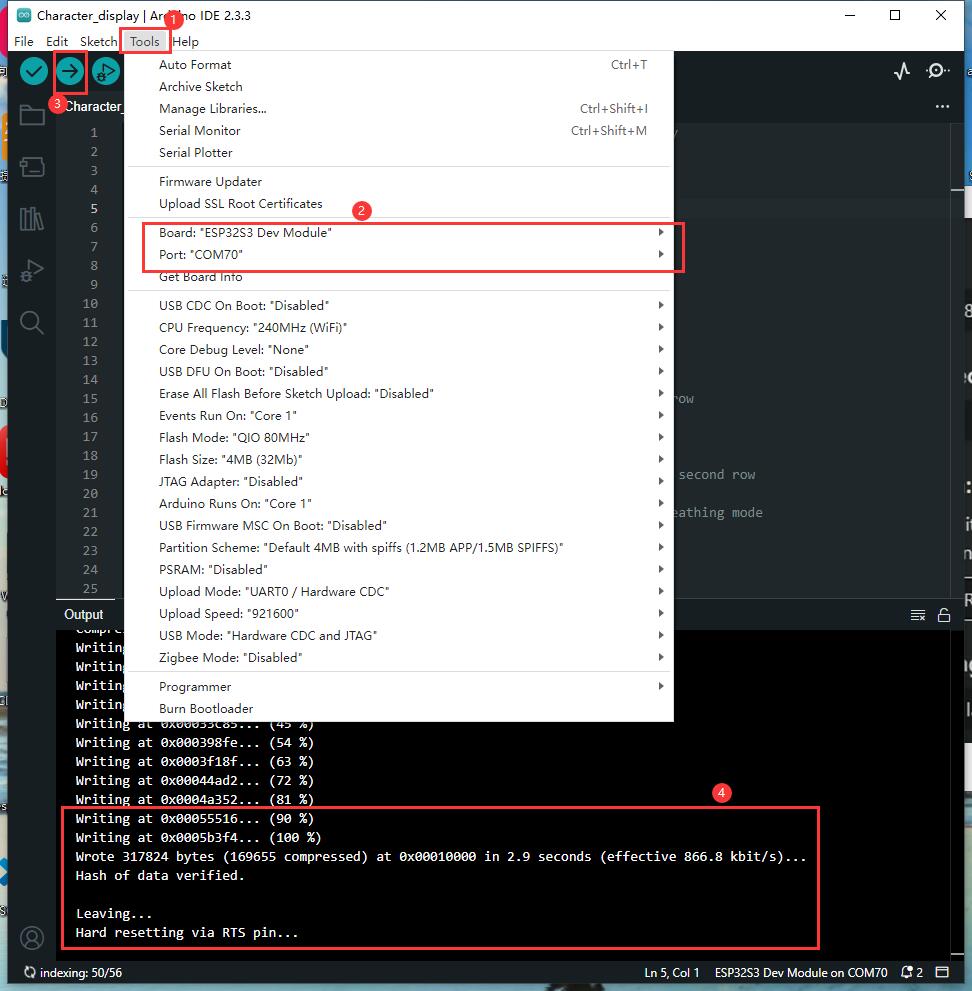
【Run demo】
- Use Arduino IDE to open the demo in *\LCD1602_I2C_Module_Demo\esp32\arduino\Waveshare_LCD1602\examples file
- The specific steps are as follows:
- ① and ② are for choosing the corresponding development board model and port
- ③ Compile and flash
- ④ Flashing completed
Micropython
【Flash Micropython firmware】
- Download the corresponding firmware from Micropython official website
- If using ESP32S3, you can directly use the firmware we provide, the path:
*\LCD1602_I2C_Module_Demo\esp32\python\bin
- For the tutorial on flashing firmware, please refer to Flash Firmware Flashing and Erasing tutorial
- Note: The download address is 0x00
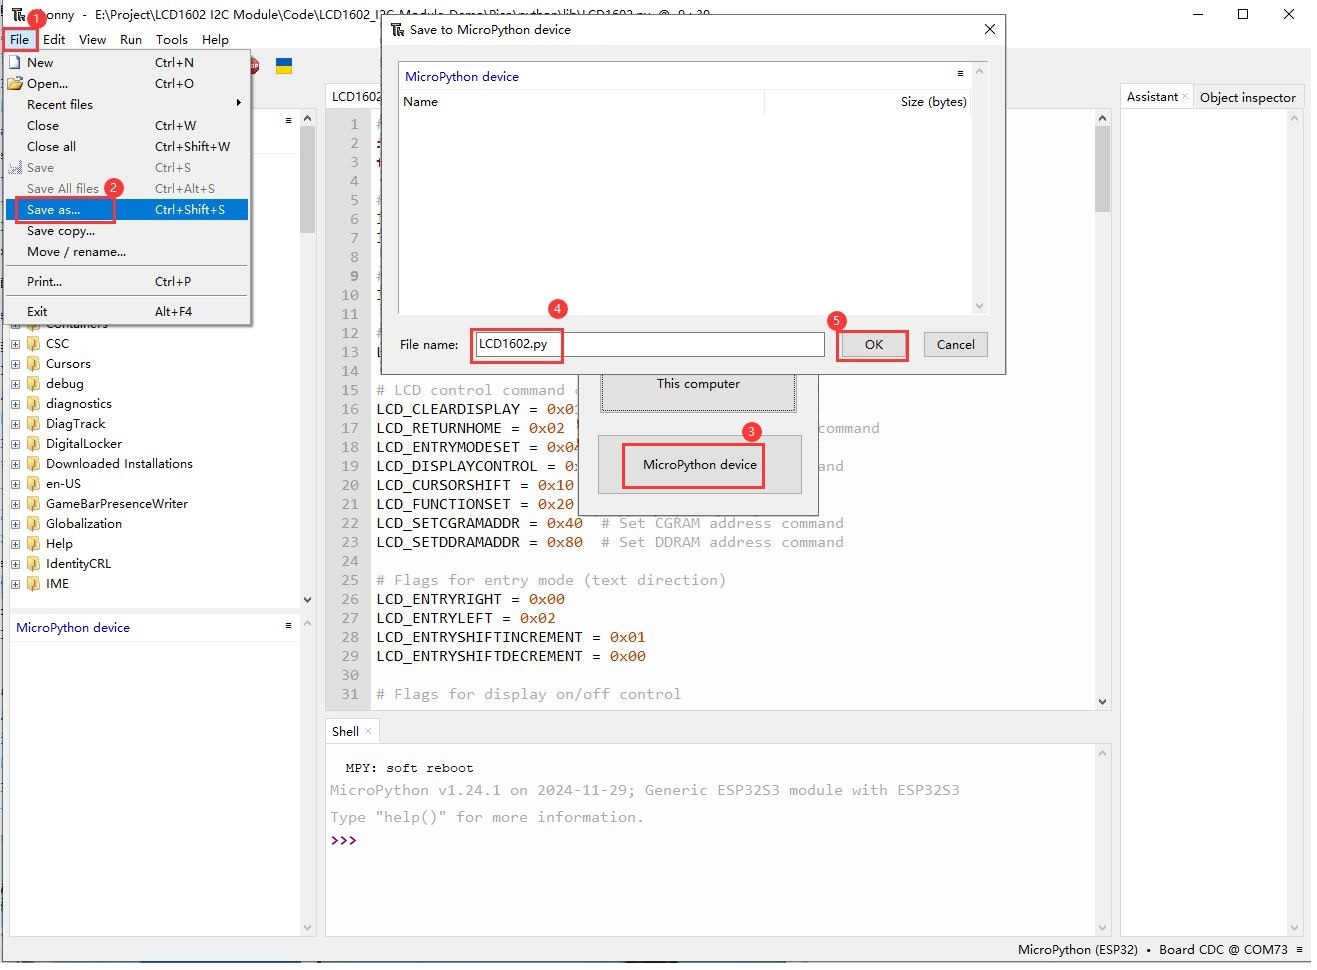
【Save driver library】
- Open Thonny, connect to esp32 device
- Open the LCD1602.py file in *\LCD1602_I2C_Module_Demo\Pico\python\lib, and save it to esp32
- The specific steps are as follows:
【Run demo】
- Use thonny to open the demo in *\LCD1602_I2C_Module_Demo\Pico\python\examples file, and run it as follows:
Working with Jetson Nano
- Prepare jetson nano that can start normally, if it doesn't, please refer to Startup Tutorial
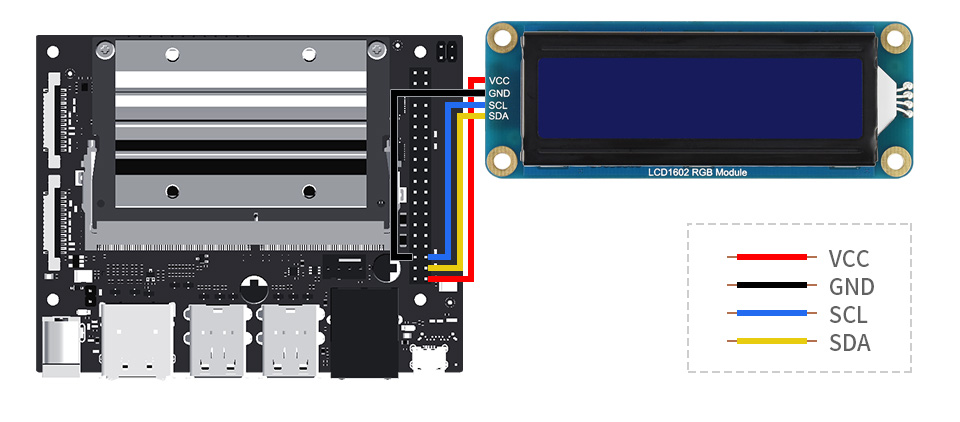
Hardware Connection
When connecting the Jetson nano, choose to use a 4PIN cable. Please refer to the pin correspondence table below
We are using a pin or PH2.0 4PIN interface, please refer to the following table for wiring
| LCD | Jetson nano | |
| Board physical pin number | ||
| VCC | 3.3V | |
| GND | GND | |
| SCL | 5 | |
| SDA | 3 | |
Take the LCD1602 Module using the PH2.0 4PIN interface as an example, and connect it to the Jetson nano according to the above table: (Please connect according to the pin definition table. The color of the wiring in the diagram is for reference only, and the actual color shall prevail.)
Connect to Jetson Nano as shown in the figure.
Demos
【Install the library and download the demo】
- python3
sudo apt install python3-smbus
- python2
sudo apt install python-smbus
- Download the demo, unzip and compile it
cd ~
wget https://files.waveshare.com/wiki/LCD1602-I2C-Module/LCD1602_I2C_Module_Demo.zip
unzip LCD1602_I2C_Module_Demo.zip
cd ~/LCD1602_I2C_Module_code/Jetson Nano/python/examples
【Run Character display demo】
- Character display
sudo python Character_display.py
【Run Custom char demo】
- Custom char
sudo python Custom_char.py
【Run Direction control demo】
- Direction control
sudo python Direction_control.py
【Run Display time demo】
- Display time
sudo python Display_time.py
【Run Scroll display demo】
- Scroll display
sudo python Scroll_display.py
API Introduction
【C/C++】
API introduction
 /**
  *  @brief  LCD screen initialization
  *  @param cols  Number of columns (currently not functional)
  *  @param rows  Number of rows
  */
 void LCD1602_init(uint8_t cols, uint8_t rows);
 /**
  *  @brief  Open display
  */
 void LCD1602_display();
 /**
  *  @brief  Send command
  *  @param value  The commands that have been sent
  */
 void LCD1602_command(uint8_t value);
 /**
  *  @brief  Set cursor position
  *  @param col  Number of columns: Optional range 0-15, maximum 39, needs to be moved to observe characters greater than 15
  *  @param row  Number of rows: Optional range 0-1, 0 represents the first row, 1 represents the second row

 void LCD1602_setCursor(uint8_t col, uint8_t row);
 /**
  *  @brief  Clear the display and return the cursor to its initial position (0 position)
  */
 void LCD1602_clear();
 /**
  *  @brief  Write data
  *  @param value  The data has been written
  */
 void LCD1602_data(uint8_t value);
 /**
  *  @brief  Display string
  *  @param str  The strings have been displayed
  */
 void LCD1602_send_string(const char *str);
 /**
  *  @brief  Turn off underline cursor
  */
 void LCD1602_noCursor();
 /**
  *  @brief  Turn on underline cursor
  */
 void LCD1602_cursor();
 /**
  *  @brief  Scroll left to display
  */
 void LCD1602_scrollDisplayLeft();
 /**
  *  @brief  Scroll right to display
  */
 void LCD1602_scrollDisplayRight();
 /**
  *  @brief  This function is used for the text that scrolls from left to right
  */
 void LCD1602_leftToRight();
 /**
  *  @brief  This function is used for the text that scrolls from right to left
  */
 void LCD1602_rightToLeft();
 /**
  *  @brief  This will align the text to the left from the cursor display position
  */
 void LCD1602_noAutoscroll();
 /**
  *  @brief  This will align the text to the right from the cursor display position
  */
 void LCD1602_autoscroll();
 /**
  *  @brief  Allow us to fill the first 8 CGRAM positions with custom characters
  *  @param location  Substitute characters: Range (0-7)
  *  @param charmap  Character array: 8 bytes in size
  */
 void LCD1602_createChar(uint8_t location, uint8_t charmap[]);
 /**
  *  @brief  Backlight chip initialization
  */
 void LCD1602_led_init();
 /**
  *  @brief  Set backlight brightness
  *  @param value  Backlight intensity value: Range (0-100)
  */
 void LCD1602_set_brightness(uint8_t value);
 /**
  *  @brief  Set backlight mode
  *  @param mode  0x00 for normal mode, 0x20 for breathing mode
  */
 void LCD1602_set_led_mode(uint8_t mode);
【Python】
API introduction
 def command(self, cmd)

     @brief  Send command
     @param cmd  The commands that have been sent
 def data(self,data)

     @brief  Write character
     @param data  The data has been written
 def setCursor(self,col,row)

     @brief  Set cursor position
     @param col  Number of columns: Optional range 0-39
     @param row  Number of rows: Optional range 0-1, 0 represents the first row, 1 represents the second row
 def clear(self)

     @brief  Clear the display and return the cursor to its initial position (0 position)
 def printout(self,arg)

     @brief  Output display to the LCD screen
     @param arg  The data that has been output
def createChar(self, location, charmap)

     @brief  Allow us to fill the first 8 CGRAM positions with custom characters
     @param location  Substitute characters: Range (0-7)
     @param charmap  Character array: 8 bytes in size
 def scrollDisplayLeft(self)

     @brief  Scroll left to display
 def scrollDisplayRight(self)

     @brief  Scroll right to display
 def cursor(self)

     @brief  Turn on underline cursor
 def nocursor(self)

     @brief  Turn off underline cursor
 def leftToRight(self)

     @brief  This function is used for the text that scrolls from left to right
 def rightToLeft(self)

     @brief  This function is used for the text that scrolls from right to left
 def autoscroll(self)

     @brief  This will align the text to the right from the cursor display position
 def noautoscroll(self)

     @brief  This will align the text to the left from the cursor display position
 def display(self)

     @brief  Open display
def set_brightness(self, Value)

     @brief  Set backlight brightness
     @param Value: Range (0-100)
def set_mode(self, Mode)

     @brief  Backlight mode
     @param Mode: Normal mode (0x00), breathing mode (0x20)
FAQ
Question: When using the python demo, why is only the second line displayed but the first line is not displayed?
It may be an issue with Python firmware incompatibility. You can use the firmware version provided in our demo.
Question: Do the SDA and SCL of LCD1602 have pull-up resistors?
Yes.
Question: What is the approximate operating current of LCD1602?
Generally around 30mA.
Support
Monday-Friday (9:30-6:30) Saturday (9:30-5:30)
Email: services01@spotpear.com
[Tutorial Navigation]
- Overview
- Usage Instructions
- Working with Raspberry Pi
- Working with Pico
- Working with Arduino
- Working with ESP32
- Working with Jetson Nano
- API Introduction
- Resources
- FAQ
- Question: When using the python demo, why is only the second line displayed but the first line is not displayed?
- Question: Do the SDA and SCL of LCD1602 have pull-up resistors?
- Question: What is the approximate operating current of LCD1602?
- Support