


- sales/support
Google Chat:---
- sales
+86-0755-88291180
- sales01
sales@spotpear.com
- sales02
dragon_manager@163.com
- support
tech-support@spotpear.com
- CEO-Complaints
zhoujie@spotpear.com
- Only Tech-Support
WhatsApp:13246739196
- Purchase/Shipping/Refund
WhatsApp:13424403025
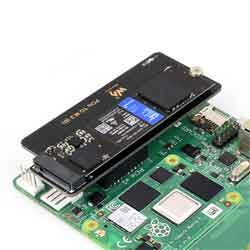
PCIe TO M.2 (B) Tutorial
Product Introduction
PCIe TO M.2 (A) is a PCI-E to M.2 adapter card used for upgrading hard drives SSD solid-state drive cards, and supports CM4
Characteristic
- Supports NVMe protocol M.2 interface hard disk protocol, high-speed read and write, high work efficiency
- Only supports CM4 expansion board
- Support Raspberry Pi Compute Module 4
- Compatible with M.2 hard drives of different sizes
- On board work indicator light, the LED stays on when powered on and flashes during reading and writing, indicating the clear working status at a glance
Instructions for use
Tutorial on mounting a hard drive to CM4
Format Hard Disk
- Insert the hard drive into the corresponding position of the PCI-E to M.2 adapter card and secure it with the screws in the screw pack.
- After powering on and starting, perform lspci to check the PCIE device

- Execute sudo mkfs. ext4/dev/nvme0n1p1 to format the device (mkfs. Then press tab to see many different suffix names, which are the format you want to format)
Wait for a moment, when done appears, it means that the formatting has been completed.

Mount
Create mounting directory
sudo mkdir toshiba
Mount device
sudo mount /dev/nvme0n1p1 ./toshiba
Check disk status
df -h
Mount hard drive
- Create a new directory as the disk mount point
sudo mkdir /home/pi/toshiba
- Execute the following command to mount the hard drive
sudo mount /dev/nvme0n1p1 /home/pi/toshiba
- Create a new directory as the disk mount point
Execute again
df -h
You can see the hard drive we inserted and related information, indicating that the hard drive has been successfully mounted

- For different hard drives, their names may vary. Here, nvme0n1p1 is displayed. Please refer to the hard drive you inserted.
literacy test
Enter the directory of the mounted disk
cd /home/pi/toshiba
- free memory
sudo sh -c "sync && echo 3 > /proc/sys/vm/drop_caches"
- Copy Raspberry Pi Memory Content to Hard Drive (Read)
sudo dd if=/dev/zero of=./test_write count=2000 bs=1024k

- Copy hard drive content to Raspberry Pi memory (write)
sudo dd if=./test_write of=/dev/null count=2000 bs=1024k
- Note: Raspberry pie is more affected by different cards and different environmental testing effects
Enter the directory of the mounted disk
cd /home/pi/toshiba
- free memory
sudo sh -c "sync && echo 3 > /proc/sys/vm/drop_caches"
- Copy Raspberry Pi Memory Content to Hard Drive (Read)
sudo dd if=/dev/zero of=./test_write count=2000 bs=1024k
- Copy hard drive content to Raspberry Pi memory (write)
TAG:
SIM7600G H Mini PCIe SIMCom Original 4G LTE Cat-4 Module Global Coverage GNSS
Banana Pi
1.54inch OLED
ESP32 C3 Round LCD Development Board Electronic EYE 0.71 inch Display Watch Screen GC9A01 160x160
Arduino 1.5inch LCD
7inch-DSI-LCD-H User Guide
Tuya AI Voice Robot T5-E1 1.75 inch Round AMOLED TouchScreen GPS For XiaoZhi Development Board
NanoKVM-USB-Development
Serial Bus Servo
Industrial Grade ETH Ethernet 8-Channel Relay Module
STM32 0.96inch RGB OLED
Raspberry Pi 5.83 inch e-Paper link (G) RYBW 800x480 For Arduino / Jetson / STM32 /ESP32
Raspberry Pi PICO
Raspberry Pi 7 inch DSI MIPI LCD TouchScreen Display 7inch 720x1280 For Luckfox Lyra RK3506/ESP32-P4/Luckfox Omni3576
Raspberry Pi 14 inch LCD 2K HDMI /Type C Display Capacitive TouchScreen 2160x1440 For Jetson Nano/mini Computer PC
here User Guide
Raspberry Pi Screen
Tutorial
E-Paper
Pi5 Active Cooler
TAG:
SpotPear
Arduino UNO R4 Minima
Rasp
Raspberry Pi 5 - 4GB RAM
Raspberry Pi Pico 2 RP2350 1.64 inch AMOLED Development Board Display TouchScreen 280x456 QMI8658 IMU QSPI
1.91Inch AMOLED
JETSON NANO Expansion Board
ATmega32U4
SpeedyBee Bee35 3.5 inch Frame RC FPV Drone
10 Axis DOF ROS IMU Sensor Accelerometer Gyroscope Magnetometer Temperature Pressure
3.4inch Round LCD HDMI Capacitive touchscreen display Raspberry Pi Jetson Nano mini PC 800x800
Raspberry Pi Camera
POE Luckfox Pico Ultra Power Over Ethernet RV1106
PC Monitor Screen
WIFI-Kit-32
RS485 to Ethernet
Lazy Keyboard
4.26inch E-link
SpotPear
FT232RNL USB TTL Industrial UART Raspberry Pi 5 Terminal Debug