


- sales/support
Google Chat:---
- sales
+86-0755-88291180
- sales01
sales@spotpear.com
- sales02
dragon_manager@163.com
- support
tech-support@spotpear.com
- CEO-Complaints
zhoujie@spotpear.com
- Only Tech-Support
WhatsApp:13246739196
- Purchase/Shipping/Refund
WhatsApp:13424403025
Raspberry Pi e-Paper NB-IoT/GPRS HAT User Guide
Instruction
This is a Raspberry Pi IoT driver board for e-Paper raw panels. It allows getting text/image data from IoT clouds through NB-IoT/eMTC/EDGE/GPRS network connection, and then display them on the e-Paper.
Features
- Onboard SIM7000E module, controlled via UART, supports NB-IoT/eMTC/EDGE/GPRS communication
- e-Paper interface, controlled via SPI, compatible with various Waveshare SPI e-Paper raw panels
- Standard Raspberry Pi 40PIN GPIO extension header, supports Raspberry Pi series boards
- Breakout SIM7000E and e-Paper control pins, for connecting with host control boards like STM32
- 3.7V lithium battery port and charging circuit, provides power to SIM7000E module or external 3.3V system (5V system like Raspberry Pi requires another power supply)
- Onboard voltage translator, select 3.3V/5V operating voltage by switch
- Provides Windows host code (based on Alibaba Cloud), make it easy to study/develop, or integrate it into IoT applications
- Comes with development resources and manual (examples for Raspberry Pi/STM32)
Specifications
- Communication interface: UART + SPI (4-wire SPI by default, switch to 3-wire SPI by soldering)
- Communication module: SIM7000E
- Quad-Band LTE-FDD B3/B8/B20/B28
- GPRS/EDGE 900/1800Mhz
- GNSS (GPS, GLONASS, BeiDou, and Galileo, GNSS antenna is required and NOT included)
- Support SIM card: NB-IoT specific card, or 1.8V/3V normal SIM card
- Applicable region: China mainland, southeast Asia, Europe, Africa, Australia, etc. (for reference only, please check the supported bands according to your local service provider)
- Power supply voltage: 5V
- Logic level: 5V / 3.3V
- Applicable battery: 3.7V lithium battery via PH2.0 connector (NOT included)
- Dimensions: 56.5mm x 65mm
Supported e-Paper
- 1.54inch e-Paper, 1.54inch e-Paper (B), 1.54inch e-Paper (C)
- 2.13inch e-Paper, 2.13inc e-Paper (B), 2.13inch e-Paper (C), 2.13inch e-Paper (D)
- 2.7inch e-Paper, 2.7inc e-Paper (B)
- 2.9inch e-Paper, 2.9inc e-Paper (B), 2.9inch e-Paper (C)
- 4.2inch e-Paper, 4.2inc e-Paper (B), 4.2inch e-Paper (C)
- 5.83inch e-Paper, 5.83inch e-Paper (B), 5.83inch e-Paper (C)
- 7.5inch e-Paper, 7.5inc e-Paper (B), 7.5inch e-Paper (C)
Interface
Interface
| PIN | Raspberry (BCM2835) | Description |
| 5V | 5V | 5V Power input |
| 3V3 | 3.3V | 3.3V Power input |
| GND | GND | Ground |
| DIN | MOSI | MOSI of SPI interface |
| CLK | 11 | SCK of SPI interface |
| CS | CE0 | Chip selection of SPI interface |
| DC | 25 | Data/Command selection |
| RESET | 17 | Reset (Low active) |
| BUSY | 24 | Busy Pin |
| TXD | 14 | TX pin of NB-IOT module |
| RXD | 15 | RX pin of NB-IoT module |
| DTR | 19 | Sleep/Wake up Pin of NB-IoT Module Set AT+CSCLK=1, then you can pull-high DTR to make module sleep, and pull-down DTR to wakeup. |
| PWR | 4 | Power on/off pin of NB-IoT Module (high active) |
| RST | 18 | Reset oub of NB-IoT pin (high active) |
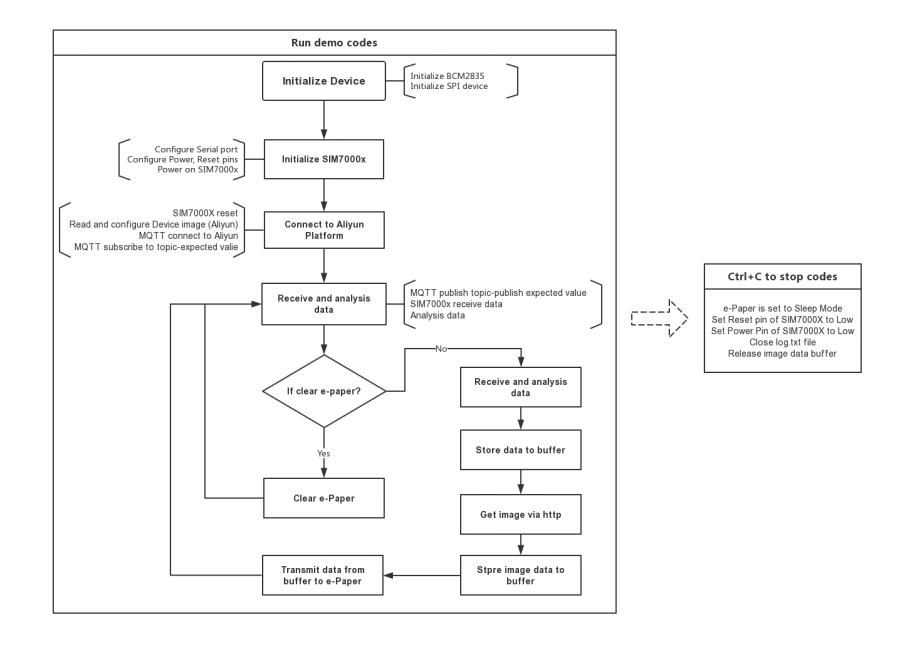
How it work?
This product use Alibaba Clound platform to refresh image to e-Paper, it included cloud side and device side.
Cloud: Use client software, transmit the image data to Alibaba Cloud.
Device: Use NB-IoT, get image data from Alibaba Could and update e-Paper.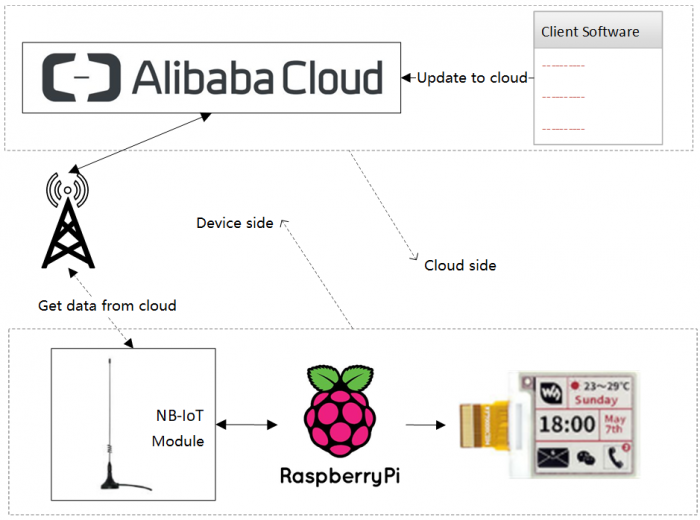
If you are the first time to use this module, we recommend you to follow the guides below step by step.
Setup Cloud side
The flow of Cloud side: Client software sends data(image, string) to Alibaba cloud platform, then devices get data from the cloud.
In this chapter, we will use client software and Alibaba cloud, you can read Document of Alibaba Cloud for reference.
Preparation
Before you begin the project, you need to sign up Alibaba Cloud and settings.
- 1. Download and install client software
- Please download ePaperTools-4.0 software from #Resource. Unzip and install it.
- 2. Create an Alibaba Cloud account. Active the IoT platform.
- Go to Alibaba Could website to make an account and login.
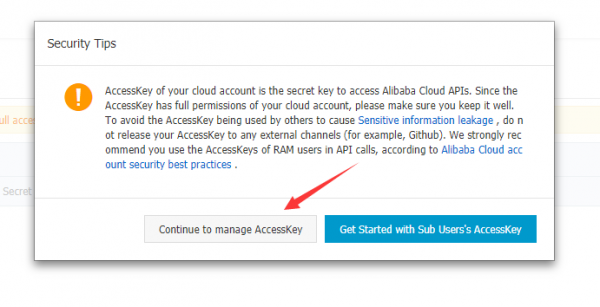
- 3. Create API AccessKey.
- Enter Accesskey page, and click "Continue to manage AccessKey"
- 4. Click Create AccessKey to create an access key.
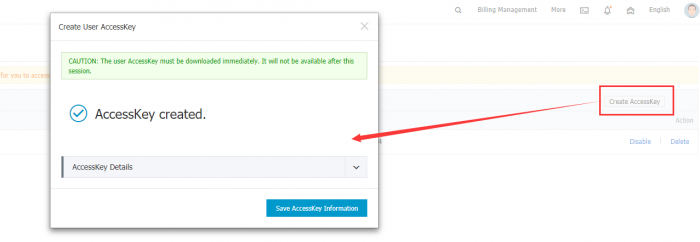
- 5. Save the access key
- The AccessKey ID and Accesskey Secret are the API key for accessing Alibaba Cloud, they are important for our whole demo. Please keep it safe for future use.
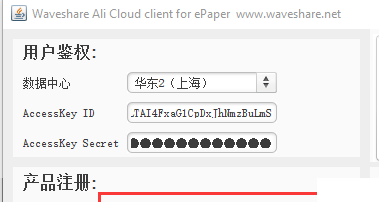
- 6. Enter the AccessKey to the e-Paper Tool software
Register product
Enter the ProductName (it is configurable) and click register to register product.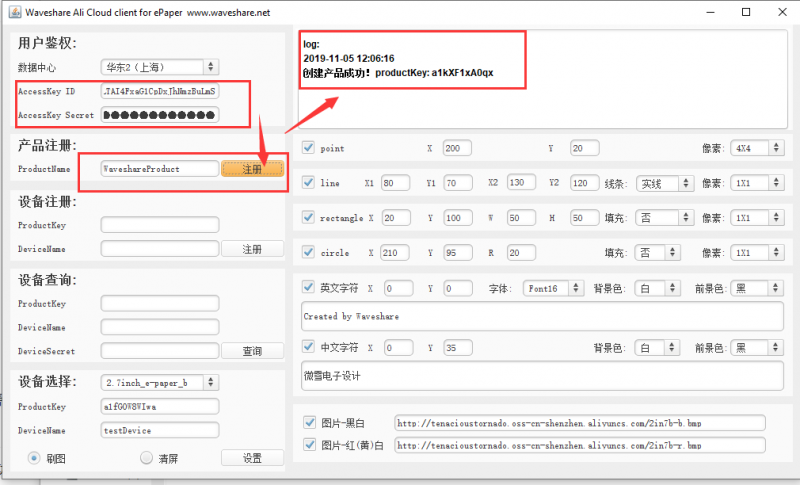
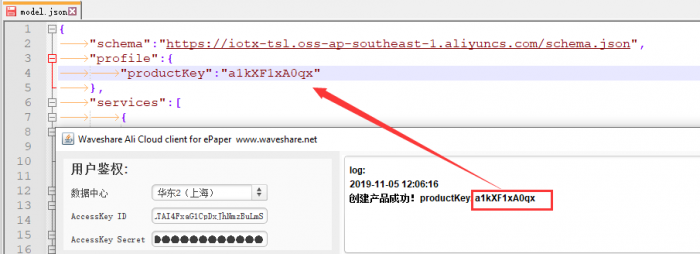
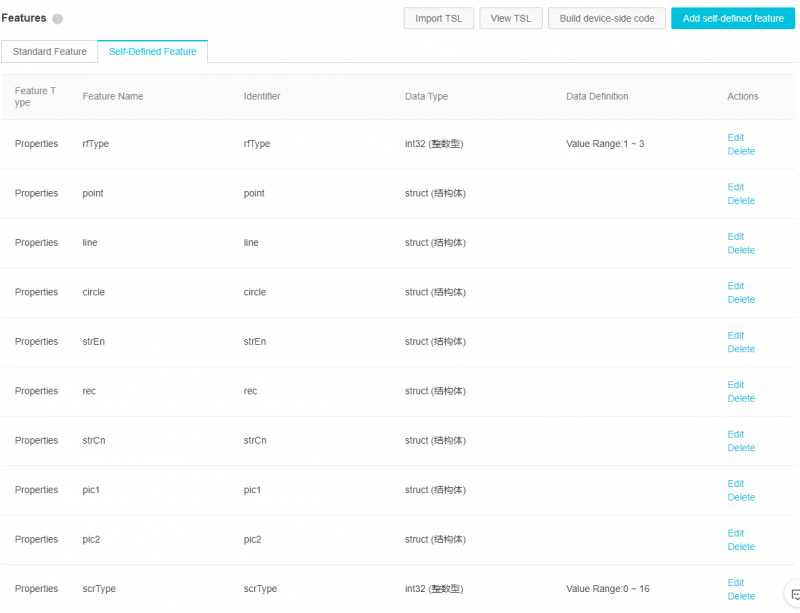
Import object model
The object model defines the drawing functions if e-Paper.
- 1. Download the model from wiki, unzip it and modify the model.json file. Change the ProductKey to the one you registered. If you close it by accident, you can search on the Console of Alibaba Cloud website.
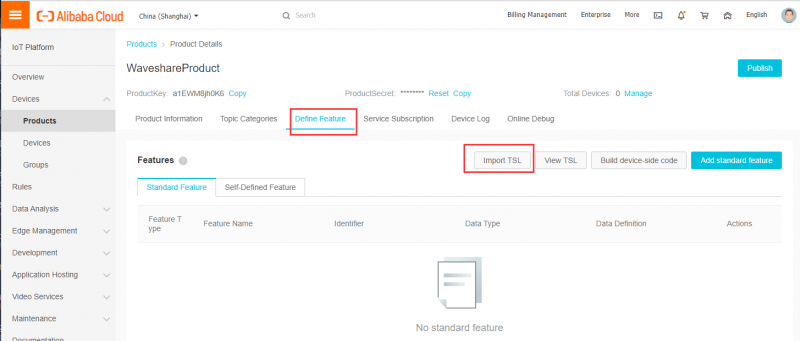
- 2. Enter the IoT Platform console, you can check the registered product
- Choose Devices -> Products.
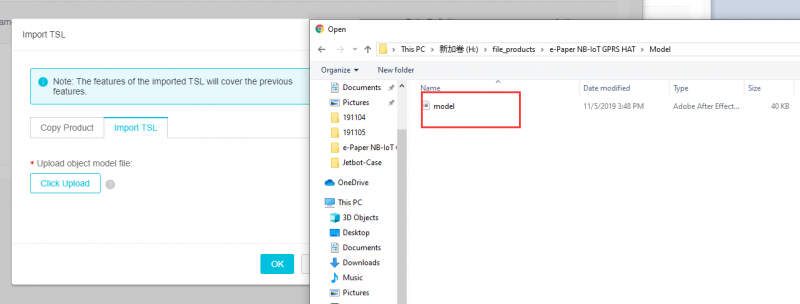
- 3. Click the product and choose define feature. Import TSL.
Register Devices
We take one kind of e-Paper as one device, to control the e-Paper, we also need to register devices for e-Paper. The Device Name is definable.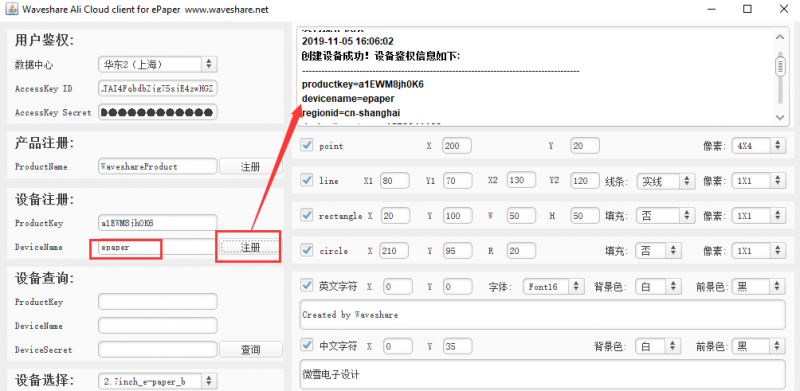
After registering, you need to save the register information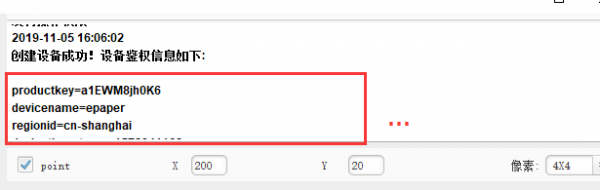
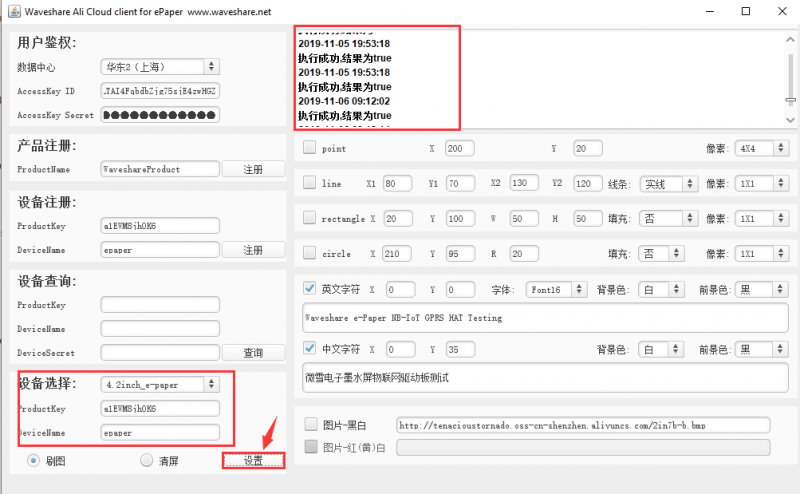
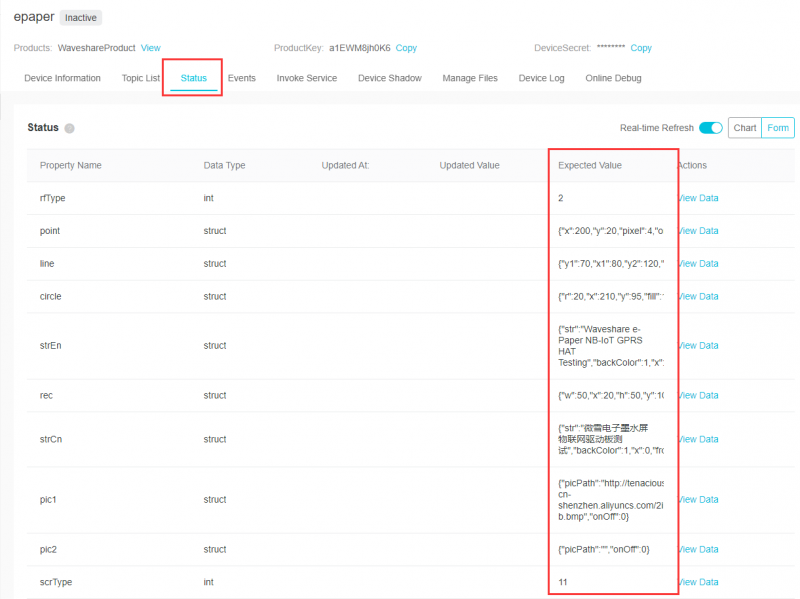
Push message
Open the e-Paper tool software. Select the device (设备选择), for example, 4.2inch e-Paper. Enter the ProductKey and DevicesName. Then choose Update (刷图) or Clear (清屏)
- 1. Update mode
- The coordination value cannot bigger than the resolution of e-Paper
- If you enable Chinese string and English string at the same time, it supports about 100 Chinese characters or 200 English characters.
- If you only enable Chinese string, it supports about 200 Chinese characters.
- If you only enable English string, it supports about 400 English characters.
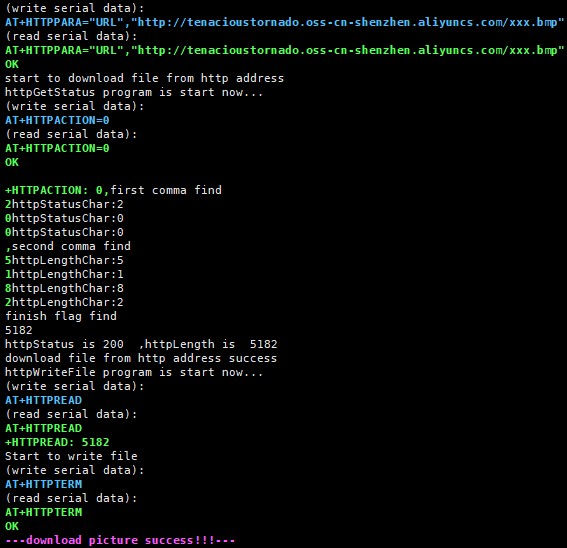
- The image should be able to download via HTTP protocol online. It only supports monochrome bitmap file, and the resolution should less or equal to the resolution of e-Paper.
- You should type the whole link of the image
- If the e-Paper you use it 3-color e-Paper, you should prepare two images, one is for Black-white part, and another is for Red part.
- 2. Clear mode
- In this mode, the e-Paper will be clear to white.
- 3. Operations
- Set the image you want to update on the right operation area and then click setting (设置). The image data will be pushed to Alibaba Cloud, you can check the push message on the website.
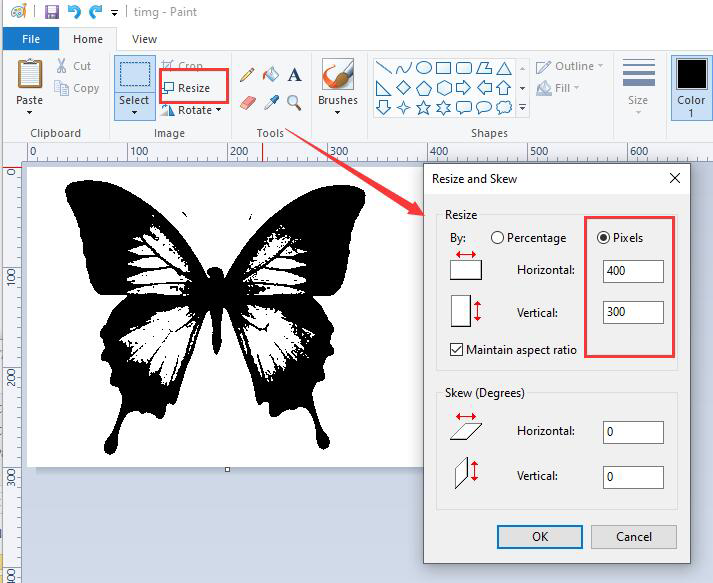
How to make bitmap
Here we show you how to make the proper bitmap file.
- 1. How to make a correct resolution?
- Open the picture with Paint software. Resize it as 400x300 and save it as a monochrome bitmap.
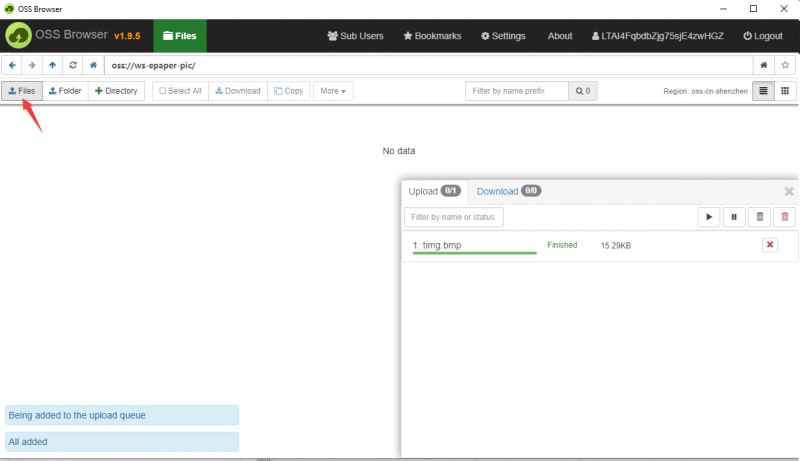
- 2. How to push the bitmap to network?
- Here we use the OSS tool of Alibaba Cloud. Note that this e-Paper HAT could only supports http but not the https protocol.
- Download the OSS browser software from wiki, and unzip it. Open the OSS-Browser software, you need to log in with the access key.
- The first time you use OSS, you need to enable it. Please click here to enable
- Then you can click "Create Bucke" to create a bucket first.
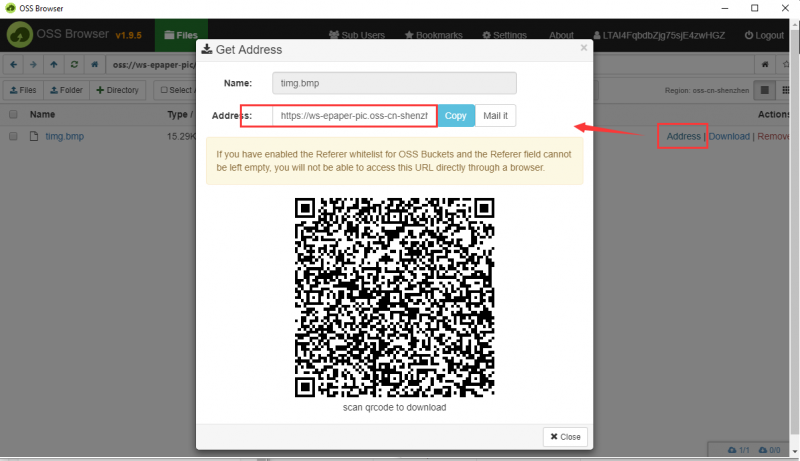
- Now you can push your pictures to cloud. And get the address
Setup Raspberry Pi
- 1. About the image
- We only test Raspbian OS, in this case, we recommend you to use Raspbian as well.
- 2. Enable serial port
- Use sudo raspi-config command to enter the configuration page, choose Interfacing Options -> Serial -> No -> Yes,
- 3. Enable SPI interface
- Use sudo raspi-config command to enter the configuration page, choose Interfacing Options -> SPI -> Yes
- 4. Install BCM2835 libraries
- Open terminal and install BCM2835 libraries
wget http://www.airspayce.com/mikem/bcm2835/bcm2835-1.60.tar.gz
tar -zxvf bcm2835-1.60.tar.gz
cd bcm2835-1.60
sudo ./configure
sudo make
sudo make check
sudo make install
- 5. Hardware setup
- 1. To use this demo, you should prepare a SIM card which supports NB-IoT network. And insert it to the SIM car slot.
- 2. Connect the antenna to LTE interface of e-Paper NB-IoT GPRS HAT
- 3. Connect your e-Paper to the e-Paper NB-IoT GPRS HAT
- 4. Set switches
| 1 | 0 |
| 3-PIN SPI | 4-PIN SPI |
| 3V3 | 5V |
| 3.3V working-level | 5V working-level |
| B | A |
| 1.54inch e-Paper (B) | 1.54inch e-Paper |
| 2.13inch e-Paper (B) | 2.13inch e-Paper |
| 2.7inch e-Paper | 2.9inch e-Paper |
| 2.7inch e-Paper (B) | |
| 2.9inch e-Paper (B) | |
| 4.2inch e-Paper | |
| 4.2inch e-Paper (B) | |
| 7.5inch e-Paper | |
| 7.5inch e-Paper (B) |
| 5V | BAT |
| 5V power input (USB interface or GPIO) | Batteries |
- To use it with Raspberry Pi, you shold set it to
| BS/Switch/Jumper | Description |
| BS weld | Set it to 0 sides (default) |
| VCCIO switch | Set it to 3V3 |
| Display Config | Set it according to the e-Paper you use |
| POWER jumper | set it to 5V |
- 6. Download demo codes from wiki, unzip and copy it to Raspbery PI
- You can also directly clone it from github by command
git clone https://github.com/waveshare/ePaper-NB-IoT-GPRS-HAT.git
- 7. Modify the device information

cd ePaper-NB-IoT-GPRS-HAT
sudo make
sudo ./epd
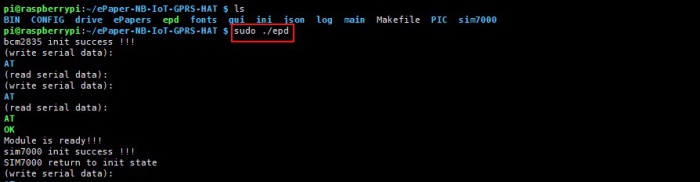


【Note】
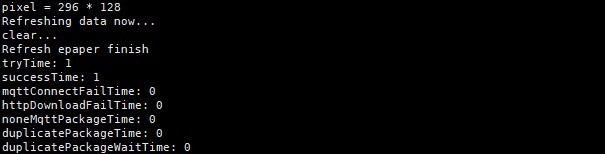
- If you don't stop the code, it will update the e-Paper every 5 seconds. If you want to modify the interval, you can modify main.c file
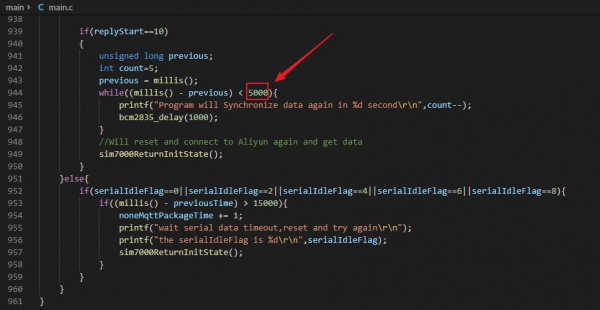
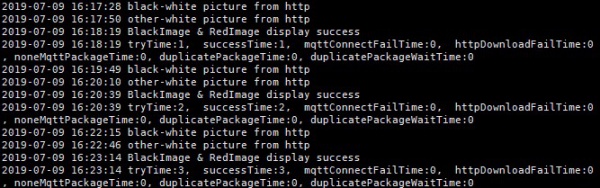
| Variables | Description | Note |
|---|---|---|
| tryTime | Try times that get image data from network | |
| successTime | Times that success to get image data from network | The times of e-Paper update |
| mqttConnectFailTime | The fail time that connect to Aliyun platform | |
| httpDiwnloadFailTime | The fail time that download data from network | |
| noneMqttPackageTime | The amount that none MQTT packages is received | |
| duplicatePackageTime | The amount of receiving duplicate MQTT package | |
| duplicatePackageWaitTime | The wait time of receiving duplicate MQTT package |