


- sales/support
Google Chat:---
- sales
+86-0755-88291180
- sales01
sales@spotpear.com
- sales02
dragon_manager@163.com
- support
tech-support@spotpear.com
- CEO-Complaints
zhoujie@spotpear.com
- Only Tech-Support
WhatsApp:13246739196
- Purchase/Shipping/Refund
WhatsApp:13424403025
Raspberry Pi Pico-CAN-B User Guide
Introduction
This is a CAN module designed for Raspberry Pi Pico, enabling Pico to achieve reliable long-distance communication.
Features
- Standard Raspberry Pi Pico header, supports Raspberry Pi Pico series boards.
- Features CAN function, adopts SPI interface CAN controller MCP2515 with transceiver SIT65HVD230DR.
- Comes with online development resources and manual (Raspberry Pi Pico C/C++ and MicroPython examples).
Specifications
- Operating voltage: 3.3V~5V
- CAN controller: MCP2515
- Control interface: SPI
- CAN transceiver: SIT65HVD230DR
- Baudrate: 5K~1000Kbps
- Dimensions: 52 x 21mm
Pinout Definition

Dimensions

Pico User Guide
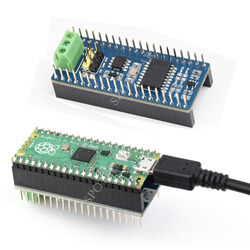
Hardware Connection
Please take care of the direction when you connect Pico, a USB port is printed to indicate. You can also check the pin of Pico and the module when connecting.
Demo Download
1. Directly download it on the Raspberry Pi: Open the Raspberry Pi and execute:
sudo apt-get install p7zip-full
cd ~
sudo wget  https://www.waveshare.com/w/upload/8/8a/Pico-CAN-B-Code.7z
7z Pico_Pico-CAN-B-Code.7z -o./Pico-CAN-B-Code.7z
cd ~/Pico-CAN-B-Code
2. Also, you can download the demo under the #Resource.
How to Use the Demo
Python
- 1. Press and hold the BOOTSET button on the Pico board, connect the pico to the USB port of the computer through the Micro USB cable, and release the button after the computer recognizes a removable hard disk (RPI-RP2).
- 2. Copy the pico_micropython_xxxxx.uf2 file in the python directory to the recognized removable disk (RPI-RP2).
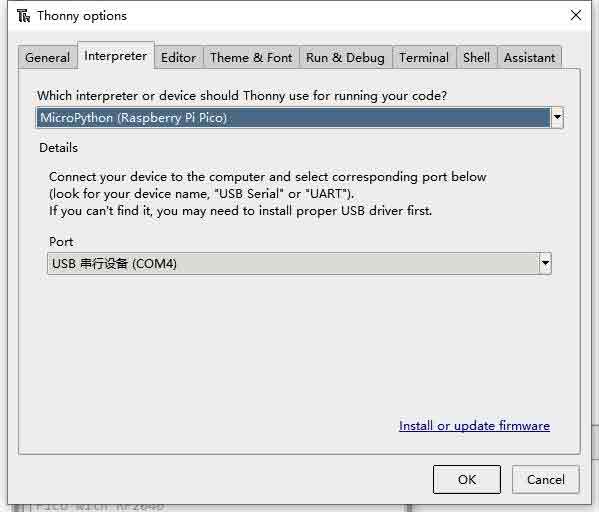
- 3. Open Thonny IDE (Note: Use the latest version of Thonny, otherwise there is no Pico support package, the latest version under Windows is v3.3.3).
- 4. Click Tools -> Settings -> Interpreter, and select Pico and the corresponding port as shown in the figure.
- 5. File -> Open -> MCP2512.py file, click to run, as shown in the following figure:

This is a transceiver demo, connect to another CAN device (A-A B-B connection), configure the frame ID 0x123, and then send 1-8 in turn.
Resource
Document
Demo
Development Software
Download Firmware
- Download MicroPython Firmware:

- Download C_Blink Firmware:

Open-source Demo
TAG:
Raspberry Pi 5 PCIe to M.2 SSD
Raspberry Pi 5 inch DSI MIPI Display LCD (D) Capacitive TouchScreen 720x1280
Raspberry Pi UPS
PC Monitor LCD
ESP32-S3 Industrial 8-CH Relay IOT LAN WiFi /Bluetooth /CAN /RJ45 Ethernet /POE
SpotPear
Raspberry Pi display
Raspberry Pi 5 RTC charge configuration
RV1106
Raspberry Pi CM5 Compute Module 5 Dual Gigabit Ethernet RJ45 Expansion IO Base Board
Raspberry Pi 5 PCIE to MiniPCIe For wireless network WIFI Card USB Bluetooth
Raspberry Pi 4 USB Audio
Raspberry Pi 5 PCIe
Raspberry Pi Pico 2 RP2350 ETH CH9120 TCP/UDP Ethernet Network For Arduino
Raspberry Pi 5 27W
Raspberry Pi 5 Power
Electronic EYE 0.71inch Round LCD Display Screen For Arduino Raspberry Pi ESP32 Pico STM32
Pi5
Jetson Orin Case
Core3566102000
TAG:
RTL8156B USB 2.5G Ethernet RJ45
Industrial Gigabit PoE Splitter Options Type-C DC Micro Raspberry Pi WebCamera WirelessAP
Milk V Duo Module 01 Evaluation Board SG2000 512MB RISC-V Duo S
Raspberry Pi Camera V2
Raspberry Pi 2inch LCD
Dual-MCU-Board
Raspberry Pi 5 PCIe to Dual 2.5G Ethernet Adapter Board - Driver-Free
Jetson Nano
CM5 Cooling Fan 5V 3007 Raspberry Pi Compute Module 5
5033S
Intel 11th
UGV Rover PT AI 4G 5G OpenCV Robot Car MediaPipe Raspberry Pi4B Pi5
ESP32-S3 TouchScreen
Sipeed NanoCluster Mini Cluster Board mini data center For Raspberry Pi CM45 / Computer /LM3H /M4N
Arduino 0.96inch RGB OLED
VisionFive2 Lite 4GB/8GB RISC V Single Board Computer JH7110S Processor with Integrated 3D GPU WIFI
Raspberry Pi 5 PWM Fan
2.66inch E-Paper E-ink G Screen Display 360x184 Red/Yellow/Black/White SPI Communication SpotPear
Raspberry Pi RP2040 1.28inch Round LCD
Changeable Photo