


- sales/support
Google Chat:---
- sales
+86-0755-88291180
- sales01
sales@spotpear.com
- sales02
dragon_manager@163.com
- support
tech-support@spotpear.com
- CEO-Complaints
zhoujie@spotpear.com
- Only Tech-Support
WhatsApp:13246739196
- Purchase/Shipping/Refund
WhatsApp:13424403025
Wrote Image for Compute Module Boards Lite version
If your CM4 board is Lite version without eMMC, Micro SD card is required, we recommend you to write image with SD card reader.
- Download the newest Raspberry Pi image from Raspberry Pi Website
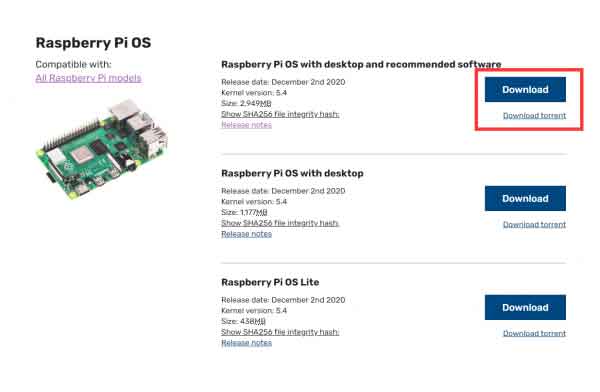
- Connect your Micro SD card to the host PC by the card reader.
- Format the Micro SD card (the portable disk) by SDFormatter.exe software
- Write the Raspberry Pi image to the Sd card by Win32DiskImager.exe software, Choose the image file and click "Write" to start. It may prompt to format the CM4 again after writing, just ignore it.
- After writing, a disk named BOOT is recognized, go into the disk and modify the config.txt file. Add the line to the file: dtoverlay=dwc2,dr_mode=host
- To finish, eject the BOOT disk from the host PC. Disconnect the USB cable and power adapter, disconnect the BOOT, and set the switch into OFF. restart the board and go ahead with the examples.
- If you do not have a card reader, you can insert the SD card to the carrier board and write it just like the eMMC version.
TAG:
Raspberry Pi 5 Sound Card
Raspberry Pi USB Camera 12MP IMX378 30fps onboard dual microphones Also For Jeston / RDK
Pi5 Double 2280
ESP32 S3 LCD 1.3 inch Holographic Display Screen 1.3inch 3D Transparent Refractive Prism Mini TV For Arduino
ESP32 S3 5 inch LCD Development Board 800x480 TouchScreen Display TVBOX LVGL HMI Sensor CAN RS485
Tutorial
TOF Time-Of-Flight Laser Range Sensor Radar Module UART / I2C Port
Raspberry Pi 5 inch (B) DSI MIPI LCD TouchScreen Display 5inch 720x1280 For Luckfox Lyra RK3506/ESP32-P4/Luckfox Omni3576
Mini TOF Time-of-Flight Laser Ranging Radar Sensor Compatible with Arduino Raspberry Pi ESP32 and Pico
Arduino 0.96inch RGB OLED
CV1800B
Sipeed NanoCluster Mini Cluster Board mini data center For Raspberry Pi CM45 / Computer /LM3H /M4N
Mini TV
Raspberry Pi 6.25 inch DSI Display MIPI LCD Capacitive TouchScreen 720x1560
Raspberry Pi 5 NVMe
Raspberry Pi Pico 2 RP2350 2 inch LCD Capacitive TouchScreen Development Board 240x320 Display QMI8658 6-Axis /OV5640 Camera /SD /Battery Port
Raspberry Pi RTC WatchDog HAT (B)
Arducam
Jetson Nano 1.54inch OLED
PCIe M.2 NVMe Dual SSD
TAG:
Raspberry Pi LCD 3D Display Transparent Screen Refractive Prism Game Mini TV For Raspberry Pi Zero
ESP32 S3
Raspberry Pi 21.5 inch Type C/HDMI Display Screen 1920x1080 Computer PC Phone Xbox/PS4/Switch
Raspberry Pi 5 Original Case
Raspberry Pi UPS
Jetson Nano
Radxa-Zero
Raspberry Pi 3.5 inch LCD G Display Resistive TouchScreen 60fps ST7796 320x480 Also For Arduino/Pico2/ESP32/RP2040/RP2350
XIAO-nRF52840 BLE Antenna SeeedStudio Arduino Tiny SuperMini
Raspberry Pi 5 22Pin to 15Pin
Raspberry Pi UPS
Jetson Xavier NX AI 21TOPS Supercomputer Edge Computing eMMC-16GB RAM 8GB 16GB NVIDIA
XD-51
Raspberry Pi USB Camera 12MP IMX378 30fps onboard dual microphones Also For Jeston / RDK
ESP32 S3 Development Board 4.3 inch LCD Capacitive Touch Screen 4.3inch Display 480×272 N16R8
spotpear
HDMI to TTL
Industrial Grade ETH Ethernet 8-Channel Relay Module
Seeed Studio XIAO SAMD21 Tiny SuperMini Arduino
MPS2280 POE Raspberry Pi 5 PCIe M.2 NVMe SSD Pi5 2280 2242 2230