- sales/support
Google Chat:---
- sales
+86-0755-88291180
- sales01
sales@spotpear.com
- sales02
dragon_manager@163.com
- support
tech-support@spotpear.com
- CEO-Complaints
zhoujie@spotpear.com
- Only Tech-Support
WhatsApp:13246739196
- Purchase/Shipping/Refund
WhatsApp:13424403025
- HOME
- >
- ARTICLES
- >
- Common Moudle
- >
- ESP
T5-E1-Touch-AMOLED-1.75 User Guide
Introduction
This product is a high-performance, highly integrated microcontroller development board designed by Waveshare. In a small form factor, it features a 1.75inch capacitive HD AMOLED screen, RTC, a 6-axis IMU (3-axis accelerometer and 3-axis gyroscope), RTC, 2 audio ADCs, 1 audio DAC, and other peripherals on board for easy development and integration into the products.
Features
- Equipped with Armv8-M STAR-MC1 MCU, up to 480 MHz frequency
- Supports 2.4GHz Wi-Fi (802.11 b/g/n/ax) and Bluetooth 5.4 (Bluetooth LE), with onboard antenna
- Built-in 640KB SRAM and 64KB ROM, stacked with 16MB PSRAM and external 8MB Flash
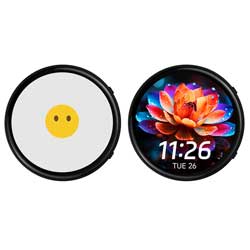
- Onboard 1.75inch capacitive touch HD AMOLED screen with a resolution of 466×466, 16.7M colors for clear color pictures
- Embedded with CO5300 driver chip and CST9217 capacitive touch chip, communicating through QSPI and I2C interfaces respectively, minimizes required IO pins
- Adopts Type-C interface to improve user convenience and device compatibility
- Onboard QMI8658 6-axis IMU (3-axis accelerometer and 3-axis gyroscope) for detecting motion gesture, step counting, etc.
- Onboard PCF85063 RTC chip, capable of precise timekeeping and automatic processing of leap years
- Onboard programmable PWR and KEY side buttons for customized function development
- Onboard 3.7V MX1.25 lithium battery recharge/discharge header
- Onboard 8PIN 2.54mm pitch header, providing 5 GPIOs and 5 IO pads reserved for external device connection and debugging, allowing flexible configuration of peripheral functions
- Onboard TF card slot for flexible storage expansion and fast data transfer, suitable for data recording and media playback, simplifying circuit design
- The AMOLED screen offer higher contrast, wider viewing angles, richer colors, and faster response times, providing superior visual effects, and also features thin design, low power consumption, and flexibility
Hardware Description
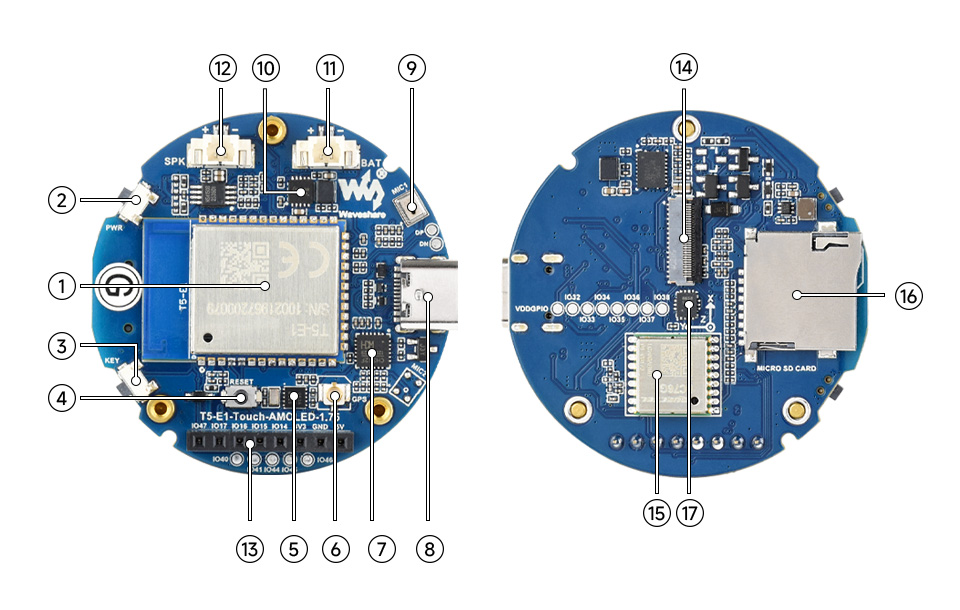
1.T5-E1 module 2. PWR power button 3. KEY button 4. RESET button 5. PCF85063 6. IPEX Gen 1 GPS antenna holder 7. CH342F 8. Type-C port 9. Microphone | 10. Battery charge and discharge chip 11. MX1.25 lithium battery interface 12. MX1.25 2P speaker interface 13. 2.54mm pitch 8PIN header 14. Screen flex cable connector 15. LC76G module 16. TF card slot 17.QMI8658 |
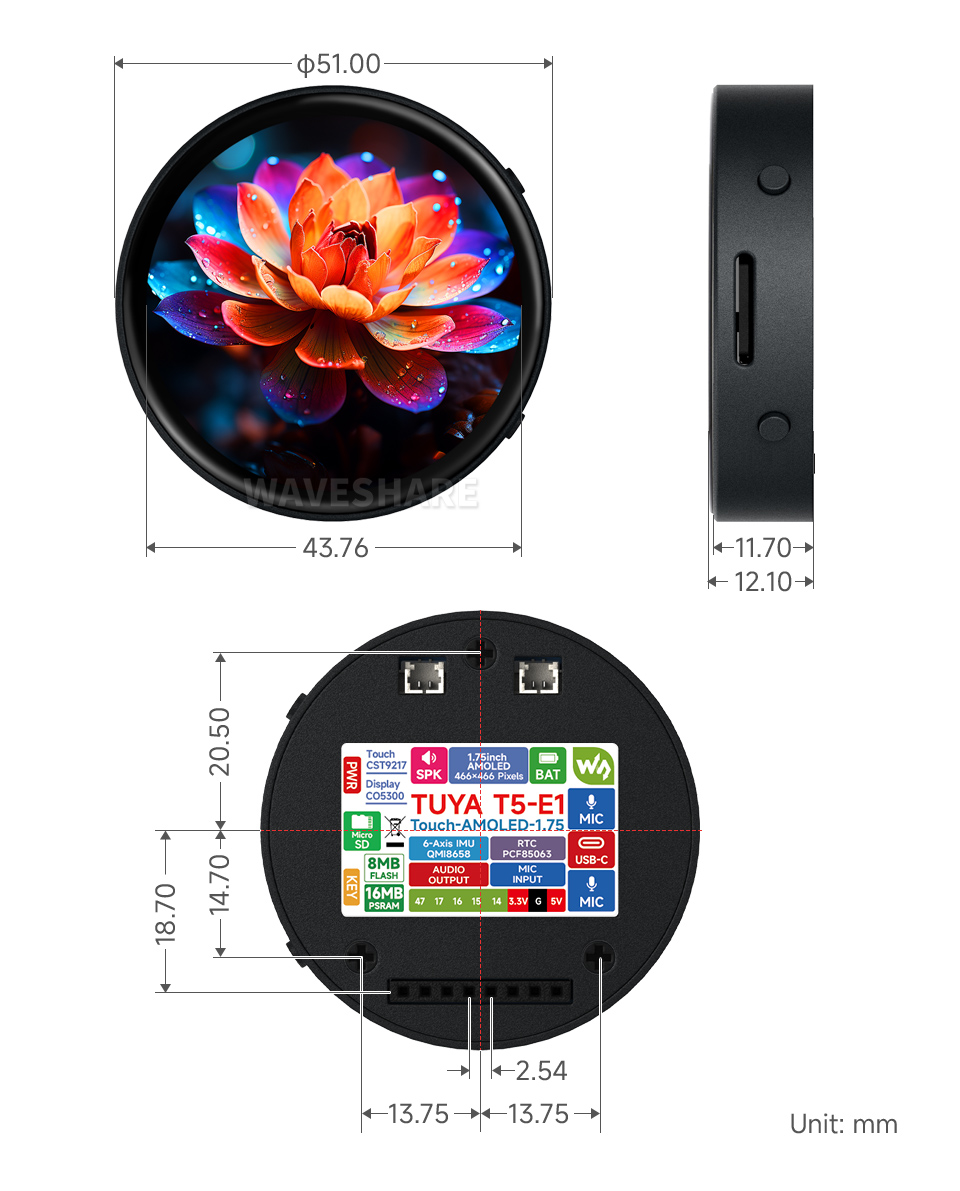
Dimensions
Screen Description
Touch and its Controller
- This touch screen is composed of surface toughened glass + thin film material, which has high strength, high hardness, and good light transmittance. It is equipped with FT3168 self-capacitance touch chip as the driver chip, which supports the I2C communication protocol standard and can realize a 10Khz~400Khz configurable communication rate.
User Guide
T5-E1-TouchAMOLED-1.75 currently provides a development tool and framework called TuyaOpen, and all current demos are developed in this tool.
Development Tool
| TuyaOpenTuyaOpen is an open-source AI+IoT development framework designed to help developers quickly create smart connected devices. It supports multiple chip platforms and RTOS-like operating systems, capable of seamlessly integrating multimodal AI capabilities, including audio, video, and sensor data processing. |

Components Preparation
- T5-E1-Touch-AMOLED-1.75 x1
- Speaker (not required) x1
- Lithium polymer batteries (not required) x1
- TF card (not required) x1
- USB cable (Type-A male to Type-C male) x1
Precautions for Using Lithium Batteries
- Lithium polymer and lithium-ion batteries are very unstable. They may cause fire, personal injury, or property damage, if they're not properly recharged or used.
- When charging and discharging the battery pack, never connect the electrodes incorrectly. Do not use inferior charger/charging panel to recharge the battery.
- Do not mix and use old batteries with new ones, and avoid using batteries from other brands.
- If you need to purchase additional lithium-ion battery products, ensure that the battery parameters are compatible with the lithium-ion battery expansion board. It is recommended to choose batteries from legitimate manufacturers and perform your own aging tests to ensure that the lithium-ion battery can operate stably and safely.
- Lithium batteries have a cycle life, please replace the old batteries with new ones when it reaches the end of its useful life or uses it for two years, whichever comes first.
- Please handle battery products properly, keep them away from flammable and explosive items, and keep them out of reach of children to avoid accidents due to improper storage.
Working with TuyaOpen
This chapter introduces the setup of the TuyaOpen environment, covering the preparation of necessary tools on different systems (Linux, Windows, macOS), demo compilation, download, and testing, helping users get familiar with the development board and facilitating secondary development.
Environment Setup
- Click to jump to the official environment setup tutorial: This link includes all steps for setting up the development environment, project compilation, firmware flashing, device authorization, device provisioning, and device debugging.
Demo
| Demo | Basic Description |
|---|---|
| 01_Factory_Firmware | Test onboard device functionality |
| 02_Switch_Demo | Test Tuya IoT application |
| your_chat_bot | Chatbot |
01_Factory_Firmware
Demo description
- This demo mainly tests the functions of all peripherals connected to the T5AI module
Hardware connection
- Insert the TF card into the development board
- Connect the speaker
- Connect the battery
- After completing the above connections, connect the development board to the computer
Code analysis
- user_main: Main function task
- tal_log_init: Configure the log output to make it more convenient for debugging
- board_register_hardware: A unified entry point for registering peripheral driver hardware on the development board
- lv_vendor_init: LVGL initialization, binding the display and touch to LVGL
- ui_init: UI design initialization, component application and callback initialization
- lv_vendor_start: Create an LVGL task
- tal_thread_create_and_start: Create a new thread to initialize the TF card, microphone, speaker, RTC, QMI, BAT, GPS (only useful with GPS modules), WIFI, and GPIO, and periodically process the gyroscope, real-time clock, obtain battery voltage, and update GPS data
- __wifi_ble_task: WIFI task, scanning the number of nearby WIFI networks
Result demonstration
- LCD screen display
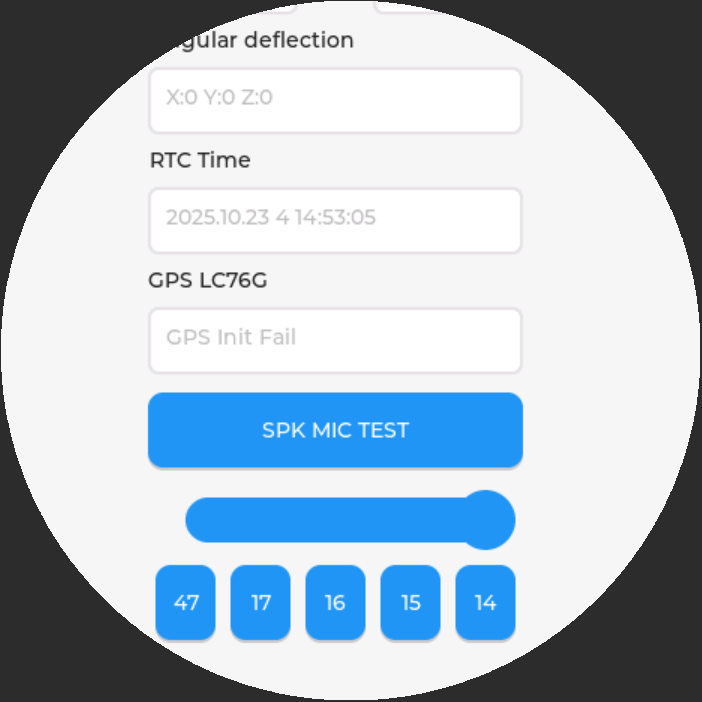
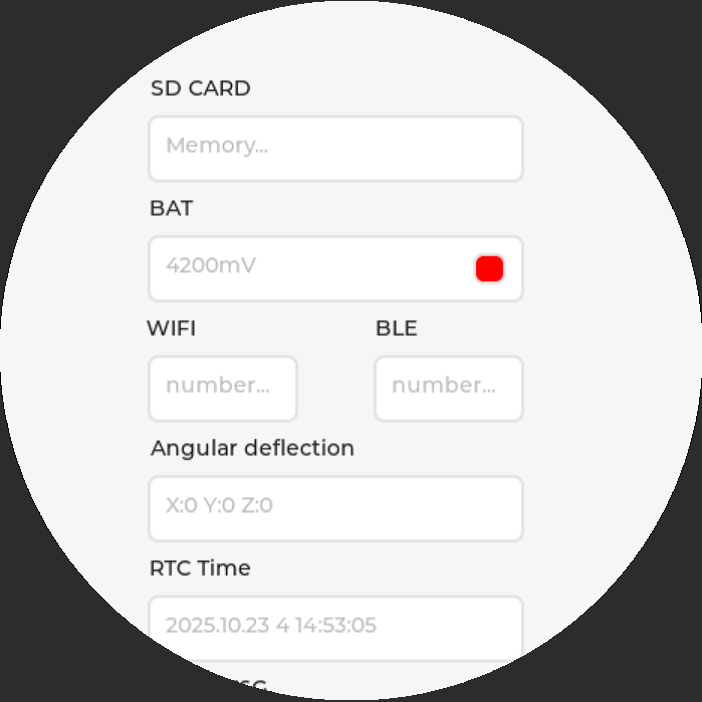
- Parameter description
| Parameter | Function | Description |
| SD Card | Show whether the TF card is mounted successfully | Connect the TF card, if the recognition fails, please format the TF card to FAT32 format |
| BAT | Battery voltage and charging indicator | When connecting the battery, the battery voltage can be detected; it shows green during charging and red when fully charged or not charged |
| WIFI | Display the number of scanned WiFi | The number of scanned items will be displayed after the scan is complete |
| Angular deflection | Display the angular deflection of the board | Display the offset in three directions |
| RTC Time | Display RTC time | Display current RTC time The RTC time may not match the current time because it cannot retain data during a power outage. To maintain accurate RTC time, you must update it with the correct time. |
| GPS LC76G | Display UTC time | Connect the GPS antenna and place it outdoors; it will synchronize to the correct UTC time within a few minutes |
| MIC SPK TEST | Test the microphone and speaker buttons | Press to start recording; speaking to the board will record, clicking again will play the previously recorded sound |
| Slider | Adjust the backlight | There is backlight adjustment from level 5 to 255, and not setting it to 0 prevents the backlight from turning off completely |
| GPIO47 | GPIO testing | Each click on a different button will switch the current IO state, and connecting an LED can be used for testing |
02_Switch_Demo
Demo description
- Tuya IoT app is a minimally functional app demo provided by the Tuya AI + IoT platform
- As a simple, cross-platform, cross-system switch example that supports multiple connections, this switch can be remotely controlled (out of office), LAN controlled (within the same LAN), and Bluetooth controlled (without available network) through the Tuya App and Tuya Cloud service.
- Before using switch_demo, you need to know the following terms:
Hardware connection
- Connect an LED to GPIO47 pin
- Connect the development board to the computer
Code analysis
- cli_cmd.c: Some command-line operations for viewing and manipulating the information and status of switch_demo.
- reset_netcfg.c: Implement network configuration reset function for IoT devices
- tuya_main.c: The main function of switch_demo.
- tuya_config.h: Tuya PID and authorization information (the example comes with a PID designed for Waveshare's APP, you can click to copy the product), created and obtained on the Tuya developer platform, please refer to the document TuyaOS > Create Product.
Result demonstration
- This demo will not light up the screen
- Support Bluetooth provisioning
- Support Wi-Fi hotspot mode provisioning
- Receive MQTT control data from the cloud and automatically respond
- Receive LAN TCP control data from the App and automatically respond
- OTA function
- Default App control panel
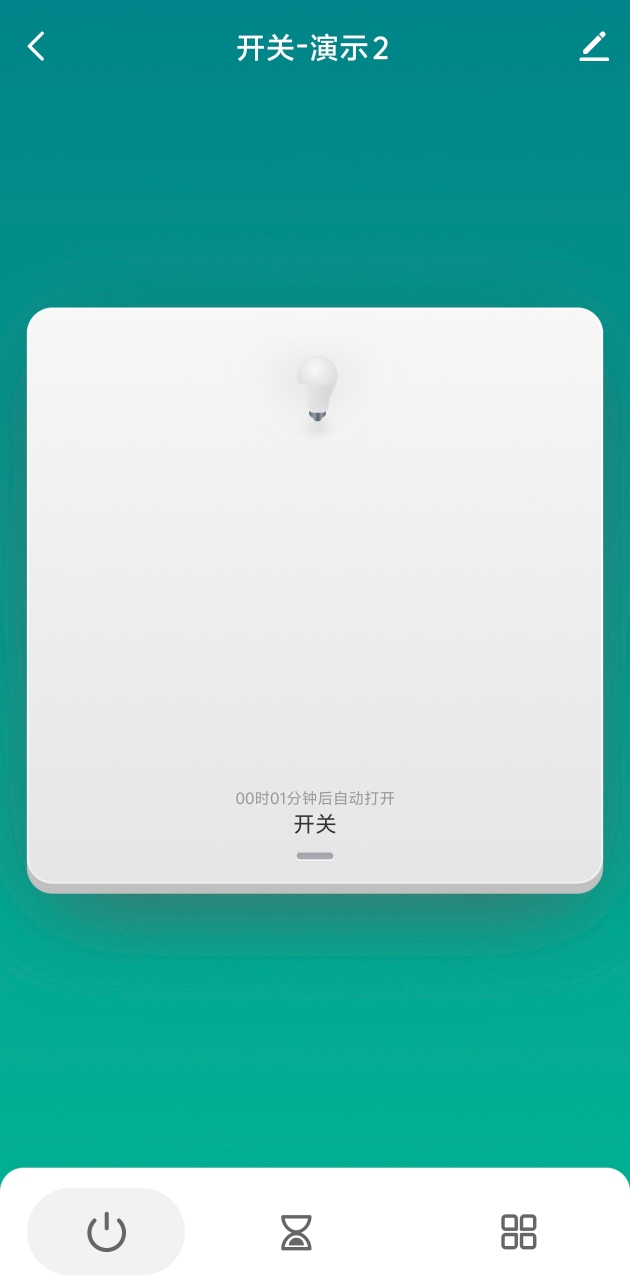
- Click to control the GPIO47 to light up or off
your_chat_bot
Demo description
- your_chat_bot is a large-model intelligent chatbot based on Tuya.AI open source, and the program is located in the development environment, specifically at \TuyaOpen\apps\tuya.ai\your_chat_bot.
- Voice is collected through the microphone, and after voice recognition processing, it realizes dialogue communication, interactive response and ridicule functions, and the chat content can be displayed on the screen in real time.
- Supports Tuya voice smart agents, and supports four chat modes:
- Long press conversation mode: The user needs to press the button for a long time to start voice input, and release the button to end the voice input.
- Button-triggered conversation mode: The device defaults to standby mode upon power-on. A short press of the button puts the device into listening state, allowing the user to speak and converse with the AI agent.
- Wake-up conversation mode: After the user wakes up the device with a wake word, they can have a single conversation, similar to interacting with a speaker.
- Free conversation mode: After the user wakes up the device with a wake word, they can have continuous conversations. If no conversation occurs after waking up, the device will return to standby mode after 30 seconds. The device needs to be woken up again before the next conversation.
- Supports interrupting the current conversation locally through button operations.
- Supports various status prompt sounds, such as network pairing, offline, wake-up, etc.
- Supports various display screens and multiple UI interfaces:
- WeChat style
- Chatbot
- Swipe subtitles (for small OLED screens)
- Supports adjusting device volume through the app.
- Performing three power-on and power-off operations consecutively can put the device into network configuration mode.
- Supports real-time switching of AI agent roles on the app side.
Hardware connection
- Install the speaker (8Ω 1W/8Ω 2W)
- Connect the development board to the computer
Code analysis
- app_chat_bot.c: Chatbot functionality implementation
- app_chat_bot.h: Chatbot functionality header file
- app_system_info.c: System information-related functions
- display: Display interface module.
- reset_netcfg.c: Device power on/off reset function.
- tuya_main.c: Application entry.
- app_display.h: Display module header file
- app_system_info.h: System information (such as network status, memory, etc.)
- reset_netcfg.h: Device power on/off reset function header file
- tuya_config.h: Device authorization code and other configuration information
Result demonstration
- The screen will light up after power-on, and the speaker will play "Entering network configuration mode"
- Download "Smart Life", and after installation, click to enter:
- Turn on Bluetooth -> Click the + in the upper left corner -> add device, you can then scan for the corresponding device, click the avatar to connect
- After hearing "I am now connected", start the conversation, and you can begin chatting
- Default App control panel

Flash Firmware Flashing
- The current demo provides test firmware, which can be used to test whether the onboard device functions properly by directly flashing the test firmware
- bin file path:
..\T5-E1-Touch-AMOLED-1.75-Demo\Firmware
Resources
Schematic Diagram
Project Diagram
Demo
Datasheets
T5-E1
Other Components
Software
FAQ
Support
Monday-Friday (9:30-6:30) Saturday (9:30-5:30)
Email: services01@spotpear.com