




- sales/support
Google Chat:---
- sales
+86-0755-88291180
- sales01
sales@spotpear.com
- sales02
dragon_manager@163.com
- support
tech-support@spotpear.com
- CEO-Complaints
zhoujie@spotpear.com
- Only Tech-Support
WhatsApp:13246739196
- Purchase/Shipping/Refund
WhatsApp:13424403025
Pi5-PCIe-Fish-Board-A User Guide
Step 1 Enabling PCIe】
By default the PCIe connector is not enabled. To enable it you should add the following option into /boot/firmware/config.txt and reboot:
# Enable the PCIe External connector.
dtparam=pciex1
A more memorable alias for pciex1 exists, so you can alternatively add dtparam=nvme to the /boot/firmware/config.txt file.
NOTE
Enumeration of PCIe devices behind a switch is not currently supported.
Step 2 PCIe Gen 3.0】
The connection is certified for Gen 2.0 speeds (5 GT/sec), but you can force it to Gen 3.0 (10 GT/sec) if you add the following lines to your /boot/firmware/config.txt.
# Enable the PCIe external connector
dtparam=pciex1
# Force Gen 3.0 speeds
dtparam=pciex1_gen=3
WARNING
The Raspberry Pi 5 is not certified for Gen 3.0 speeds, and connections to PCIe devices at these speeds may be unstable.
You should then reboot your Raspberry Pi for these settings to take effect.
Step 3 Booting from PCIe】
Once enabled, and after you reboot, an NVMe disk attached via the PCIe should be visible. However, your Raspberry Pi won’t try to boot off the NVMe drive. If you wish to enable boot support you will need to change the BOOT_ORDER in the bootloader configuration. Edit the EEPROM configuration by,
sudo rpi-eeprom-config --edit
and change the BOOT_ORDER line to be as below.
BOOT_ORDER=0xf416
after saving your changes, reboot your Raspberry Pi to update the EEPROM.
NOTE】
Your Raspberry Pi will not boot from an attached NVMe drive unless you have the external PCIe port enabledd, and there’s a NVMe drive with a valid boot partition attached to the PCIe bus.
Step 4 Control the on-board LED and Extra Power】
Note: This step is not necessary. The module can work normally without these connections
Connect as the following picture
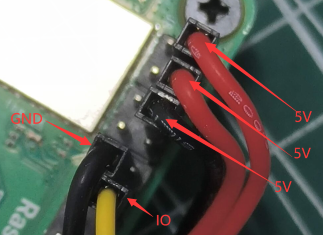
RUN LED-code
Note: This step is not necessary. The module can work normally without these connections
Connect as the following picture
RUN LED-code
TAG:
Luckfox Pico PLUS
Raspberry Pi Triple LCD HAT
Raspberry Pi 5.83 inch e-Paper link (G) RYBW 800x480 For Arduino / Jetson / STM32 /ESP32
User Guide
Sipeed Tang Primer 25K GW5A RISCV FPGA Development Board Dock SDRAM GW5A-LV25MG121 Retro Game linux
Raspberry Pi Pico 2 Plus RP2350 Board RP2350A
Raspberry Pi Mipi
Sipeed Lichee Tang Nano 20K FPGA RISCV Open-Source Retro-Game Linux MINI Development Board GW2AR-18
ESP32 C3 Round LCD Development Board Electronic EYE 0.71 inch Display Watch Screen GC9A01 160x160
ESP32-S3FH4R2 Matrix 8x8 RGB-LED-WiFi Bluetooth QST Attitude Gyro Sensor QMI8658C Arduino Python
Intel 12th
ESP32-S3
SpotPear
Raspberry Pi Pico
ESP32-C3 1.47 inch LCD Display Development Board 1.47inch Screen SD 172×320
Raspberry Pi 5 27W
Raspberry Pi 5 ABS Case
RP2040
ESP32-C6
JETSON NANO B01
TAG:
Computer Secondary Screen
ESP32-C3 1.47 inch LCD Display Development Board 1.47inch Screen SD 172×320
Arducam
Raspberry Pi USB Global Shutter Camera 1MP OV9281 120fps Black/White 120fps also For Jeston RDK
Raspberry Pi 5 Audio Jack
LuckFox Pico
Raspberry Pi Compute Module 0 CM0
X872 Raspberry Pi 4 USB M.2 NVMe SSD NAS
Luckfox Pico Camera MIS5001 5MP wide-angle lenses‌ For RV1106/Pro/MAX/Ultra (Not For RV1103 Pico)
Raspberry Pi Radio Module 2 original wireless module 2.4GHz WiFi4 Bluetooth 5.2
Pi5 Official Active Cooler
CVITEK CV1800B SG2000 SG2002 64MB 256MB 512MB RISC-V DRAM-64M Chip
USB Camera 5MP OS05A20 USB 2.0 onboard single mike
3D Display
ESP32 S3 touchscreen
Industrial USB TO RS485 Isolated Bidirectional Converter Original (E) FT232RNL 1200m Long Distance
LuckFox
LuckFox Pico camera
Raspberry Pi 5 8mp Camera
Jetson Orin Nano/NX Super Developer IO Base Development Board HDMI Version For Jetson Orin Nano/NX Module