- sales/support
Google Chat:---
- sales
+86-0755-88291180
- sales01
sales@spotpear.com
- sales02
dragon_manager@163.com
- support
tech-support@spotpear.com
- CEO-Complaints
zhoujie@spotpear.com
- sales/support
WhatsApp:13246739196
- HOME
- >
- ARTICLES
- >
- Common Moudle
- >
- LCD
4.3inch DSI LCD User Guide
Introduction
4.3inch Capacitive Touch Display for Raspberry Pi, 800×480, IPS Wide Angle, MIPI DSI Interface
Features
- 4.3inch IPS screen. 800x480 resolution
- Capacitive touch panel, support 5-point touch
- Supports Pi 4B/3B+/3A+/3B/2B/B+/A+. Another adapter board is required for CM3/3+
- DSI interface, refresh rate up to 60Hz.
- Supports Raspbian/Ubuntu/Kali and WIN 10 IoT, driver free.
User guide
Hardware connection
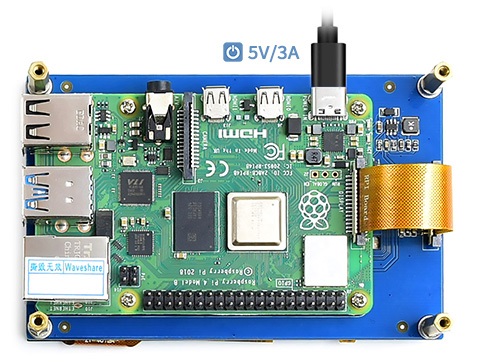
- Connect the DSI interface of 4.3inch DSI LCD to the DSI interface of Raspberry Pi.
- For easy use, you can fix the Raspberry Pi on the backside of the 4.3inch DSI LCD by screws

Software setting
- Download image (Raspbian, Ubuntu, Kali or WIN 10 IOT) from the Raspberry Pi website. https://www.raspberrypi.org/downloads/
- Unzip the archive to get .img file (The installation method of WIN 10 IOT is different, please refer to its website)
- Insert your TF card to PC by card reader, format it firstly
- Write the .img file to your TF card by Win32DiskImager or Etcher
- After writing, insert the TF card to your Raspberry Pi
- Power on Raspberry Pi
Rotation
To change the orientation of the display, you can modify /boot/config.txt file as below
- Open the file
sudo nano /boot/config.txt
- Modify it for rotating
- 90°
display_lcd_rotate=1
dtoverlay=rpi-ft5406,touchscreen-swapped-x-y=1,touchscreen-inverted-x=1
- 180
display_lcd_rotate=2
dtoverlay=rpi-ft5406,touchscreen-inverted-x=1,touchscreen-inverted-y=1
- 270
display_lcd_rotate=3
dtoverlay=rpi-ft5406,touchscreen-swapped-x-y=1,touchscreen-inverted-y=1
If you use Raspberry Pi 4, you need to remove the line: dtoverlay=cv4-fkms-V3D
- Save and reboot Raspberry Pi
sudo reboot
Install virtual keyboard
Open terminal and install it by the following command
sudo apt-get install matchbox-keyboard
After installing, you can click Accessories -> Keyboard to open the keyboard.
TAG:
ESP32-S3
RV1106
Solar Power Manager Module (D)
1.5inch Display
Raspberry Pi 5
Raspberry Pi RP2040 Camera
LuckFox Pico Mini
MP2.5G Raspberry Pi 5 PCIe to 2.5G Ethernet HAT Pi5 RTL8125
ESP32 S3 Development Board 1.46 inch Round LCD 1.46inch Display 412x412 QMI8658 Sensor / MIC / SD /MP3 Audio /Battery Port LVGL/HMI For Arduino
LuckFox Pico
EyeLink-RC-S1 Industrial Edition 5.5 inch Touchscreen Camera R1M Card Recording Flight Controller FPV Drone ground station image transmission remote
Developer Kit
NVIDIA Jetson Orin Nano 4/8GB AI 20/40Tops Lower Power Autonomous Machines
MLX90641
RP2040 LoRa
JETSON NANO B01
X1203 Raspberry Pi 5 UPS Board Uninterruptible Power Supply For Li-Battery (NOT includ)
ESP32 1.9inch LCD
Milk-V RJ45
Raspberry Pi 5.83 inch e-Paper link (G) RYBW 800x480 For Arduino / Jetson / STM32 /ESP32
TAG:
Raspberry Pi Pico HM01B0
KVM-A4 Raspberry Pi Zero 2W KVM
Raspberry Pi NB-IoT
Milk-V Duo
Raspberry pi 5 Aluminum Case
Raspberry Pi
Raspberry Pi 18.5 inch TypeC Monitor DisplayScreen Computer PC 1920x1080
ADXL354C Dev Board
Raspberry Pi Zero V1.3
CVITEK CV1800B SG2000 SG2002 64MB 256MB 512MB RISC-V DRAM-64M Chip
Raspberry Pi 7 inch DSI LCD C Case A Display MIPI 1024x600 Capacitive TouchScreen
ADXL357BEZ
ESP32 S3 4.3inch LCD 800x480 Captive TouchScreen Display Board LVGL Sensor CAN I2C RS485
CSI-to-HDMI
Raspberry Pi Pico 2 RP2350 LCD 0.96 inch Displayscreen RP2350A
mobile phone
1.28 inch Round Rotary LCD Smart Screen 1.28inch Knob Display 240x240 Option Touch/No-Touch
Jetson Nano
1.54inch OLED
Industrial Modbus RS485 RTU 8-ch Magnetic Latching Relay Module (C) With Digital Input


