


- sales/support
Google Chat:---
- sales
+86-0755-88291180
- sales01
sales@spotpear.com
- sales02
dragon_manager@163.com
- support
tech-support@spotpear.com
- CEO-Complaints
zhoujie@spotpear.com
- Only Tech-Support
WhatsApp:13246739196
- Purchase/Shipping/Refund
WhatsApp:13424403025
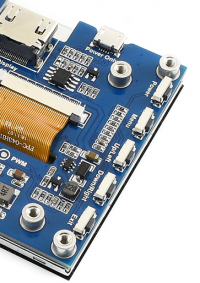
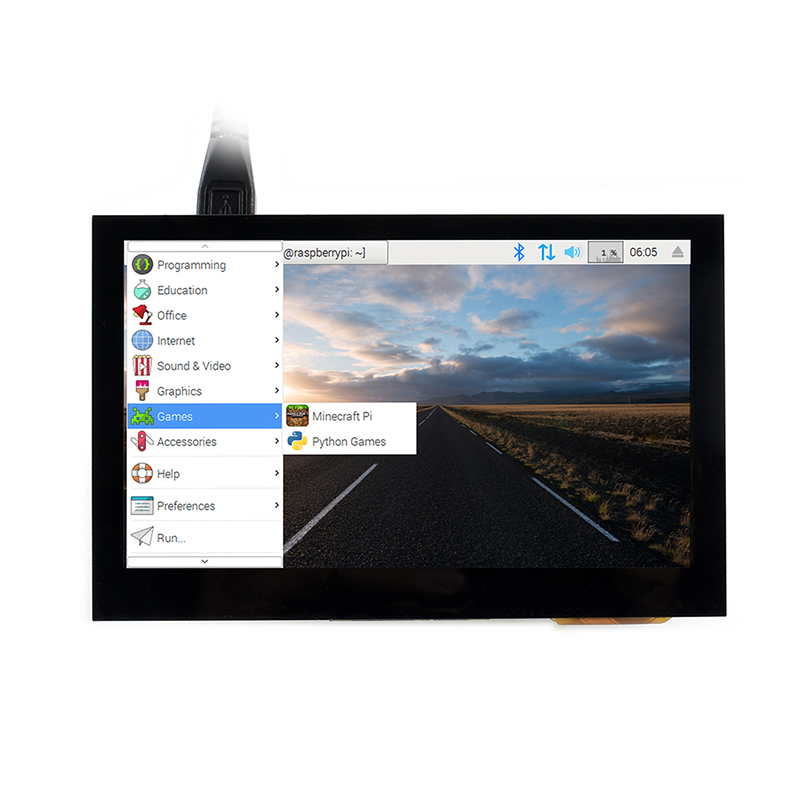
Raspberry Pi 4.3inch HDMI LCD (B) User Guide
Introduction
4.3inch, 800x480, Capacitive Touch Screen LCD, HDMI interface, Supports Multi mini-PCs, Multi Systems
Features
- IPS screen, 800x480 hardware resolution, configurable by software (up to 1920 x 1080)
- Supports popular mini PCs such as Raspberry Pi, BB Black, Banana Pi, as well as general desktop computers
- When works with Raspberry Pi, supports Raspbian/Ubuntu/Kali/Retropie/WIN10 IOT, driver free
- When work as a computer monitor, supports Windows 10/8.1/8/7, five-points touch, and driver free
- Multi languages OSD menu, for power management, brightness/contrast adjustment, etc.
- 3.5mm audio jack, speaker connector, supports HDMI audio output
How to use
Working with Windows PC
- Turn on the backlight switch on the backside of LCD
- Connect Touch interface of LCD to USB port of PC
- Connect HDMI (Display) interface of LCD to HDMI port of PC
- Connect earphone to HP interface or 8Ω 5W Speaker to Speaker interface of LCD if audio output is required.
- Hot-Plug isn't supported by some PC, you can try to restart if LCD doesn't display after connecting
Working with Raspberry Pi
- Download lastest Raspbian image from Raspberry Pi website
- Write the image to SD card. (refer to RPi Image Install about how to write image)
- After writing, open and modify the /boot/config.txt file, which located at root directory (BOOT) of SD card, append these lines to config.txt file
max_usb_current=1
hdmi_group=2
hdmi_mode=87
hdmi_cvt 800 480 60 6 0 0 0
- 【Note】There should not be spaces in both sides of equal-sign.
- If the LCD cannot work with statements above when working with Pi 4, you can comment/remove statement dtoverlay=cv4-fkms-V3D on config.txt file and try again.
- Connect Touch interface of LCD to USB port of Raspberry Pi
- Connect HDMI interface of LCD to HDMI port of Raspberry Pi
Configure orientation (Raspberry Pi)
- Display rotate
Add line below to /boot/config.txt file
display_rotate=1 #1:90; 2: 180; 3: 270
Save and reboot
sudo reboot
- Touch rotate
Raspbian doesn't support touchscreen rotate as display, therefore, we need to rotate touch separately.
- Install libinput
sudo apt-get install xserver-xorg-input-libinput
- Create xorg,conf.d directory
sudo mkdir /etc/X11/xorg.conf.d
- Copy 40-libinput-config file to the folder created
sudo cp /usr/share/X11/xorg.conf.d/40-libinput /etc/X11/xorg.conf.d/
- Append setting statements to 40-libinput-conf file
sudo nano /etc/X11/xorg.conf.d/40-libinput.conf
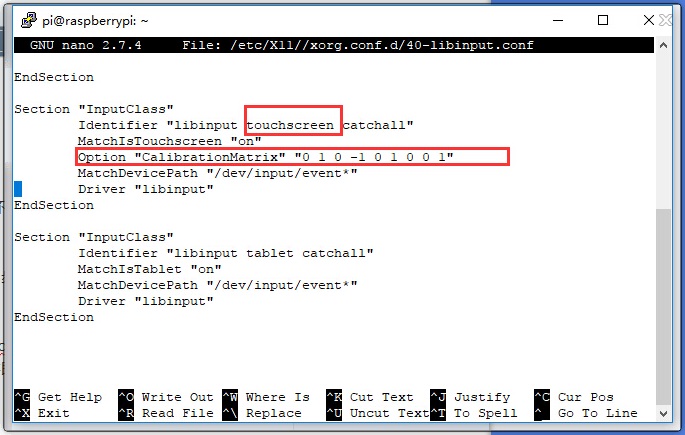
【Note】
- 90 degree: Option "CalibrationMatrix" "0 1 0 -1 0 1 0 0 1"
- 180 degree: Option "CalibrationMatrix" "-1 0 1 0 -1 1 0 0 1"
- 270 degree: Option "CalibrationMatrix" "0 -1 1 1 0 0 0 0 1"
- Save and reboot
Keys
- Power: Open/Close LCD display (backlight)
- Menu: Open menu/OK
- Up/Left: Direction
- Down/Right: Direction
- Exit: Return/Exit
TAG:
Milk-V Duo Ethernet
Raspberry Pi 4 Sound Card
NVIDIA-acess User Guide
X1005 Raspberry Pi 5 PCIe to M.2 NVMe Dual SSD Adapter Board HAT Pi5 Double 2230/2242/2260/2280
Jetson Orin NX
Raspberry Pi 5 inch LCD 720x1280 Capacitive TouchScreen Display HDMI For Jetson Nano/mini Computer PC
Raspberry Pi 12.3 inch LCD HDMI /Type C Display In-Cell Capacitive TouchScreen 1920x720 For Jetson Nano/mini Computer PC
Raspberry Pi 7.5 inch e-Paper link (H) RYBW 800x480 For Arduino / Jetson Nano / STM32
TOF Time-Of-Flight Laser Range Sensor Radar Module UART / I2C Port
SpotPear
ESP32-S3 GEEK
Raspberry Pi LCD 3D Display
ESP32-S3 0.85inch LCD
Arducam
Raspberry Pi Pico 2 RP2350A USB-C Mini Development Board
ESP32-S3 1.14inch LCD
NVIDIA Jetson Xavier NX AI 21TOPS Supercomputer Edge Computing eMMC-16GB RAM 8/16GB
Luckfox Pico LCD
ISX031C GMSL Camera H100 Image Sensor IP67 protection rating For Jetson Orin And MAX9296 GMSL camera
Raspberry Pi 2inch LCD
TAG:
ESP32-S3 GEEK Development Board
Raspberry Pi 3G 4G LTE Mini PCIe Samsung ARTIK Rock64 Asus Tinker Latte Panda
RP2040 LoRa
NVIDIA
Raspberry Pi Touchscreen
DeepSeek AI Voice Chat ESP32 S3 Development Board 2.06-inch AMOLED Display 410×502 2.06inch TouchScreen Programmable Watch
Jetson Camera
Raspberry Pi 64MP Camera
Industrial grade isolated USB to RS232/485 converter supports USB to 2-way RS232 + 2-way RS232/485 original FT4232HL
PC USB Secondary Screen
Raspberry Pi 5 PCIe FFC Standard PCIe Slot
Raspberry Pi 3.97 inch e-Paper link BW 800x480 For Arduino / Jetson / STM32 /ESP32
Raspberry Pi RP2040 Keyboard
Raspberry Pi 5 PCIe to 2.5G Ethernet Adapter Board Plug and Play
Raspberry Pi Compute Module 5 CM5 Official Original IO Board
LuckFox
XIAO Round 1.28inch Capacitive Touch LCD Display 240×240 screen RTC watch SeeedStudio
Raspberry Pi MLX90640
ESP32 S3 1.91 inch AMOLED Display Screen Arduino LVGL SD-Port QMI8658C 6-Axis Sensor
Jetson Orin 5G/4G/3G expansion board GNSS GPS RM520N-GL