


- sales/support
Google Chat:---
- sales
+86-0755-88291180
- sales01
sales@spotpear.com
- sales02
dragon_manager@163.com
- support
tech-support@spotpear.com
- CEO-Complaints
zhoujie@spotpear.com
- Only Tech-Support
WhatsApp:13246739196
- Purchase/Shipping/Refund
WhatsApp:13424403025
Writing-Image User Guide
Steps
Please note that the EMMC version does not support being booted from the SD card.
Image Download
- Download the latest Raspberry Pi image from Raspberry Pi Website.
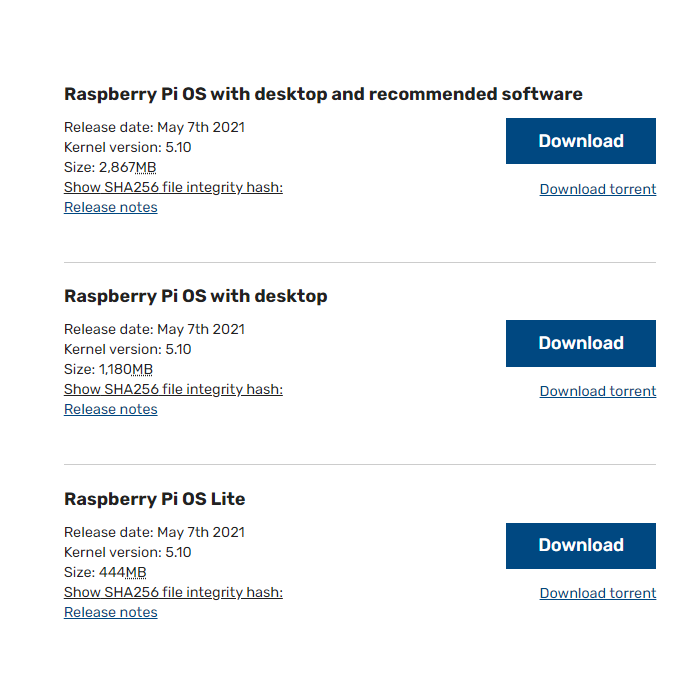
- The option "Raspberry Pi OS with desktop and recommended software" is recommended for EMMC 16G or CM4 lite 16G above memory cards.
Download rpiboot
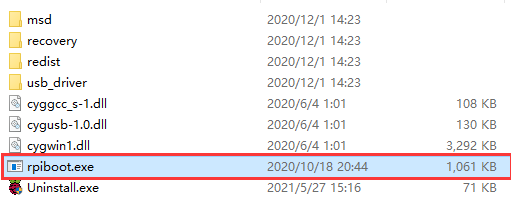
- Download and open the rpiboot software with administrator authority to install the driver and start the tool.
- After the installation is successful, there is an application of rpiboot.exe in the installation directory.
Enter Writing Mode
- Connect BOOT and GND, set the switch to ON, or just connect the USB-C port. You can check the product page to understand the location of the BOOT pin, for example:

- Connect the Micro USB/Type C interface (SLAVE port) of the carrier board to the host PC, then connect a power adapter to the cattier board.
- If you use the following products, you do not need to connect the power adapter:
Compute Module 4 PoE Board
Compute Module 4 IO Board
CM4-DUAL-ETH-BASE
Compute Module 4 PoE 4G Board
- If no need external power supply:
CM4-IO-BASE-B
CM4-IO-BASE-A
Compute Module 4 PoE Board (B)
CM4-NANO-A
CM4-NANO-B
- After connecting, the boards should be recognized as BCMxxx devices on Windows PC.

- Run the rpiboot.exe as administrator (The software in the installation directory of Step 2).
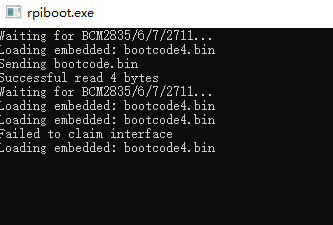
- Then the boards will be recognized as a portable disk, just format and write it with a new image.

Note: If your PC doesn't recognize the BCMxxx device, please check the connection again. Note that the USB cable used should be an OTG cable. *If you cannot write the image successfully, please try:- Use Windows 10 PC instead of Windows 7 or Linux. The other two OS are unstable as feedback.
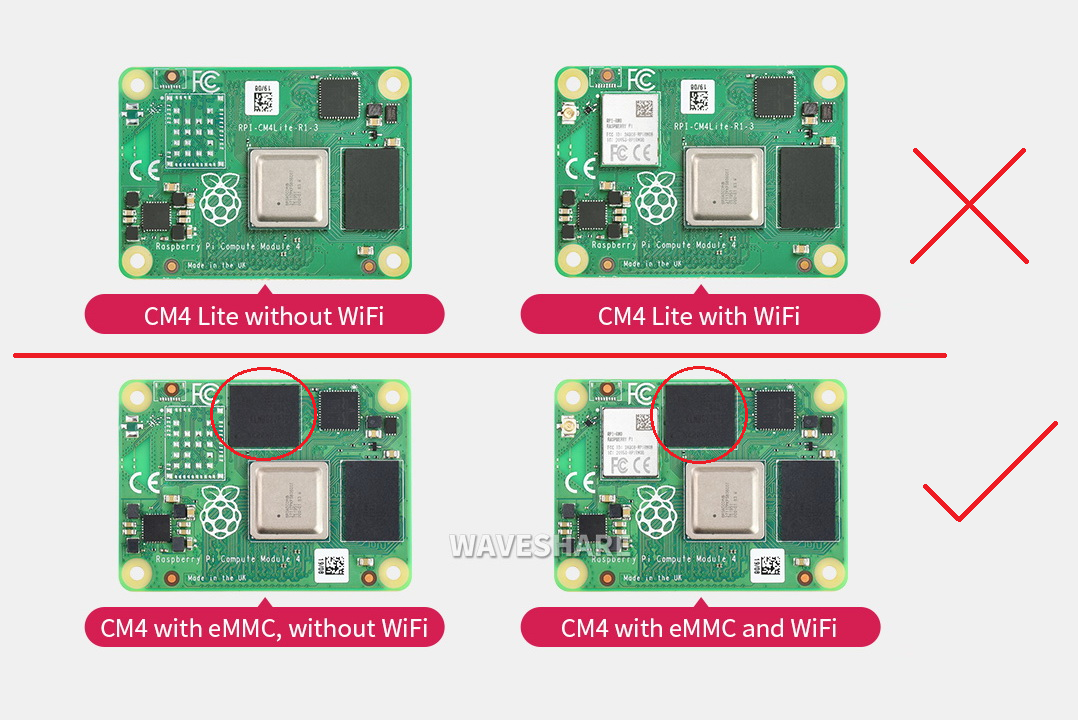
- Check if you write the eMMC version but not the Lite version. The eMMC version has one more chip than the Lite version.
- Connect a power adapter to the Power interface.
- Change to another USB OTG cable.
- Change to another USB port of the PC.
- Try to restart your host PC.
- Remount the CM4 board and try it again.
- Try with another PC.
- Check if you write the eMMC version but not the Lite version. The eMMC version has one more chip than the Lite version.
- Use Windows 10 PC instead of Windows 7 or Linux. The other two OS are unstable as feedback.
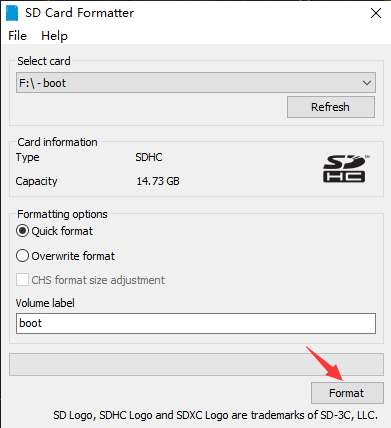
Format EMMC
- Format the SD card by SDFormatter.exe software
- Also, you can use the disk manager in WIN to set or delete the partition, just set the new partition after deleting the partition:
- Right-click My Computer -> Manager -> Disk Manager -> Find the new disk descriptor (Please select the correct one) -> Delete all partitions -> Create a partition (any file system) If you have programmed the system, there will be two disk descriptors, all you need to do is format it directly or delete the partition.
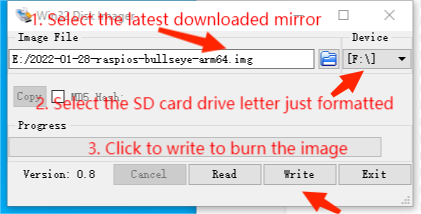
Write Image
- Write the Raspberry Pi image by Win32DiskImager.exe software.
- Choose the image file and click "Write" to start. It may prompt whether to format it after writing, please ignore it.
- After writing, in My Computer, a USB flash driver descriptor is recognized.
- Note:
- If you use the latest Raspberry Pi OS (image after October 30, 2021) USB2.0 is OTG mode by default, CM4 will report an error:
config failed, hub doesn't have any ports! (err -19)
- However, USB is still available. If you want to remove this error, remove "otg_mode=1" in [cm4] of config.txt, and add "dtoverlay=dwc2, dr_mode=host" (USB cannot be recognized without adding it).
dtoverlay=dwc2,dr_mode=host

- If you use the latest Raspberry Pi OS (image after October 30, 2021) USB2.0 is OTG mode by default, CM4 will report an error:
Reboot
- Power off after writing images, just disconnect it from the computer. Turn off the BOOT key or switch it off. Then reboot it.
TAG:
Raspberry Pi 4/4.3 inch DSI MIPI LCD TouchScreen Display 4/4.3inch 480x800 For Luckfox Lyra RK3506/ESP32-P4/Luckfox Omni3576
Raspberry Pi Compute Module 5 PoE BASE A IO Board RJ45 For CM5 Lite/eMMC
USB Binocular Camera 2MP OS02G10 Distortion Free Binocular Synchronous Frame USB 2.0 Plug and Play
RTL8723 WIFI SDIO Expansion Module Board For Luckfox Pico Mini B /Luckfox Pico Plus /Luckfox Pico Pro /Luckfox Pico Max
Raspberry Pi display
Raspberry Pi AI HAT+ Official Original Hailo-8/8L 13/26Tops For Pi5 PCIe M.2 Gen3
ESP32-S3FH4R2-MINI-Tiny-Stamp-WIFI-Bluetooth5
Raspberry Pi 5
GPU Monitor Display
ESP32 3.5 inch Capacitive TouchScreen LCD Display ST7796 FT6336 320x480 For Arduino/Raspberry Pi/Pico
Raspberry Pi 8.8 inch DSI MIPI LCD TouchScreen Display 8.8inch 480x1920 For Luckfox Lyra RK3506/ESP32-P4/Luckfox Omni3576
Milk-V Duo RJ45 Tutorial
EyeLink-RC-S1 Industrial Edition 5.5 inch Touchscreen Camera R1M Card Recording Flight Controller FPV Drone ground station image transmission remote
1.5inch LCD
ESP32-S3 Industrial-Grade IOT RS485 CAN Communicator WiFi Bluetooth
Programmable Magnetic Encoder
Spotpear
ESP32-C3FN4
Core3566104000
AV to TTL
TAG:
LuckFox Pico pro
Rotary touchscreen
2.13Inch E-Ink
ESP32-S3 1.69inch LCD Display WiFi Bluetooth QST Attitude Gyro Sensor QMI8658C Arduino Python
spotpear
Seeed Studio XIAO SAMD21 Tiny SuperMini Arduino
Raspberry Pi Pico W
PoE-HAT-F
Raspberry Pi AI Camera 12MP IMX500 RP2040
ESP32 Mini TV
Autofocus Camera
7inch LCD 1024×600 Computer PC Monitor Display Secondary Screen TypeC USB CPU RAM Windows
ESP32 S3 2.1 inch LCD 480x480 Captive TouchScreen Display QMI8658C 6-Axis Sensor GPIO Expansion TCA9554
Home Assistant voice
Industrial USB TO RS485 Isolated Bidirectional Converter Original (E) FT232RNL 1200m Long Distance
Solar
ESP32 C6 1.47 inch LCD Display Screen WiFi6 BLE5 ST7789
M12 High Resolution Lens 16MP 105 3.56mm Raspberry Pi High Quality HQ Camera M12
ESP32-S3 7inch LCD Display 7 inch TouchScreen 7B 1024×600 N16R8 CAN RS485 Sensor
ESP32-P4-ETH RJ45 POE DSI/MIPI 10.1 inch LCD Display Touchscreen/CSI Camera/Audio Speaker AI Deepseek