- sales/support
Google Chat:---
- sales
+86-0755-88291180
- sales01
sales@spotpear.com
- sales02
dragon_manager@163.com
- support
tech-support@spotpear.com
- CEO-Complaints
zhoujie@spotpear.com
- sales/support
WhatsApp:13246739196
Raspberry Pi 5 PCIe to HAT With RM520N-GL User Guide
Overview
Introduction
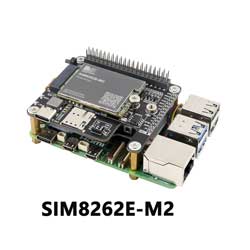
PCIe to 5G M.2 adapter board is designed specifically for Raspberry Pi 5, compatible with 3042/3052 size 5G modules, supporting Gen2 mode and high-speed communication.
Features
- Support PCIe protocol 5G M.2 interface communication protocol, high-speed communication, low delay.
- PCI-E x1 Gen2 mode.
- Only support Raspberry Pi 5.
- Compatible with 3042 / 3052 sized 5G M.2 communication modules.
- Onboard operation indicator, PWR indicator normally on when power on; When using SIM8262 series modules, NET indicator blinking when registering the network; and it is normally on when RM5xx series modules are used. It is easy to learn the working status.
- HAT+ design, with onboard EEPROM chip.
- Onboard power monitoring chip, real-time monitoring the working status of 5G modules.
- Reserve fan vent and the mounting holes to reserve air ducts for PI5 fans, increase air flow and reduce module temperature.
Dimensions
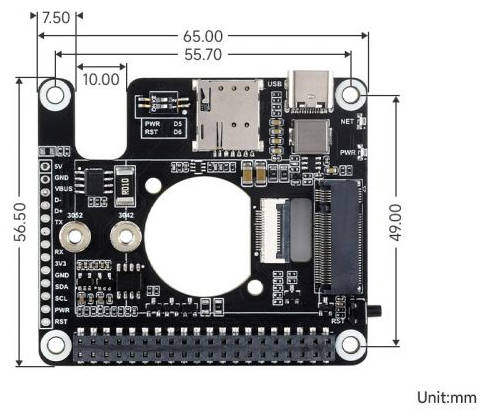
How to Use
Hardware Connection
- Please pay attention to the cable direction, as shown below:
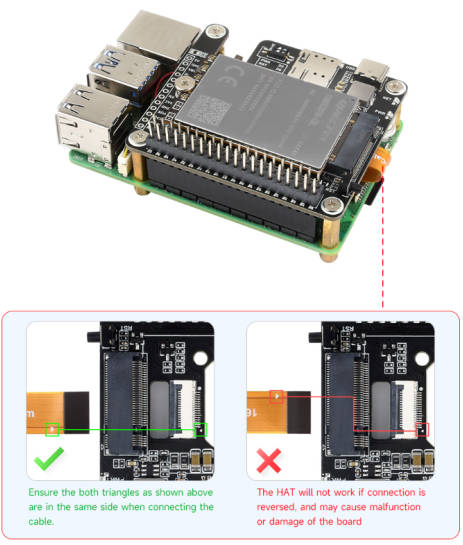
Antenna Installation
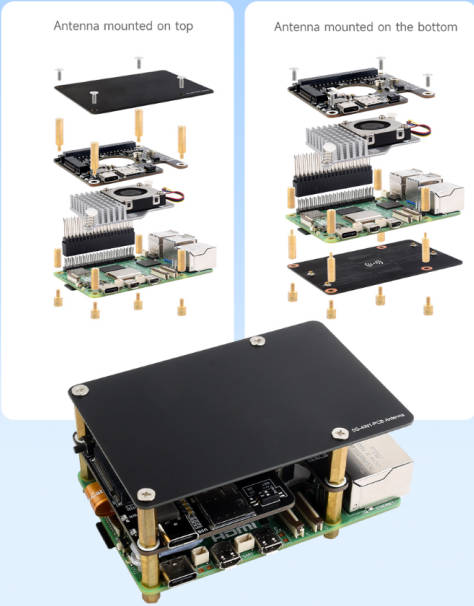
- The 5G PCBA antenna with this product can be installed through the screw pack, and the Top Installation method is recommended.
DIP Switch Control
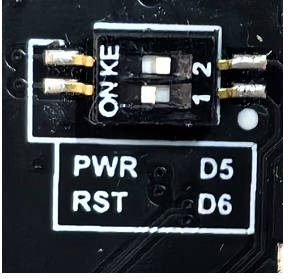
The on-board module switch and restart function dip switch are connected to GPIO5 and GPIO6 of Raspberry Pi. By opening the dip switch, you can control the module's reset and power functions via the Raspberry Pi.
In the default setting, please open the RST of the dip switch and close the PWR switch. You can use a script to restart the module when the Raspberry Pi restarts to ensure proper loading of the module's PCIe interface.
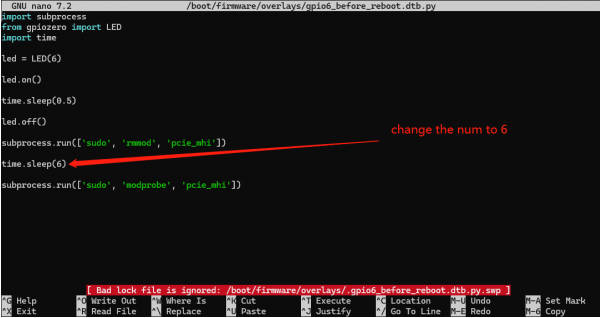
Reset or Power ON/OFF Module with Code
Control GPIO pins with python gpiozero, and the high/low level switch should be adjusted according to the actual status (power on/off, rebooting time sequence) of the module.
import subprocess
from gpiozero import LED
import time
# led = LED(5) #Ctl On/off
led = LED(6) # Ctl Restart
led.on()
time.sleep(0.5)
led.off()
Update Kernel
1. Copy the following commands for one-key upgrade (5~10 minutes required), and the command has settled module reset issue. Then, you can turn on the SIP and turn off the PWR of the dip switch.
wget -O - https://files.waveshare.com/wiki/PCIe-TO-5G-HAT%2B/install.sh | sudo bash
2. After the Raspberry Pi auto reset, you can view the kernel information.
uname --all
Modify Module Modes
- Connect the module to the Windows PC with one TYPE-C To USB cable (you may need to install the driver, refer to #Resources, and select the appropriate driver file to install according to the corresponding module).
- Use serial port assistant to open the module AT port.
SIM8262XX
- Modify the module to PCIe EP mode:
AT+CPCIEMODE=EP
at+cusbcfg=usbid,1e0e,9001
RM5xxx Series Module
- Modify the module to PCIe EP mode:
AT+QCFG="data_interface",1,0
AT+QCFG="pcie/mode",0
AT+QCFG="usbnet",2
Dial-up Internet Test
Modify the Raspberry Pi kernel and the module PCIe mode, then reboot the Raspberry Pi or reboot with power off.
Input lspci to view PCIe device loading status.
Use the Dial-up Tool to Dial up the Internet
sudo waveshare-CM
Power Monitoring
- Onboard INA219 chip can detect voltage and current, convenient for monitoring the status of the device, monitoring the 5V voltage input status (not 3.3V).
- Default I2C address 0x40, the address can be modified through the back resistor to support the stacking of different expansion boards.
Demo:
wget https://files.waveshare.com/wiki/PCIe-TO-5G-HAT%2B/PCIe_TO_M.2_HAT%2B.zip
unzip -o PCIe_TO_M.2_HAT+.zip -d ./PCIe_TO_M.2_HAT+
cd PCIe_TO_M.2_HAT+
sudo python INA219.py
Openwrt System Porting
Currently running the OpenWrt operating system on Raspberry Pi 5 is experimental to some extent.
Sample Image
- Click here to download the sample image.
Dial-up Test
Use the following dial-up tools to access the network:
waveshare-CM
Windows Network Access
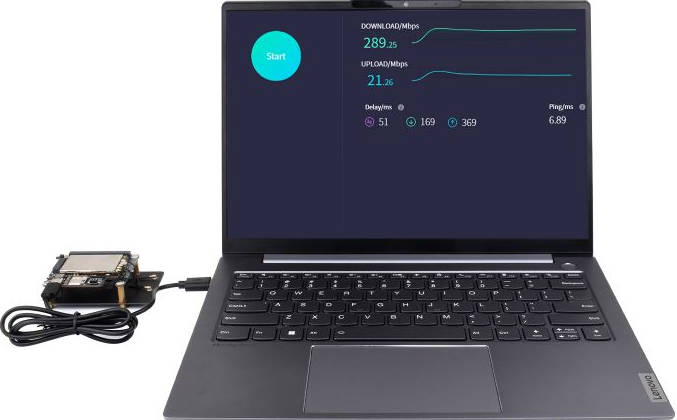
To use this product to access Windows and the Internet, you need to set the module to USB mode and use the Type-C port on the board to access windows
Related commands
SIM8262XX Series Modules
Connect it with serial port tool, and switch the module mode as auto dial-up.
at+cusbcfg=usbid,1e0e,9011
RM5xxx Series Modules
Modify the data channel of the module as USB:
AT+QCFG="data_interface",0,0
AT+QCFG="usbnet",2
Resource
Datasheet
INA219
SIM8262 Series Module
- SIM8262E-M2 SPEC
- SIM82XX SIM83XX Series AT Command Manual V1.02.pdf
- SIM83X0 SIM82X0 Series Module Hardware Design Manual
- SIM82XX SIM83XX Series SSL Application Note
- SIM82XX SIM83XX Series TCPIP Application Note V1.01
- SIM82XX SIM83XX Series GNSS Application Note V1.00
- SIM82XX SIM83XX Series SMS Application Note V1.01
- SIM82XX SIM83XX Series MQTT(S) Application Note V1.01
- SIM82XX SIM83XX Series LBS Application Note V1.01
- SIM82XX SIM83XX Series HTTP(S) Application Note V1.01
- SIM82XX SIM83XX Series TTS Application Note V1.01
RM5xx Series Module
Drivers
SIM8262 Series Modules
RM5xx Series Modules
FAQ
Please use the Linux drivers we provided below to compile by yourself:
This situation might occur due to a Raspberry Pi DNS server error. In this case, manual DNS settings are required.
First of all, it is important to understand the lab data and the actual data, in reality, due to the lack of base stations, signal coverage is not good, 5G coverage bugs are also more, the network speed may not always reach the peak. Under normal circumstances, 4G upload speed stabilized at 20-40Mbps, 5G upload speed stabilized at 100Mbps (fewer people or nearer to the base station, the faster the speed).
- It may be switched to SIM 2, please use the following command to switch to SIM 1:
AT+SMSIMCFG=1,1
To switch to SIM2, use the following command: (some HATs have SIM2):
AT+SMSIMCFG=1,2
- If it still doesn't work, consider that Airplane Mode is on, use the following command to turn off Airplane Mode:
AT+CFUN=1
- If only the socket is detached, replacing it should suffice.
- However, if the copper foil is also detached, typically it cannot be repaired.
- When removing it, ensure balanced force by gently rocking it left and right; avoid pulling forcefully.
- IPEX Generation 4 sockets are relatively fragile, so handle them with extra care during use.
Support
Monday-Friday (9:30-6:30) Saturday (9:30-5:30) -China time
Email: services01@spotpear.com
[Tutorial Navigation]
- Overview
- Introduction
- Dimensions
- How to Use
- Hardware Connection
- Antenna Installation
- DIP Switch Control
- Update Kernel
- Modify Module Modes
- Dial-up Internet Test
- Power Monitoring
- Openwrt System Porting
- Windows Network Access
- Resource
- FAQ
- Question:Can the provided kernel be used in other Linux systems like Ubuntu? How can PCIe driver support be added to the Ubuntu system?
- Question:The module I am using is SIM8262E-M2, I have loaded the provided kernel, why can't I register to the device successfully?
- Question:I've identified PCIe, loaded it into the device, the dial-up demo is running normally, and the SIM card isn't overdue. Why can't I get online?
- Question:Why is my 5G speed not as fast as it says online?
- Question:What should I do if the SIM card is not recognized by SIM820X-M2 5G HAT?
- Question:The IPEX Generation 4 antenna socket of the 5G module has come off. Can it be repaired?
- Support


