- sales/support
Google Chat:---
- sales
+86-0755-88291180
- sales01
sales@spotpear.com
- sales02
dragon_manager@163.com
- support
tech-support@spotpear.com
- CEO-Complaints
zhoujie@spotpear.com
- Only Tech-Support
WhatsApp:13246739196
- Purchase/Shipping/Refund
WhatsApp:13424403025
Raspberry Pi 5 AI Kit User Guide
【Product Description】
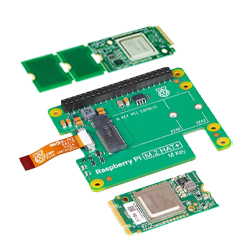
The Raspberry Pi AI Kit bundles the Raspberry Pi M.2 HAT+ with a Hailo AI acceleration module for use with Raspberry Pi 5. The kit contains the following:
[] Hailo AI module containing a Neural Processing Unit (NPU)
[] Raspberry Pi M.2 HAT+, to connect the AI module to your Raspberry Pi 5
[] thermal pad pre-fitted between the module and the M.2 HAT+
[] mounting hardware kit
[] 16mm stacking GPIO header
【AI module features】
】13 tera-operations per second (TOPS) neural network inference accelerator built around the Hailo-8L chip.
】M.2 2242 form factor
【Install】
】To use the AI Kit, you will need:
[] a Raspberry Pi 5
】Each AI Kit comes with a pre-installed AI module, ribbon cable, GPIO stacking header, and mounting hardware. Complete the following instructions to install your AI Kit:
】 First, ensure that your Raspberry Pi runs the latest software. Run the following command to update:
sudo apt update && sudo apt full-upgrade
】Next, ensure that your Raspberry Pi firmware is up-to-date. Run the following command to see what firmware you’re running:
sudo rpi-eeprom-update
[] If you see 6 December 2023 or a later date, proceed to the next step. If you see a date earlier than 6 December 2023, run the following command to open the Raspberry Pi Configuration CLI:
sudo raspi-config
[] Under Advanced Options > Bootloader Version, choose Latest. Then, exit raspi-config with Finish or the Escape key.
[] Run the following command to update your firmware to the latest version:
sudo rpi-eeprom-update -a
Then, reboot with sudo reboot.
】Disconnect the Raspberry Pi from power before beginning installation.
】For the best performance, we recommend using the AI Kit with the Raspberry Pi Active Cooler. If you have an Active Cooler, install it before installing the AI Kit.
】Install the spacers using four of the provided screws. Firmly press the GPIO stacking header on top of the Raspberry Pi GPIO pins; orientation does not matter as long as all pins fit into place. Disconnect the ribbon cable from the AI Kit, and insert the other end into the PCIe port of your Raspberry Pi. Lift the ribbon cable holder from both sides, then insert the cable with the copper contact points facing inward, towards the USB ports. With the ribbon cable fully and evenly inserted into the PCIe port, push the cable holder down from both sides to secure the ribbon cable firmly in place.
】Set the AI Kit on top of the spacers, and use the four remaining screws to secure it in place.
】Insert the ribbon cable into the slot on the AI Kit. Lift the ribbon cable holder from both sides, then insert the cable with the copper contact points facing up. With the ribbon cable fully and evenly inserted into the port, push the cable holder down from both sides to secure the ribbon cable firmly in place.
】Congratulations, you have successfully installed the AI Kit. Connect your Raspberry Pi to power; Raspberry Pi OS will automatically detect the AI Kit.
WARNING
Always disconnect your Raspberry Pi from power before connecting or disconnecting a device from the M.2 slot.
【Getting Started】
This guide will help you set up the Raspberry Pi AI Kit with your Raspberry Pi 5. This will enable you to run rpicam-apps camera demos using the Hailo AI neural network accelerator.
】Prerequisites
For this guide, you will need the following:
】a Raspberry Pi 5
】a Raspberry Pi AI Kit, which includes:
[] an M.2 HAT+
[] a pre-installed Hailo-8L AI module
】a 64-bit Raspberry Pi OS Bookworm install
】any official Raspberry Pi camera (e.g. Camera Module 3 or High Quality Camera)
】Hardware setup
】Attach the camera to your Raspberry Pi 5 board following the instructions at Install a Raspberry Pi Camera. You can skip reconnecting your Raspberry Pi to power, because you’ll need to disconnect your Raspberry Pi from power for the next step.
】Follow the installation instructions to get your AI Kit hardware connected to your Raspberry Pi 5.
】Follow the instructions to enable PCIe Gen 3.0. This step is optional, but highly recommended to achieve the best performance with your AI Kit.
】Install the dependencies required to use the AI Kit. Run the following command from a terminal window:
sudo apt install hailo-all
[] This installs the following dependencies:
->Hailo kernel device driver and firmware
->HailoRT middleware software
->Hailo Tappas core post-processing libraries
->The rpicam-apps Hailo post-processing software demo stages
】Finally, reboot your Raspberry Pi with sudo reboot for these settings to take effect.
】To ensure everything is running correctly, run the following command:
hailortcli fw-control identify
[] If you see output similar to the following, you’ve successfully installed the AI Kit and its software dependencies:
Executing on device: 0000:01:00.0
Identifying board
Control Protocol Version: 2
Firmware Version: 4.17.0 (release,app,extended context switch buffer)
Logger Version: 0
Board Name: Hailo-8
Device Architecture: HAILO8L
Serial Number: HLDDLBB234500054
Part Number: HM21LB1C2LAE
Product Name: HAILO-8L AI ACC M.2 B+M KEY MODULE EXT TMP
[] Additionally, you can run dmesg | grep -i hailo to check the kernel logs, which should yield output similar to the following:
[ 3.049657] hailo: Init module. driver version 4.17.0
[ 3.051983] hailo 0000:01:00.0: Probing on: 1e60:2864...
[ 3.051989] hailo 0000:01:00.0: Probing: Allocate memory for device extension, 11600
[ 3.052006] hailo 0000:01:00.0: enabling device (0000 -> 0002)
[ 3.052011] hailo 0000:01:00.0: Probing: Device enabled
[ 3.052028] hailo 0000:01:00.0: Probing: mapped bar 0 - 000000000d8baaf1 16384
[ 3.052034] hailo 0000:01:00.0: Probing: mapped bar 2 - 000000009eeaa33c 4096
[ 3.052039] hailo 0000:01:00.0: Probing: mapped bar 4 - 00000000b9b3d17d 16384
[ 3.052044] hailo 0000:01:00.0: Probing: Force setting max_desc_page_size to 4096 (recommended value is 16384)
[ 3.052052] hailo 0000:01:00.0: Probing: Enabled 64 bit dma
[ 3.052055] hailo 0000:01:00.0: Probing: Using userspace allocated vdma buffers
[ 3.052059] hailo 0000:01:00.0: Disabling ASPM L0s
[ 3.052070] hailo 0000:01:00.0: Successfully disabled ASPM L0s
[ 3.221043] hailo 0000:01:00.0: Firmware was loaded successfully
[ 3.231845] hailo 0000:01:00.0: Probing: Added board 1e60-2864, /dev/hailo0
】To ensure the camera is operating correctly, run the following command:
rpicam-hello -t 10s
This starts the camera and shows a preview window for ten seconds. Once you have verified everything is installed correctly, it’s time to run some demos.
】Demos
The rpicam-apps suite of camera applications implements a post-processing framework. This section contains a few demo post-processing stages that highlight some of the capabilities of the AI Kit.
The following demos use rpicam-hello, which by default displays a preview window. However, you can use other rpicam-apps instead, including rpicam-vid and rpicam-still. You may need to add or modify some command line options to make the demo commands compatible with alternative applications.
To begin, download the post-processing JSON files required for the demos. These files determine which post-processing stages to run and configure the behaviour of each stage. For example, you can enable, disable, strengthen, or weaken the strength of the temporal filtering in the object detection demos. Or you could enable or disable the output mask drawing in the segmentation demo.
To download the entire collection of post-processing JSON files, clone the rpicam-apps repo. Run the following command to clone only the most recent commit from the repo, saving space:
git clone --depth 1 https://github.com/raspberrypi/rpicam-apps.git ~/rpicam-apps
TIP
The commands provided in subsequent sections use the JSON files in this repository. To make it easy to reference these files, this command creates the cloned rpicam-apps directory in your home folder. If you modify the location of this directory, you must also alter the demo commands below to reference the new location of the JSON files.
】Object Detection
This demo displays bounding boxes around objects detected by a neural network. To disable the viewfinder, use the -n flag. To return purely textual output describing the objects detected, add the -v 2 option. Run the following command to try the demo on your Raspberry Pi:
rpicam-hello -t 0 --post-process-file ~/rpicam-apps/assets/hailo_yolov6_inference.json --lores-width 640 --lores-height 640
Alternatively, you can try another model with different trade-offs in performance and efficiency.
To run the demo with the Yolov8 model, run the following command:
rpicam-hello -t 0 --post-process-file ~/rpicam-apps/assets/hailo_yolov8_inference.json --lores-width 640 --lores-height 640
To run the demo with the YoloX model, run the following command:
rpicam-hello -t 0 --post-process-file ~/rpicam-apps/assets/hailo_yolox_inference.json --lores-width 640 --lores-height 640
To run the demo with the Yolov5 Person and Face model, run the following command:
rpicam-hello -t 0 --post-process-file ~/rpicam-apps/assets/hailo_yolov5_personface.json --lores-width 640 --lores-height 640
】Image Segmentation
This demo performs object detection and segments the object by drawing a colour mask on the viewfinder image. Run the following command to try the demo on your Raspberry Pi:
rpicam-hello -t 0 --post-process-file ~/rpicam-apps/assets/hailo_yolov5_segmentation.json --lores-width 640 --lores-height 640 --framerate 20
】Pose Estimation
This demo performs 17-point human pose estimation, drawing lines connecting the detected points. Run the following command to try the demo on your Raspberry Pi:
rpicam-hello -t 0 --post-process-file ~/rpicam-apps/assets/hailo_yolov8_pose.json --lores-width 640 --lores-height 640
】Further Resources
Hailo has also created a set of demos that you can run on a Raspberry Pi 5, available in the hailo-ai/hailo-rpi5-examples GitHub repository
You can find Hailo’s extensive model zoo, which contains a large number of neural networks, in the hailo-ai/hailo_model_zoo GitHub repository
Check out the Hailo community forums and developer zone for further discussions on the Hailo hardware and tooling.
【Product brief】
For more information about the AI Kit, including mechanical specifications and operating environment limitations, see the product brief
【Support】
Monday-Friday (9:30-6:30) Saturday (9:30-5:30) -China time
Email: services01@spotpear.com