


- sales/support
Google Chat:---
- sales
+86-0755-88291180
- sales01
sales@spotpear.com
- sales02
dragon_manager@163.com
- support
tech-support@spotpear.com
- CEO-Complaints
zhoujie@spotpear.com
- Only Tech-Support
WhatsApp:13246739196
- Purchase/Shipping/Refund
WhatsApp:13424403025
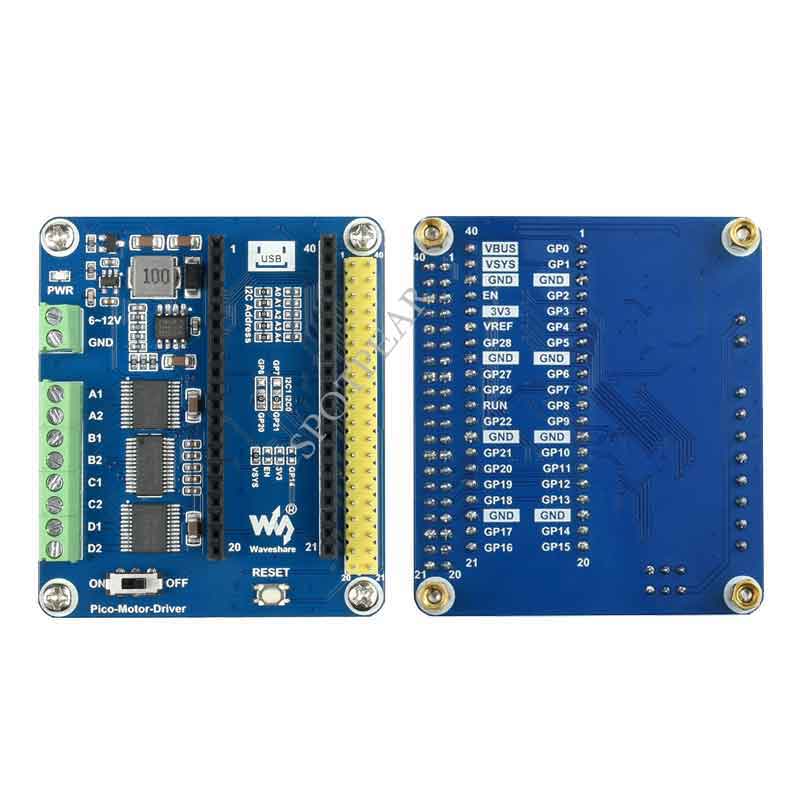
Raspberry Pi Pico-Motor-Driver User Guide
Overview
This is a DC motor driver module for Raspberry Pi Pico, driving up to 4 x DC motors
Features
- Standard Raspberry Pi Pico header, supports Raspberry Pi Pico series.
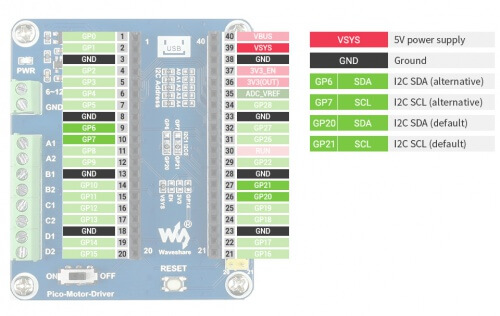
- I2C controlled, supports 32 x different I2C addresses by setting the 5 address jumpers.
- Onboard PCA9685 chip, provides 12-bit hardware PWM to adjust the motor speed.
- Onboard TB6612FNG dual H-bridge motor driver, high efficiency, low heating.
- Integrates 5V regulator, up to 3A output current, can be powered from the battery through VIN terminal.
- Break out unused pins of Pico for easy extension.
- Provides online supporting manual (example demos for Raspberry Pi Pico C/C++ and MicroPython).
Specification
- Operating voltage: 6~12V (VIN terminals)
- Logic level: 3.3V
- Pwm driver: PCA9685
- Motor driver: TB6612FNG
- Control interface: I2C
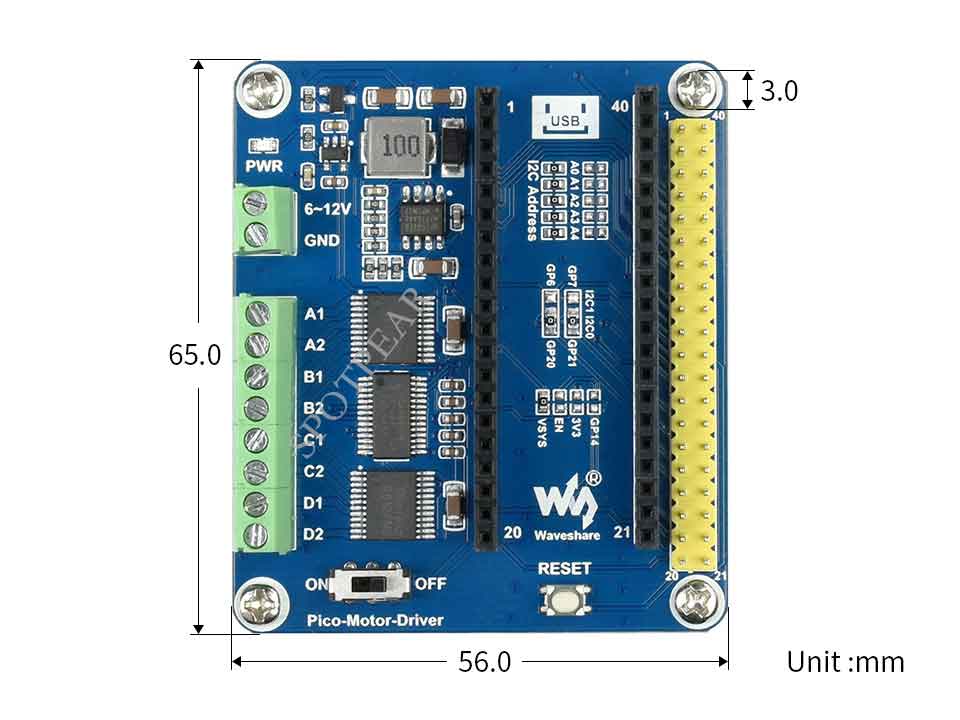
- Dimensions: 65 x 56mm
Pinout
Dimensions
User Guide
Hardware Connection
When connecting the Pico, please be careful not to reverse the corresponding direction. You can judge the direction by observing the end with a USB silkscreen on the module and the USB port end of the Pico (you can also judge the direction by the pin number of the female connector on the module and the pin number of the Pico).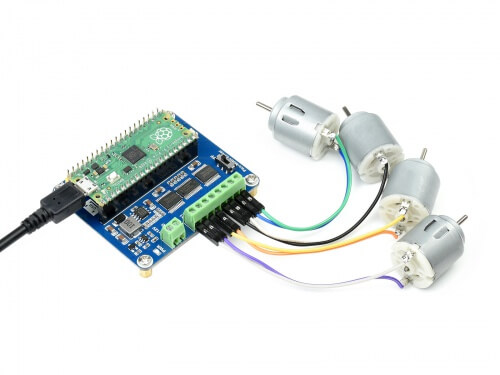
Demo Download
Method 1: Directly download from the Raspberry Pi and open the terminal to run:
sudo apt-get install p7zip-full
cd ~
sudo wget  https://files.waveshare.com/upload/5/5c/Pico-Motor-Driver-code.7z
7z Pico_pico-Motor-Driver-code.7z -o./pico-Motor-Driver-code.7z
cd ~/pico-Motor-Driver-code
Method 2: Download from #Resource.
Working with Raspberry Pi
C
- The following tutorial is operated on the Raspberry Pi. However, due to the multi-platform and portable features of cmake, it can be successfully compiled on PC as well, but the operation is slightly different and requires users to make their own judgment.
d ~/pico-Motor-Driver-code/c/
Create a build folder and add SDK:
For example, if the path of SDK is ../../pico-sdk
Then you should create a build and add the path like these:
cd build
export PICO_SDK_PATH=../../pico-sdk
(Note: Be sure to write the right path for your own SDK)
Run cmake.. command to to generate Makefile file
cmake ..
Run make command to build.
make -j9
Execute make to generate the executable file, the first compilation takes a long time.
make -j9
After the compilation is complete, the uf2 file will be generated. Press and hold the button on the Pico board, connect the Pico to the USB port of the Raspberry Pi through the Micro USB cable, and release the button. After connecting, the Raspberry Pi will automatically recognize a removable disk (RPI-RP2), and copy the main.uf2 file in the build folder to the recognized removable disk (RPI-RP2).
cp main.uf2 /media/pi/RPI-RP2/
Python codes
Run in Raspberry Pi
- 1. Flash the Micropython firmware and copy the pico_micropython_xxxxx.uf2 file into pico (more on this in the Windows tutorial below). Official firmware download.
- 2. Open the Thonny IDE on the Raspberry Pi (click on the Raspberry Pi logo -> Programming -> Thonny Python IDE), and you can view the version information at Help->About Thonny.
- To make sure that your version has the Pico support package, again you can click Tools -> Options... -> Interpreter to select MicroPython (Raspberry Pi Pico and ttyACM0 port).
as shown in the picture: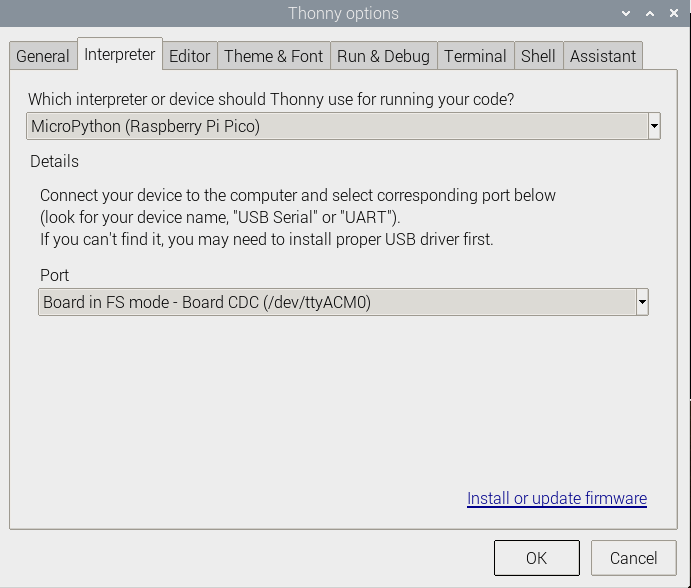
If your Thonny doesn't support Pico, you can update it with the following command:
sudo apt upgrade thonny
- Choose File->Open...->python/ and select the corresponding .py file to run the codes.
Experimental Phenomenon: Motor A and B will rotate at full speed in the positive direction for 2S, and then rotate at half speed in the reverse direction for 4S.
Use in Windows
- 1. Press and hold the BOOTSET button on the Pico board, connect the pico to the USB port of the computer via the Micro USB cable, and release the button when the computer recognizes a removable hard drive (RPI-RP2).
- 2. Download the pico_micropython_xxxxx.uf2 file and copy it to a recognized removable drive (RPI-RP2). Official firmware download
- 3. Open Thonny IDE (Note: Use the latest version of Thonny, otherwise there is no Pico support package, the latest version under Windows is v3.3.3).
- 4. Click Tools -> Settings -> Interpreter, and select Pico and the corresponding port as shown in the figure.
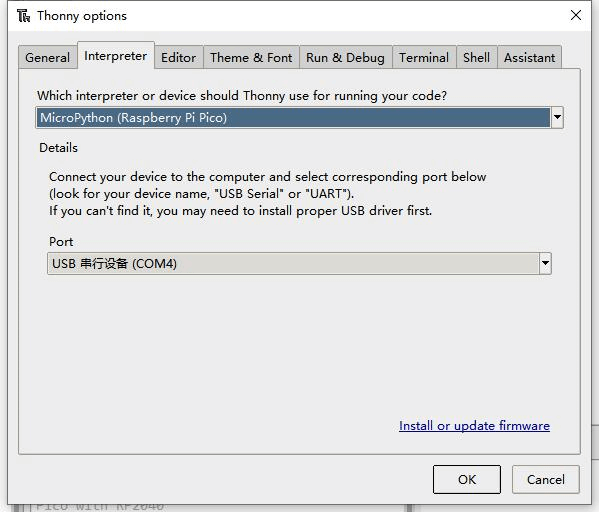
- 5. File -> Open -> the corresponding .py file, click to run, as shown in the following figure:
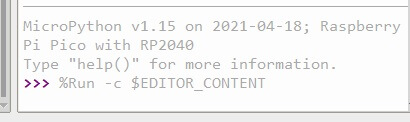
The experimental phenomenon is identical to the c program and will not be repeated here.
Resource
Document
Demo codes
Development Software
- Zimo221.7z
- Image2Lcd.7z
- Font Library Tutorial
- Image Extraction Tutorial
- Thonny Python IDE (Windows V3.3.3)
Pico Quick Start
Firmware Download
- MicroPython Firmware Download

- C_Blink Firmware Download

Text Tutorial
Introduction
MicroPython Series
- 【MicroPython】 machine.Pin Function
- 【MicroPython】 machine.PWM Function
- 【MicroPython】 machine.ADC Function
- 【MicroPython】 machine.UART Function
- 【MicroPython】 machine.I2C Function
- 【MicroPython】 machine.SPI Function
- 【MicroPython】 rp2.StateMachine
C/C++ Series
For C/C++, it is recommended to use Pico VS Code for development. This is a Microsoft Visual Studio Code extension designed to make it easier for you to create, develop, and debug projects for the Raspberry Pi Pico series development board. Whether you are a beginner or an experienced professional, this tool can help you confidently and easily develop Pico. Below we will introduce how to install and use the extension.
- Official website tutorial: https://www.raspberrypi.com/news/pico-vscode-extension/.
- This tutorial is applicable to Raspberry Pi Pico, Pico2, and our company's RP2040 and RP2350 series development boards.
- The development environment defaults to Windows as an example. For other environments, please refer to the official website tutorial for installation.
Arduino IDE Series
Install Arduino IDE
- Download the Arduino IDE installation package from Arduino website.
- Just click on "JUST DOWNLOAD".
- Click to install after downloading.
- Note: You will be prompted to install the driver during the installation process, we can click Install.
Install Arduino-Pico Core on Arduino IDE
- Open Arduino IDE, click the File on the left corner and choose "File -》Preferences".
- Add the following link in "Additional boards manager URLs", then click OK.
https://github.com/earlephilhower/arduino-pico/releases/download/global/package_rp2040_index.json
Note: If you already have the ESP32 board URL, you can separate the URLs with commas like this:
https://dl.espressif.com/dl/package_esp32_index.json,https://github.com/earlephilhower/arduino-pico/releases/download/global/package_rp2040_index.json
- Click on Tools -> Board -> Board Manager -> Search for pico, it shows installed since my computer has already installed it.
Upload Demo At the First Time
- Press and hold the BOOTSET button on the Pico board, connect the Pico to the USB port of the computer via the Micro USB cable, and release the button when the computer recognizes a removable hard drive (RPI-RP2).
- Download the demo from #Resource, open the D1-LED.ino under arduino\PWM\D1-LED path.
- Click Tools -> Port, remember the existing COM, do not need to click this COM (different computers show different COM, remember the existing COM on your computer).
- Connect the driver board to the computer with a USB cable, then click Tools -> Ports, select uf2 Board for the first connection, and after the upload is complete, connecting again will result in an additional COM port.
- Click Tools -> Board -> Raspberry Pi Pico/RP2040 -> Raspberry Pi Pico.
- After setting, click the right arrow to upload.
If you encounter problems during the period, you need to reinstall or replace the Arduino IDE version, uninstall the Arduino IDE clean, after uninstalling the software you need to manually delete all the contents of the folder C:\Users\[name]\AppData\Local\Arduino15 (you need to show the hidden files in order to see it) and then reinstall.
Open Source Demo
- MicroPython Demo (GitHub)
- MicroPython Firmware/Blink Demo (C)
- Official Raspberry Pi C/C++ Demo
- Official Raspberry Pi MicroPython Demo
- Arduino Official C/C++ Demo
Support
Monday-Friday (9:30-6:30) Saturday (9:30-5:30)
Email: services01@spotpear.com