- sales/support
Google Chat:---
- sales
+86-0755-88291180
- sales01
sales@spotpear.com
- sales02
dragon_manager@163.com
- support
tech-support@spotpear.com
- CEO-Complaints
zhoujie@spotpear.com
- sales/support
WhatsApp:13246739196
Beaglebone BB Green User Guide
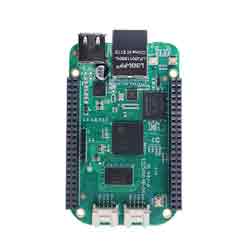
The SeeedStudio BeagleBone Green (BBG) is a low-cost, open source, community-supported development platform designed for developers and hobbyists. This is a joint effort of BeagleBoard.org and Seeed Studio. Based on the classic open source hardware design of the BeagleBone Black and developed into this differentiated version. The BBG includes two Grove connectors, making it easier to connect to a large range of Grove sensors. Removing the onboard HDMI makes room for these Grove connectors.
Boot Linux in less than 10 seconds and start developing in 5 minutes with just a single USB cable.
Features
1. Fully compatible with BeagleBone Black
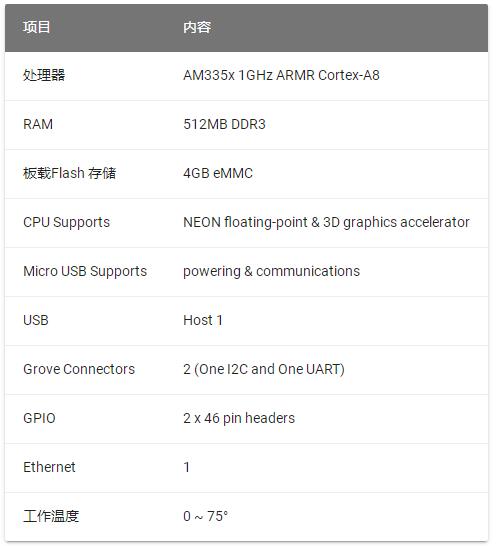
2. Processor: AM335x 1GHz ARMR Cortex-A8
•512MB DDR3 RAM
•4GB 8-bit eMMC onboard flash storage
•3D graphics accelerator
•NEON floating point accelerator
•2x PRU 32-bit microprocessors
3. Interface
•USB client can supply power and communicate
•USB host
•Ethernet
•2x 46 pin headers
•2x Grove connectors (I2C and UART)
4. System Compatible
•Debian
•Android
•Ubuntu
•Cloud9 IDE on Node.js w/ BoneScript library
•Coming soon to be compatible with more
Specifications
Creative application
Internet of Things
Smart home
Industrial application
Automated process control
Robot interaction
Sensor node
Hardware overview
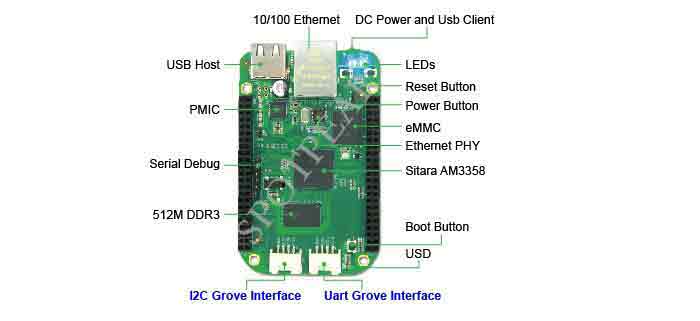
- USB Host - USB Host
- DC Power and USB Client - Powers the board and acts as a slave
- LEDs
- D2 is configured as heartbeat blinking in boot
- D3 lights up when configured in boot to read and write SD card data
- D4 is configured in boot to light up when CPU is active
- D5 is configured in boot to light up when eMMC reads and writes
- Boot button
- When there is an SD card inserted, the system will first boot from the SD card, if you want to boot from eMMC, press this button, then power on.
- When activated, it acts as a normal button and connects to GPIO_72
- I2C Grove Interface - connects to I2C2
- Uart Grove Interface - connects to UART2
- Serial Debug - connects to UART0, PIN1~PIN6: GND, NC, NC, RX, TX, NC, Please note that pin1 refers to the pin near the USB.
Pin Diagram
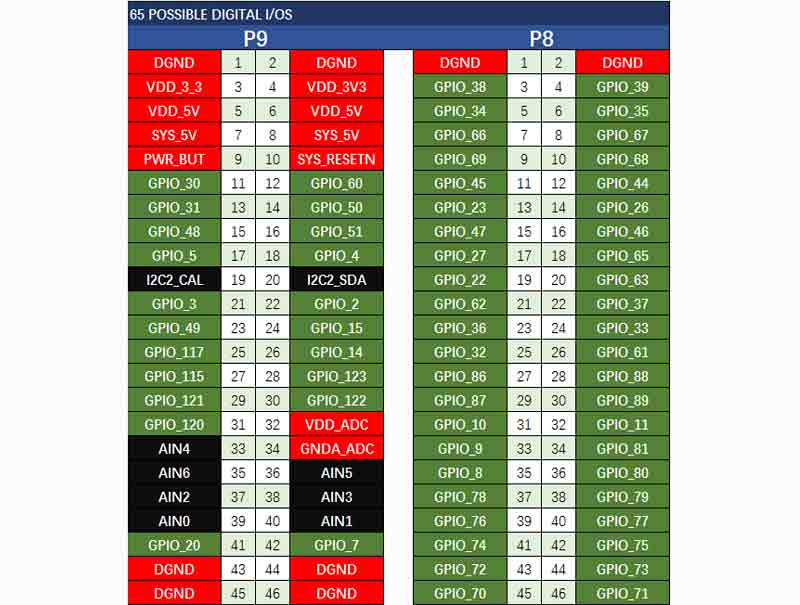
Each digital I/O pin has 8 different modes to choose from, including GPIO.
65 different possible digital I/Os
Note
In GPIO mode, each digital I/O pin can handle interrupts.
PWMs and Timers
Note
Up to 8 digital I/O pins can be configured in pulse width modulation mode (PWM) to generate signals to control motors or generate analog levels without CPU involvement.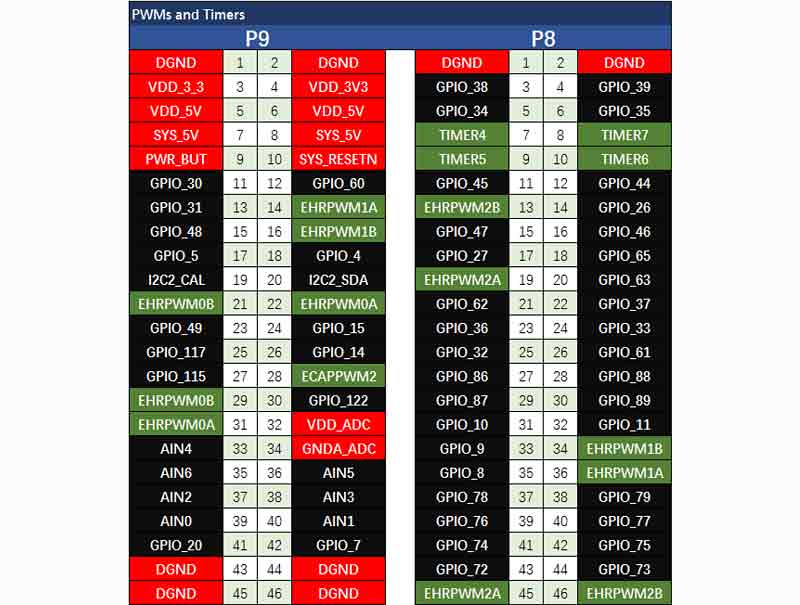
Analog input
Note
Please make sure that the input voltage applied to any analog pin is not higher than 1.8V. There is only one 8-channel 12-bit digital-to-analog converter on the board, of which 7 channels are led out to the interface.
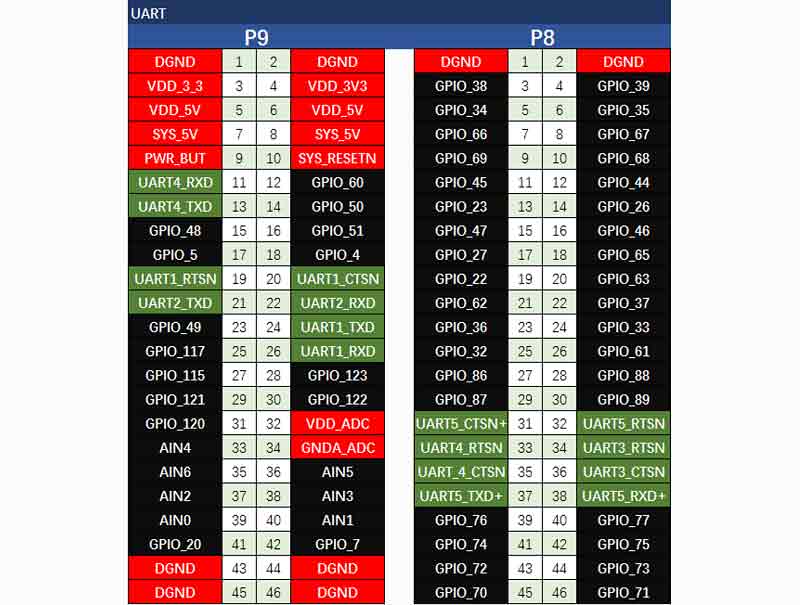
UART
Note
There is a dedicated header for connecting to the UART0 pin and connecting to the debug cable. 5 additional serial ports are also connected to the expansion interface.
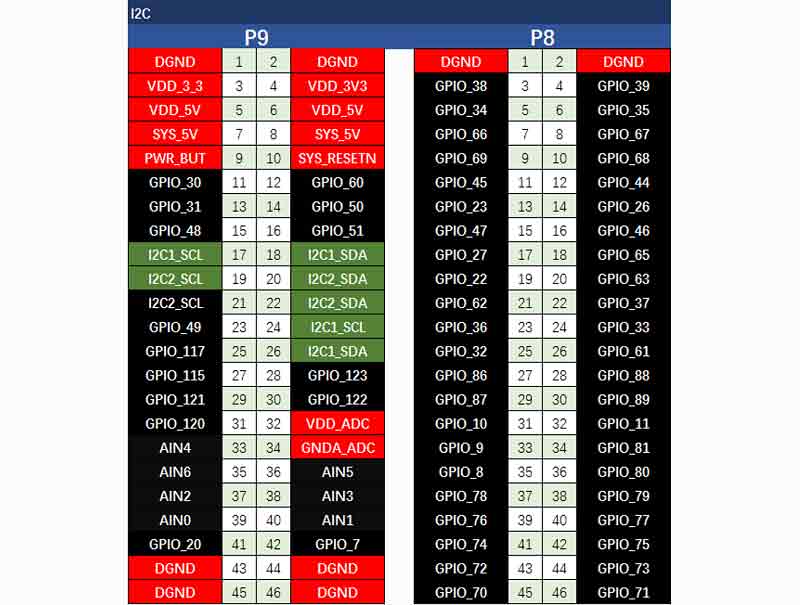
I2C
Note
The first I2C bus is used to read EEPROMS on the Cape add-on board, in order not to affect this functionality this bus cannot be used for other digital I/O operations, but you can still use it to add other I2C devices to the available addresses. The second I2C bus is free to configure and use.
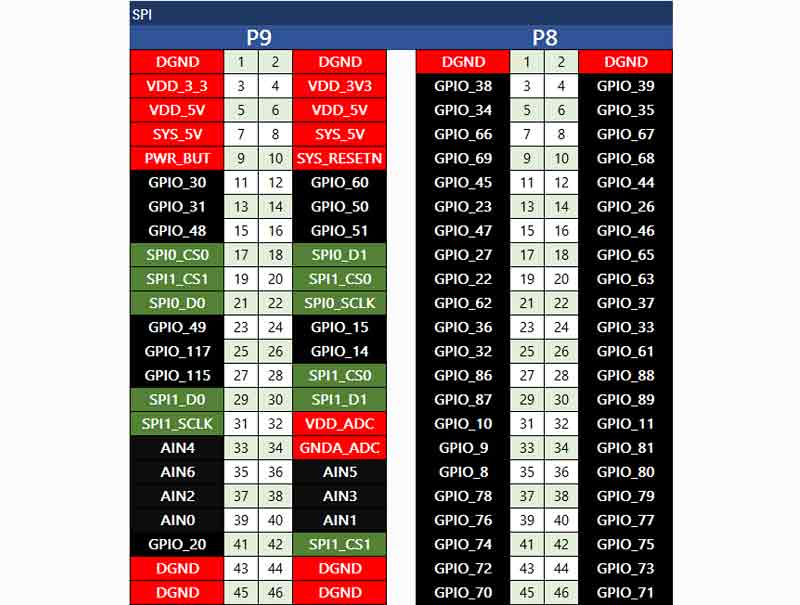
SPI
Note
If you need to transfer data quickly, you can consider using the SPI interface.

Getting Started Guide
Step 1. Connect BBG via USB interface
Connect your BBG to your computer using the provided Micro-USB cable. This will both power the board and provide a development interface. BBG will boot Linux from the onboard 2GB or 4GB eMMC.
BBG will run as a flash drive, giving you a local copy of the documentation and drivers. Note that this interface may not be used to reconfigure the microSD card with a new image, but it can be used to update boot parameters using the uEnv.txt file.
You will see the PWR LED light up steadily. Within 10 seconds, you should see another LED blink in its default configuration.
- D2 is configured as heartbeat blinking in boot
- D3 lights up when configured in boot to read and write SD card data
- D4 is configured in boot to light up when CPU is active
- D5 is configured in boot to light up when eMMC reads and writes
Step 2. Install the driver
Install drivers for your operating system to allow your Beaglebone to access the network via USB. Additional drivers give you access to the motherboard.
| Operating system | USB driver | Remark |
| Windows (64-bit) | 64-bit installer | |
| Windows (32-bit) | 32-bit installer | |
| Mac OS X | Network and Serial | Note that Network and Serial are two different drivers, you need to install both |
| Linux | mkudevrule.sh | Driver installation is not required, but you may find several udev rules helpful. |
Note
For Windows systems, please note the following:
- Windows driver certification warning may pop up two or three times, click "Ignore", "Install" or "Run"
- Click the link below to see what you need to install 64-bit or 32-bit Click here
- On non-latest versions of Windows, you may encounter an error (0xc000007b) during installation. In this case, click Install and try again.
- You may need to restart your computer.
- The driver has been tested under Windows 10.
Note
Additional FTDI USB to serial/JTAG information and drivers are available from https://www.ftdichip.com/Drivers/VCP.htm.
Note
Additional USB to virtual Ethernet information and drivers are available from https://www.linux-usb.org/gadget/ and https://joshuawise.com/horndis.
Step 3. Use a browser to browse your Beagle
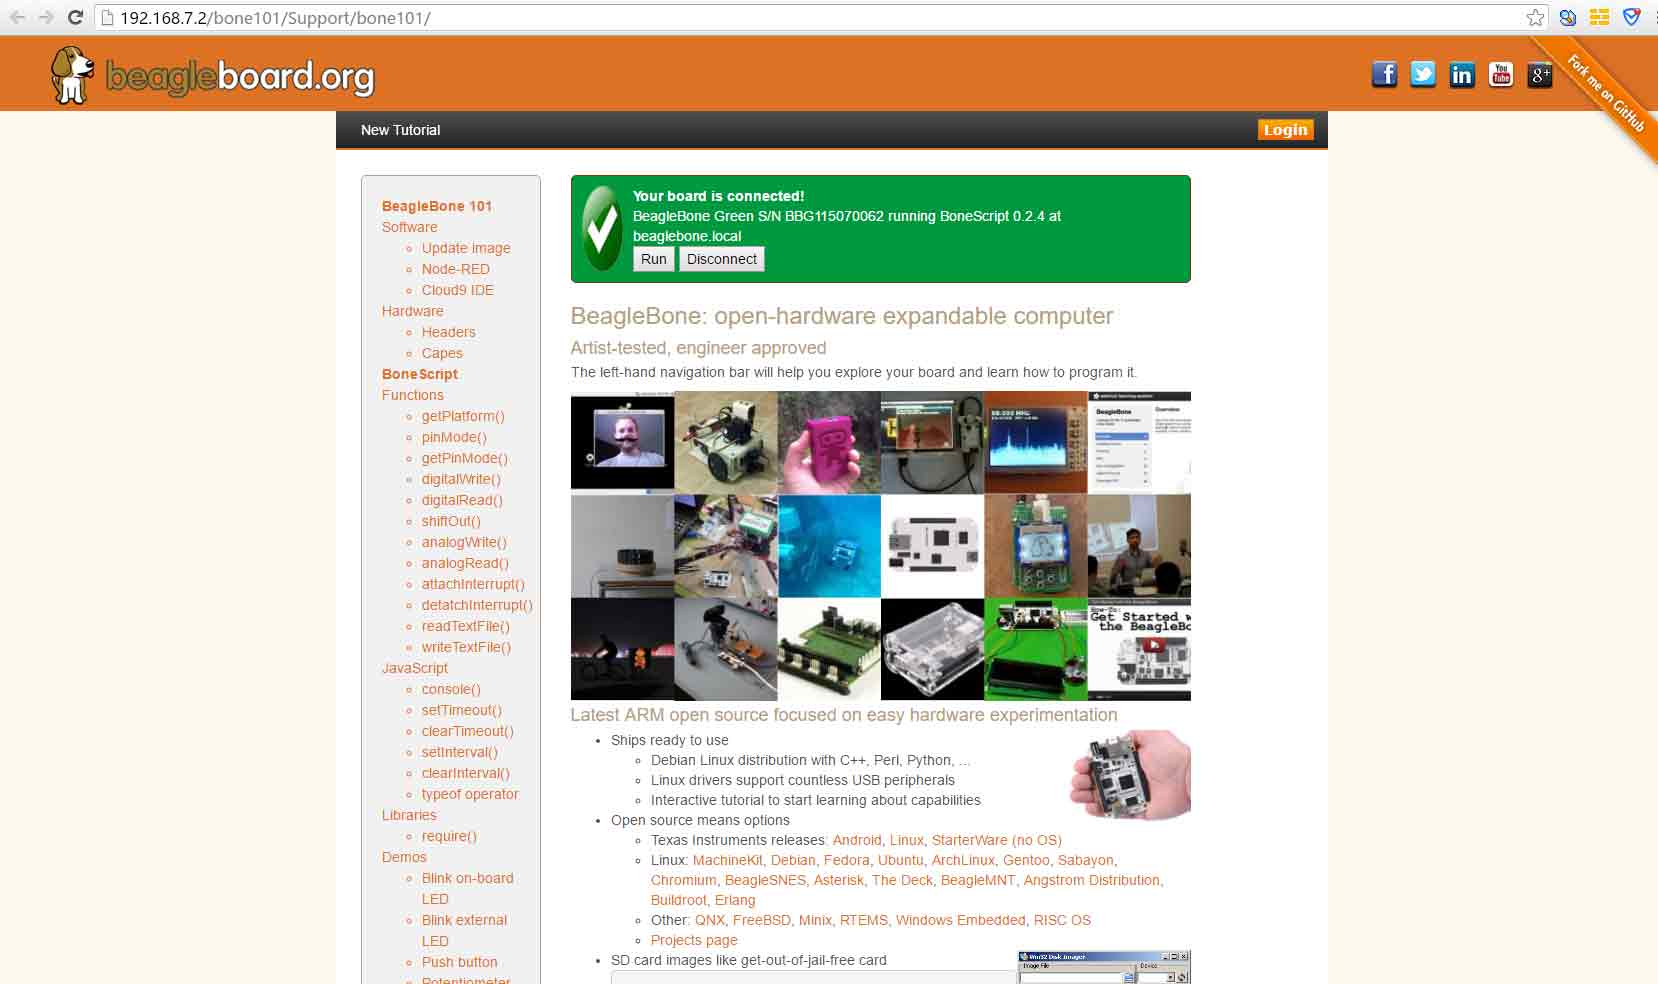
Using Chrome or Firefox (Internet Explorer will not work), browse to the web server running on your board. It will load a presentation showing you what the board does. Use the arrow keys on the keyboard
Click http://192.168.7.2 to load your BBG. Older software images require you to use the BEAGLE_BONE drive to boot the network. With the latest software image, this step is no longer required.
Step 4. Cloud9 IDE
To start editing programs on your board, click the link below to launch the Cloud9 IDE

https://wiki.seeedstudio.com/cn/BeagleBone_Green/#faq
Update to the latest software
You'll need to update your motherboard to the latest software to maintain better performance, and here we'll show you how to do it step by step.
Step 1. Download the latest firmware
First, you must download the appropriate firmware here.

https://beagleboard.org/latest-images
Note
Due to the size of the software, this download may take approximately 30 minutes or more.
The file you download will have an **img.xz** extension. This is the firmware for SD card burning.
Step 2. Install SD card burning program
Download and install Image Writer for Windows. Make sure you download the version that corresponds to your system.
Step 3. Write your firmware to SD card
First you need to connect the microSD card to the computer via an SD adapter. Then use the software Image Write for Windows to write the decompressed firmware to the SD card.
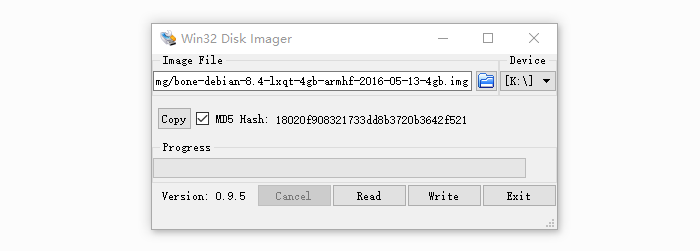
Click the Write button, then the writing process will start.
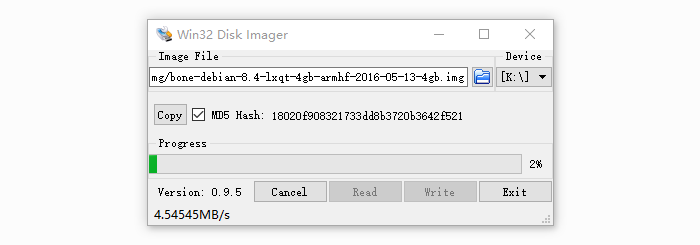
Note
- You may see a warning about a damaged SD card, please accept it with confidence.
- You should not link the BeagleBone to the computer at this time.
- The whole process will take about 10 minutes.
Step 4. Boot your system from SD card
Power off, insert the SD card, then power on and the system will boot from the SD card.
Note
- If you don't need to write firmware to your onboard eMMC, you don't need to read the last chapter of this chapter. Otherwise please continue.
If you wish to write firmware to your onboard eMMC, you will need to load into the board and modify the file.
Found in /boot/uEnv.txt:
#enable BBB: eMMC Flasher:
cmdline=init=/opt/scripts/tools/eMMC/init-eMMC-flasher-v3.sh
change into:
| ##enable BBB: eMMC Flasher: | |
| cmdline=init=/opt/scripts/tools/eMMC/init-eMMC-flasher-v3.sh |
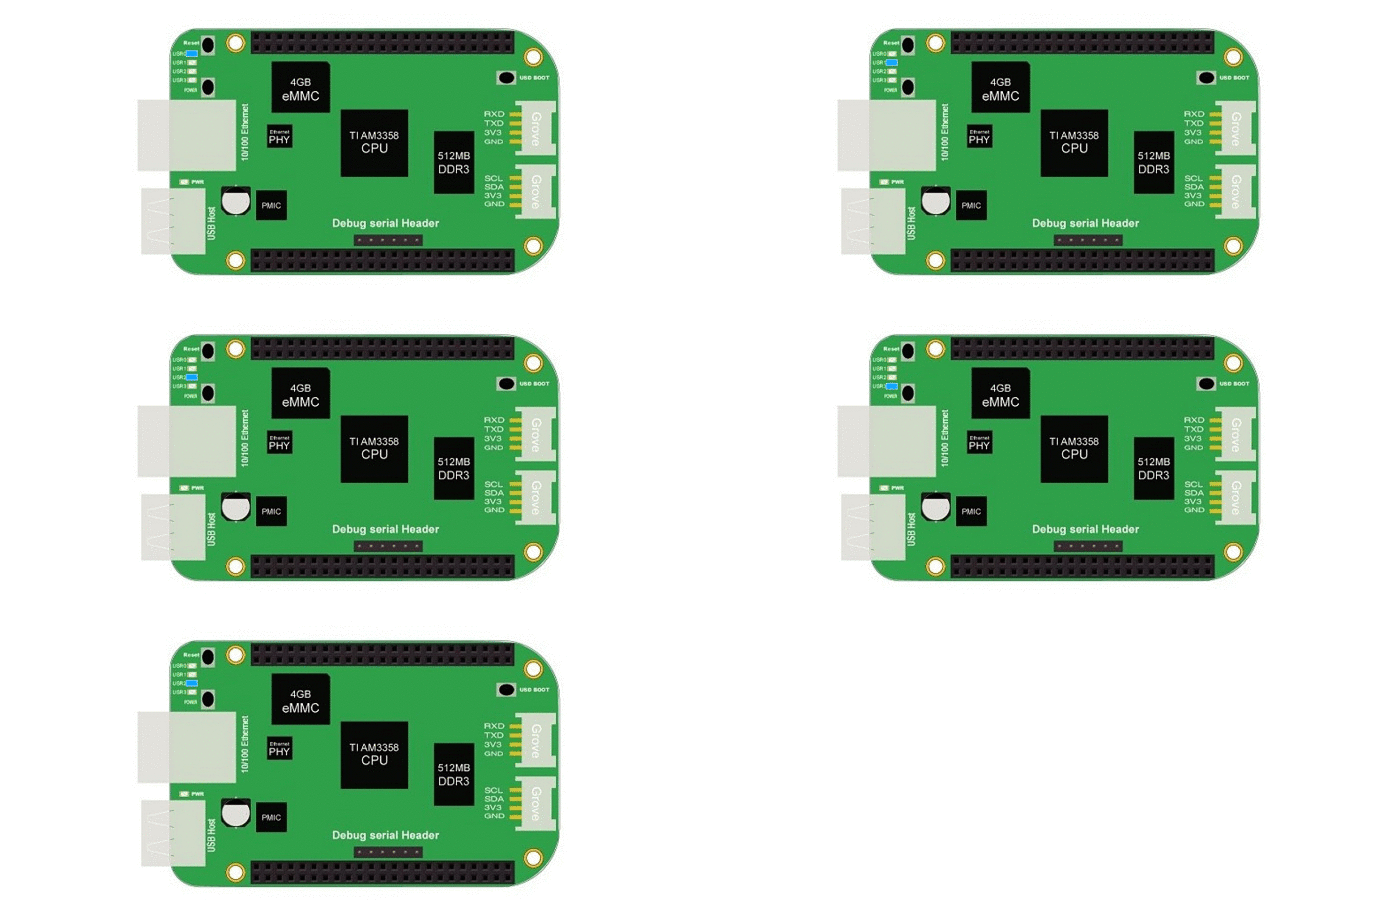
Then you will see 4 LED lights will blink as shown below.
Note
- If you don't see the light traces shown above, press the RESET button to reset the board.
When the blinking is complete, all 4 user indicator LEDs will turn off. The latest Debian systems automatically shut down the board after it finishes loading the firmware. This process may take up to **10 minutes**. Power off, remove the SD card, power on again and you're done.


