


- sales/support
Google Chat:---
- sales
+86-0755-88291180
- sales01
sales@spotpear.com
- sales02
dragon_manager@163.com
- support
tech-support@spotpear.com
- CEO-Complaints
zhoujie@spotpear.com
- Only Tech-Support
WhatsApp:13246739196
- Purchase/Shipping/Refund
WhatsApp:13424403025
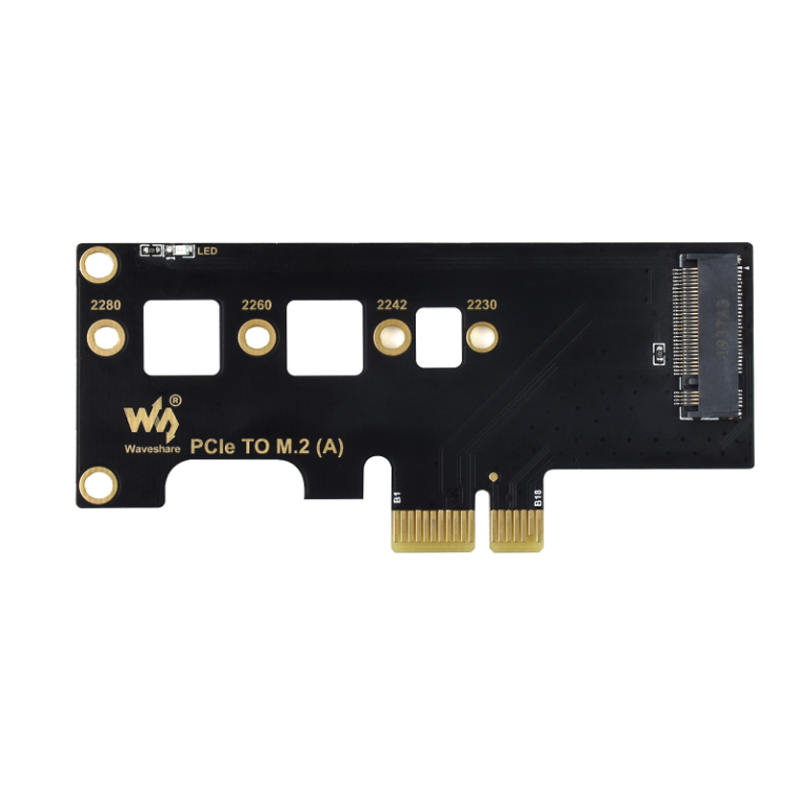
Raspberry Pi CM4 PCIe TO M.2 (A) User Guide
Overview
PCIe TO M.2 (A) is an adapter board for PCI-E to M.2, It is used for connecting SSD, supports Raspberry Pi Compute Module 3.
Features
- Adapter For NVMe Protocol M.2 SSD, Faster Reading/Writing, Improving Efficiency
- Supports Base Boards With PCI-E×1 / ×4 / ×8 / ×16 Socket
- Supports Raspberry Pi Compute Module 4
- Compatible With Different Sizes Of M.2 SSD
- Onboard Operating Indicator, The LED Lights Up When Power-On And Keeps Blinking While Reading/Writing
Mount the SSD to CM4
Format the SSD
- Insert the SSD to the PCI-E to M.2 adapter and fixe it with screws.
- Connect the SSD to another PC to format first. For example, we connect it to Windows PC because most of the windows PC has M.2 or PCI-E interface. Please shut down your PC before you connect the SSD and then reboot. Format the SSD after reading it.
Note: Do not use quick format mode.
Drive Detecting
Turn off the CM4, connect the adapter to CM4 and turn on.
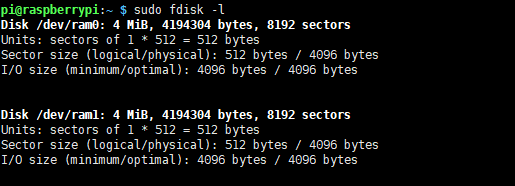
- Check if the disk is detected
sudo fdisk -l
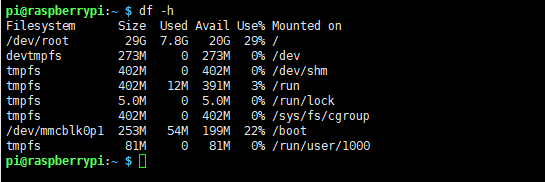
- Check the memory of disk
df -h
Mount the disk
- Create a new directory
sudo mkdir /home/pi/toshiba
- Mount the disk by the following command
sudo mount /dev/nvme0n1p1 /home/pi/toshiba
Check the memory again.
df -h
If you can get the information of the new disk, it means that the disk was mounted sucessfully<br\> 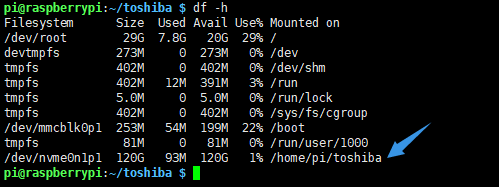
- The name should be different for different disks, here is nvme0n1p1 and it may be different in your board.
Read/write test
Enter the directory
cd /home/pi/toshiba
- Release the momory
sudo sh -c "sync && echo 3 > /proc/sys/vm/drop_caches"
- Copy the Pi to the SSD (read)
sudo dd if=/dev/zero of=./test_write count=2000 bs=1024k

- Copy the SSD to Pi (write)
sudo dd if=./test_write of=/dev/null count=2000 bs=1024k

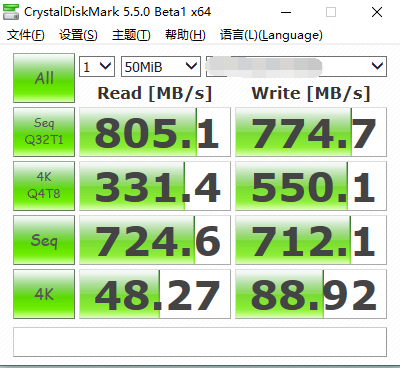
- Note: The test result may be different with different SSD and Pi. If you want to test the SSD, you can connect it to PC.
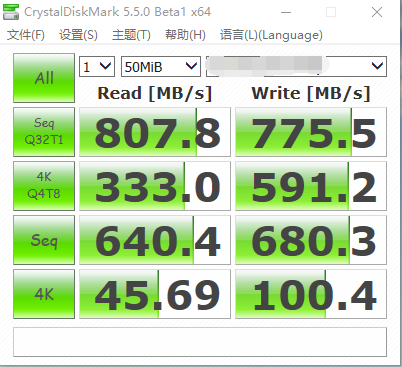
Test in PC
TAG:
7inch-USB-Monitor user guide
ESP32-S3N8R8 7inch LCD Display TouchScreen 800&amp;amp;amp;amp;amp;amp;amp;amp;amp;amp;times;480 WiFi Bluetooth CAN RS485 Sensor
Raspberry Pi 5 8mp Camera
2.66inch e-Paper e-link Module 360x184 4-Color Red Yellow Black White For Arduino Raspberry Pi STM32 Jetson Tutorial Information Wiki Program Code User Guide SpotPear
Sipeed SLogic 4IN1 USB Logic Analyzer 80M / DAPLink / CKLink Debugger Tool / UART Module
ESP32-C3-Ornament-Trinket-LVGL-Astronaut-Clock-Watch-MINI-TV-1.69inch-Round-LCD-TouchScreen-ST7789-240x280
ESP32 1.9 inch LCD Capacitive TouchScreen 1.9inch Display ST7789 170x320 for Arduino /Raspberry Pi /Pico
Core3566102032
NanoKVM-Lite
Raspberry Pi 5 inch LCD 720x1280 Capacitive TouchScreen Display HDMI For Jetson Nano/mini Computer PC
ESP32 S3 4inch LCD Development Board 480x480 TouchScreen Display TVBOX LVGL HMI Sensor CAN RS485
Raspberry Pi 3.5 inch e-Paper link (G) RYBW 384x184 For Arduino / Jetson Nano / STM32
Jetson Nano PWM Fan
RV1106
Jetson RTL8822CE 5GHz WiFi Wireless Bluetooth5 Card NGFF-M.2 RTL8822CE-CG Core
3.5 inch LCD Computer CPU GPU RAM Monitor PC USB Secondary Display Screen
Raspberry Pi Pico 2 RP2350 Core2350B Core Board PSRAM
Raspberry Pi Compute Module 5 CM5 Cortex A76 BCM2712 With/Without Wi-Fi RAM 2/4/8/16GB eMMC Lite/8/16/32/64GB
X1011 Raspberry Pi 5 PCIe to M.2 NVMe 4-Ports SSD Board HAT Pi5 Four-Times 2280
ESP32 C3 1.44inch LCD
TAG:
Raspberry Pi 1.3inch
Changeable Photo Frames
Jetson Xavier NX Kit
Raspberry Pi 5 PCIe M.2 NVMe SSD Pi5 2280-2242 2230 X1001
Raspberry Pi 5 PCIe FFC Standard PCIe Slot
VisionFive2 case
Raspberry Pi Monitor DisplayScreen 15.6 inch LCD
SpeedyBee F405 V4 BLS 60A FC ESC Stack Flight Controller DJI FPV Drone
Raspberry Pi RTC WatchDog
Luckfox Pico Core1106 RV1106
ESP32 S3 Round 1.5 inch OLED TouchScreen Smart Knob Display
SpotPear
ESP32-S3 4 inch LCD Touchscreen Display 480x480 RS485 SHT20 Relay Arduino LVGL 86 TVbox
10 Axis DOF ROS IMU Sensor Accelerometer Gyroscope Magnetometer Temperature Pressure
Pi5 Active Cooler CN
JETSON
Jetson 1.5inch LCD
Raspberry Pi CM5 Mini Base IO Board NANO B Development For Compute Module 5
Raspberry Pi 4B
UART TTL To RS232