- sales/support
Google Chat:---
- sales
+86-0755-88291180
- sales01
sales@spotpear.com
- sales02
dragon_manager@163.com
- support
tech-support@spotpear.com
- CEO-Complaints
zhoujie@spotpear.com
- sales/support
WhatsApp:13246739196
Raspberry Pi SIM800C GSM/GPRS HAT User Guide
Introduction
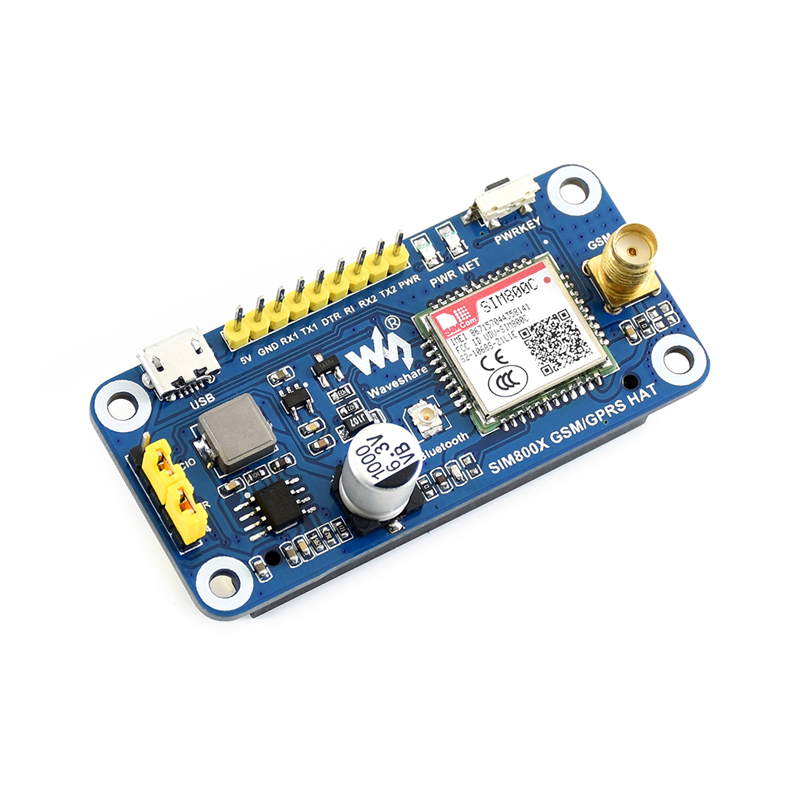
GSM/GPRS HAT for Raspberry Pi, Based on SIM800C
Features
- Raspberry Pi connectivity, compatible with Raspberry Pi 2B/3B/3B+/Zero/Zero W
- Supports SMS, GPRS, DTMF, HTTP, FTP, MMS, email, etc.
- Bluetooth 3.0, supports data transferring through Bluetooth
- 2x LEDs for indicating the module working status
- SIM card slot for 1.8V/3V SIM card
- Baudrate auto detection (1200bps ~115200bps)
- Control via AT commands (3GPP TS 27.007, 27.005, and SIMCOM enhanced AT Commands)
- Supports SIM application toolkit: GSM 11.14 Release 99
- Comes with development resources and manual (examples for Raspberry Pi/Arduino/STM32)
GSM/GPRS
- Band
- GSM 850/EGSM 900/DCS 1800/PCS 1900 MHz
- Quad-band auto search
- Compliant to GSM phase 2/2+
- Enutting power
- Class 4 (2W @ GSM 850/EGSM 900 MHz)
- Class 1 (1W @ DCS 1800/PCS 1900 MHz)
- GPRS connectivity
- GPRS multi-slot class 12 (default)
- GPRS multi-slot class 1~12 (configurable)
- GPRS data feature
- Downlink/Uplink speed: max 85.6kbps
- Coding schemes: CS-1\CS-2\CS-3\CS-4
- Supports PAP (Password Authentication Protocol) for PPP connection
- Supports PBCCH
- Supports USSD
- SMS
- Supports: MT/MO/CB/Text/PDU mode
- SMS storage: SIM card
- Bluetooth
- Integrates AT commands
- Compliant to Bluetooth specification3.0 + EDR
- Supports SPP, OPP, HFP/HSP, etc.
- MISC
- Operating voltage: 5V
- Operating temperature: -40°C ~ 85°C
- Storage temperature: -45°C ~ 90°C
- Dimensions: 30.2mm x 65mm
Pinout
| PIN | Description |
|---|---|
| 5V | 5V power input |
| GND | Ground |
| RX1 | Serial port 1 Data receiver |
| Tx1 | Serial port 2 Data transmission |
| DTR | Sleep control pin. High: Sleep; Low: Wake-up (should set AT+CSCLK=1) |
| RI | Interrupt wake-up pin. this pin defaults to high and keep low for 120ms when URCs are reported or SMS received. (should set "AT+CFGRI=1") |
| RX2 | Serial port 2 Data receiver |
| TX2 | Serial port 2 Data transmission |
| PWR | Power control pin |
| RESET | When power is on, you can reset module by pulling-down the reset pin. It is unavailable when power off |
Jumpers
Raspberry Pi 40PIN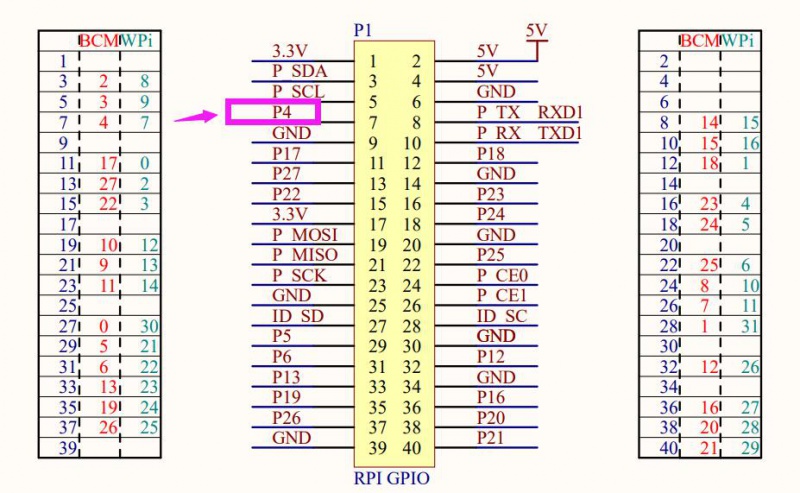
| PWR | Light: Module is powered on with 5V voltage input |
| NET | light on for 64ms and off for 800ms: Not registered the network |
Working with PC
Hardware connection
Connect to PC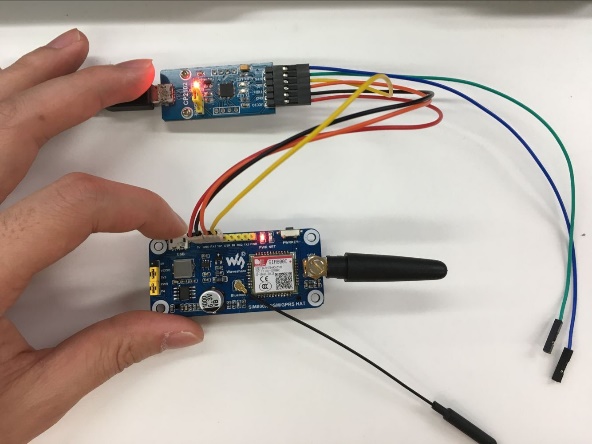
In addition to the micro USB cable and GSM/Bluetooth antenna, users need to prepare the following before using the SIM800C module.
- A GPRS compatible card
- A serial module (TTL to USB like CP2102 USB UART Board)
- Insert the CPRS card into the card slot on the back of the module and connect the LTE antenna (The LTE antenna must be rotated to the outside of the board)
- Connect the CP2102 module to the corresponding serial port 1 (or serial port 2) of the SIM800C, and use the USB cable to connect the module to the computer.
- Power the SIM800C module. At this time, the PWR light indicator should light up in red and the NET light should be off.
- Press the PWRKEY button and hold for about 1 second. Waiting for about 2 seconds. You should see that the NET light starts flashing. This means the module is powered on successfully.
- Open the serial assistant software, then select the corresponding serial port, and set baud rate to 115200. Check the "Newlines" Options. By opening the extension you can see the already set AT commands. Click on the corresponding command to send it directly.
Networking testing
Networking testing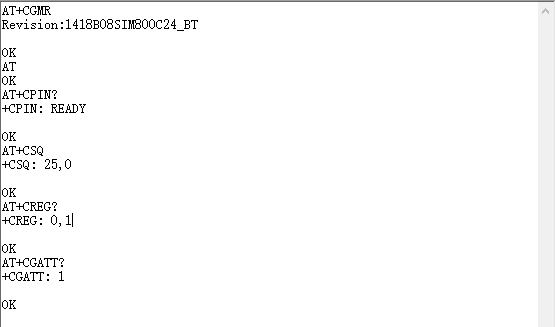
The following table lists some common AT commands that can be used to quickly and easily detect whether the SIM800C's AT serial communication and network connection are normal. Before following the steps of the network communication demonstration described in the table below, it is recommended to do a simple network test to confirm that the target network connection is normal and operable.
| Commands | Description |
|---|---|
| AT | AT Test Command |
| ATE | ATE1: Turns on echoing; ATE0: Turns off e'choing. |
| AT+CSQ | Network signal quality query, returns a signal value |
| AT+CGMR | Request firmware version |
| AT+CREG? | Request network registration status |
| AT+CGATT? | Check for GPRS attachment service status |
For details AT commands, please refer to SIM800C Series_AT_Command Manual ===TCP/IP Communication
SIM800 series TCPIP Structure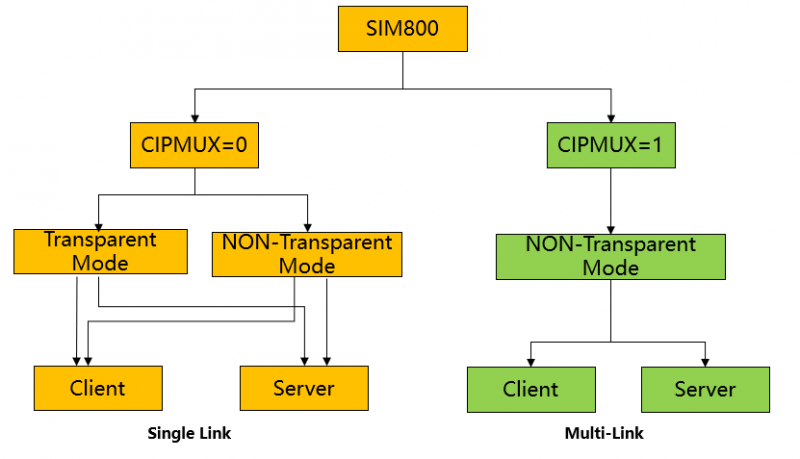
The TCP/IP application of the SIM800 serial module has two connection modes, which can be set by the command AT CIPMUX=<n>. When AT CIPMUX is set to 0 (AT+CIPMUX=0), it is in single link mode; when AT CIPMUX is set to 1 (AT+CIPMUX=1), it is in multi-link mode. The module is set as single link mode by default.
In single link mode, the SIM800 serial module can operate in both transparent and non-transparent modes. In both transmission modes, the module can be configured as a TCP/UDP client or as a TCP server.
In multi-link mode, the SIM800 serial module can only work in non-transparent mode.
In this mode, the module can work as an absolute TCP/UDP connection client, which can establish a total of 6 connections; it can also be configured as a TCP server, and can also be configured with 5 TCP/UDP clients. SIM800C TCP/IP defaults to a multi-client architecture that supports a total of five sockets, including TCP or UDP.
With the following demonstrations we will focus on the client communication of the SIM800C, in single-link non-transparent mode and transparent mode.
【Client communication in non-transparent mode】
Non-Transparent Mode TCP Clinet testing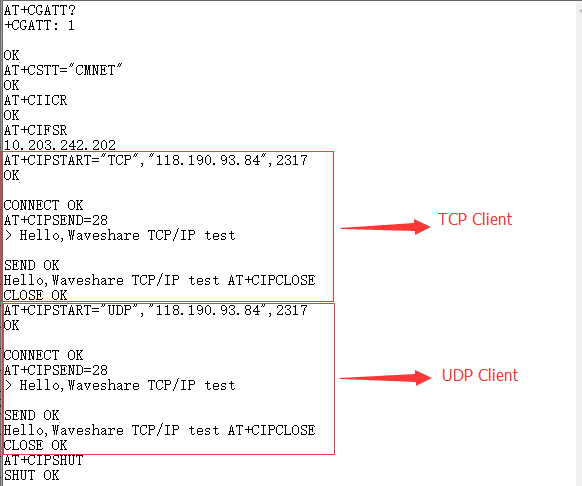
| AT Commands | Description |
|---|---|
| AT+CGATT? | Check GPRS attachment service status |
| AT+CSTT="CMNET" | Set APN |
| AT+CIICR | Establish a wireless connection |
| AT+CIFSR | Retrieve the local IP address |
| AT+CIPSTART="TCP","118.190.93.84",2317 | Establish a TCP client connection |
| AT+CIPSTART="UDP","118.190.93.84",2317 | Establish a UDP client connection |
| AT+CIPSEND=<string length> | Send a specified string length |
| AT+CIPCLOSE | Close the connection |
| AT+CIPSHUT | Close PDP context connection |
【Client communication in transparent transmission mode】
Transparent mode TCP Client testing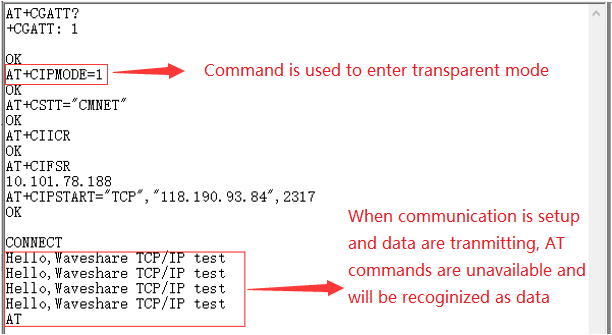
| AT Commands | Description |
|---|---|
| AT+CGATT? | Check GPRS attachment service status |
| AT+CIPMODE=1 | Set to transparent mode |
| AT+CSTT="CMNET" | Set APN |
| AT+CIICR | Establish a wireless connection |
| AT+CIFSR | Retrieve the local IP address |
| AT+CIPSTART="TCP","118.190.93.84",2317 | Establish a TCP client connection |
| AT+CIPSTART="UDP","118.190.93.84",2317 | Establish a UDP client connection |
| AT+CIPSEND=<string length> | Send a specified string length |
| AT+CIPCLOSE | Close the connection |
| AT+CIPSHUT | Close PDP context connection |
To switch between the transparent transmission mode and the command mode, any of following methods describe below are available.
- The escape sequence can be used to exit from transparent mode if the forth parameter of AT+CIPCCFG is 1. The default escape sequence is +++, and to use this sequence, there should be 1000ms idle period before this sequence and 1000ms idle period after this sequence. Besides, the interval between each + should not exceed 1000ms, otherwise it will be treated as TCP/IP data.
- DTR line (pin) of serial port can also be used. To use this method, AT&D1 should be set firstly. Pull DTR line to Low for at least 1 second and then pull up, the module will switch from data mode to command mode and an “OK” string will be returned indicating the module is in command mode.
- Unintentionally, for TCP client connection, if the remote server closes the connection, the module will switch back to command mode automatically.
- Conversely, for TCP server connection, if the remote client closes the connection, the module will switch back to command mode automatically.
- Restarting the module.
HTTP Communication
This chapter introduces the HTTP communication function of SIM800C module, which is mainly divided into HTTP GET and HTTP POST. For more details information about the HTTP and FTP communication, please refer to SIM800C Series_IP_Application_Note
【HTTP GET】
HTTP GET testing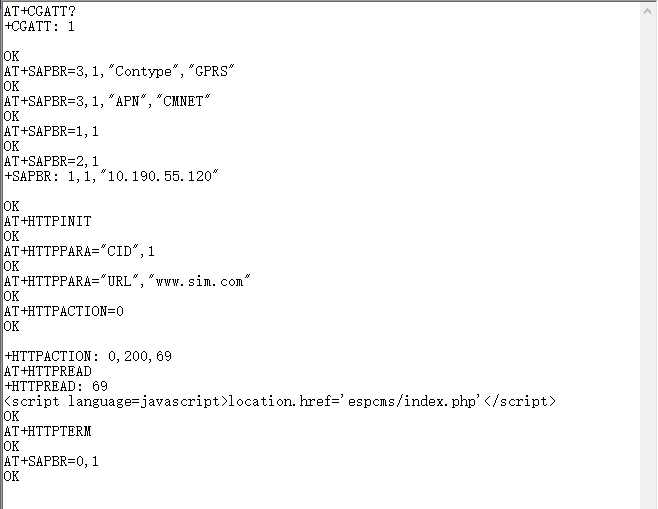
| AT Commands | Description |
|---|---|
| AT+SAPBR=3,1,"Contype","GPRS" | Configure bearer profile 1 |
| AT+SAPBR=3,1,"APN","CMNET" | Configure the bearer profile APN. |
| AT+SAPBR=1,1 | Open a GPRS context |
| AT+SAPBR=2,1 | Query a GPRS context |
| AT+SAPBR=0,1 | Close the GPRS context. |
| AT+HTTPINIT | Check the HTTP connection status |
| AT+HTTPPARA="CID",1 | Set parameters for HTTP session |
| AT+HTTPPARA="URL","www.sim.com" | Set parameters for HTTP session |
| AT+HTTPACTION=0 | GET session start |
| AT+HTTPREAD | Read the data of the HTTP server |
| AT+HTTPTERM | End HTTP service |
【HTTP Post】
HTTP POST testing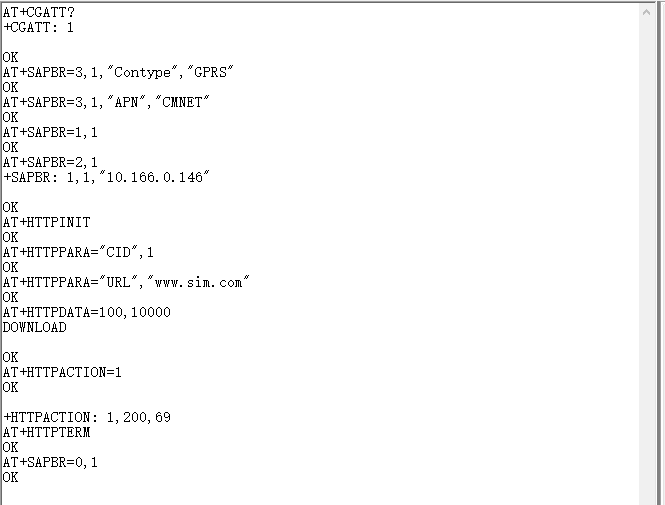
| AT Commands | Description |
|---|---|
| AT+SAPBR=3,1,"Contype","GPRS" | Configure bearer profile 1 |
| AT+SAPBR=3,1,"APN","CMNET" | Configure the bearer profile APN. |
| AT+SAPBR=1,1 | Open a GPRS context |
| AT+SAPBR=2,1 | Query a GPRS context |
| AT+SAPBR=0,1 | Close the GPRS context. |
| AT+HTTPINIT | Check the HTTP connection status |
| AT+HTTPPARA="CID",1 | Set parameters for HTTP session |
| AT+HTTPPARA="URL","www.sim.com" | Set parameters for HTTP session |
| AT+HTTPDATA=100,10000 | Upload 100 bytes data, waiting for 10000ms |
| AT+HTTPACTION=0 | GET session start |
| AT+HTTPREAD | Read the data of the HTTP server |
| AT+HTTPTERM | End HTTP service |
Sending and receiving emails
The TCP/IP application of the SIM800 serial module has two connection modes, which can be set by the command AT+CIPMUX=<n>.
Sending email 1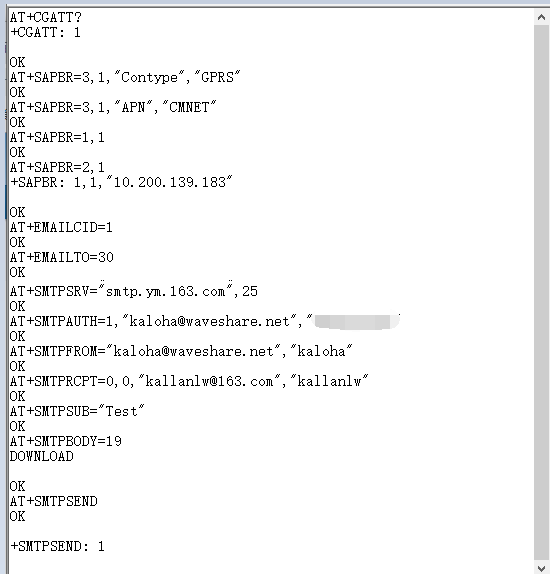
Sending email 2

【Sending emails】
For sending emails some of the features this module offers are sending ordinary emails, set the email Carbon-copy; it can also email attachments, send it encoded as UTF-8 etc. We provide a simple operation demonstration of how to send an ordinary email.
Receiving email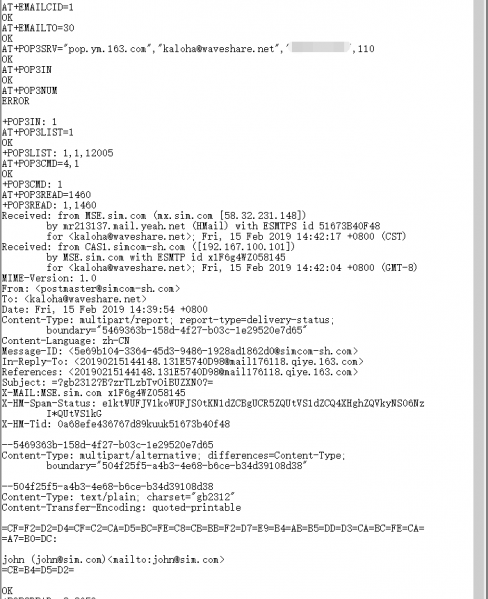
| AT Commands | Description | Return |
|---|---|---|
| AT+SAPBR=3,1,"Contype","GPRS" | Configure bearer profile 1 | OK |
| AT+SAPBR=3,1,"APN","CMNET" | Configure the bearer profile APN. | OK |
| AT+SAPBR=1,1 | Open a GPRS context | OK |
| AT+SAPBR=2,1 | Query a GPRS context | OK |
| AT+SAPBR=0,1 | Close the GPRS context. | OK |
| AT+EMAILCID=1 | Configure email parameters | OK |
| AT+EMAILTO=30 | Set time value of the server response | OK |
| AT+SMTPSRV="smtp.ym.163.com",25 | Set SMTP server address and port | OK |
| AT+SMTPAUTH=1,"kaloha@waveshare.net","123456" | Set username and password | OK |
| AT+SMTPFROM="kaloha@waveshare.net","kaloha" | Set the sender address and name | OK |
| AT+SMTPRCPT=0,0,"kallanlw@163.com","kallanlw" | Set a recipient | OK |
| AT+SMTPRCPT=1,0,"john@sim.com","john" | Set the CC email and name | OK |
| AT+SMTPSUB="Test" | Set the email subject | OK |
| AT+SMTPBODY=19 | Set the message body | OK |
| This is a new Email | Content of the email | OK |
| AT+SMTPSEND | Send the email | OK |
| AT+SAPBR=3,1,"Contype","GPRS" | Configure bearer profile 1 | OK |
| AT+SAPBR=3,1,"APN","CMNET" | Configure the bearer profile APN. | OK |
| AT+SAPBR=1,1 | Activate a GPRS context | OK |
| AT+SAPBR=2,1 | Query GPRS context | OK |
| AT+SAPBR=0,1 | Close the GPRS context. | OK |
| AT+EMAILCID=1 | Configures email parameters | OK |
| AT+EMAILTO=30 | Set time value of the server response | OK |
| AT+SMTPSRV="smtp.ym.163.com",25 | Set SMTP server address and port | OK |
| AT+SMTPAUTH=1,"kaloha@waveshare.net","123456" | Set username and password | OK |
| AT+SMTPFROM="kaloha@waveshare.net","kaloha" | Set sender address and name | OK |
| AT+SMTPRCPT=0,0,"kallanlw@163.com","kallanlw" | Set the email recipient address and name | OK |
| AT+SMTPRCPT=1,0,"john@sim.com","john" | Set the email CC address and name | OK |
| AT+SMTPSUB="Test" | Set the email subject | OK |
| AT+SMTPBODY=19 | Set the message body | OK |
| This is a new Email | Content of email | OK |
| AT+SMTPSEND | Send email | OK |
【Receiving emails】
| AT Commands | Description | Return |
|---|---|---|
| AT+SAPBR=3,1,"Contype","GPRS" | Configure bearer profile 1 | OK |
| AT+SAPBR=3,1,"APN","CMNET" | Configure the bearer profile APN. | OK |
| AT+SAPBR=1,1 | Activate a GPRS context | OK |
| AT+SAPBR=2,1 | Query a GPRS context | OK |
| AT+SAPBR=0,1 | Close the GPRS context. | OK |
| AT+EMAILCID=1 | Configure email parameters | OK |
| AT+EMAILTO=30 | Set time value of the server response | OK |
| AT+POP3SRV="pop.ym.163.com","kaloha@waveshare.net","123456",110 | Set POP3 server address and account information | OK |
| AT+POP3IN | Log in to the POP3 server | OK |
| AT+POP3NUM | Get the total number of messages and its total size | OK |
| AT+POP3LIST=1 | Get the size of first email | OK |
| AT+POP3CMD=4,1 | Read the first message | OK |
| AT+POP3READ=1460 | Read the message content | OK |
【SMS sending and receiving】
Sending SMS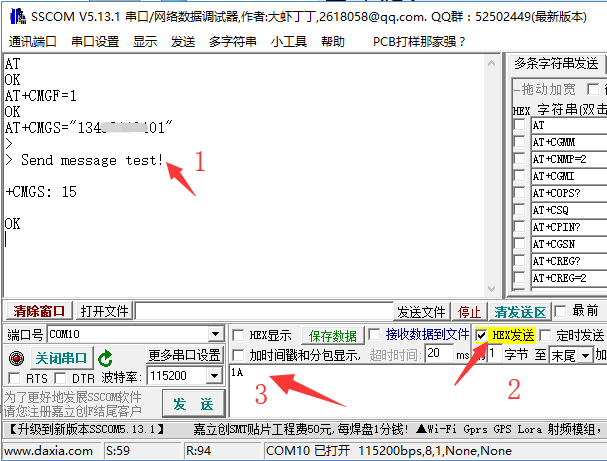
The TCP/IP application of the SIM800 serial module has two connection modes, which can be set by the command AT+CIPMUX=<n>.
【Sending message】
- AT+CMGF=1: Sets the SMS mode to TEXT
- AT+CMGS="phone number"<Enter>, sets the recipient's mobile number, and then returns: ">"
- To send the required content, such as "Send massage test!", there is no need to press enter at the end.
- After editing the short message, send a “1A” in hexadecimal format for sending the message.
(1A is the key value of "CTRL+Z", which is used to tell the module to perform the “send” operation. To cancel the operation, send 1B or "ESC")
- After the transmission is done, the module returns +CMGS:15 to confirm the transmission is successful.
【Receiveing message】
Receiving message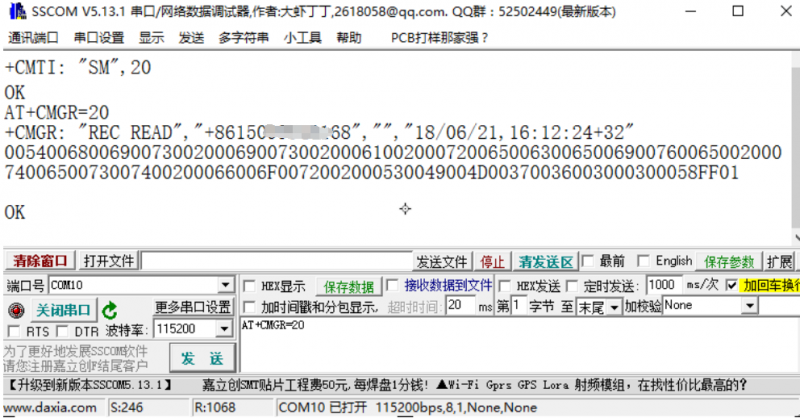
- Send this message on the phone: "This is a receiving test for SIM7600X!" to the test module
- When receiving the information, the serial port will brake down the report to specific format, such as "SM", 20. This means that there are 20 messages in the SM, and the message sent is the 20th one.
- For reading messages use AT+CMGR=20. This reads the 20th message (AT+CMGL="ALL" reads all messages)
- For deleting messages: AT+CMGD=20, as shown in the picture below
- The displayed information is converted to text by a transcoder.
Bluetooth Debugging
The SIM800 serial module supports Bluetooth 3.0 and other profiles such as SPP, OPP and HFP/HSP.
The commands in the table below mainly demonstrates the Bluetooth SPP serial communication functionality.
For more information about Bluetooth, please refer to SIM800C_Series_BT_Application_Note
Bluetooth debugging 1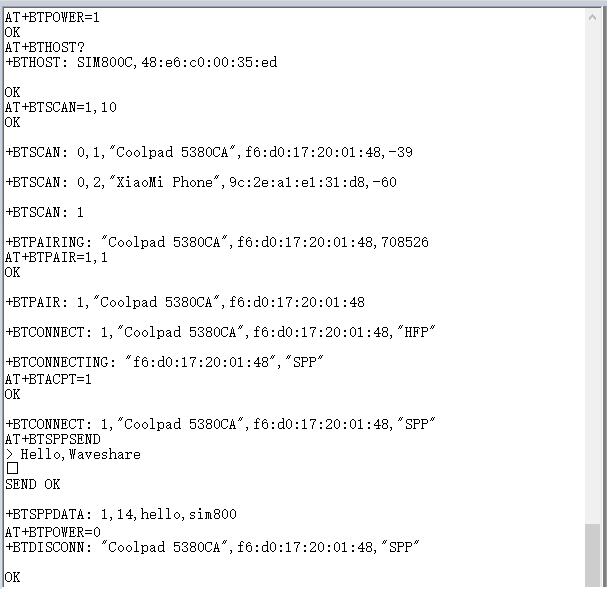
| AT Commands | Description | Return |
|---|---|---|
| AT+BTPOWER=1 | Turn on the Bluetooth power | OK |
| AT+BTHOST? | Query Bluetooth name and address | OK |
| AT+BTSCAN=1,10 | Search for nearby Bluetooth devices | OK |
| AT+BTPAIR=1,1 | Digital confirmation mode response pairing | OK |
| AT+BTACPT=1 | Accept client connection request | OK |
| AT+BTSPPSEND | Send data | OK |
| AT+BTPOWER=0 | Turn off the Bluetooth power | OK |
Test steps:
- Prepare an Android cellphone and install Bluetooth serial APP: Serial Bluetooth

Bluetooth debugging 2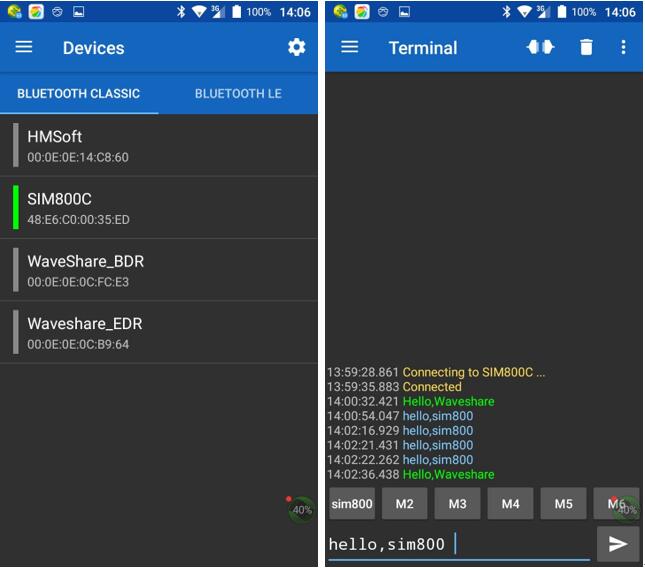
- On the module, send an AT command to turn on the Bluetooth power: AT+BTPOWER=1
- Inquiry the module's own Bluetooth name and address: AT+BTHOST?
- Turn on the Bluetooth of your Android cellphone, search for nearby Bluetooth devices, find the Bluetooth name and address of the module, and initiate a connection request.
- At this time, the serial port of the module will receive a prompt (+BTPAIRING: “Mobile Bluetooth Name”, address, pairing code), then send confirmation pair: AT+BTPAIR=1,1
- Open the Serial Bluetooth APP on your cellphone (or scan the QR code is below), switch to Device, and select connect SIM800 Bluetooth
Working with Raspberry Pi
Hardware connection
SIM800C GSM GPRS HAT has 40PIN header on board, compatible with any revision of Raspberry Pi.
Connecting to Raspberry Pi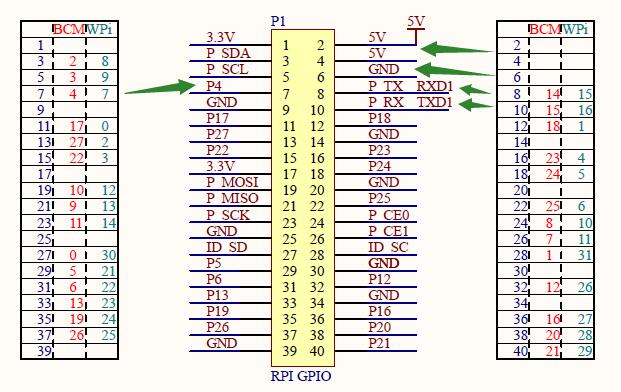
Hardware connection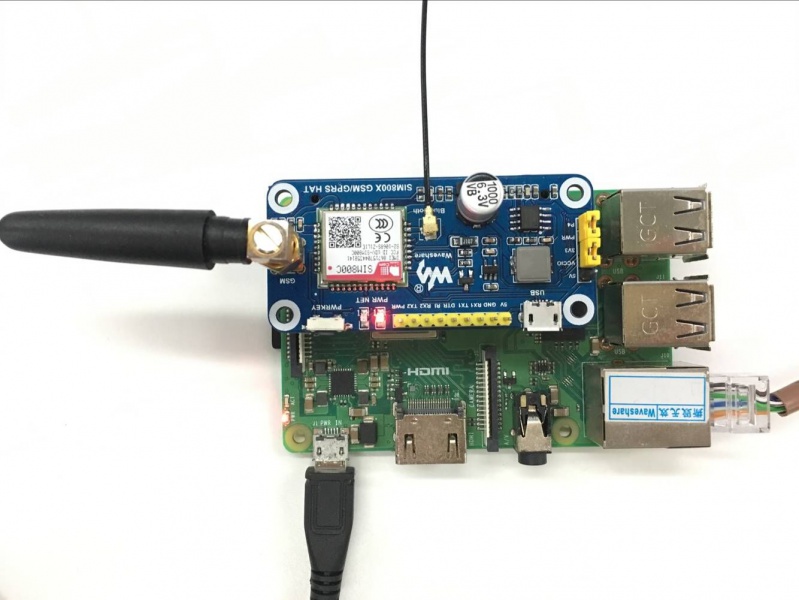
| SIM800C GMS/GPRS HAT | Raspberry Pi |
|---|---|
| 5V | 5V |
| GND | GND |
| RXD | TXD (BCM P14) |
| TXD | RXD (BCM P15) |
| PWR | P7 (BCM P4) |
Software Setting
【Pin initialization】
The default PWR pin of the module is to jump to the P4 pin of raspberry pi by placing a jumper cap. In order to ensure that SIM800C GSM/GPRS HAT can work properly after it is connected to raspberry pi, it is necessary to initialize the level output of raspberry pi board pin.
- Download demo codes from wiki page. Extract and copy the SIM800C folder to /home/pi of Raspberry Pi
- Open Terminal,enter /home/pi/ then execute commands below
chmod 777 pi_gpio_init.sh
- Set the script to auto-run after booting.
sudo nano /etc/rc.local
- Add command before exit 0
sh /home/pi/SIM800C/pi_gpio_init.sh
【Serial port setting】
The serial port of Raspberry Pi is set for shell login by default. Therefore, we need to disable shell login function and enable hardware serial
- Enter configuration page
sudo raspi-config
- Choose Interfacing Options->Serial->no->yes
- Open /boot/config.txt file, make sure the state below is added to the file:
enable_uart=1
- reboot Raspberry Pi
minicom debugging
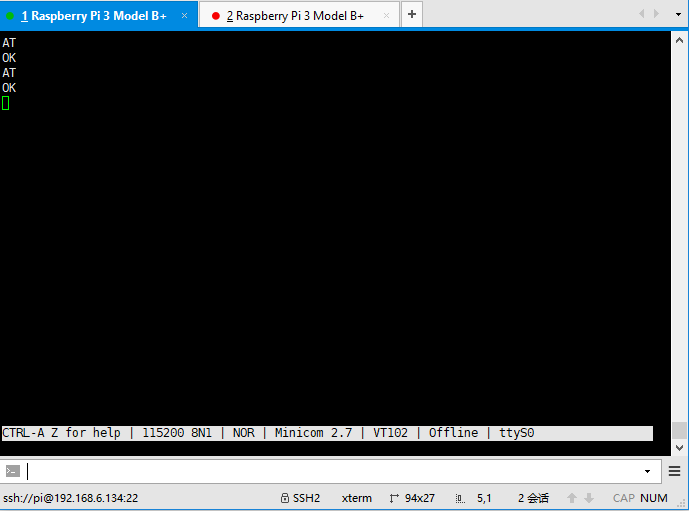
Press the PWRKEY button and hold for about 1 second. Waiting for about 2 seconds. You should see that the NET light starts flashing. This means the module is powered on successfully.
Install minicom on your Raspberry
sudo apt-get install minicom
Then execute command minicom -D /dev/ttyS0 to run the minicom
Note that the defualt baud rate is 115200, serial port is ttyS0 (for Raspberry Pi 3B/3B+ is ttyS0, for Raspberry Pi Zero/2B it should be ttyAMA0)
PPP networking
About the PPP networing, you can refer to this page: SIM868 PPP Dail-up Networking


