- sales/support
Google Chat: zj734465502@gmail.com
- sales
+86-0755-88291180
- sales01
sales01@spotpear.com
- sales02
dragon_manager@163.com
- support
services01@spotpear.com
- CEO-Complaints
manager01@spotpear.com
- sales/support
WhatsApp:13246739196
- HOME
- >
- ARTICLES
- >
- Common Moudle
- >
- ESP
ESP32-C3-Zero User Guide
Overview
Introduction
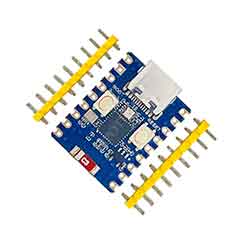
ESP32-C3-Zero (without pin header) and ESP32-C3-Zero-M (with pin header) are tiny in size with castellated holes, making them easy to integrate into other host boards. ESP32-C3-Zero comes with an onboard Type-C USB connector, which exposes most of the unused pins in a small form factor. It adopts ESP32-C3FN4 as a System-on-Chip (SoC) that integrates low-power WiFi and BLE5 with 4MB Flash. In addition, there is a hardware encryption accelerator, RNG, HMAC, and Digital Signature modules to meet the safety requirements of IoT and provide peripheral interfaces. Moreover, its low-power working mode supports most application scenarios such as IoT, mobile devices, wearable electronic devices, and smart homes.
Features
- Low-power SoC equipped with RISC-V 32-bit single-core processor, up to 160MHz main frequency.
- Supports 2.4GHz Wi-Fi (802.11 b/g/n) and Bluetooth® 5 (LE).
- 400KB of SRAM and 384KB ROM, and 4MB of onboard Flash memory.
- Castellated module and onboard ceramic antenna, allow soldering direct to carrier boards.
- Supports flexible clock, module power supply independent setting, and other controls to realize low power consumption in different scenarios.
- Integrated with USB serial port full-speed controller, 15 × GPIO pins allow flexible configuring pin functions.
- 3 × SPI, 1 × I2C, 2 × UART, 1 × I2S, 2 × ADC, etc.
Hardware Description
- When using ESP32-C3-Zero with daughterboards, please avoid covering the ceramic antenna with PCB boards, metal, or plastic components.
- In ESP32-C3-Zero, GPIO12 to GPIO17 pins are not exposed; these pins are used for stacking the 4MB Flash.
- ESP32-C3-Zero uses GPIO10 to connect with WS2812 RGB LED. Please refer to the documentation link for WS2812 specifications.
- ESP32-C3-Zero does not employ a USB to UART chip. When flashing firmware, press and hold the BOOT button (GPIO9) and then connect the Type-C cable.
- The "TX" and "RX" markings on the board indicate the default UART0 pins for ESP32-C3-Zero. Specifically, TX is GPIO21, and RX is GPIO20.
Hardware Connection
- Press the BOOT (GPIO9) key before connecting the Type-C cable each time download the firmware.
- Input 3.7V~6V for the castellated hole with 5V silkscreen when connecting the external power.
Dimensions
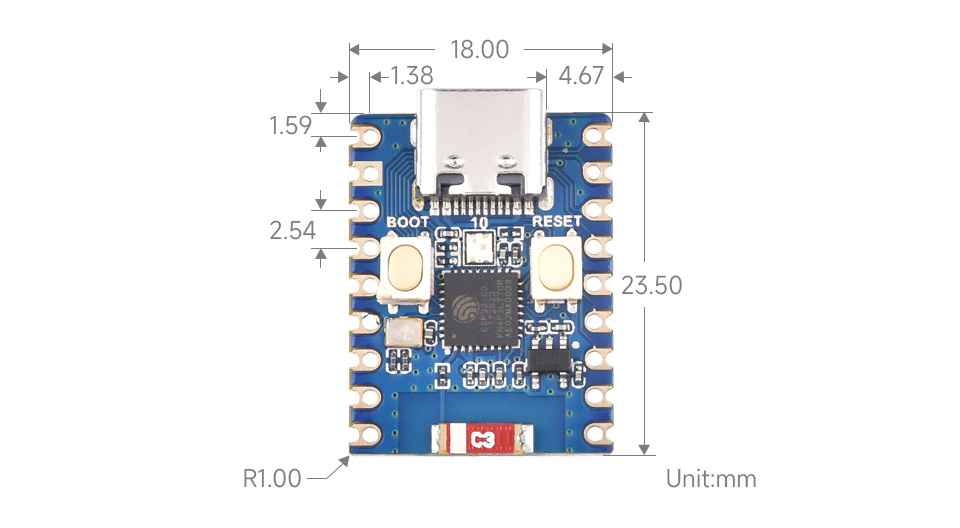
Environment Setting
The software framework for ESP32 series development boards is completed, and you can use CircuitPython, MicroPython, and C/C++ (Arduino, ESP-IDF) for rapid prototyping of product development. Here's a brief introduction to these three development approaches:
- CircuitPython is a programming language designed to simplify coding tests and learning on low-cost microcontroller boards. It is an open-source derivative of the MicroPython programming language, primarily aimed at students and beginners. CircuitPython development and maintenance are supported by Adafruit Industries.
- You can refer to development documentation for CircuitPython-related applications development.
- The GitHub library for CircuitPython allows for recompilation for custom development.
- MicroPython is an efficient implementation of the Python 3 programming language. It includes a small subset of the Python standard library and has been optimized to run on microcontrollers and resource-constrained environments.
- You can refer to development documentation for MicroPython-related application development.
- The GitHub library for MicroPython allows for recompilation for custom development.
- The official libraries and support from Espressif Systems for C/C++ development make it convenient for rapid installation. For Windows 10 system:
- Mac and Linux operating system users can refer to the official instructions. Additionally, you can find development manuals for ESP32 series Arduino and ESP-IDF development to assist you in the process.
Arduino
1. Download and install Arduino IDE.
2. Install ESP32 on the Arduino IDE as shown below, and you can refer to this link.
- Fill in the following link in the Additional Boards Manager URLs section of the Settings interface under File -> Preferences and save.
https://raw.githubusercontent.com/espressif/arduino-esp32/gh-pages/package_esp32_index.json
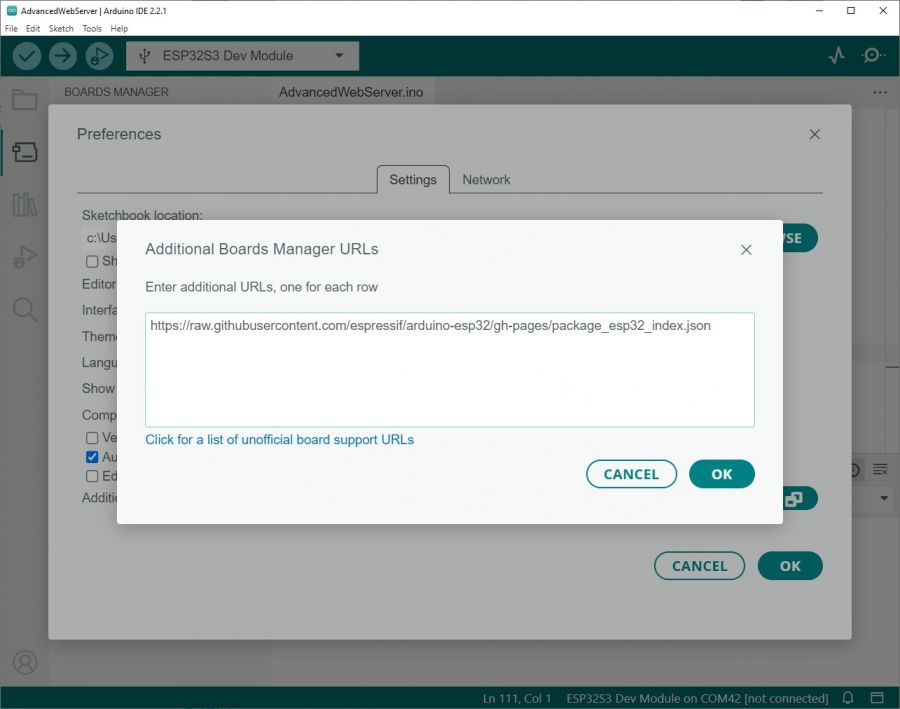
- Search esp32 on Board Manager to install, and restart Arduino IDE to take effect.
3. ESP32-C3-Zero does not have USB to UART chip mounted, you need to use the USB of ESP32-C3 as the download interface and Log print interface, and you need to enable USB CDC when using Arduino IDE.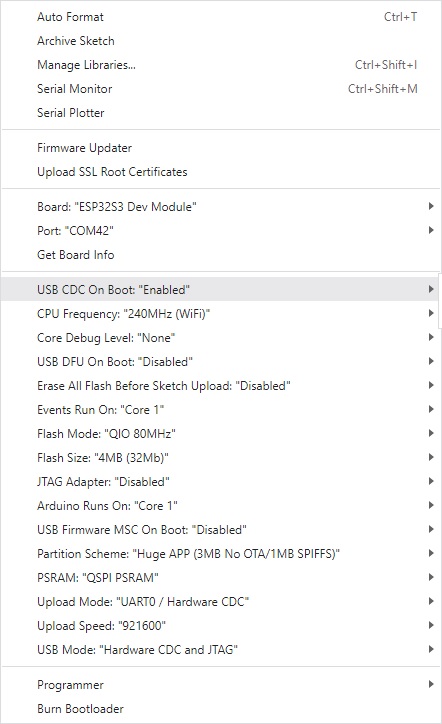
MicroPython
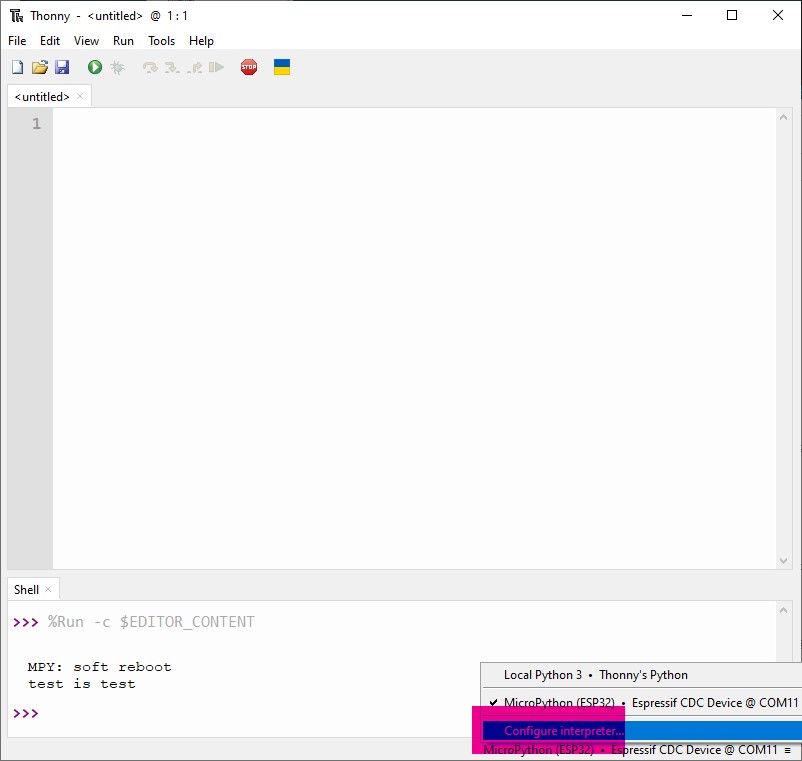
- 1. Download and install the latest Thonny, open Thonny IDE -> Configure interpreter..., as shown below:
- 2. Press the BOOT key on the board, connect it to the USB cable, find the device manager or the corresponding COM port, and download or run the demo. For more details, you can see #Hardware Connection.
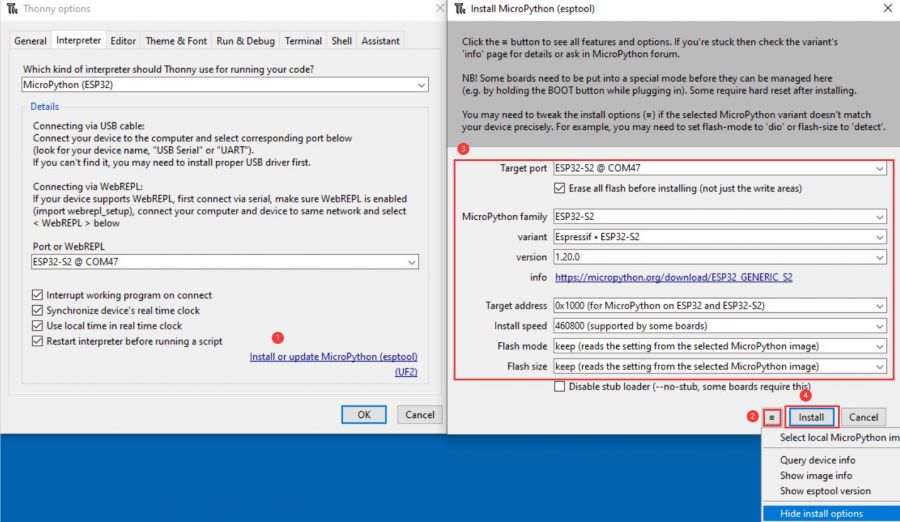
- 3. Select the ESP32 series online MPY firmware to download according to the following steps. The Flash content of the development board will be cleared before downloading, and the whole download process lasts about 1 minute.
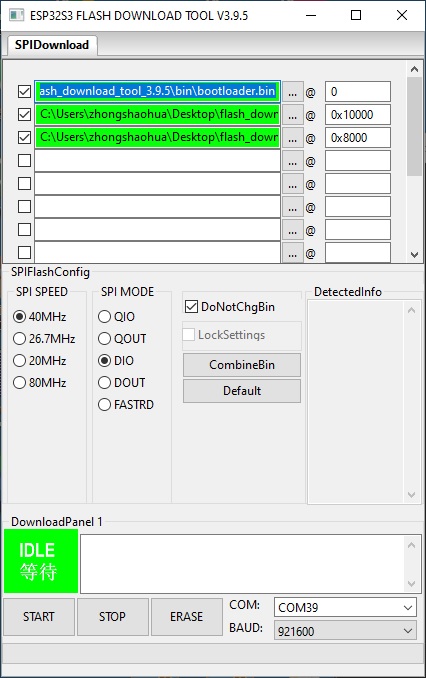
- 4. Download the local firmware using flash_download_tool according to the following figure. You can choose either step 3 or step 4, but we recommend to choose step 4.
- 5. Please refer to MicroPython Documentation and Release Note to program.
Sample Demo
- Please refer to arduino-esp32 for Arduino sample demo or File -> examples on the Arduino IDE.
- Please refer to MicroPython development documentation and sample demo for mpy example.
Resource
Document
- Schematic
- MicroPython development documentation
- ESP32 Arduino Core's documentation
- arduino-esp32
- ESP-IDF
- esp32-c3 programming guide
Demo
Software
Datasheet
FAQ
Question:Can the ESP32-C3-Zero be powered via pins?
You can use 5V pins and then supply it with 5V.
Question:How to burn ESP32-C3-Zero with hardware debugging, is it just plugging in the type C port and connecting it to the computer?
That's right. If the burn fails, press and hold the boot button to connect to the computer and then release it.
Question:Does ESP32-C3-Zero support ipv6?
ESP32-C3 has ipv6 sample demo, it can support ipv6.
Support
[Tutorial Navigation]
- Overview
- Resource
- FAQ
- Question:Can the ESP32-C3-Zero be powered via pins?
- Question:How to burn ESP32-C3-Zero with hardware debugging, is it just plugging in the type C port and connecting it to the computer?
- Question:Does ESP32-C3-Zero support ipv6?
- Support


