- sales/support
Google Chat:---
- sales
+86-0755-88291180
- sales01
sales@spotpear.com
- sales02
dragon_manager@163.com
- support
tech-support@spotpear.com
- CEO-Complaints
zhoujie@spotpear.com
- Only Tech-Support
WhatsApp:13246739196
- Purchase/Shipping/Refund
WhatsApp:13424403025
- HOME
- >
- ARTICLES
- >
- Raspberry Pi
- >
- Raspberry Pi LCD
- >
- GPIO-SPI
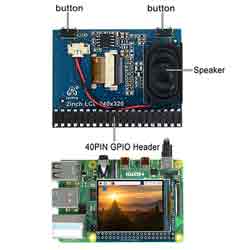
Raspberry pi 2inch LCD 240x320 User Guide
【Download】
[] Image: 2inch-240x320-230822.img
[] schematic diagram: 2inch LCD 240x320 with buzzer-230426.pdf
[] Key program: key_test.py
[] Display drive: lcd2.dtbo
【Configuration display】
[] Download lcd2.dtbo copy to /boot/overlays/
Increase display configuration
sudo nano /boot/config.txt
And add that follow code in the configuration file:
dtparam=spi=on
dtoverlay=lcd2:rotate=270
hdmi_force_hotplug=1
max_usb_current=1
hdmi_group=2
hdmi_mode=1
hdmi_mode=87
hdmi_cvt 480 320 60 6 0 0 0
hdmi_drive=2
display_rotate=0
Attention! In the configuration file of Raspberry Pi, please comment out two lines of code dtoverlay=vc4-kms-v3d and max_framebuffers=2:
#dtoverlay=vc4-kms-v3d
#max_framebuffers=2
【Download, compile and install fbcp】
sudo apt update
sudo apt-get install git -y
sudo git clone https://github.com/tasanakorn/rpi-fbcp.git
cd ./rpi-fbcp/
sudo mkdir -m 777 ./build
cd ./build/
sudo apt install libraspberrypi-dev -y
sudo apt-get install cmake -y
sudo cmake ..
sudo make
sudo install fbcp /usr/local/bin/fbcp
【Set auto-start startx and fbcp】
sudo nano ~/.bash_profile
Note: If there is no .bash_profile file, create one yourself
【Add the following code to the bottom of the .bash_profile file】
if [ "$(cat /proc/device-tree/model | cut -d ' ' -f 3)" = "5" ]; then
# Raspberry Pi 5B configuration
export FRAMEBUFFER=/dev/fb1
startx 2> /tmp/xorg_errors
else
# Non-Raspberry Pi 5B configuration
export FRAMEBUFFER=/dev/fb0
sleep 20
fbcp &
startx 2> /tmp/xorg_errors
fi
【Set CLI automatic login】
sudo raspi-config nonint do_boot_behaviour B2
Noto: This command has optional parameters
B1 - Boot to console, requiring login
B2 - Boot to console, logging in automatically
B3 - Boot to desktop, requiring login
B4 - Boot to desktop, logging in automatically
Note: Make sure the username of the Raspberry Pi is pi, otherwise it will not log in automatically
【Switch to X11】
sudo raspi-config nonint do_wayland W1
Note: This command has optional parameters
W1 - Use the X11 backend
W2 - Use the Wayland backend
【The above configuration will take effect after restart】
sudo reboot
Note: After setting all the above configurations, the system will become longer during each restart, and SSH also needs to wait for a while to enter;
【Configure speakers】
Edit configuration file:
sudo nano /boot/config.txt
Add to the configuration file
dtoverlay=audremap,pins_18_19
Save to exit, and then restart:
sudo reboot
Enter the command at the terminal after restarting.
sudo raspi-config,
Select system options-> audio->' headset' and restart again.
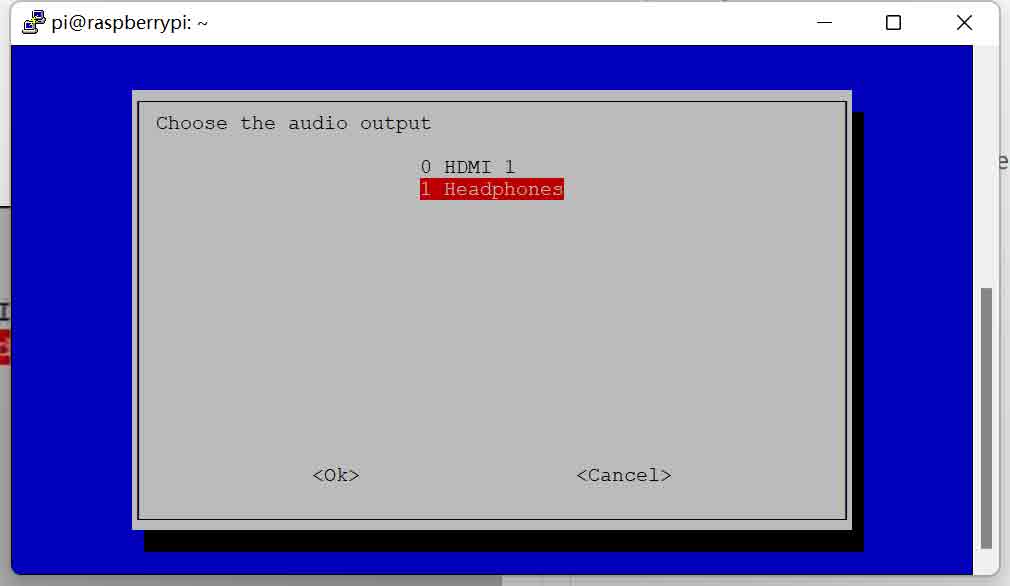
Enter the system interface, just find an mp3 file and double-click it to play it. If it can play normally, it will be fine.
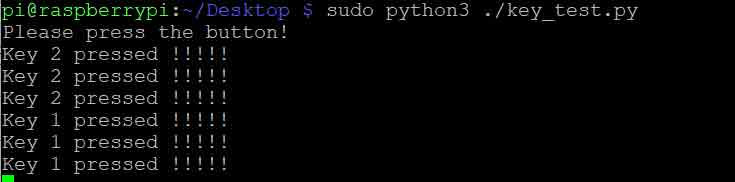
【Key code test】
Download key_test.py Running code:
sudo python3 ./key_test.py
Press the module button at this time, and the terminal will output a prompt message.