- sales/support
Google Chat:---
- sales
+86-0755-88291180
- sales01
sales@spotpear.com
- sales02
dragon_manager@163.com
- support
tech-support@spotpear.com
- CEO-Complaints
zhoujie@spotpear.com
- Only Tech-Support
WhatsApp:13246739196
- Purchase/Shipping/Refund
WhatsApp:13424403025
4inch DSI LCD (C) User Guide
Features
- 4-inch IPS screen, 720 x 720 hardware resolution.
- Support 10-point capacitive touch, toughened glass panel with up to 6H hardness.
- Adopts optical bonding technique, clearer image.
- Drive the LCD directly via the DSI interface of the Raspberry Pi, up to 60Hz refresh rate.
- When used with Raspberry Pi, the Raspberry Pi OS driver is provided.
- Supports Pi 4B/3B+/3A+, another DSI-Cable-15cm is required for CM3+/4.
- Supports software control of backlight brightness.
Working with Raspberry Pi
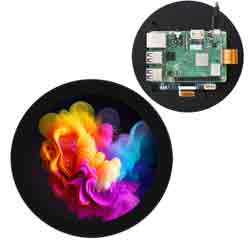
Hardware Connection
- Connect the DSI interface of the display to the DSI interface of the Raspberry Pi board with a 15PIN FPC cable.
- Mount the Raspberry Pi board backside down to the carrier board of the LCD, and connect to the 5V power and I2C communication via the 4PIN connector.
- The final connection is shown below:
Software Setting
Method 1: Manual Driver Installation
- 1. Download the image from the Raspberry Pi website.
- 2. Connect the TF card to the PC, and use SDFormatter software to format the TF card.
- 3. Open the Win32DiskImager software, select the system image downloaded in step 2, and click 'Write' to write the system image.
- 4. After programming, connect the TF card to the Raspberry Pi and boot. Log into the Raspberry Pi's terminal (you can connect the Raspberry Pi to an HDMI display or log in remotely with ssh).
Step 1: Download and enter the Waveshare-DSI-LCD driver folder.
git clone https://github.com/waveshare/Waveshare-DSI-LCD
cd Waveshare-DSI-LCD

#Second, input uname -a to view the internal core version in the terminal, and input cd to the corresponding directory.
#5.15.84 runs the following commands
cd 5.15.84

#6.1.21 runs the following commands
#cd 6.1.21

#Step 3: Please determine how many bits of the system you are currently using, 32-bit system into the 32 directory, 64-bit system into the 64 directory
cd 32
#cd 64

#Step 4: Enter your corresponding model command to install the driver, pay attention to the I2C dip switch selection.
#4inch DSI LCD (B) 720×720 driver:
sudo bash ./WS_xinchDSI_MAIN.sh 40C I2C0

#Step 5: Wait a few seconds, when the driver installation is complete, without prompting any error reports, reboot to load the DSI driver can be used normally
sudo reboot
#Note: The above steps are required to ensure that the Raspberry Pi can connect to the Internet properly.
- 5. After waiting for rebooting the system, it can normally display and be touched.
Method 2: Program Pre-install Image
- 1. Choose the image corresponding to the Raspberry Pi, download and unzip the ".img" file.
- Raspberry Pi 4B/CM4 version download: Waveshare DSI LCD - Pi4 pre-install image.
- Raspberry Pi 3B/3B+/CM3 version download: Waveshare DSI LCD - Pi3 pre-install image.
- 2. Connect the TF card to the PC, use SDFormatter to format the TF card.
- 3. Open the Win32DiskImager software, select the system image downloaded in step 2, and click 'Write' to write the system image.
- 4. After programming, open the config.txt file in the root directory of the TF card, add the following code under [all], and save and eject the TF card safely.
dtoverlay=WS_xinchDSI_Screen,SCREEN_type=10,I2C_bus=10
dtoverlay=WS_xinchDSI_Touch,I2C_bus=10- 5. Connect the TF card to the Raspberry Pi, and boot the Raspberry Pi. It can normally display and be touched after waiting for 30 seconds.
Display Rotation
Method 1: Graphical Interface Rotation
In the start menu, select: Preferences -> Screen Configuration -> Configure -> Screens -> DSI-1 -> Orientation, select the corresponding angle in it, click "√", select Yes, and restart.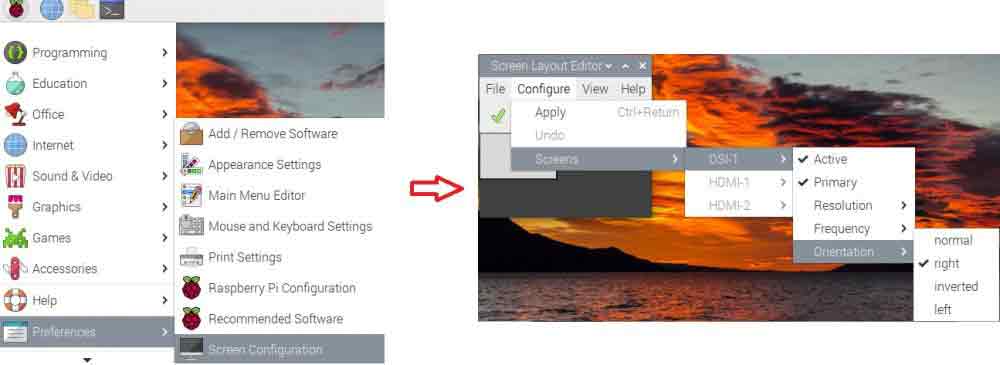
Method 2: Rotation Display In Lite Version
sudo nano /boot/cmdline.txt
#Add a command to display the rotation angle at the beginning of the cmdline.txt file, save it and restart it.
#Display rotates 90 degrees
video=DSI-1:720x720M@60,rotate=90
#Display rotates 180 degrees
video=DSI-1:720x720M@60,rotate=180
#Display rotates 270 degrees
video=DSI-1:720x720M@60,rotate=270
Touch Rotation
sudo nano /boot/config.txt
#Modify the instruction of touch rotation angle at the end of the config.txt file and take effect after reboot (default instruction of 0° touch direction exists)
#0°:
dtoverlay=WS_xinchDSI_Touch,invertedx,swappedxy
#90°:
dtoverlay=WS_xinchDSI_Touch,invertedx,invertedy
#180°:
dtoverlay=WS_xinchDSI_Touch,invertedy,swappedxy
#270°:
dtoverlay=WS_xinchDSI_Touch
Brightness Control via Software
Method 1: Graphical Interface Dimming
Using the application provided by Waveshare:
cd Waveshare-DSI-LCD
#Determine the kernel version currently in use, e.g. 5.15.61 kernel, and run the following command
cd 5.15.84
#Determine how many bits of the currently used system, 32-bit system into the 32 directory, 64-bit system into the 64 directory
cd 32
#cd 64
cd Backlight
sudo ./install.sh
After the installation is complete, you can open the program in the Start menu - > Accessories - > Brightness, as shown below:
Method 2: Lite Version Dimming Command
To adjust the system command of the lite version, after entering the root privilege, execute the following command on the Raspberry Pi terminal:
echo X > /sys/waveshare/rpi_backlight/brightness
(X value in the range of 0~255)
For example:
sudo su root
echo 100 > /sys/waveshare/rpi_backlight/brightness
Note
- 1. Update the system and execute the following commands:
sudo apt-get update
sudo apt-get full-upgrade
After upgrading the system, some pre-install driver files may be covered, and you need to reinstall the driver so that it can normally display.
- 2. Replace the board
If users have installed the driver on the Raspberry Pi 4 Model B before, they may find it is unable to normally display after changing the board such as Raspberry Pi 3 Model B+.
As Pi4 and Pi3 need to load different driver files, you need to reinstall the drivers on the new board according to #Software Setting so that it can normally display.