


- sales/support
Google Chat:---
- sales
+86-0755-88291180
- sales01
sales@spotpear.com
- sales02
dragon_manager@163.com
- support
tech-support@spotpear.com
- CEO-Complaints
zhoujie@spotpear.com
- Only Tech-Support
WhatsApp:13246739196
- Purchase/Shipping/Refund
WhatsApp:13424403025
WAVEGO servo is assembled and calibrated properly
How do I know WAVEGO servo is assembled and calibrated properly
- Firstly, you need to understand how the servos work. The servos of WAVEGO can be controlled within 180 degrees, and do not need limit blocks as a result of its large torque. However, there is no way to confirm the angular position of the current servo output shaft by appearance as the round-copper gear output shaft can rotate continuously under the external force.
Due to the above reasons, before installing the servo rocker arm, it is necessary to use the driver board of the robot to control the servo to rotate to the middle position of its motion range (180°), and then install the servo rocker arm according to the specified angle. For the specific method and installation angle, please refer to the product WIKI assembly tutorial. The tutorial also includes the servo calibration method. The following describes how to determine whether the product is properly assembled and calibrated, which is convenient for quickly locating the problem.
- Assemble and calibrate the servo according to the tutorial.
- Turn on.
- Use your mobile phone to search for the WIFI hotspot name WAVESHARE Robot and enter the password 1234567890 to connect to the hotspot.
Generally. after the mobile phone is connected to the hotspot, it will prompt that it is not connected to the Internet due to the failure of Ping to the Internet server. The mobile phone may automatically disconnect the hotspot. After reconnecting the hotspot, it will not be automatically disconnected in the future.
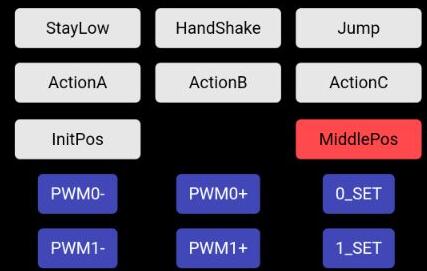
- Open the browser on the mobile phone (Google Chrome is recommended, other browsers may have button compatibility issues), and visit page 192.168.4.1.
- The content of the page is as follows. There are two buttons on the page: InitPos and MiddlePos. The former is the middle position of the servo angle during assembly (same as the assembly mode), and the latter is the position of the servo after calibration. After pressing the button, all servos will rotate to the corresponding angle.
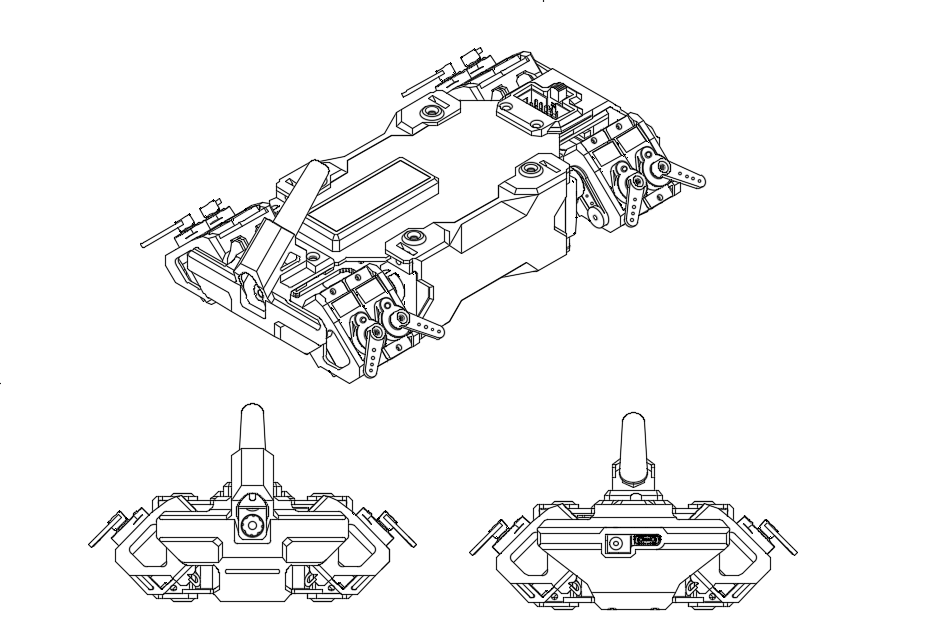
- After pressing the InitPos button, the servo swing angle is as follows. Due to the mechanical structure, an error within ±10° is allowed here (for this reason, the servo needs to be calibrated). If the error is too large, you need to re-install the corresponding servo rocker arm according to the assembly tutorial.
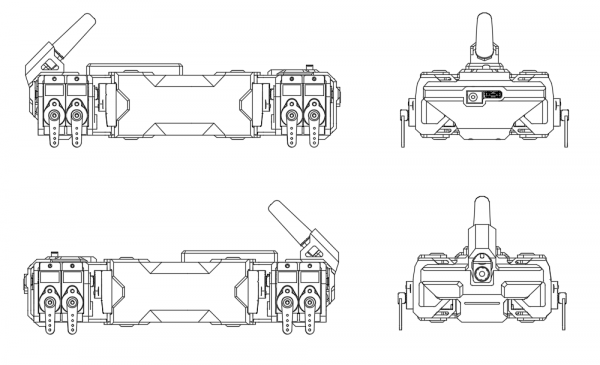
- After pressing the MiddlePos button, the servo swing angle is as follows. Since this position is the position after software calibration, the error needs to be as small as possible. If the error is larger than the picture, the servo needs to be re-calibrated.
TAG:
Refractive Prism
E-Ink
DTM3202
Serial UART Bus Servo TTL ST3235 30KG.CM Magnetic Encoder 360° High Precision And Large Torque
Luckfox Pico MINI
ESP32 C3 1.44inch LCD
Jetson Nano
X1200 Raspberry Pi 5 UPS Board Uninterruptible Power Supply For 18650-Li-Battery (NOT includ)
Industrial RS232 to RS485
WiFi6
ESP32 C3
Mini Uninterruptible Power Supply module Supports charging And Power output at the same time 5V 2.5A
Raspberry Pi 7 inch HMI industrial DSI Display LCD 7inch TouchScreen Computer 720×1280
development board
Good low light performance
0.49inch OLED Screen Display 64×32 SSD1315 Arduino Raspberry Pi ESP32 Pico STM32
Raspberry Pi Pico 2 P2350-Plus Smart Car Kit PicoGo2 Autonomous Driving Learning Car
ESP32 S3 Development Board 1.64 inch AMOLED Display 1.64inch TouchScreen For Arduino LVGL With SD-Port/ QMI8658C 6-Axis Sensor
Raspberry Pi CM5 4G/5G Dual Ethernet Port ETH Gigabit/2.5G Expansion Board with RJ45 IO Base and GPIO
EVAL-ADXL354CZ EVAL BOARD
TAG:
ESP32-C6 AI 1.54-inch e-Paper Ink Screen 1.54inch Display AIoT Development Board Deepseek
Sipeed LonganPi Pi 3H ARM Linux H618 Cortex-A53
0.85 inch LCD
CAN Analyzer
SpotPear
Raspberry Pi M.2 4G 5G LTE HAT GSM GPRS EDGE RM500 SIM8200 GM800 Samsung ARTIK Rock64 Asus Tinker Latte Panda
ESP32 S3 Round 2.1 inch LCD Knob Rotary Display
Raspberry Pi IR Array Thermal Imaging Camera Far infrared
Raspberry Pi 10.1 inch DSI LCD C Display MIPI 1280×800 Capacitive TouchScreen
Seeed Studio XIAO SAMD21 Tiny SuperMini Arduino
Arduino Thermal imaging
5.79inch e Paper Ink (B) Red-Black-White display 792x272 Arduino Raspberry Pi Jetson Nano STM32
Raspberry Pi 5 NVMe
Raspberry Pi 5
1.69inch LCD TouchScreen Display 240×280 ST7789 Arduino Raspberry Pi ESP32S3 Pico STM32
Raspberry Pi Pico 2 RP2350 1.64 inch AMOLED Development Board Display TouchScreen 280x456 QMI8658 IMU QSPI
Raspberry Pi 5 DSI
Raspberry Pi 5 Official Red-White Case
PI5
Arduino UNO R4 case