- sales/support
Google Chat:---
- sales
+86-0755-88291180
- sales01
sales@spotpear.com
- sales02
dragon_manager@163.com
- support
tech-support@spotpear.com
- CEO-Complaints
zhoujie@spotpear.com
- Only Tech-Support
WhatsApp:13246739196
- Purchase/Shipping/Refund
WhatsApp:13424403025
WAVEGO Custom Action Development Tutorial
WAVEGO: Custom Action Development Tutorial
In the demo of ServoCtrl.h, we provide six functions for custom actions:
void functionStayLow();
void functionHandshake();
void functionJump();
void functionActionA();
void functionActionB();
void functionActionC();
For the first three of them, we designed some actions: staying low, shaking hands, and jumping.
The last three you can use to design some custom actions, you can also extend more functions and change the HTML code in WebPage.h for more buttons, the code for the function call is in app_httpd.cpp.
In this tutorial, we'll cover how to program actions.
Take "stay low" as an example:
void functionStayLow(){
// The robot squatted from the normal standing height WALK_HEIGHT to the minimum height WALK_HEIGHT_MIN
for(float i = 0; i<=1; i+=0.02){
standUp(besselCtrl(WALK_HEIGHT, WALK_HEIGHT_MIN, i));
GoalPosAll();
delay(1);
}
delay(300);
// The robot rises from the lowest standing height WALK_HEIGHT_MIN to the highest standing height WALK_HEIGHT_MAX
for(float i = 0; i<=1; i+=0.02){
standUp(besselCtrl(WALK_HEIGHT_MIN, WALK_HEIGHT_MAX, i));
GoalPosAll();
delay(1);
}
// The robot descends from the highest standing height WALK_HEIGHT_MAX to the normal standing height WALK_HEIGHT
for(float i = 0; i<=1; i+=0.02){
standUp(besselCtrl(WALK_HEIGHT_MAX, WALK_HEIGHT, i));
GoalPosAll();
delay(1);
 }
}
The complete code is as above. After calling this function, the robot will first squat to the lowest point, then stand up to the highest point, and finally, return to the normal standing height.standUp() function is used to control the standing height of the robot.
For example, if you want the robot to stand at a height of 70mm, you can write as follows:
standUp(70); // Call this function to calculate the angle to which each joint needs to rotate if the robot stands at a height of 70mm.
             // and store the target position of the angle each joint should turn to in GoalPWN[].
            // Calling this function alone will not make the servos start turning.
GoalPosAll(); // After calling this function, all servos of the robot will rotate to the corresponding position in GoalPWM[].
The purpose of GoalPosAll() is that the joint operation of each leg takes time, especially when performing complex movements, and the calculation is more.
If it is larger, it needs the servos to start moving at the same time to make the movements more coordinated.
If you want the movement to be linear, you can write the squat and rise as follows.
for(int i = 0; i<=10; i++){
standUp(70-i);
GoalPosAll();
delay(10);
}
for(int i = 0; i<=10; i++){
standUp(60+i);
GoalPosAll();
delay(10);
}
If you want the action to be flexible, you can use the following function to achieve the effect of a flexible action.
besselCtrl(VAL_START, VAL_END, i); // VAL_START: initial value
                                  // VAL_END: end value
                                 // i: the locating point for linear changing
                                // The return value of this function is the value of the nonlinear change calculated based on VAL_START, VAL_END, and the linearly changing anchor point i, we will explain how this is used below.
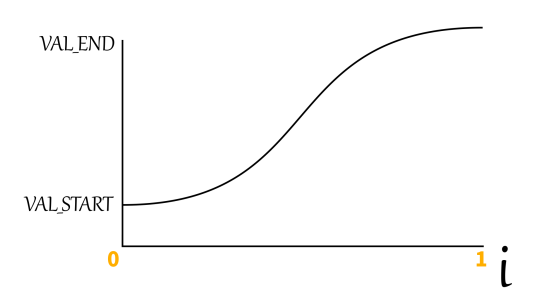
As shown in the figure above, the horizontal axis is the variable "i", the fixed point with linear changing, and the value of "i" changes linearly between 0-1 (the increment does not change at the same time).
The VAL_START and VAL_END of the vertical axis are the initial value and the end value respectively, but it should be noted that the initial value is not necessarily smaller than the end value.
The output value is between VAL_START and VAL_END. When the "i" value changes linearly from 0 to 1, the change speed of the output value is changing, starting slow, then fast and finally slow.
Use this function to make the robot's movements look more natural.
For example, when you want to reduce the standing height of the robot from WALK_HEIGHT to WALK_HEIGHT_MIN, you can write as follows:
for(float i = 0; i<=1; i+=0.02){
    standUp(besselCtrl(WALK_HEIGHT, WALK_HEIGHT_MIN, i));
    GoalPosAll();
    delay(1);
}
So besselCtrl() can also be used for other more complex purposes, taking the following handshake as an example:
void functionHandshake(){
   // Each leg can be edited individually, then call GoalPosAll() to unify the movement.
   for(float i = 0; i<=1; i+=0.02){
      // Control the front two legs to retract a bit and raise them so the robot looks up.
      singleLegCtrl(1, besselCtrl(WALK_EXTENDED_X, 0, i), besselCtrl(WALK_HEIGHT,
WALK_HEIGHT_MAX, i), besselCtrl(WALK_EXTENDED_Z, -15, i));
      singleLegCtrl(3, besselCtrl(WALK_EXTENDED_X, 0, i), besselCtrl(WALK_HEIGHT,
WALK_HEIGHT_MAX, i), WALK_EXTENDED_Z);

   // Control the rear two legs to retract and lower so the robot appears to sit down while looking up.
   singleLegCtrl(2, -WALK_EXTENDED_X, besselCtrl(WALK_HEIGHT, WALK_HEIGHT_MIN10, i), besselCtrl(WALK_EXTENDED_Z, 2*WALK_EXTENDED_Z, i));
   singleLegCtrl(4, -WALK_EXTENDED_X, besselCtrl(WALK_HEIGHT, WALK_HEIGHT_MIN10, i), besselCtrl(WALK_EXTENDED_Z, 2*WALK_EXTENDED_Z, i));

   // After all the above calculations are completed, perform a unified movement, otherwise it will look uncoordinated if it is counted one step at a time.
GoalPosAll();
   // Symbolically give some delay, in fact, the calculation process of the leg link above will also take some delay.
delay(1);
}

  // The following is used for handshake action.
  for(float i = 0; i<=1; i+=0.02){
    singleLegCtrl(3, besselCtrl(0, WALK_RANGE/2+WALK_EXTENDED_X, i),
besselCtrl(WALK_HEIGHT_MAX, WALK_HEIGHT_MIN, i), besselCtrl(WALK_EXTENDED_Z, 0,
i));
   GoalPosAll();
   delay(1);
}
for(int shakeTimes = 0; shakeTimes < 3; shakeTimes++){
   for(float i = 0; i<=1; i+=0.03){
    singleLegCtrl(3, WALK_RANGE/2+WALK_EXTENDED_X,
besselCtrl(WALK_HEIGHT_MIN, WALK_HEIGHT_MIN+30, i), 0);

      GoalPosAll();
      delay(1);
      }
      for(float i = 0; i<=1; i+=0.03){
        singleLegCtrl(3, WALK_RANGE/2+WALK_EXTENDED_X,
besselCtrl(WALK_HEIGHT_MIN+30, WALK_HEIGHT_MIN, i), 0);

      GoalPosAll();
      delay(1);
    }
   }
   // Contrary to the sit-down motion in the first part, here is the return to the standing motion of the robot
   for(float i = 0; i<=1; i+=0.02){
      singleLegCtrl(1, besselCtrl(0, WALK_EXTENDED_X, i),
besselCtrl(WALK_HEIGHT_MAX, WALK_HEIGHT, i), besselCtrl(-15, WALK_EXTENDED_Z,
i));
      singleLegCtrl(3, besselCtrl(WALK_RANGE/2+WALK_EXTENDED_X, WALK_EXTENDED_X,
i), besselCtrl(WALK_HEIGHT_MIN, WALK_HEIGHT, i), besselCtrl(0, WALK_EXTENDED_Z,
i));

       singleLegCtrl(2, -WALK_EXTENDED_X, besselCtrl(WALK_HEIGHT_MIN-10,
WALK_HEIGHT, i), besselCtrl(2*WALK_EXTENDED_Z, WALK_EXTENDED_Z, i));
        singleLegCtrl(4, -WALK_EXTENDED_X, besselCtrl(WALK_HEIGHT_MIN-10,
WALK_HEIGHT, i), besselCtrl(2*WALK_EXTENDED_Z, WALK_EXTENDED_Z, i));

        GoalPosAll();
        delay(1);
 }