




- sales/support
Google Chat:---
- sales
+86-0755-88291180
- sales01
sales@spotpear.com
- sales02
dragon_manager@163.com
- support
tech-support@spotpear.com
- CEO-Complaints
zhoujie@spotpear.com
- Only Tech-Support
WhatsApp:13246739196
- Purchase/Shipping/Refund
WhatsApp:13424403025
- HOME
- >
- ARTICLES
- >
- Common Moudle
- >
- Sensors
UART Fingerprint Sensor (G) User Guide
Features
This product uses a high-performance Cortex-core main controller and integrates a highly secure commercial fingerprint algorithm, supporting functions such as fingerprint enrollment, image capture, template extraction, and fingerprint comparison. Users do not need to deeply understand complex fingerprint recognition algorithms; they can carry out secondary development simply by sending commands over the serial port, making it suitable for fingerprint recognition application scenarios with high requirements for size and accuracy.
- Simple to operate, with no need to understand the fingerprint algorithm or internal structure; the corresponding operations can be completed with simple commands
- Built-in commercial algorithm, supporting fingerprint enrollment, fingerprint comparison, fingerprint image extraction, and template upload, with stable performance and fast recognition speed
- Uses capacitive fingerprint recognition with sensitive response; a light touch on the capture window is enough to complete recognition quickly
- High hardware integration, with the main controller and fingerprint sensor integrated into one unit, making it easy to embed into small-size application scenarios
- Built-in human body sensing device, supporting power-down sleep and touch wake-up functions to effectively reduce power consumption
- Capture window equipped with an LED indicator, indicating fingerprint capture status in real time
- Onboard UART serial communication interface
- Can be easily connected to a PC for use with the host software, and also supports embedded hardware platforms such as STM32 and Raspberry Pi
Application Scenarios
- Fingerprint locks
- Fingerprint safes
- Fingerprint access control
- Fingerprint time and attendance
Specifications
| Parameter | Specification |
|---|---|
| Model | UART Fingerprint Sensor (G) |
| Sensor Type | Capacitive touch sensor |
| Resolution | 508 DPI |
| Image Pixel Array | 192 × 192 |
| Fingerprint Template Size | 448 bytes |
| Sensor Dimensions | 9.6 × 9.6 (mm) |
| Fingerprint Capacity | 1000 fingerprints |
| Comparison Time | < 0.5 s (1 : N, and N ≤ 500) |
| False Acceptance Rate | < 0.001% (security level 3) |
| False Rejection Rate | < 2% (security level 3) |
| Operating Voltage | 3.3 V |
| Operating Current | < 60 mA |
| ESD Test | ESD IEC 61000-4-2 LEVEL 4 ±15 kV air discharge |
| Communication Interface | UART (TTL) |
| Communication Baud Rate | 115200 bps (supports 9600 bps to 115200 bps) |
| Operating Environment | Temperature: -10 ℃ to 60 ℃; Humidity: 0 %RH to 90 %RH (non-condensing) |
Interface Description
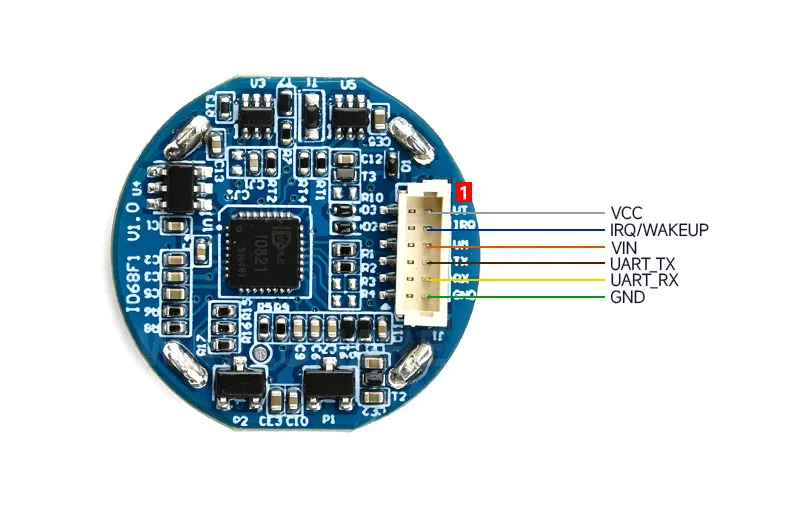
| No. | Signal Definition | Description |
|---|---|---|
| 1 | VCC | Sensor chip constant power (3.3 V) |
| 2 | IRQ/WAKEUP | Finger touch wake-up signal output, high level output; a high level is output whenever a finger touches it |
| 3 | VIN | Power (+3.3 V); when ultra-low standby power consumption is required, this pin must be connected to a controllable power supply |
| 4 | UART_TX | UART transmit |
| 5 | UART_RX | UART receive |
| 6 | GND | Common ground |
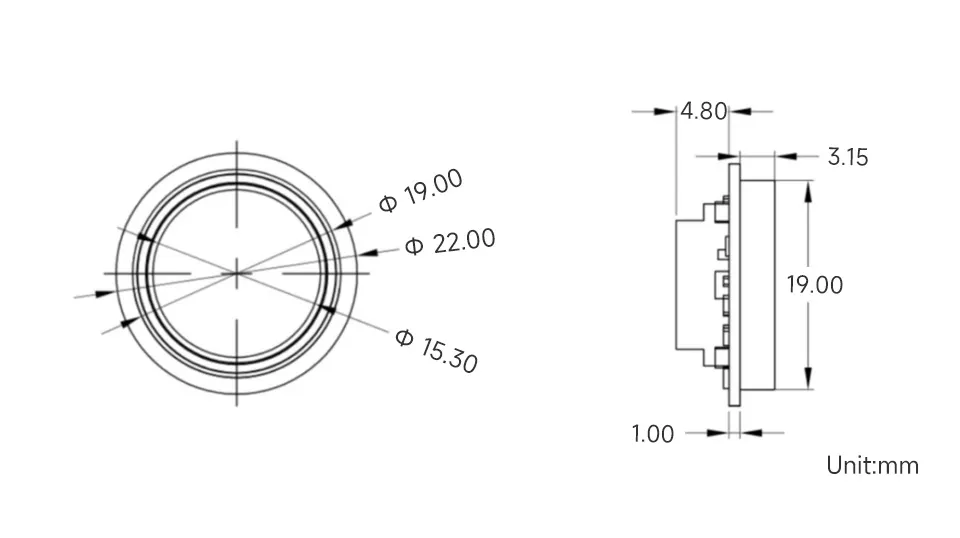
Dimensions
For the module outline and mounting dimensions, see the dimension drawing below.
PC Software Usage
The PC software runs on a Windows PC. For downloads, see the software tools in Resources and Documents.
The UART Fingerprint Sensor (G) only provides a UART interface, so select Serial as the communication method.
Hardware Connection
Use a USB-to-UART serial module such as the FT232 to connect to the module (the serial module must be provided by yourself), and install the corresponding driver.
| Serial Module | UART Fingerprint Sensor (G) | Notes |
|---|---|---|
| GND | GND | Power ground |
| RX | UART_TX | UART data transmission pin, requires crossover wiring |
| TX | UART_RX | UART data transmission pin, requires crossover wiring |
| 3.3 V | VIN | 3.3 V power input |
| 3.3 V | VCC | Sensor chip constant power (3.3 V) |
| GPIO | IRQ/WAKEUP | Finger touch wake-up signal output, outputs a high level when a finger touches it; can be connected to a regular GPIO pin, configured as an input |
After connecting, plug the serial module into the PC and check the corresponding COM port in Device Manager.
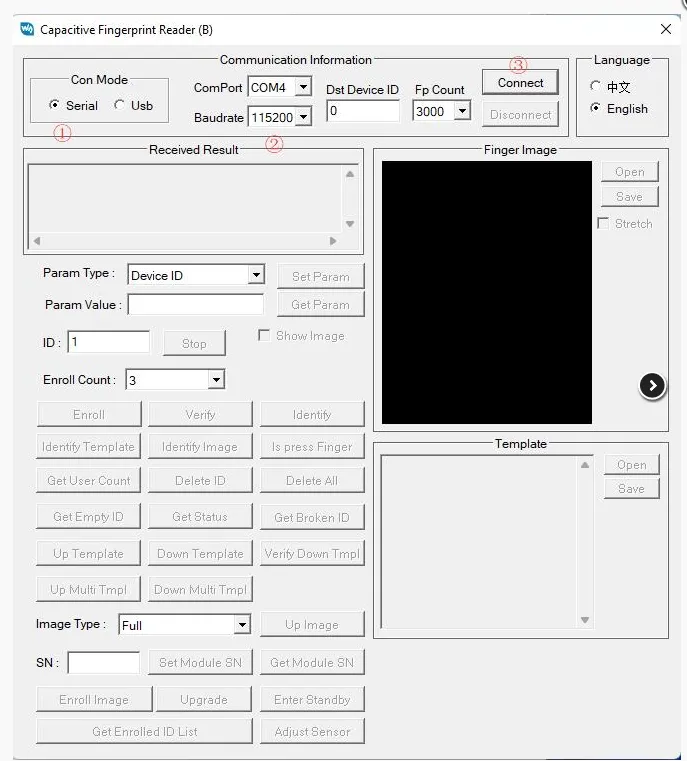
Open the Software
Open the PC software, select Serial as the communication method, and select a port number and baud rate that match the module (the module's communication baud rate is 115200 bps).
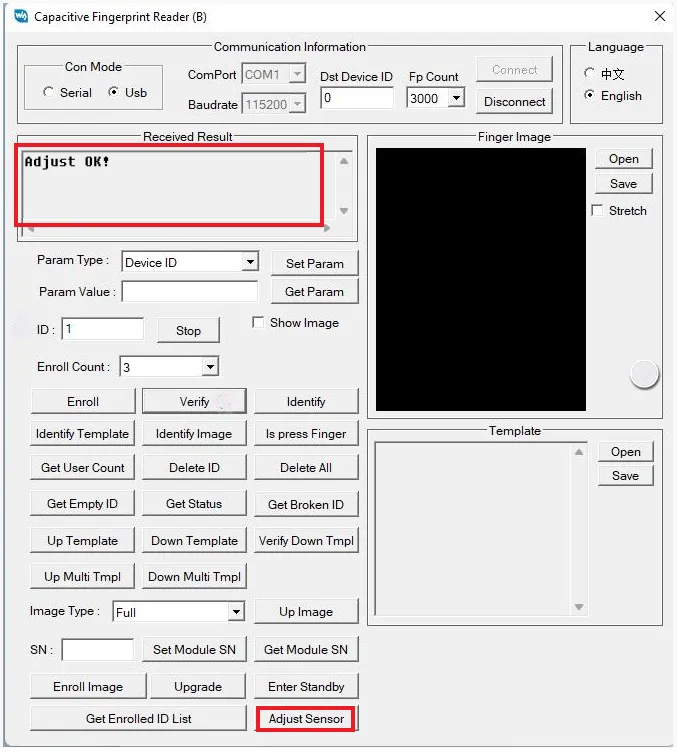
Check Communication
Click Initialize Sensor. When the connection is successful, the receive area displays "Adjust OK!".
Set Parameters
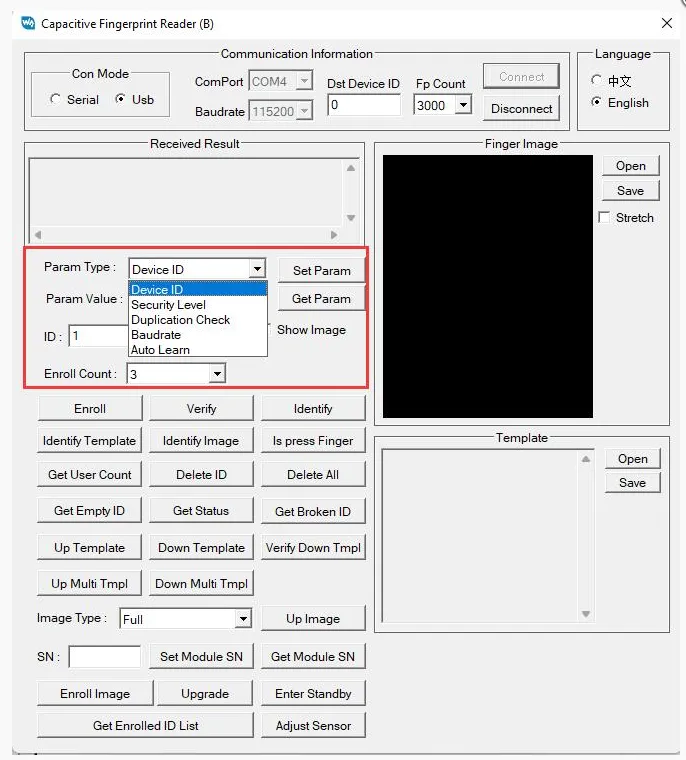
Types of parameters that can be set:
- Device ID: Module device number, settable range 1 - 255
- Security Level: Security level, settable 1 - 5. The larger the value, the lower the false acceptance rate (FAR) and the higher the false rejection rate (FRR)
- Duplication Check: Fingerprint duplication check status, on / off (1 / 0)
- Baudrate: Baud rate
- Auto Learn: Fingerprint template self-learning status, on / off (1 / 0)
Select the parameter type, fill in the parameter value, and click Set Param to modify the module parameters. Click Get Param to read the module's current parameters.
Enroll Users
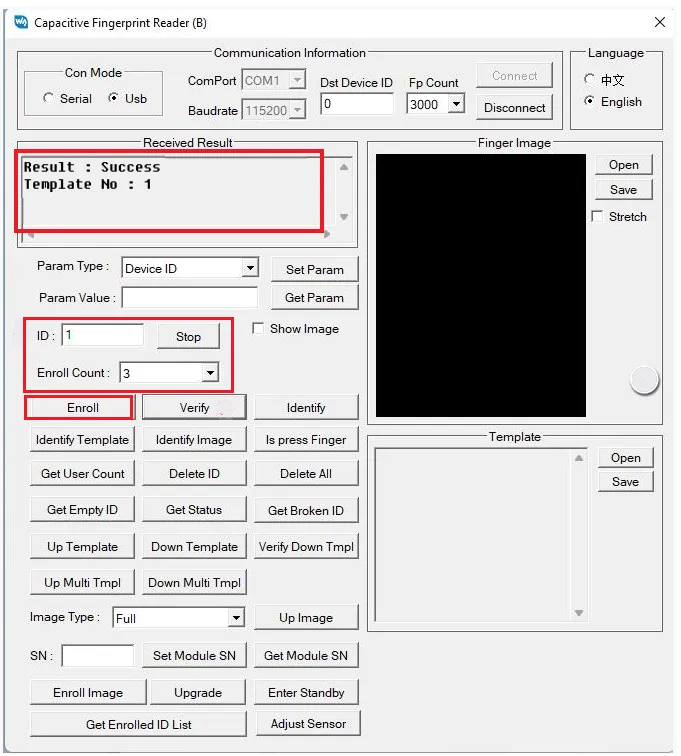
First set ID (the number under which the fingerprint is stored) and Enroll Count (how many times the finger needs to be enrolled), then click Enroll and follow the prompts step by step. On success, the receive area returns the result.
If you are unsure which ID to use, you can query available numbers via Get Empty ID, Get Status, and Get Enrolled ID List.
Fingerprint Comparison
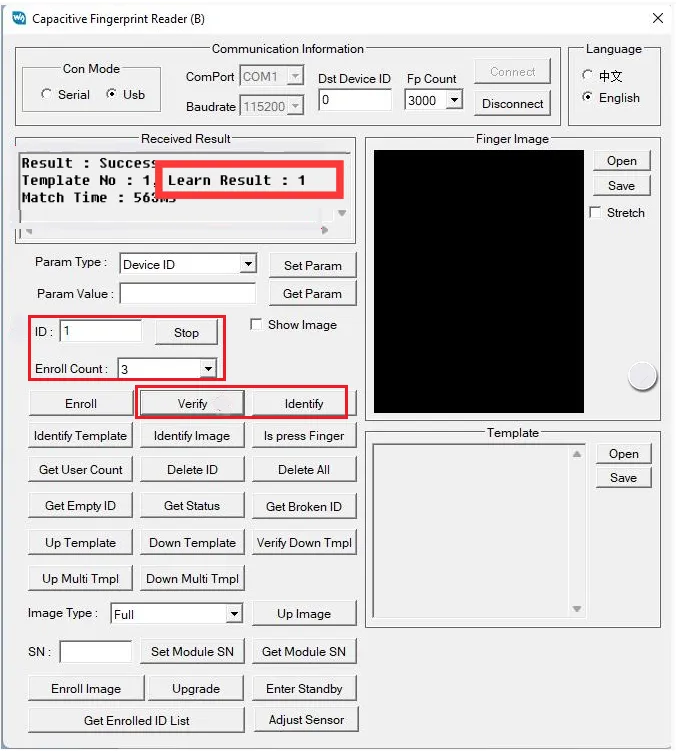
After specifying the template fingerprint ID to compare against, click Verify (1:1). When the self-learning feature is enabled, the comparison time is slightly longer than 0.5 s, and the unsaved portion of the fingerprint on the finger will be saved.
Clicking Identify (1:N) continuously compares fingerprints within the registered number range, which matches the configured fingerprint capacity; after a successful comparison, it pauses for about 0.5 s before automatically proceeding to the next comparison.
View Total User Count
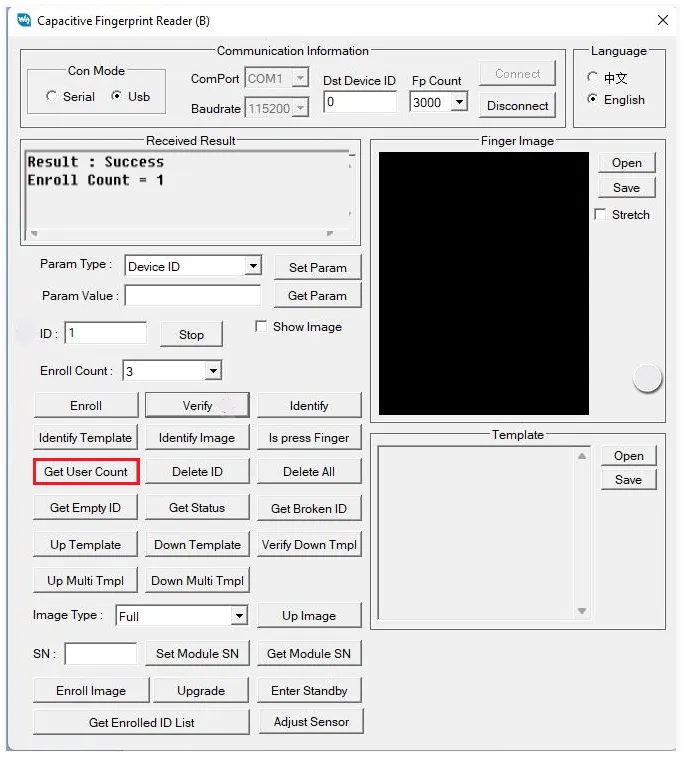
- Click Get User Count to query the number of fingerprints registered on the module; the query range matches the configured fingerprint capacity.
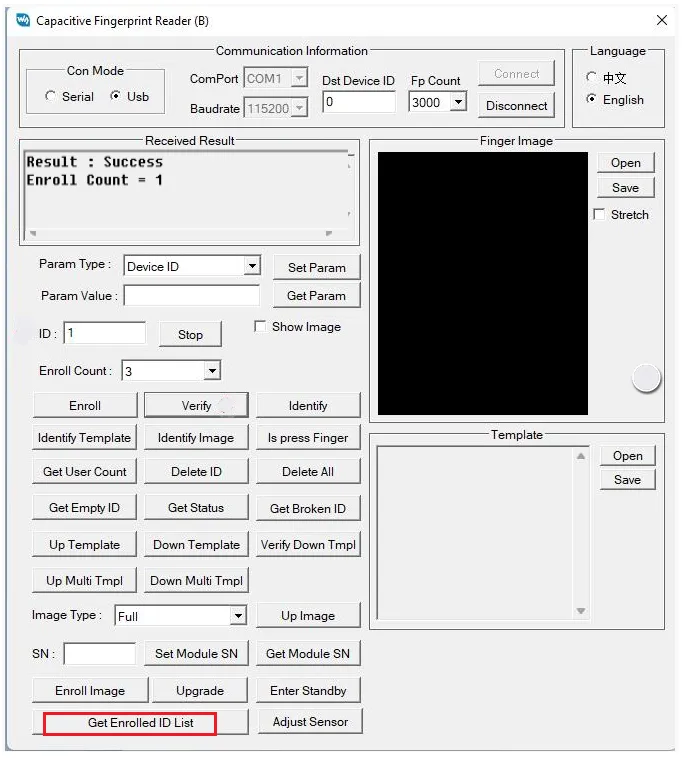
- Click Get Enrolled ID List to query the number of registered fingerprints; scroll the result area to view the registered fingerprint IDs.
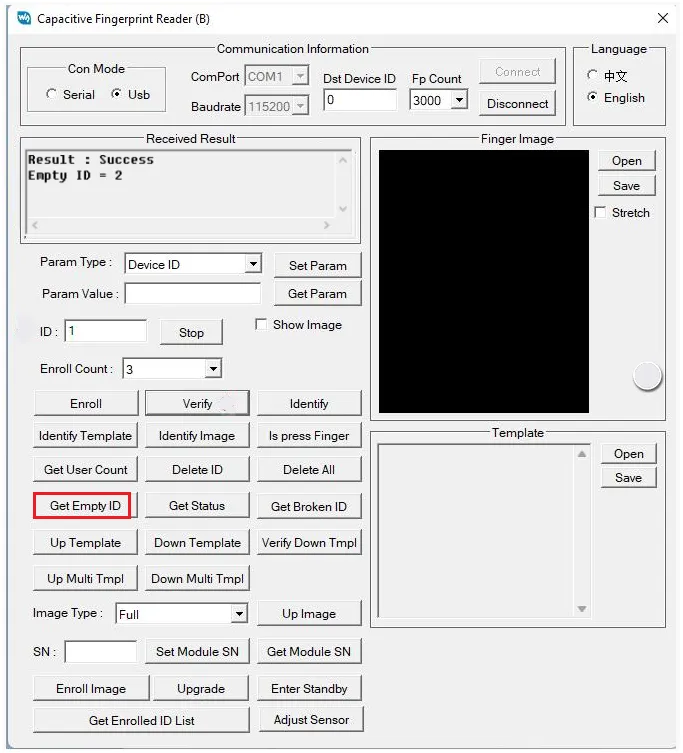
Get Empty ID
Click Get Empty ID to query, starting from ID 1, the first ID that has not been registered.
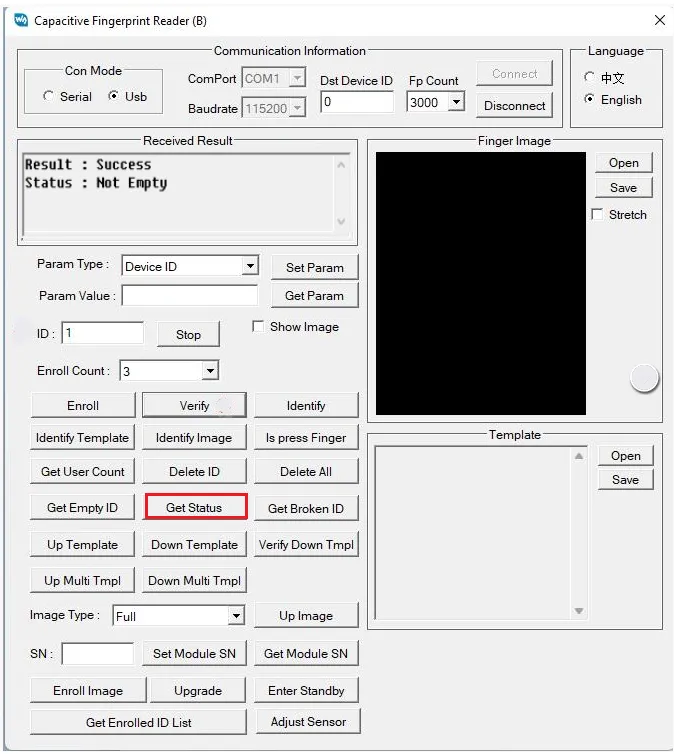
Get the Registration Status of the Current ID
Click Get Status to check whether the storage space for the current ID is empty.
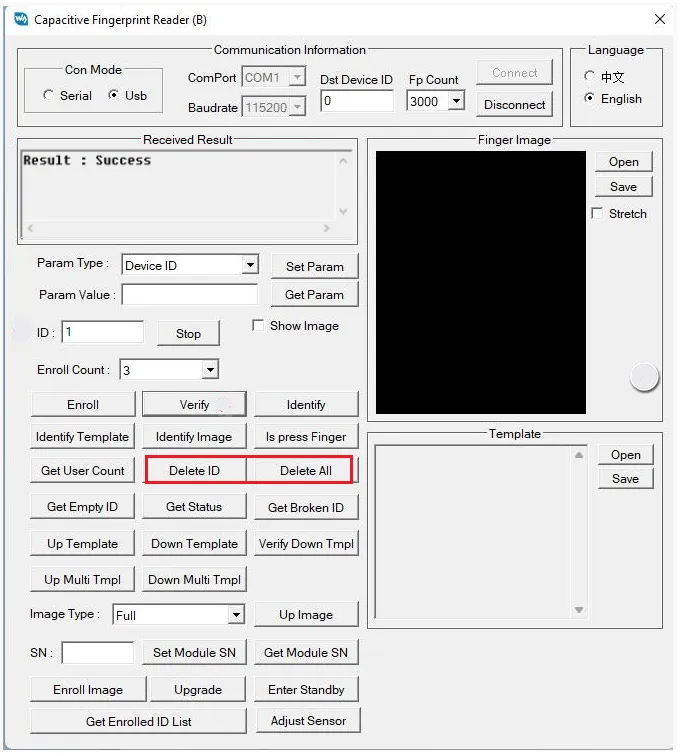
Delete Fingerprints
- Click Delete ID to delete the fingerprint for the current ID.
- Click Delete All to delete all fingerprints within the registered number range. Confirm that you no longer need to keep these fingerprints before clicking Delete All.
View Fingerprint Images
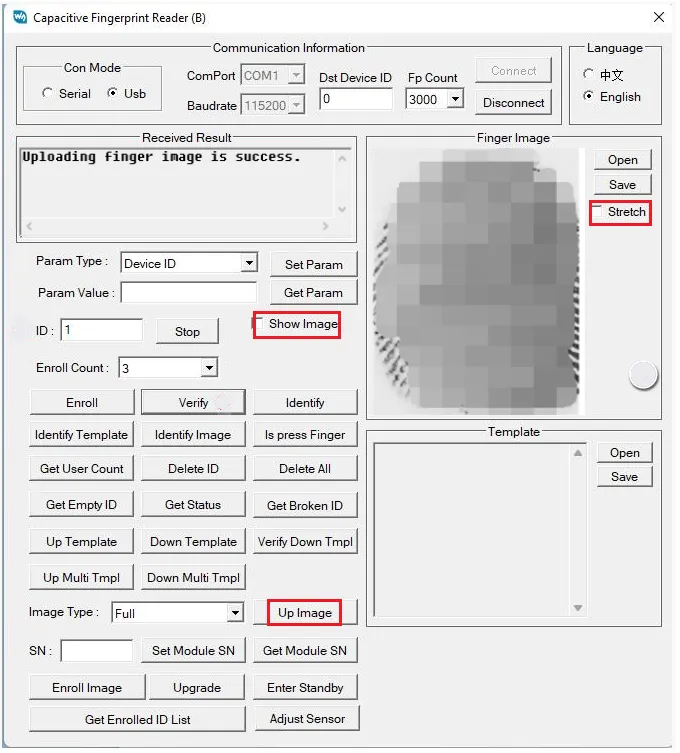
Click Up Image, then press a finger on the capture window to obtain the image. This method cannot be used to view already-saved fingerprints.
You can also check Show Image, and the fingerprint image will be displayed each time a fingerprint needs to be entered; transmitting image data over the serial port takes about 6 s, so it is not recommended. Checking Stretch displays the fingerprint image across the full window.
View Fingerprint Templates
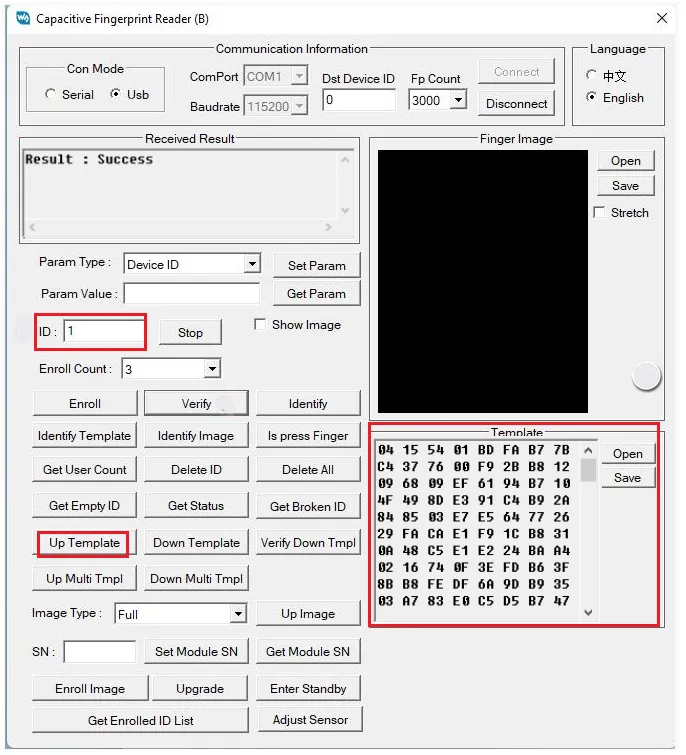
Select an ID for which a fingerprint has already been saved, and click Up Template to view the fingerprint template for that ID. This method can only be used to view already-saved fingerprints.
Click Up Multi Tmpl and select a folder to save the fingerprint data within the registered ID range to that folder in FPT format.
Enroll Users Using Fingerprint Images
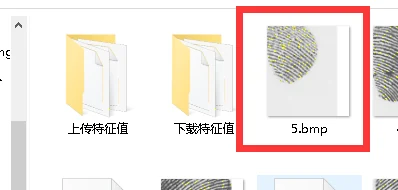
First configure the ID and image count following the user enrollment steps, then click Enroll Image and select a fingerprint image file. The image size is 242 × 266.
Enroll Users Using Templates
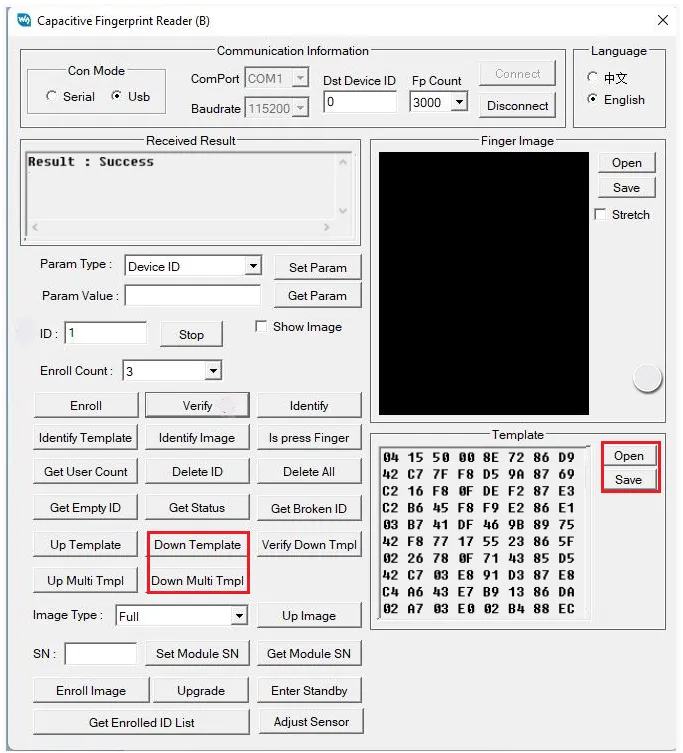
- Single download: Configure the ID, click Open to select an FPT format file, then click Download Template.
- Batch download: Click Down Multi Tmpl and select a folder; the FPT format files in the folder are downloaded to the module in sorted order, with ID numbers increasing sequentially.
Identify Using Fingerprint Images
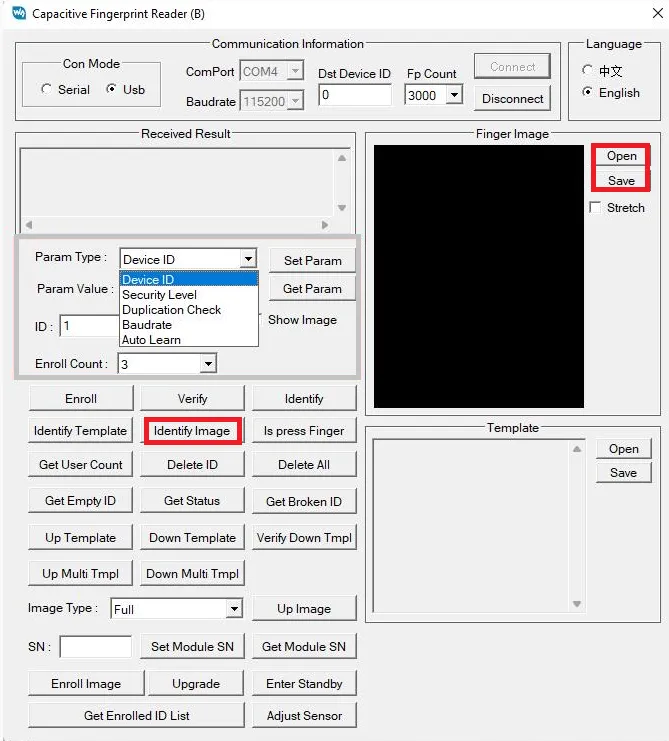
Click Open to select a fingerprint image, then click Identify Image.
Identify Using Templates
First configure the ID and image count following the user enrollment steps.
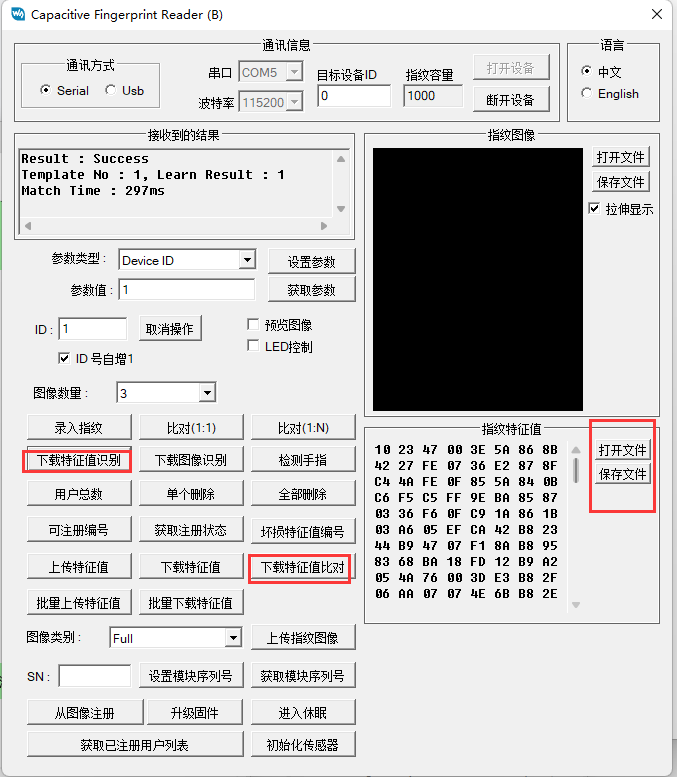
- Click Open to select an FPT format file, then click Identify Template to compare against the fingerprint template within the selected fingerprint ID.
- Click Verify Down Tmpl to compare against the pressed finger.
View Broken Templates
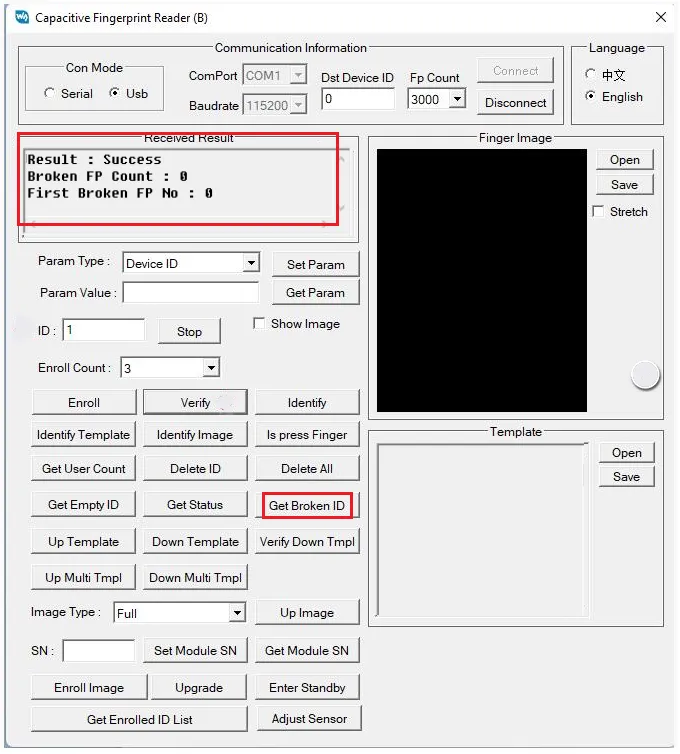
Click Get Broken ID, and the receive area displays the total number of broken templates and the ID of the first broken template.
Resources
The internal command algorithm of the UART Fingerprint Sensor (G) is compatible with the UART Fingerprint Sensor (F), so the programs and command manual for the F model are used.
1. Example
- Fingerprint Scanner Module (F) Example Package
- Fingerprint Scanner Module (F) Example Package (GitHub)
2. Technical Manuals
3. Software Tools
- Serial debugging: SSCOM Serial Debug Assistant
- Host software testing: Capacitive Fingerprint Reader (B) Test Software
Support
Monday-Friday (9:30-6:30) Saturday (9:30-5:30)
Email: services01@spotpear.com
[Tutorial Navigation]
- Features
- Application Scenarios
- Specifications
- Interface Description
- Dimensions
- PC Software Usage
- Hardware Connection
- Open the Software
- Check Communication
- Set Parameters
- Enroll Users
- Fingerprint Comparison
- View Total User Count
- Get Empty ID
- Get the Registration Status of the Current ID
- Delete Fingerprints
- View Fingerprint Images
- View Fingerprint Templates
- Enroll Users Using Fingerprint Images
- Enroll Users Using Templates
- Identify Using Fingerprint Images
- Identify Using Templates
- View Broken Templates
- Resources
- Support