- sales/support
Google Chat:---
- sales
+86-0755-88291180
- sales01
sales@spotpear.com
- sales02
dragon_manager@163.com
- support
tech-support@spotpear.com
- CEO-Complaints
zhoujie@spotpear.com
- Only Tech-Support
WhatsApp:13246739196
- Purchase/Shipping/Refund
WhatsApp:13424403025
CM5-DUAL-ETH-MINI User Guide
Overview
Introduction
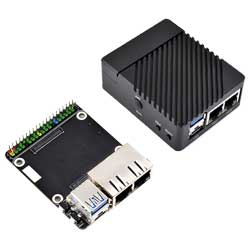
As a MINI board for Raspberry Pi Compute Module 5, CM5-DUAL-ETH-MINI is a baseboard that can be used with the Raspberry Pi Compute Module 5, supporting dual network port supply and Type-C 5V 5A DC power supply. It comes with 1 USB3.2 Gen1 port, making it convenient for users.
Features and Precautions
1. Do not plug or unplug any device other than USB and network port when the device is powered on
2. Type C is used as a USB SLAVE interface for burning images, and cannot be used as an OTG interface, it cannot provide power to external devices
3. Onboard default 1 USB 3.2 Gen1 port
7. The onboard BOOT button , you can press BOOT button before powering on, and connect to the computer through Type-C to let the device enter the flashing mode
8. Do not connect other devices when using Type C to flash. Insufficient power supply for burning will cause the device to be unrecognized
9. The USB3.0 port has a maximum current output of 2A
Dimensions
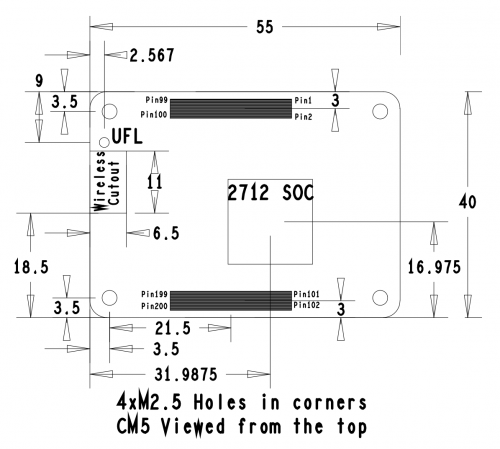
Core Board Size
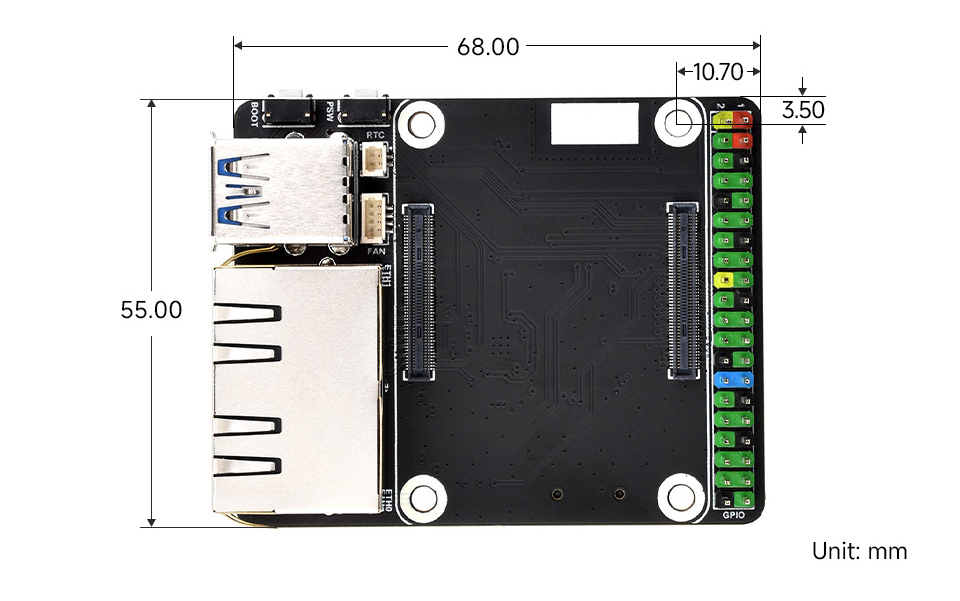
Baseboard Size
Case Size
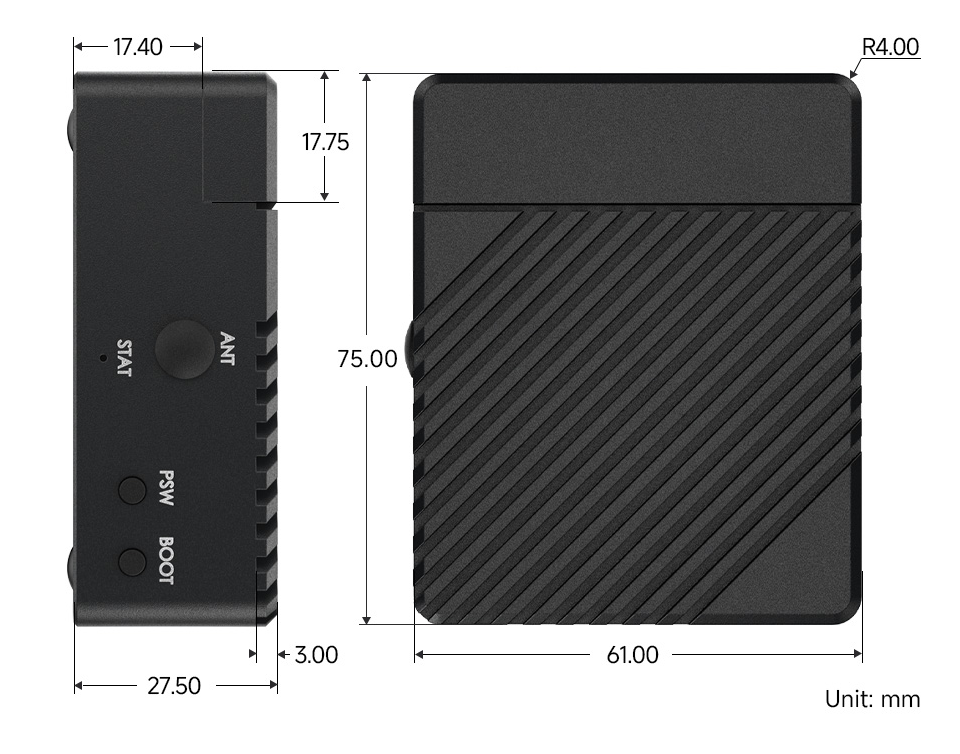
Image Flashing
How to Enter Flashing Mode
Choose one of the two
1. The onboard PSW button is connected to BOOT, you can press the PSW button before powering on, and connect to the computer through Type C to let the device enter the burning mode
2. Connect the jumper cap to BOOT
Click here for EMMC version
Click here for LITE version
Note
If a power supply limitation prompt appears
Add usb_max_current_enable=1 to /boot/firmware/config.txt
Fan Control
The PI5 fan defaults to starting when the temperature reaches 50 degrees. If you want to control it at other temperatures, you can do so by adding specific content to /boot/firmware/config.txt, for example:
dtparam=fan_temp0=36000,fan_temp0_hyst=2000,fan_temp0_speed=90
dtparam=fan_temp1=40000,fan_temp1_hyst=3000,fan_temp1_speed=150
dtparam=fan_temp2=52000,fan_temp2_hyst=4000,fan_temp2_speed=200
dtparam=fan_temp3=58000,fan_temp3_hyst=5000,fan_temp3_speed=255
Among which:
fan_temp0/1/2/3               Indicates the temperature (36000 means 36℃)

fan_temp0/1/2/3_speed         Indicates the corresponding rotational speed (value up to 255)

fan_temp0/1/2/3_hyst          Indicates the hysteresis temperature
For more details, refer to here
Notice: There are only 4 temperatures, 0, 1, 2 and 3, and it's not possible to set other temperatures. The hysteresis temperature must not exceed the step range between two temperatures
Real-Time Clock (RTC)
There is no battery by default, and an additional RTC battery is required
Software Debugging
The default device is /dev/rtc0
Regarding time, by inputting "date" in the command line, you can see the current time. Connecting the Raspberry Pi system to the network will automatically synchronize the time. If the default RTC device is connected and functioning properly, the RTC time will be updated after the automatic network synchronization
sudo hwclock -r Read the RTC time, if there are multiple RTC devices, you can use -f to select the corresponding devices (for example: sudo hwclock -f /dev/rtc1 -r)
Hwclock
System clock -> Hardware clock (RTC)
sudo hwclock -w
Synchronize hardware clock (RTC) -> System clock
sudo hwclock  -s
 #Need to turn off the network, or disable network time synchronization, otherwise it will be changed back
Set the hardware clock time (RTC):
sudo hwclock --set --date="9/8/2023 16:45:05"View the hardware clock (RTC)
sudo hwclock -r
Show version information.
sudo hwclock --verbose
Automated Wakeup
To support a low-power mode for wake-up alarms, add the configuration:
sudo -E rpi-eeprom-config --edit
#Add the following 2 lines
POWER_OFF_ON_HALT=1
WAKE_ON_GPIO=0
#Restart the device after adding (if you connect to the serial port log, you can see that there are update related logs)
sudo reboot
#You can use the following methods to test the function:
echo +600 | sudo tee /sys/class/rtc/rtc0/wakealarm
sudo halt  or  sudo poweroff
#10 minutes later, it will be awakened and restarted
RTC Battery Charging
Note: Before adding this, make sure your RTC battery allows charging and check the maximum allowable voltage
sudo nano /boot/firmware/config.txt
#Add
dtparam=rtc_bbat_vchg=3000000
#Among these, 3,000,000 represents the maximum voltage. Charging will stop when it reaches 3V, and the charging will restart with a trickle charge when the voltage drops below 3V
USB
The USB port is a USB 3.2 Gen2 port, which supports 5Gbps rate and has a maximum current of 2A
Network Card
- The new version of the Raspberry Pi system kernel integrates the RTL8111H driver. If you can't find the network card, you can try to upgrade the software package
sudo apt update
sudo apt upgrade
- If you are using another version of the system, please install the driver (the following is for dual port use on Ubuntu system)
cd
sudo apt install git
git clone --depth=1 https://github.com/raspberrypi/linux
sudo apt install bc bison flex libssl-dev make
cd linux
KERNEL=kernel_2712
make bcm2712_defconfig
- Run the following command to build a 64-bit kernel:
make -j6 Image.gz modules dtbs
- Run the following command to build a 32-bit kernel:
make -j6 zImage modules dtbs
- Install the kernel module on the boot media:
sudo make -j6 modules_install
- To install the 64-bit kernel:
- Run the following command to create a backup image of the current kernel, install a new kernel image, overlay, README, and unmount the partition:
sudo cp /boot/firmware/$KERNEL.img /boot/firmware/$KERNEL-backup.img
sudo cp arch/arm64/boot/Image.gz /boot/firmware/$KERNEL.img
sudo cp arch/arm64/boot/dts/broadcom/*.dtb /boot/firmware/
sudo cp arch/arm64/boot/dts/overlays/*.dtb* /boot/firmware/overlays/
sudo cp arch/arm64/boot/dts/overlays/README /boot/firmware/overlays/
- To install the 32-bit kernel:
- Create a backup of the current kernel and install a new kernel image:
sudo cp /boot/firmware/$KERNEL.img /boot/firmware/$KERNEL-backup.img
sudo cp arch/arm/boot/zImage /boot/firmware/$KERNEL.img
- Based on your kernel version, run the following command:
- For the highest version 6.4 kernel:
sudo cp arch/arm/boot/dts/*.dtb /boot/firmware/
- For kernel version 6.5 and above:
sudo cp arch/arm/boot/dts/broadcom/*.dtb /boot/firmware/
- Finally, copy the overlay and README:
sudo cp arch/arm/boot/dts/overlays/*.dtb* /boot/firmware/overlays/
sudo cp arch/arm/boot/dts/overlays/README /boot/firmware/overlays/
- Finally, run the following command to restart your Raspberry Pi and run the kernel you just compiled:
sudo reboot
Resources
Datasheets and Schematic Diagram
CM5 Core board datasheet
CM5 Core board 3D
CM5 Core introduction
CM5-DUAL-ETH-MINI Schematic
3D
Related Links
FAQ
Question: Can the old versions of the Raspberry Pi operating system be used with CM5?
CM5 requires the latest version of Raspberry Pi OS Bookworm (2024-11-19 or later).
Support
Monday-Friday (9:30-6:30) Saturday (9:30-5:30)
Email: services01@spotpear.com