- sales/support
Google Chat:---
- sales
+86-0755-88291180
- sales01
sales@spotpear.com
- sales02
dragon_manager@163.com
- support
tech-support@spotpear.com
- CEO-Complaints
zhoujie@spotpear.com
- Only Tech-Support
WhatsApp:13246739196
- Purchase/Shipping/Refund
WhatsApp:13424403025
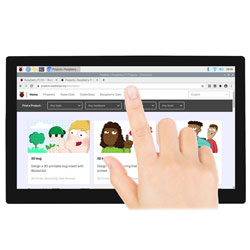
10.1HP-CAPQLED User Guide
Overview
Features
- 10.1-inch QLED quantum dot display, wider color gamut, more pure chroma, and longer lifetime.
- 1280 x 720 hardware resolution, support software resolution (up to 1920 x 1080).
- 10-point capacitive touch control.
- Toughened glass capacitive touch panel, 6H hardness (case version only).
- When used with Raspberry Pi, supports Raspberry Pi OS / Ubuntu / Kali and Retropie.
- Ubuntu is supported when used with Jetson Nano.
- When used as a computer monitor, supports Windows 11/10/8.1/8/7.
- Support popular Game Consoles like Xbox360, PS4, and SWITCH.
- Multi-languages OSD menu, for power management, brightness/contrast adjustment, etc.
- Onboard a 3.5mm audio jack and supports HDMI audio output.
What's On Board
Working with PC
This product supports Windows 11/10/8.1/8/7 OS:
- 1. Connect the 5V power supply to the Power port of the LCD, and you can see that the LCD backlight is on normally.
- 2. Connect the TOUCH interface of the LCD to the USB interface of the PC. Wait for a while, the windows will automatically recognize the touch function.
- 3. Connect the HDMI interface of the LCD to the HDMI port of the PC. About 5s later, you can see the LCD display properly. If you need the audio, you can insert 3.5mm earphones into HP ports.
Note:
- 1) When the computer is connected to several different displays at the same time, only this LCD can be used to control the cursor on the main display, so we recommended setting this LCD as the main display.
- 2) Some of PC cannot support the HDMI screen Hot Plug. In this case, restarting the PC can solve.
Working with Raspberry Pi
Support Raspberry Pi OS / Ubuntu / Kali and Retropie systems for Raspberry Pi.
When working with Raspberry Pi, you should set the resolution of the LCD by yourself, otherwise, the LCD screen will not work. For more detailed information, please read the following section.
Please download the latest version of the image on the Raspberry Pi official website.
- 1) Download the compressed file to the PC, and unzip it to get the .img file.
- 2) Connect the TF card to the PC, and use SDFormatter software to format the TF card.
- 3) Open the Win32DiskImager software, select the system image downloaded in step 1, and click "write" to write the system image.
- 4) After the image has finished writing, open the config.txt file in the root directory of the TF card.
- 5) Add the following code at the end of config.txt, then save and quit the TF card safely.
hdmi_group=2
hdmi_mode=87
hdmi_timings=1280 0 160 32 48 720 0 10 10 12 0 0 0 60 0 77000000 3
You must make sure that there are no spaces on either side of the equal sign.
- 6) Save and connect the TF card to your Pi then power up.
- 7) Connect the 5V power supply to the Power port of the LCD, and you can see that the LCD backlight is lit normally.
- 8) Connect the Touch interface of the LCD to the USB port of Raspberry Pi.
- 9) Connect the HDMI interface of LCD to the HDMI port of Raspberry Pi and then power on the Raspberry Pi.
After about a few seconds, you can see the LCD display normally.
Working with Jetson Nano
Using Jetson Nano doesn't require software configuring.
- 1) Connect the 5V power supply to the Power port of the LCD, and you can see that the LCD backlight is on normally.
- 2) Connect the TOUCH interface of the display to the USB port of the Jetson Nano.
- 3) Connect the HDMI interface of the display to the HDMI port of Jetson Nano.
- 4) Wait for seconds and the display will work normally. If you need to get the audio, you need to connect 3.5mm earphones to the HP port of the display.
Note:
When using the HP audio interface, you may need to set the sound output settings in the system.
Resources
Relevant Information
Software
FAQ
Add the following command to /boot/config.txt:
disable_splash=1Replace the custom image with the image in this directory /usr/share/plymouth/themes/pix/splash.png.
Test environment: 2022-04-04-raspios-bullseye-armhf 32-bit system
Supported models: Support Waveshare DSI LCD, DPI LCD, and HDMI LCD capacitive touch screen series.64bit system does not support by default
Software Installation
wget https://files.waveshare.com/upload/1/18/Evdev-right-click-emulation.zip
unzip Evdev-right-click-emulation.zip
cd evdev-right-click-emulation
sudo apt install build-essential libevdev2 libevdev-dev
cd 'evdev-right-click-emulation'
sudo cp 'out/evdev-rce' '/usr/local/bin/'
sudo chmod +x '/usr/local/bin/evdev-rce'
Enter the command:
sudo evdev-rce
After running, you can touch and long press to realize the right-click function.
Set IP
sudo usermod -G 'input' -a pi
echo 'uinput' | sudo tee -a /etc/modules
sudo nano  /etc/udev/rules.d/99-uinput.rules
Add in 99-uinput.rules file.
KERNEL=="uinput", MODE="0660", GROUP="input"
save it and run it in the terminal.
sudo udevadm control --reload-rules
sudo udevadm trigger
Then reboot:
sudo reboot
Run after reboot (no sudo needed at this point).
evdev-rce
After running, you can touch and long press to realize the right-click function.
Set Startup
Enter the terminal:
sudo mkdir ~/.config/autostart
sudo nano ~/.config/autostart/right_click.desktop
Add the following in right_click.desktop.
[Desktop Entry]
Version=1.0
Type=Application
Name=evdev-rce
GenericName=Enable long-press-to-right-click gesture
Exec=env LONG_CLICK_INTERVAL=1000 LONG_CLICK_FUZZ=200  /usr/local/bin/evdev-rce
Terminal=true
StartupNotify=false

#If you want to modify the sensitivity, you can modify the size of the two parameters, LONG_CLICK_INTERVAL=1000 LONG_CLICK_FUZZ=200.
It depends on the system, if the system has hibernation, then the screen will also be black. If it's the official Raspberry Pi system, the default ten minutes or so without action is to have hibernation.
Remove the resistor in the red box shown below, and then solder the PWM signal pin to the right pad to realize PWM dimming. Dimming frequency is 4k.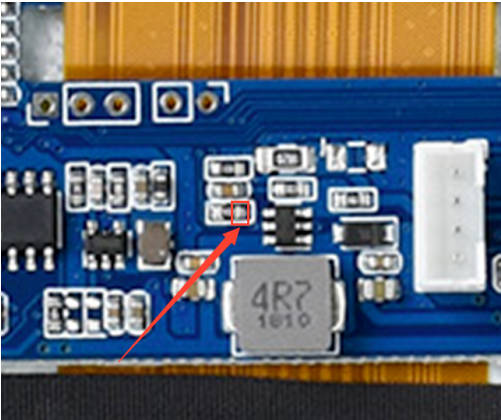
Support
Monday-Friday (9:30-6:30) Saturday (9:30-5:30)
Mobile: +86 13434470212
Email: services01@spotpear.com