- sales/support
Google Chat:---
- sales
+86-0755-88291180
- sales01
sales@spotpear.com
- sales02
dragon_manager@163.com
- support
tech-support@spotpear.com
- CEO-Complaints
zhoujie@spotpear.com
- Only Tech-Support
WhatsApp:13246739196
- Purchase/Shipping/Refund
WhatsApp:13424403025
- HOME
- >
- ARTICLES
- >
- Common Moudle
- >
- ESP
ESP32 C3 0.42LCD display text
1、 Open the arduino IDE
2、 Select Chip
2.1. Click on tools
2.2. Click on board
2.3. Click on esp32 and select esp32-c3
3、Substitution code burning
#include<Arduino.h>
#include<U8g2lib.h>
#ifdefU8X8_HAVE_HW_SPI
#include<SPI.h>
#endif
#ifdefU8X8_HAVE_HW_I2C
#include<Wire.h>
#endif
#defineSDA_PIN5
#defineSCL_PIN6
U8G2_SSD1306_72X40_ER_F_HW_I2Cu8g2(U8G2_R0,/* reset=*/U8X8_PIN_NONE);// EastRising 0.42" OLED
#defineINFO_SCREEN_DELAY3000
uint8_tz =127;// start value
uint32_tlcg_rnd(void){
z =(uint8_t)((uint16_t)65*(uint16_t)z +(uint16_t)17);
return(uint32_t)z;
}
voidsetup(void){
Wire.begin(SDA_PIN, SCL_PIN);
u8g2.begin();
}
voiddraw(intis_blank)
{
inti, j;
intn;
chars[4];
for(j =0; j <20; j++)
{
// random number
n =lcg_rnd();
// random string
for(i =0; i <3; i++)
{
s[i] =lcg_rnd()>>3;
if(s[i] <16)
s[i] += 'a';
else
s[i] += 'A';
}
s[3] = '\0';
// print number
u8g2.setCursor(0,15);
u8g2.print("Number: ");
if(is_blank)
u8g2.print(" ");
u8g2.setCursor(70,15);
u8g2.print(n);
// print string
u8g2.setCursor(0,30);
u8g2.print("Text: ");
u8g2.setCursor(70,30);
u8g2.print(s);
if(is_blank)
u8g2.print(" ");
// make the result visible
u8g2.sendBuffer();
// delay, so that the user can see the result
delay(200);
}
}
voiddraw_m1_t()
{
u8g2.clearBuffer();
u8g2.setFontMode(1);
u8g2.setFont(u8g2_font_cu12_tr);
u8g2.setCursor(0,15);
u8g2.print(F("setFontMode(1);"));
u8g2.setCursor(0,30);
u8g2.print(F("setFont(..._tr);"));
u8g2.setCursor(0,55);
u8g2.print(F("Very Bad"));
u8g2.sendBuffer();
delay(INFO_SCREEN_DELAY);
u8g2.setFontMode(1);
u8g2.setFont(u8g2_font_cu12_tr);
u8g2.clearBuffer();// clear the internal memory once
draw(0);
}
voiddraw_m0_t()
{
u8g2.clearBuffer();
u8g2.setFontMode(1);
u8g2.setFont(u8g2_font_cu12_tr);
u8g2.setCursor(0,15);
u8g2.print(F("setFontMode(0);"));
u8g2.setCursor(0,30);
u8g2.print(F("setFont(.._tr);"));
u8g2.setCursor(0,55);
u8g2.print(F("Wrong"));
u8g2.sendBuffer();
delay(INFO_SCREEN_DELAY);
u8g2.setFontMode(0);
u8g2.setFont(u8g2_font_cu12_tr);
u8g2.clearBuffer();// clear the internal memory once
draw(0);
}
voiddraw_m1_h()
{
u8g2.clearBuffer();
u8g2.setFontMode(1);
u8g2.setFont(u8g2_font_cu12_tr);
u8g2.setCursor(0,15);
u8g2.print(F("setFontMode(0);"));
u8g2.setCursor(0,30);
u8g2.print(F("setFont(.._hr);"));
u8g2.setCursor(0,55);
u8g2.print(F("Still bad"));
u8g2.sendBuffer();
delay(INFO_SCREEN_DELAY);
u8g2.setFontMode(1);
u8g2.setFont(u8g2_font_cu12_hr);
u8g2.clearBuffer();// clear the internal memory once
draw(0);
}
voiddraw_m0_h()
{
u8g2.clearBuffer();
u8g2.setFontMode(1);
u8g2.setFont(u8g2_font_cu12_tr);
u8g2.setCursor(0,15);
u8g2.print(F("setFontMode(0);"));
u8g2.setCursor(0,30);
u8g2.print(F("setFont(.._hr);"));
u8g2.setCursor(0,55);
u8g2.print(F("Almost ok"));
u8g2.sendBuffer();
delay(INFO_SCREEN_DELAY);
u8g2.setFontMode(0);
u8g2.setFont(u8g2_font_cu12_hr);
u8g2.clearBuffer();// clear the internal memory once
draw(0);
}
voiddraw_m0_h_with_extra_blank()
{
u8g2.clearBuffer();
u8g2.setFontMode(1);
u8g2.setFont(u8g2_font_cu12_tr);
u8g2.setCursor(0,15);
u8g2.print(F("setFontMode(0);"));
u8g2.setCursor(0,30);
u8g2.print(F("setFont(.._hr);"));
u8g2.setCursor(0,55);
u8g2.print(F("Extra blank --> Ok"));
u8g2.sendBuffer();
delay(INFO_SCREEN_DELAY);
u8g2.setFontMode(0);
u8g2.setFont(u8g2_font_cu12_hr);
u8g2.clearBuffer();// clear the internal memory once
draw(1);
}
voidloop(void){
// This problem applies only to full buffer mode
u8g2.clearBuffer();
u8g2.setFontMode(1);
u8g2.setFont(u8g2_font_cu12_tr);
u8g2.setCursor(0,15);
u8g2.print(F("Problems with"));
u8g2.setCursor(0,30);
u8g2.print(F("full buffer mode"));
u8g2.setCursor(0,45);
u8g2.print(F("and skipped clear."));
u8g2.sendBuffer();
delay(INFO_SCREEN_DELAY);
draw_m1_t();// fontmode 1, t font --> wrong
draw_m1_h();// fontmode 1, h font --> wrong
draw_m0_t();// fontmode 0, t font --> wrong
draw_m0_h();// fontmode 1, h font --> ok
draw_m0_h_with_extra_blank();// fontmode 1, h font with extra blank --> correct
delay(1000);
}
3.1. Copy the code into the Arduino IDE
3.2. Use a type-c cable to connect the computer to the ESP 32-c3 development board. After successful connection, the serial port will be displayed in the computer management window
3.3Click on Tools in the Arduino IDE, then click on Port and select the serial port Adafruit QT ESP32-C3
3.4Click on Verify
3.5.Click on upload
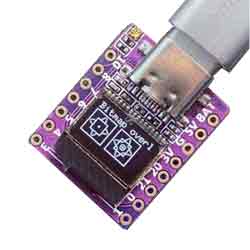
3.6.The test results are as follows