


- sales/support
Google Chat:---
- sales
+86-0755-88291180
- sales01
sales@spotpear.com
- sales02
dragon_manager@163.com
- support
tech-support@spotpear.com
- CEO-Complaints
zhoujie@spotpear.com
- Only Tech-Support
WhatsApp:13246739196
- Purchase/Shipping/Refund
WhatsApp:13424403025
Raspberry Pi 2.23inch OLED HAT User Guide
Instruction
This is a 2.23inch OLED display within controller.You can directly add it on Raspberry Pi by the 40 PIN pinheader, or connect it to other hardware platform via the IIC and SPI interfaces.The interface of 2.23inch OLED HAT is default SPI, you can also switch to I2C by soldering the resitors on the back of OLED.
Specification
| Controller | SSD1305 |
| Interface | SPI/I2C (default SPI) |
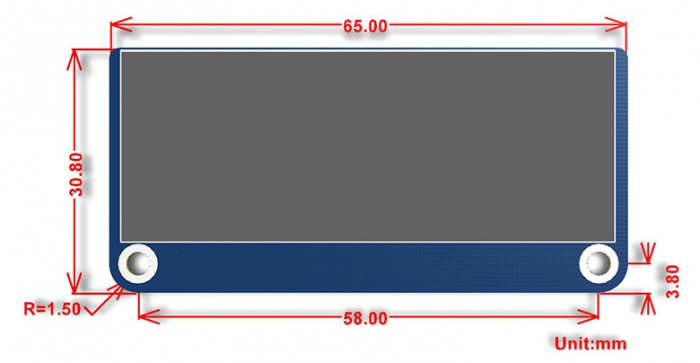
| Display size | 2.23inch |
| Pixel size | 0.41mm x 0.39mm |
| Display color | White |
| Working voltage | 3.3V |
Usage Guide
PINS
| PIN | Description |
|---|---|
| VCC | 3.3V/5V |
| GND | GND |
| DIN | MOSI of SPI interface / SDA of I2C interface |
| CLK | SCLK of SPI interface / SCL of I2C interface |
| CS | Chip select of SPI interface (Low active) / GND when set to I2C itnerface |
| DC | Command / Data selection (SPI) / GND (I2C) |
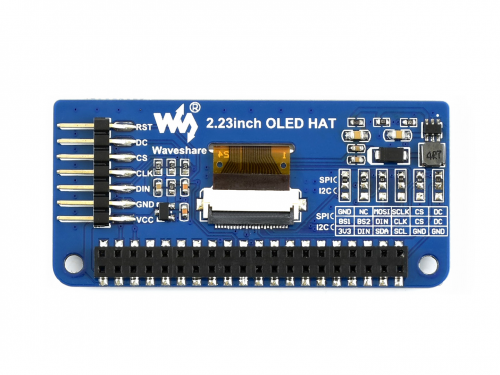
The interface of 2.23inch OLED HAT is default SPI interface, that is 0R resistors are soldered to SPI sides. If you want to use I2C interface, you need to solder the 0R resistors to I2C side,
Working principle
SSD1305 is a controller for 132*64 resolution OLED, however, this 2.23inch OLED HAT has only 128*32 resolution, therefore only part of SSD1305's buffer are used.
- I2C
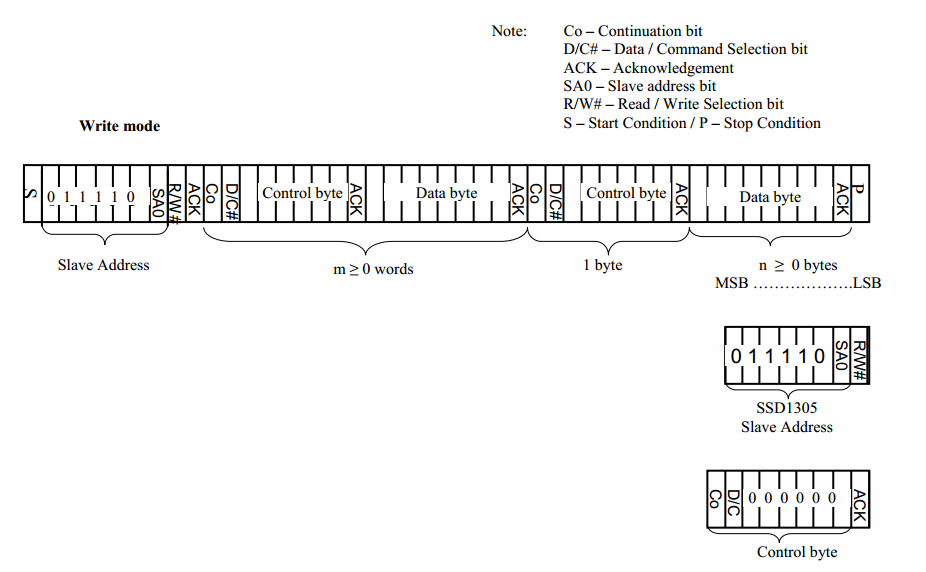
At the begging, the Master device sends a byte (7 bits address and 1 bit R/W)to slaver device and wait for a response.
After getting response, the Master device sends a control byte, this byte tells slave device the data followed later is command or data.
Then Master device will send data or command to slaver device.
For more details please refer to Page22 Figure 8-6 of Datasheet
- SPI
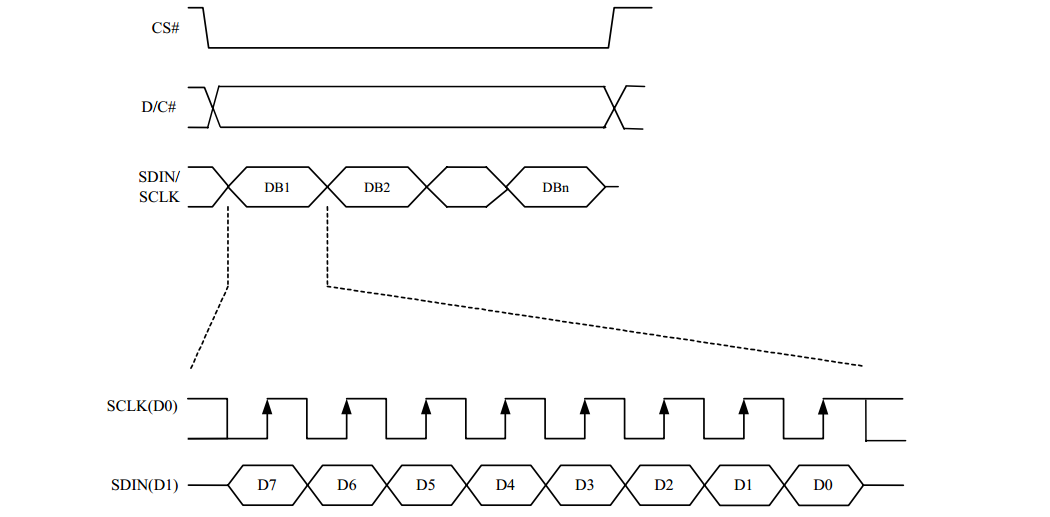
For details of the SPI communicating, you can refer to Datasheet Page21 Figure8-5.
Exampels
We provide examples for this module based on three popular hardware platform (STM32, Arduino and RaspberryPi). The libraries include supports Drawing points, lines, figures and displaying strings.
You can download the codes from [[#Demo codes] and unzip it to get examples.
- STM32 examples
STM32 example is based on Waveshare (XNULCEO-F103RB)
| 2.23inch OLED HAT | STM32 Board |
|---|---|
| VCC | 3.3V |
| GND | GND |
| DIN | PB15 |
| CLK | PB13 |
| 2.23inch OLED HAT | STM32 Board |
|---|---|
| VCC | 3.3V |
| GND | GND |
| DIN | PB15 |
| CLK | PB13 |
| CS | PB12 |
| DC | PC6 |
| RST | PC2 |
- Open project, compile and download to XNUCLEO-F103RB board
- Raspberry Pi example
Hardware connection
| 2.23inch OLED HAT | Raspberry Pi (BCM) |
|---|---|
| VCC | 3.3V |
| GND | GND |
| DIN | SDA |
| CLK | SCL |
| 2.23inch OLED HAT | Raspberry Pi(BCM) |
|---|---|
| VCC | 3.3V |
| GND | GND |
| DIN | MOSI |
| CLK | SCLK |
| CS | CE0 |
| DC | 24 |
| RST | 25 |
Software setting
Open terminal of Raspbain and enable I2C/SPI interface
sudo raspi-config
Choose Interfacing Options -> I2C -> Yes;
or
Choose Interfacing Options -> SPI ->Yes;
Libraries Installation
Open terminal of Raspbain and install libraries (BCM2835, wiringPi, Python) as below
#Installing BCM2835 library, for more details of the libraries, you can refer ti its website: http://www.airspayce.com/mikem/bcm2835/
wget http://www.airspayce.com/mikem/bcm2835/bcm2835-1.60.tar.gz
tar zxvf bcm2835-1.60.tar.gz
cd bcm2835-1.60/
sudo ./configure
make
sudo make check
sudo make install

#Installing wiringPi libraries,
sudo apt-get install wiringpi
#For Pi 4, you need to update it
cd /tmp
wget https://project-downloads.drogon.net/wiringpi-latest.deb
sudo dpkg -i wiringpi-latest.deb
gpio -v

#Installing python libraries
#python2
sudo apt-get update
sudo apt-get install python-pip
sudo apt-get install python-pil
sudo apt-get install python-numpy
sudo pip install RPi.GPIO
sudo pip install spidev
#python3
sudo apt-get update
sudo apt-get install python3-pip
sudo apt-get install python3-pil
sudo apt-get install python3-numpy
sudo pip3 install RPi.GPIO
sudo pip3 install spidev
Runing example (Take SPI codes as example)
Copy Raspberry Pi codes which is downloaded before to Raspberry Pi, put it to /home/pi of Raspbian
Enter the corresponding directory of codes and execute commands to run:
#bcm2835:

cd ~/Raspberry Pi/SPI/bcm2835
make
sudo ./oled

#wiringPi
cd ~/Raspberry Pi/SPI/wiringPI
make
sudo ./oled

#python

cd ~/Raspberry Pi/SPI/python
sudo python stats.py
Note: If wiringPi and Python example work abnormally after bcm2835 example, please reboot and test again.
- Arduino example
This examples are based on Waveshare UNO PLUS which is compatible with official Arduino UNO R3
- Connect OLED to UNO Plus according to figure below:
| PIN | UNO PLUS |
|---|---|
| VCC | 3.3V |
| GND | GND |
| DIN | SDA/D14 |
| CLK | SCL/D15 |
| PIN | UNO PLUS |
| VCC | 3.3V |
| GND | GND |
| DIN | D11(MOSI) |
| CLK | D13(SCK) |
| CS | D10 |
| DC | D8 |
| RST | D9 |
How to create image data
- Open Image2Lcd software
- Open an BMP file
- Set Data type: *c
- Scanning type: Horizontal
- Grey Scale: Monochrome
- Max height and width: 128 32
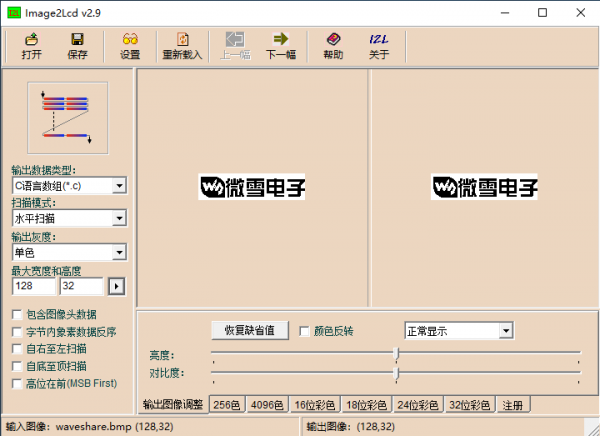
The expected result: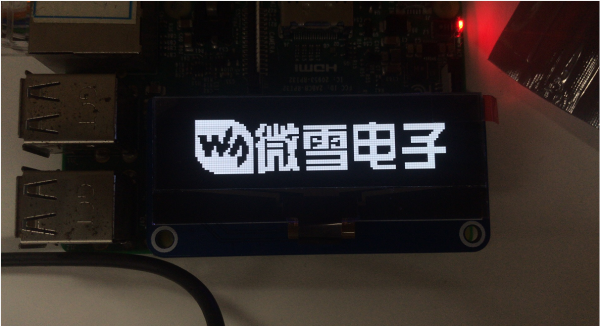
