- sales/support
Google Chat:---
- sales
+86-0755-88291180
- sales01
sales@spotpear.com
- sales02
dragon_manager@163.com
- support
tech-support@spotpear.com
- CEO-Complaints
zhoujie@spotpear.com
- sales/support
WhatsApp:13246739196
2-CH CAN HAT
Introduction
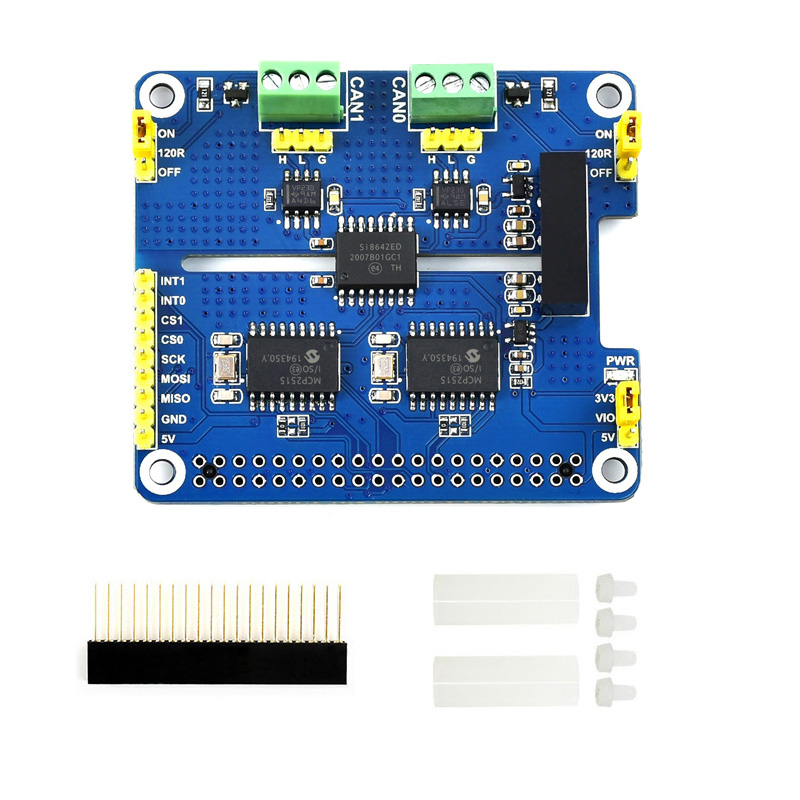
2-Channel Isolated CAN Bus Expansion HAT for Raspberry Pi, MCP2515 + SN65HVD230 Dual Chips Solution, Multi Onboard Protection Circuits
Introduction
This is a 2-Channel CAN bus expansion HAT designed for Raspberry Pi, supports CAN FD (CAN with Flexible Data-Rate), the speed is higher than the traditional 1Mbps of CAN2.0, features multi onboard protection circuits, high anti-interference capability, and stable operation. It suits for fields such as automotive devices or industrial automation.
Features
- Standard Raspberry Pi 40PIN GPIO extension header, supports Raspberry Pi series boards
- Adopts MCP2515 and SN65HVD230 dual chips combined solution, allows 2-channel CAN communication
- Integrated power isolation, providing stable isolated voltage, requires no extra power supply for the isolated terminal
- Onboard digital isolator, signal isolation makes the communication more safe, more stable, and better anti-interference
- Onboard TVS (Transient Voltage Suppressor) diode, provides ESD protection and transient peak voltage protection
- Onboard voltage translator, select 3.3V/5V operating voltage by jumper
- Onboard 120Ω terminal resistor, configured by jumper
- Breakout SPI control pins, for connecting with host control boards like STM32/Arduino
- Comes with development resources and manual
Specifications
- CAN controller: MCP2515
- CAN transceiver: SN65HVD230
- Communication interface: SPI (two channels independent SPI by default, swith to one channel SPI by soldering)
- Operating voltage: 5V
- Logic level: 3.3V/5V
- Dimensions: 65.0 x 56.5 mm
Interfaces
CAN bus
| PIN | Raspberry Pi (BCM) | Raspberry Pi (WPI) | Description |
| 5V | 5V | 5V | 5V Power input |
| GND | GND | GND | Ground |
| MISO | 9(MISO) | 13(MISO) | SPI clock input |
| MOSI | 10(MOSI) | 12(MOSI) | SPI data input |
| SCK | 11(SCLK) | 14(SCLK) | SPI data output |
| CS_0 | 8(CE0) | 10(CE0) | CAN_0 chip select |
| INT_0 | 25(Default)/24 | 6(Default)/5 | CAN_0 interrupt output |
| CS_1 | 7(CE1) | 11(CE1) | CAN_1 chip select |
| INT_1 | 23(Default)/22 | 4(Default)/3 | CAN_1 interrupt output |
Hardware description
CAN bus
CAN module could process packets transmit/receive on CAN bus. Packets transmit: first store packet to related buffer and control register. Use SPI interface to set the bits on control register or enable transmit pin for transmitting. Registers could be read for detecting communication states and errors. It will first check if there are any errors of packets detected on CAN bus, then verify it with filter which is defined by user. And store packet to one of buffers if it has no errors.
Raspberry Pi cannot support SPI bus, so this module use SPI interface and on board a receiver/transmitter for CAN communication.
Microchip Technology’s MCP2515 is a stand-alone Controller Area Network (CAN) controller that implements the CAN specification,version 2.0B. It is capable of transmitting and receiving both standard and extended data and remote frames. The MCP2515 has two acceptance masks and six acceptance filters that are used to filter out unwanted messages, thereby reducing the host MCUs overhead. The MCP2515 interfaces with microcontrollers (MCUs) via anindustry standard Serial Peripheral Interface (SPI), that is Raspberry Pi can communicate with MCP2515 via SPI interface without external driver. What we need todo is to enable the kernel driver on devices tree. For more details, please refer to datasheet.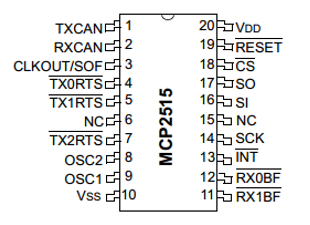
SN65HVD230 from TEXAS INSTRUMENTS is a CAN transceiver, which is designed for high communication frequency, anti-jamming and high reliability CAN bus communication. SN65HVD230 provide three different modes of operation: highspeed, slope control and low-power modes. The operation mode can be controlled by Rs pin. Connect the Tx of CAN controller to SN65HVD230’s data input pin D, can transmit the data of CAN node to CAN network; And connect the RX of CAN controller to SN65HVD230’s data input pin R to receive data.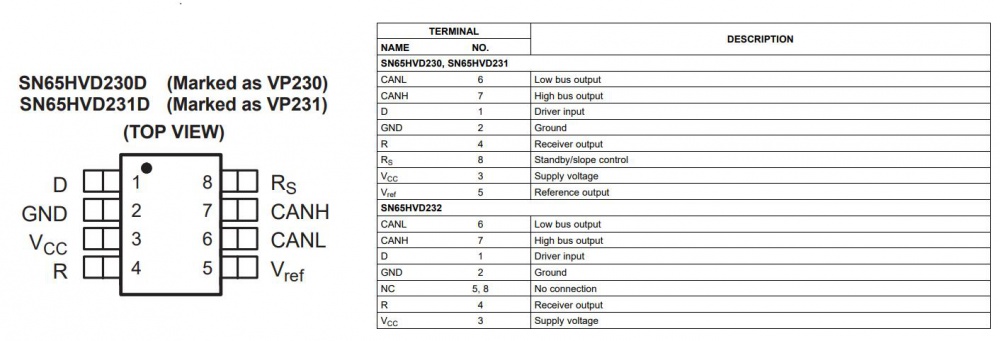
Working with Raspberry Pi
The working voltage level of Raspberry Pi is 3.3V, therefore we need to set the VIO of 2-CH CAN FD HAT to 3.3V as below: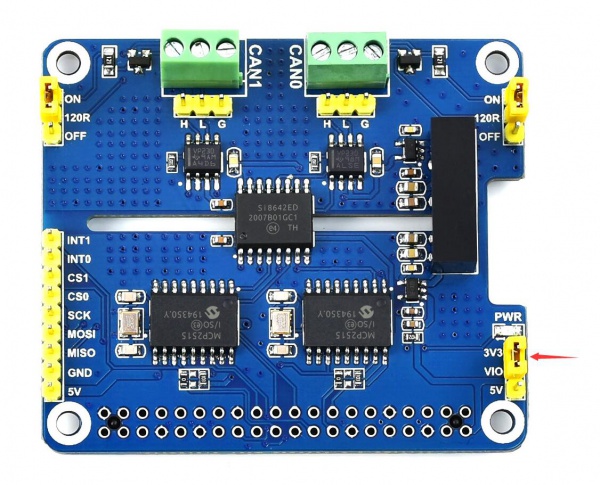
Install libraries
- bcm2835
Open terminal and run commands below to install bcm2835 library
wget http://www.airspayce.com/mikem/bcm2835/bcm2835-1.60.tar.gz
tar zxvf bcm2835-1.60.tar.gz
cd bcm2835-1.60/
sudo ./configure
sudo make
sudo make check
sudo make install
# For More:http://www.airspayce.com/mikem/bcm2835/
- wiringPi
sudo apt-get install wiringpi
#When used on Raspberry Pi 4B, you may need to upgrade first:
wget https://project-downloads.drogon.net/wiringpi-latest.deb
sudo dpkg -i wiringpi-latest.deb
gpio -v
# Run the command "gpio -v". If the version 2.52 is displayed, the installation is successful
- Python
Install python library
#python2
sudo apt-get update
sudo apt-get install python-pip
sudo apt-get install python-pil
sudo apt-get install python-numpy
sudo pip install RPi.GPIO
sudo pip install spidev
sudo pip2 install python-can
#python3
sudo apt-get update
sudo apt-get install python3-pip
sudo apt-get install python3-pil
sudo apt-get install python3-numpy
sudo pip3 install RPi.GPIO
sudo pip3 install spidev
sudo pip3 install python-can
PREPARATION
Insert the module to Raspberry Pi, and then modify config.txt file:
sudo nano /boot/config.txt
Append these statements to the file:
dtparam=spi=on
dtoverlay=mcp2515-can0,oscillator=16000000,interrupt=23
dtoverlay=mcp2515-can1,oscillator=16000000,interrupt=25
- Save and exit, then restart your Pi:
sudo reboot
- After restart, check if initialize successfully:
dmesg | grep spi
- Set up CAN:
sudo ip link set can0 up type can bitrate 1000000
sudo ip link set can1 up type can bitrate 1000000
sudo ifconfig can0 txqueuelen 65536
sudo ifconfig can1 txqueuelen 65536
- For more information about CAN kernel instructions, please check:
https://www.kernel.org/doc/Documentation/networking/can.txt
- Run "ifconfig":
ifconfig
Testing
If there is only one 2-CH CAN HAT on hand, you can connect CAN0_H and CAN1_H and CAN0_L and CAN1_L of the module as shown in the following figure: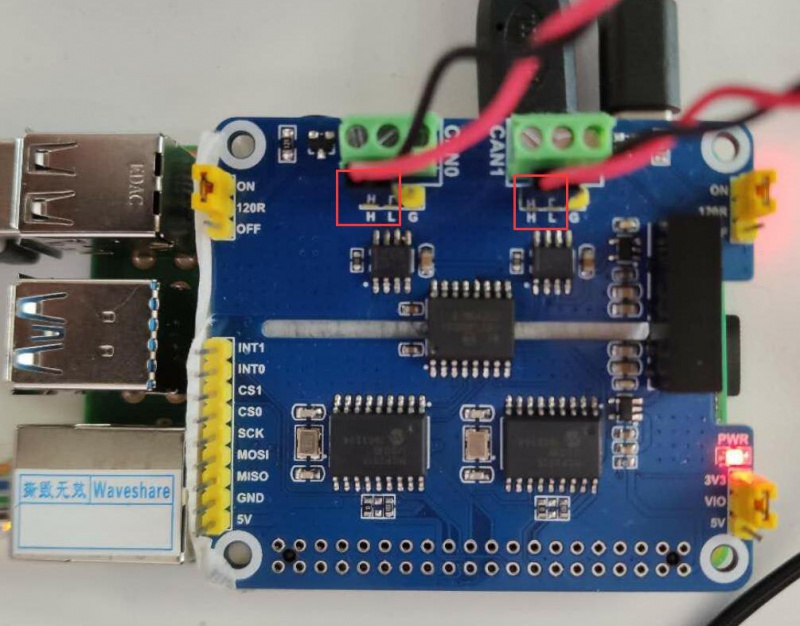
- install can-utils:
sudo apt-get install can-utils
- Open two terminal windows:
One terminal input receives CAN0 data command:
candump can0
Another terminal input sends CAN1 data command:
cansend can1 000#11.22.33.44
- The demonstration effect is as follows: (receiving on the left, sending on the right)

If you have two 2-CH CAN HAT on hand, you can directly connect CAN_H and CAN_L two by two. The effect is the same as the above, pay attention to match the communication rate, identify the ID, and output the interface serial number.
Python example
- Enter the direcory of python example:
- Run the receiver.py script in receiver terminal:
sudo python reveive.py
- Run the send.py script in sender terminal:
sudo python send.py
【Note】 The CAN1 is used as sender, and CAN0 is used as receiver.
Codes analysis
【Python example】
The demo codes provided is based on python, please check that if you installed the python-can library.
Before you send data, you should create a CAN device firstly,
os.system('sudo ip link set can0 type can bitrate 100000')
os.system('sudo ifconfig can0 up')
This code is used to initialize CAN0 as receiver/sender. If you want to change it to CNA1, you can use this one:
os.system('sudo ip link set can1 type can bitrate 100000')
os.system('sudo ifconfig can1 up')
- Connect to CAN BUS
can0 = can.interface.Bus(channel = 'can0', bustyp = 'socketcan_ctypes')
- or
can0 = can.interface.Bus(channel = 'can1', bustyp = 'socketcan_ctypes')
- Create message
msg = can.Message(arbitration_id=0x123, data=[0, 1, 2, 3, 4, 5, 6, 7], extended_id=False)
- Send message
can0.send(msg)
- or:
can1.send(msg)
- Finally, close CAN device
os.system('sudo ifconfig can0 down')
- or:
os.system('sudo ifconfig can1 down')
- Receive message:
msg = can0.recv(10.0)
The variables of recv() function is the timeout of receving.
For more information, please refer to:https://python-can.readthedocs.io/en/stable/interfaces/socketcan.html
【WringPi example】
- Blocking the reception, the Raspberry Pi opens the terminal and runs::
cd 2-CH_CAN_HAT_Code/wiringPi/receive/
make clean
sudo make
sudo ./can_receive
- Raspberry Pi opens the terminal and runs:
cd 2-CH_CAN_HAT_Code/ wiringPi/receive/
make clean
sudo make
sudo ./can_send


