


- sales/support
Google Chat:---
- sales
+86-0755-88291180
- sales01
sales@spotpear.com
- sales02
dragon_manager@163.com
- support
tech-support@spotpear.com
- CEO-Complaints
zhoujie@spotpear.com
- Only Tech-Support
WhatsApp:13246739196
- Purchase/Shipping/Refund
WhatsApp:13424403025
Pico-GPS-L76K User Guide
Overview
Introduction
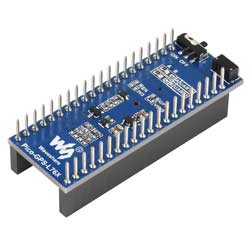
This item is Raspberry Pi Pico GNSS (Global Navigation Satellite System) expansion board based on the L76K module, supporting multiple satellite systems including GPS, BeiDou (BDS), GLONASS, and QZSS. It supports both multi-system joint positioning and single-system independent positioning, and supports A-GNSS functionality. It has the advantages of fast, accurate positioning and low power consumption. Paired with Raspberry Pi Pico/Pico 2, it can easily achieve global positioning.
Features
- Onboard Raspberry Pi Pico interface, suitable for Raspberry Pi Pico series boards
- Supports Multi-GNSS systems: GPS, BeiDou (BDS), GLONASS and QZSS
- Built-in Low-Noise Amplifier (LNA) for improved reception sensitivity
- Built-in SAW Filter for enhanced noise reduction performance
- Supports A-GNSS function
- Supports serial port communication baud rate range: 4800bps ~ 115200bps (default 9600bps)
- Onboard battery holder, supports ML1220 rechargeable cell, for power-off preservation of ephemeris data and quick warm start
- Onboard 4 x LED indicators for module operating status
- Provides online supporting manual (demos for Raspberry Pi Pico C/C++ and MicroPython)
Specifications
| GNSS parameters | |
| Frequency bands: GPS L1 (1575.42Mhz) BD2 B1 (1561.098MHz) | |
| Number of channels: 33 tracking channels, 99 capture channels, and 210 PRN channels | |
| C/A code | |
| SBAS: WAAS, EGNOS, MSAS, GAGAN | |
| Horizontal positioning accuracy (autonomous positioning) | <2.5m CEP |
| Time to first fix @ -130dBm (EASY function enabled) | |
| Cold start: <15s | |
| Warm start: <5s | |
| Hot start: <1s | |
| Sensitivity | |
| Capture: -148dBm | |
| Track: -163 dBm | |
| Recapture: -160dBm | |
| Dynamic performance | |
| Altitude (max): 18000m | |
| Speed (max): 515m/s | |
| Acceleration (max): 4g | |
| Other parameters | |
| Communication interface | UART |
| Serial port baud rate | 4800~115200bps (default 9600bps) |
| Update rate | 1Hz (default), 10Hz (max) |
| Communication protocol | NMEA 0183, PMTK |
| Supply voltage | 5V |
| Total current | Less than 40mA@5V (Continue mode) |
| Operating temperature | -40℃ ~ 85℃ |
| Outline Dimensions | 52mm × 21mm |
Hardware Description
Hardware connection
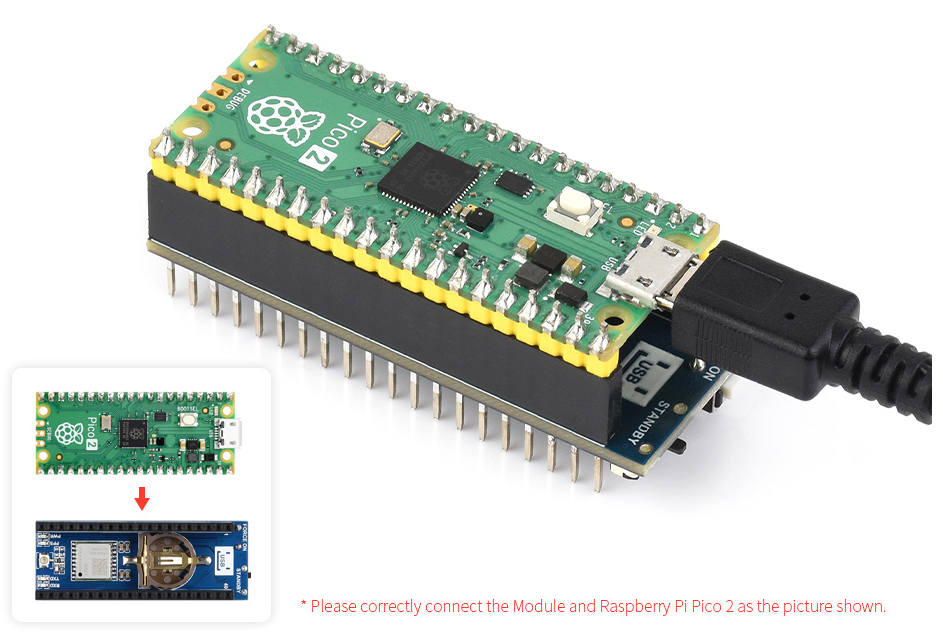
1. Note the USB logo on the Pico-GPS-L76K corresponds to the USB connection direction on the Raspberry Pi Pico
2. When downloading the C demo, hold down the BOOT button and then connect the USB cable
3. Ensure the unlabeled side of the antenna faces upwards towards the sky and do not obstruct the antenna, as shown in the figure below
Pinout Definition

1. UART0 (GPIO0, GPIO1) is used by default on board, and UART1 (GPIO4, GPIO5) is optional for communication, and H1 and H2 in Schematic diagram are soldered to the B-end position, and UART1 is re-selected in the software
2. The onboard buttons and switches control the wakeup and sleep of the L76K. Solder 0R resistors at the R18 and R19 positions in the Schematic diagram to change this to GPIO control
3. The onboard LDO powers the L76K module. If you move the 0R at position R3 in the Schematic diagram to position R6, you can completely shut off the power on the Pico-GPS-L76K using GPIO14. Alternatively, if you move the 0R at position R3 to position R7, you can use the 3.3V power on the RP2040
4. The PPS pin of the L76K module is not connected to GPIO by default. If you need to use it, connect it with a 0R resistor at the position of R20 in the Schematic diagram
Button Description
1. The Force ON button is used for L76K galaxy configuration: defaults to GPS + GLONASS galaxy combination; press the Force ON button to start the module with a GPS + BDS galaxy combination
2. STANDBY is the standby mode switch: When the switch is set to ON, Pico-GPS-L76K enters standby mode and no longer outputs NMEA. If there is no data output, please check if the switch is set to OFF
Dimensions

NMEA0183
- Pico-GPS-L76B outputs NMEA0183 information via serial port, and Raspberry Pico parses NMEA 0183 sentences to output human-readable information
- NMEA 0183 is a standard format developed by the National Marine Electronics Association (NMEA) for marine electronic devices. It has become the unified RTCM (Radio Technical Commission for Maritime Services) standard protocol for GPS navigation devices
- NMEA 0183 includes seven types of protocol frames such as $GPZDA, $GPRMC, $GPVTG, $GPGNS, $GPGGA, $GPGSA, $GPGSV*3, $GPGLL, and $GPGST. Among them, the two characters following the $ sign represent the GNSS system of a country or region, such as GPGGA for the US GPS, BDGGA for Chinese Beidou, GLGGA for Russian GLONASS, GAGGA for the EU Galileo, and GNGGA for multi-GNSS positioning
- Using GPRMC as an example, briefly describe the information represented by each part of the protocol frame. For the other 6 protocol frames, please refer to NMEA 0183 Manual
Recommended Minimum Specific GPS/TRANSIT Data (RMC) recommended positioning information
$GPRMC,<1>,<2>,<3>,<4>,<5>,<6>,<7>,<8>,<9>,<10>,<11>,<12>*hh<CR><LF>
$GNRMC,010555.000,A,2232.4682,N,11404.6748,E,0.00,125.29,230822,,,D*71
<1> UTC time, hhmmss.sss (hour-minute-second) format
<2> Positioning status, A=Valid positioning, V=Invalid positioning
<3> Latitude ddmm.mmmm (degrees-minutes) format (leading 0s will also be transmitted)
<4> Latitude hemisphere N (Northern Hemisphere) or S (Southern Hemisphere)
<5> Longitude dddmm.mmmm (degree-minute) format (leading 0s will also be transmitted)
<6> Longitude hemisphere E (East longitude) or W (West longitude)
<7> Ground speed (000.0~999.9 knots, leading 0s will also be transmitted)
<8> Ground heading (000.0~359.9 degrees, with north as the reference, the leading 0s will also be transmitted)
<9> UTC date, in ddmmyy format (day month year)
<10> Magnetic declination (000.0~180.0 degrees, the leading 0s will also be transmitted)
<11> Magnetic declination direction, E (East) or W (West)
<12> Mode indicator (output only for NMEA0183 3.00 version, A=Autonomous positioning, D=Differential, E=Estimated, N=Data invalid)
*hh : The final checksum *hh is the data used for verification. It is not necessary in normal use, but it is recommended when there is strong electromagnetic interference in the surrounding environment. hh represents the bitwise XOR value of all characters of "$" and "*" (excluding these two characters). Some manufacturers define their own statement format starting with "$P", followed by a 3-character manufacturer ID identifier, and then a custom data body.
Environment Setup
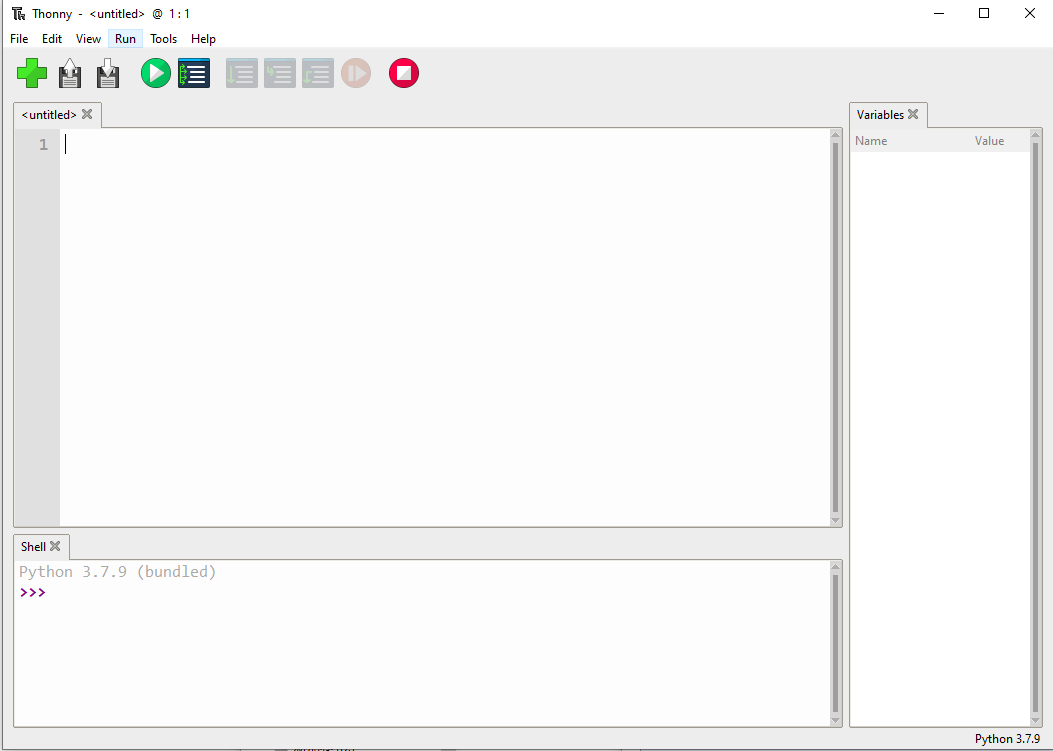
This tutorial uses Thonny for code testing. Click to download the related IDE and install it, then open Thonny
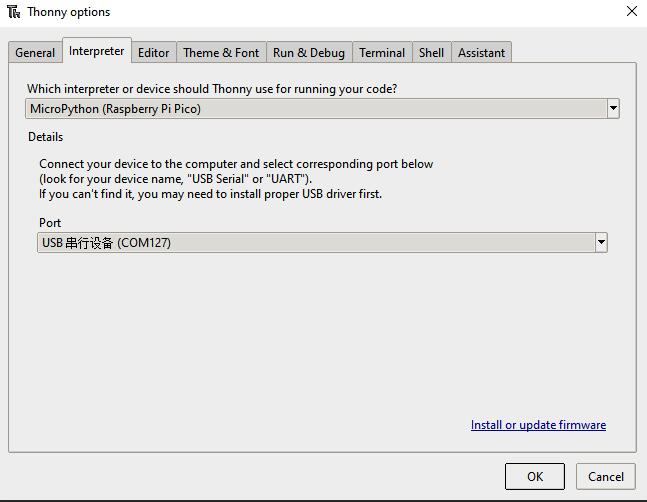
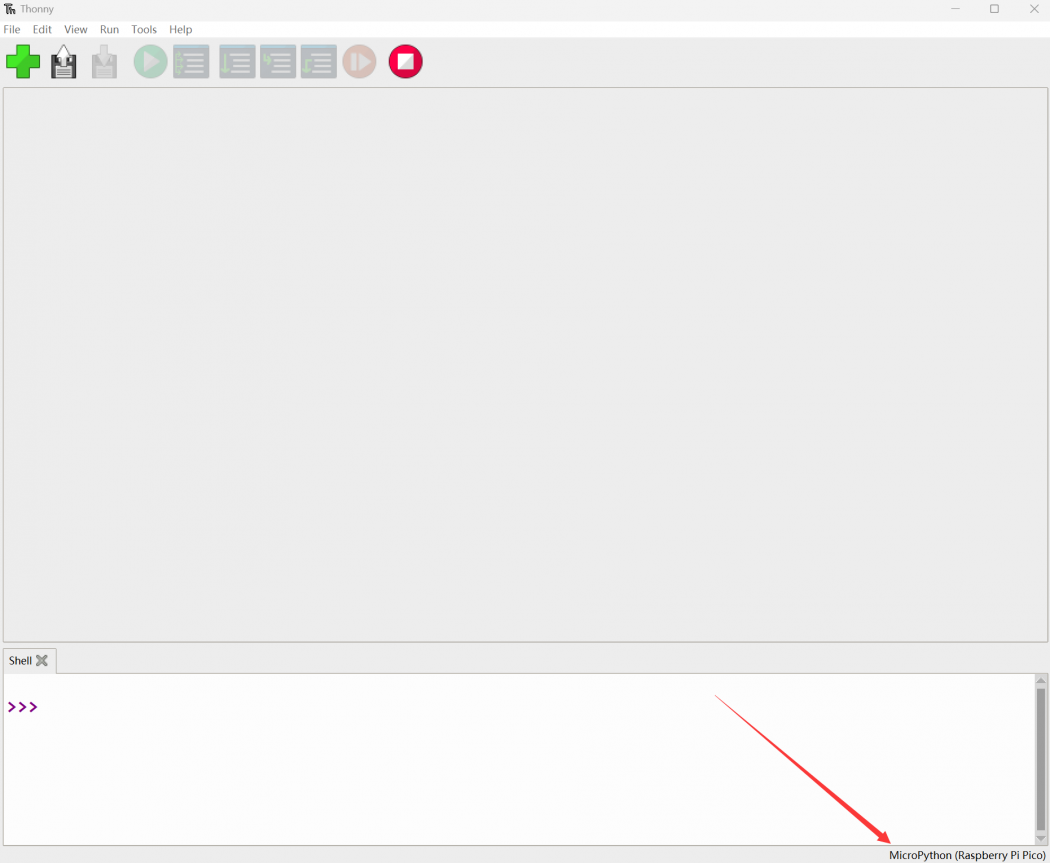
- Please refer to official documentation to set up the Python environment. In Thonny, choose Raspberry Pi Pico device under Tools->Options->Interpreter, as shown in the figure below
Demo Download
1. Click to download Demo
2. Unzip the demo, please upload the Micorpython demo to the Pico file system, as shown in the figure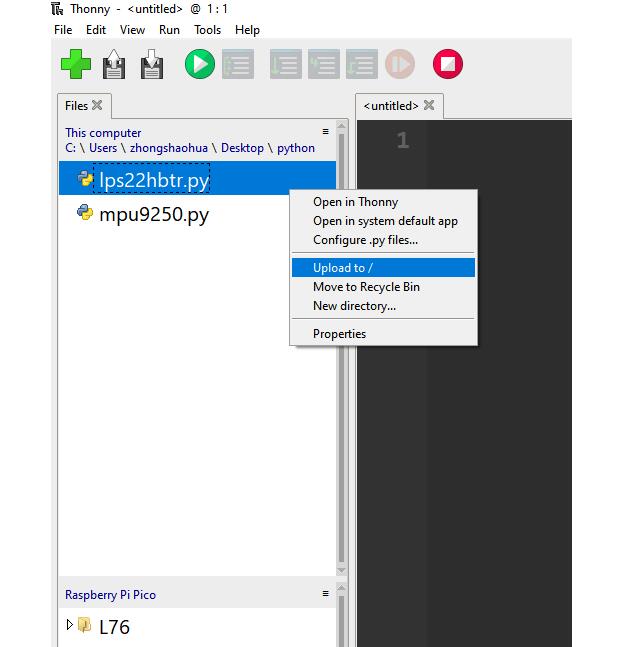
Demo
Micropython
1. Open Thonny IDE, upload the file to the Raspberry Pi Pico file system, open the coordinate_convert.py file, and run the demo, as shown in the figure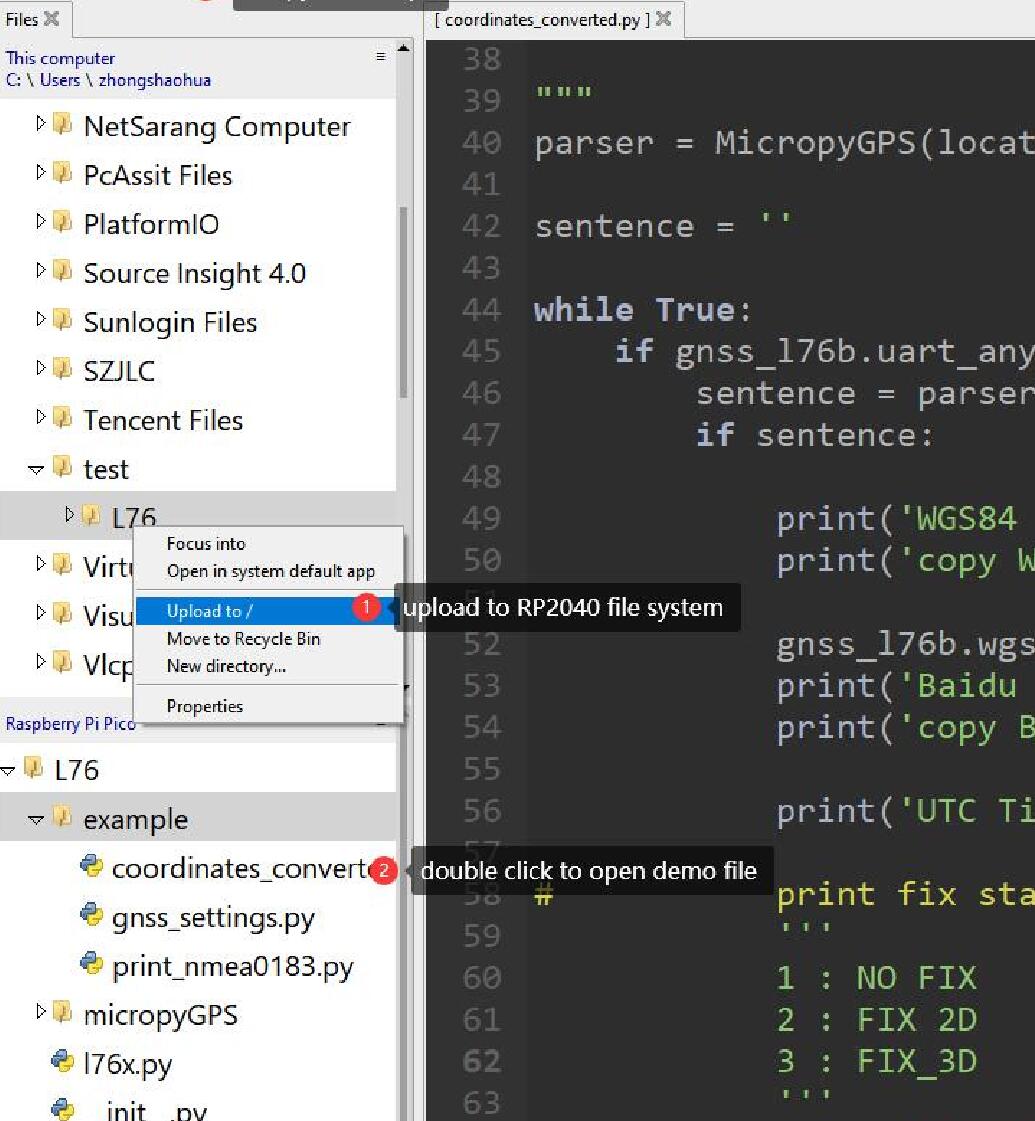
2. Under sunny conditions, the positioning information will be obtained in about 30 seconds after the L76B is powered on, as shown in the following figure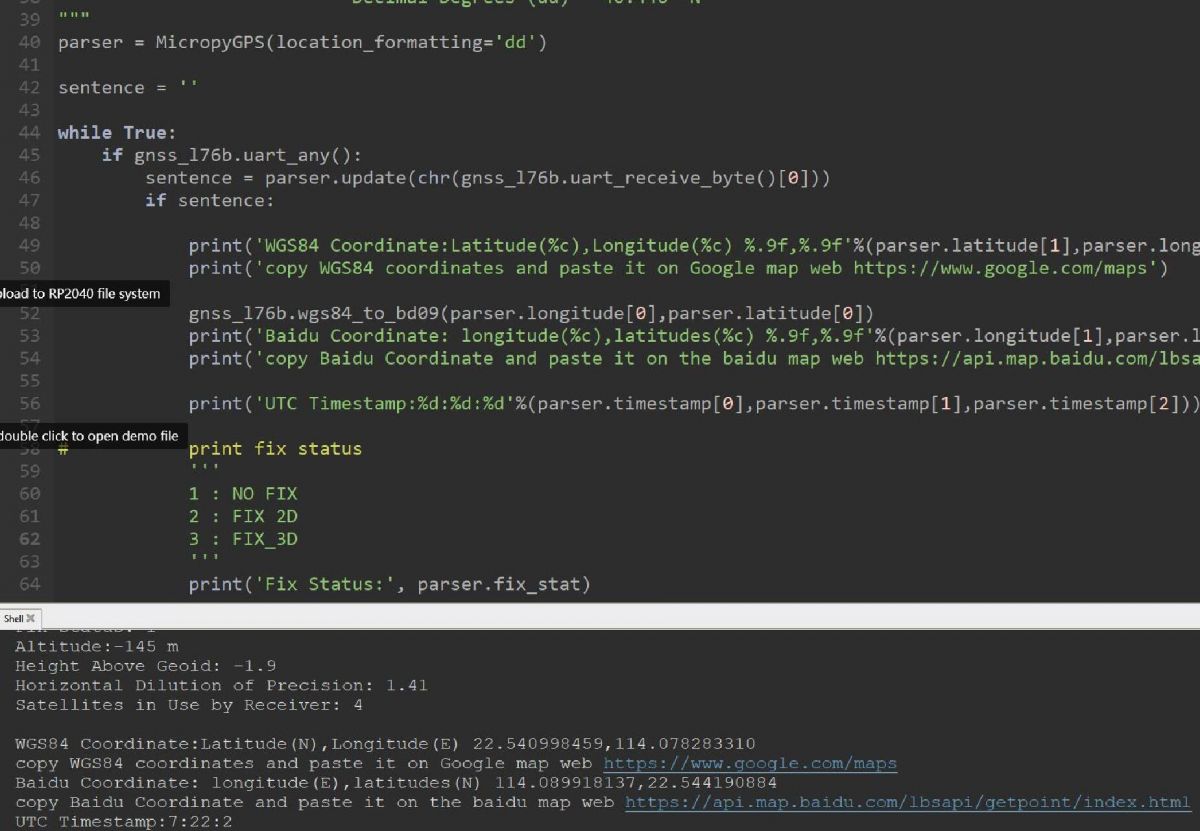
3. Users can copy the location information displayed in the terminal in Thonny, and use Google Map or Baidu Map to mark the coordinates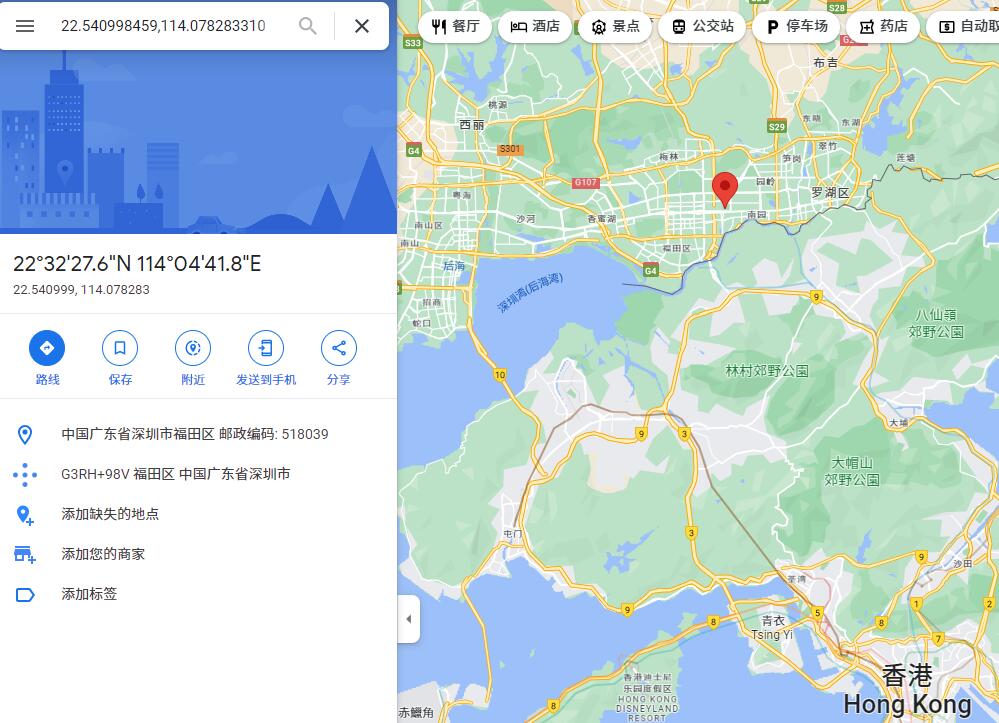
Demo Analysis
- Note that the value in dd form used in the NMEA0183 statement parser type created in the coordinates_converter.py needs to be initialized to other forms such as ddm and dms longitude and latitude values, and the coordinate conversion function needs to be rewritten
# make an object of NMEA0183 sentence parser
"""
Setup GPS Object Status Flags, Internal Data Registers, etc
local_offset (int): Timzone Difference to UTC
location_formatting (str): Style For Presenting Longitude/Latitude:
                           Decimal Degree Minute (ddm) - 40° 26.767′ N
                           Degrees Minutes Seconds (dms) - 40° 26′ 46″ N
                           Decimal Degrees (dd) - 40.446° N
"""
parser = MicropyGPS(location_formatting='dd')
- The coordinates_converter.py file converts NMEA0183 sentences into WGS84 coordinates latitude and longitude values, which are applicable for coordinate annotation on Google Maps and Baidu Map
while True:
    if gnss_l76b.uart_any():
        sentence = parser.update(chr(gnss_l76b.uart_receive_byte()[0]))
        if sentence:

            print('WGS84 Coordinate:Latitude(%c),Longitude(%c) %.9f,%.9f'%(parser.latitude[1],parser.longitude[1],parser.latitude[0],parser.longitude[0]))
            print('copy WGS84 coordinates and paste it on Google map web https://www.google.com/maps')

            gnss_l76b.wgs84_to_bd09(parser.longitude[0],parser.latitude[0])
            print('Baidu Coordinate: longitude(%c),latitudes(%c) %.9f,%.9f'%(parser.longitude[1],parser.latitude[1],gnss_l76b.Lon_Baidu,gnss_l76b.Lat_Baidu))
            print('copy Baidu Coordinate and paste it on the baidu map web https://api.map.baidu.com/lbsapi/getpoint/index.html')

            print('UTC Timestamp:%d:%d:%d'%(parser.timestamp[0],parser.timestamp[1],parser.timestamp[2]))

#           print fix status
            '''
            1 : NO FIX
            2 : FIX 2D
            3 : FIX_3D
            '''
            print('Fix Status:', parser.fix_stat)

            print('Altitude:%d m'%(parser.altitude))
            print('Height Above Geoid:', parser.geoid_height)
            print('Horizontal Dilution of Precision:', parser.hdop)
            print('Satellites in Use by Receiver:', parser.satellites_in_use)
            print('')
- The gnss_setting.py file lists the related settings for L76B, including the NMEA output frequency and hot start settings as shown in the code
# set NMEA0183 sentence output frequence
'''
optional:
SET_POS_FIX_100MS
SET_POS_FIX_200MS
SET_POS_FIX_400MS
SET_POS_FIX_800MS
SET_POS_FIX_1S
SET_POS_FIX_2S
SET_POS_FIX_4S
SET_POS_FIX_8S
SET_POS_FIX_10S
'''
gnss_l76b.L76X_Send_Command(gnss_l76b.SET_POS_FIX_1S)

#set #Startup mode
'''
    SET_HOT_START
    SET_WARM_START
    SET_COLD_START
    SET_FULL_COLD_START
'''
gnss_l76b.L76X_Send_Command(gnss_l76b.SET_COLD_START)
Pico Getting Started
Firmware Download
- MicroPython Firmware Download

- C_Blink Firmware Download
Basic Introduction
MicroPython Series
Install Thonny IDE
In order to facilitate the development of Pico/Pico2 boards using MicroPython on a computer, it is recommended to download the Thonny IDE
- Download Thonny IDE and follow the steps to install, the installation packages are all Windows versions, please refer to Thonny's official website for other versions
- After installation, the language and motherboard environment need to be configured for the first use. Since we are using Pico/Pico2, pay attention to selecting the Raspberry Pi option for the motherboard environment
- Configure MicroPython environment and choose Pico/Pico2 port
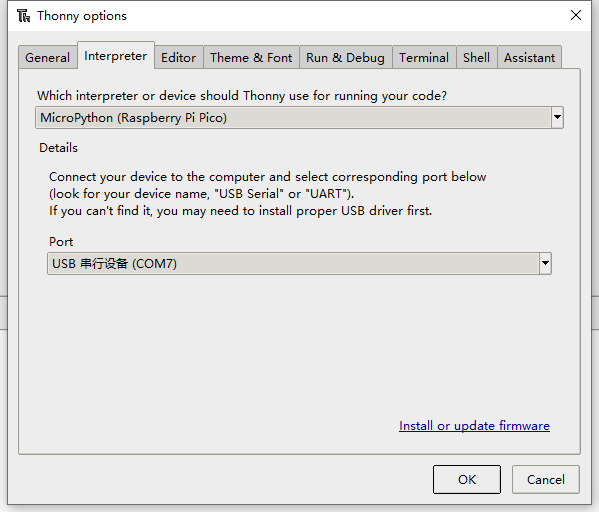
- Connect Pico/Pico2 to your computer first, and in the lower right corner of Thonny left-click on the configuration environment option --> select Configture interpreter
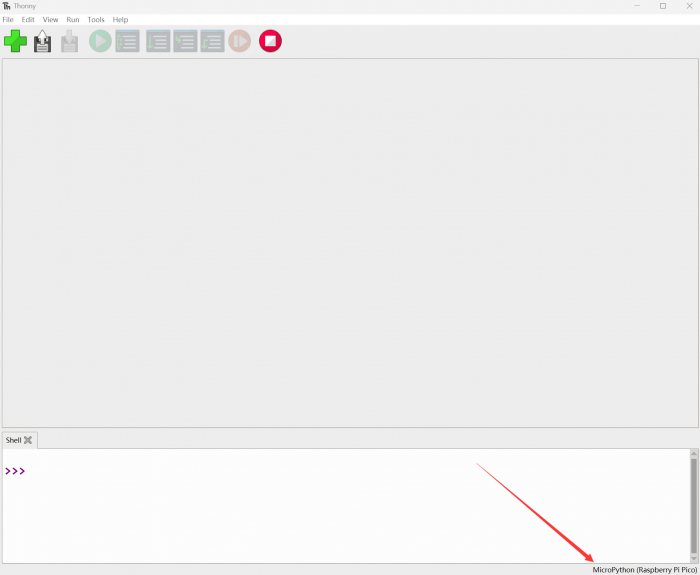
- In the pop-up window, select MicroPython (Raspberry Pi Pico), and choose the corresponding port
Flash Firmware
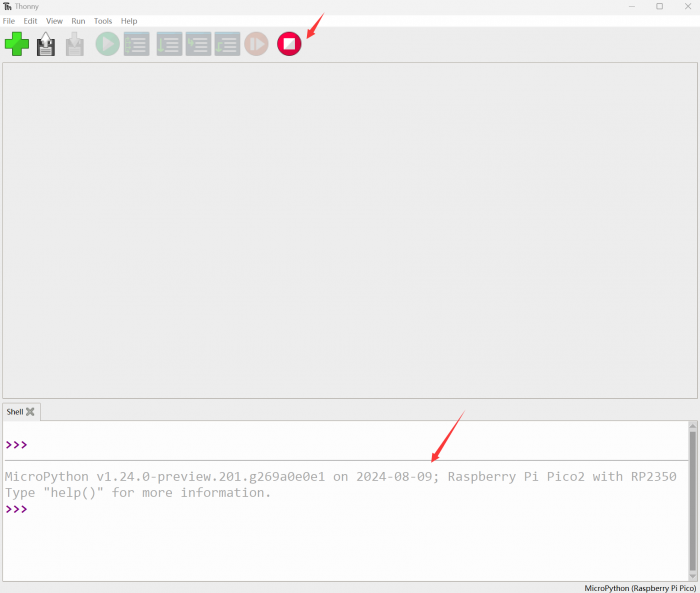
- Click OK to return to the Thonny main interface, download the corresponding firmware library and burn it to the device, and then click the Stop button to display the current environment in the Shell window
- Note: Flashing the Pico2 firmware provided by Micropython may cause the device to be unrecognized, please use the firmware below or in the package
- How to download the firmware library for Pico/Pico2 in windows: After holding down the BOOT button and connecting to the computer, release the BOOT button, a removable disk will appear on the computer, copy the firmware library into it
- How to download the firmware library for RP2040/RP2350 in windows: After connecting to the computer, press the BOOT key and the RESET key at the same time, release the RESET key first and then release the BOOT key, a removable disk will appear on the computer, copy the firmware library into it (you can also use the Pico/Pico2 method)
MicroPython Series Tutorials
【MicroPython】 machine.Pin class function details
【MicroPython】machine.PWM class function details
【MicroPython】machine.ADC class function details
【MicroPython】machine.UART class function details
【MicroPython】machine.I2C class function details
【MicroPython】machine.SPI class function details
【MicroPython】rp2.StateMachine class function details
C/C++ Series
For C/C++, it is recommended to use Pico VSCode for development. This is a Microsoft Visual Studio Code extension designed to make it easier for you to create, develop, and debug projects for the Raspberry Pi Pico series development boards. No matter if you are a beginner or an experienced professional, this tool can assist you in developing Pico with confidence and ease. Here's how to install and use the extension.
- Official website tutorial: https://www.raspberrypi.com/news/pico-vscode-extension/
- This tutorial is suitable for Raspberry Pi Pico, Pico2 and the RP2040 and RP2350 series development boards developed by Waveshare
- The development environment defaults to Windows11. For other environments, please refer to the official tutorial for installation
Install VSCode
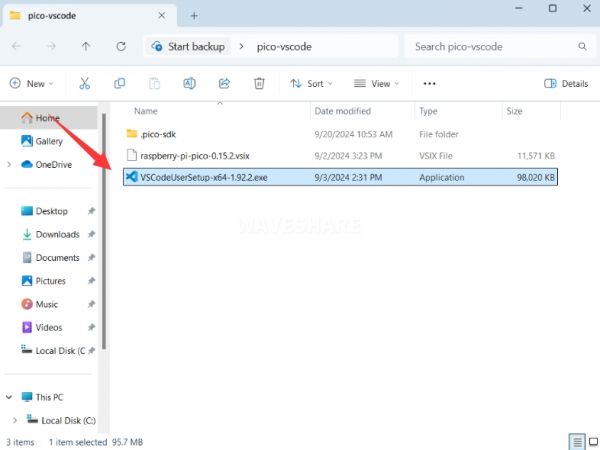
- First, click to download pico-vscode package, unzip and open the package, double-click to install VSCode
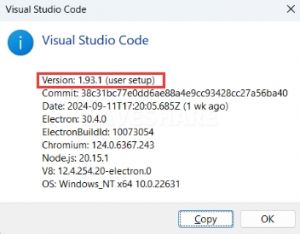
Note: If vscode is installed, check if the version is v1.87.0 or later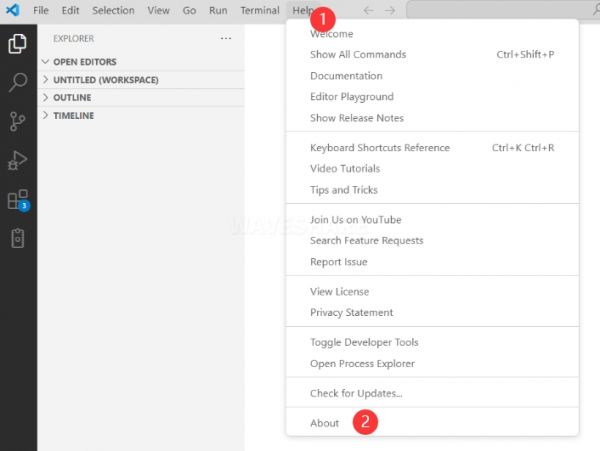
Install Extension
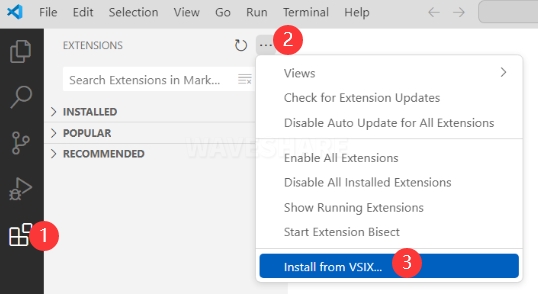
- Click Extensions and select Install from VSIX
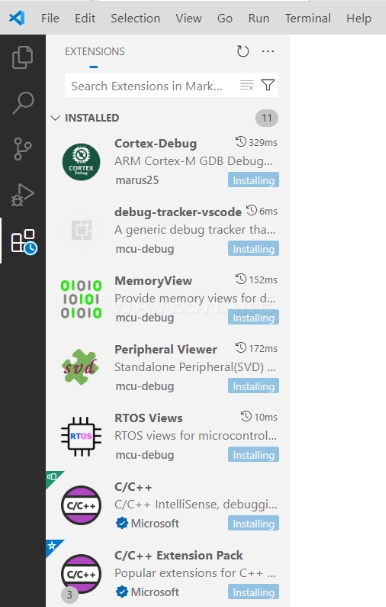
- Select the package with the vsix suffix and click Install

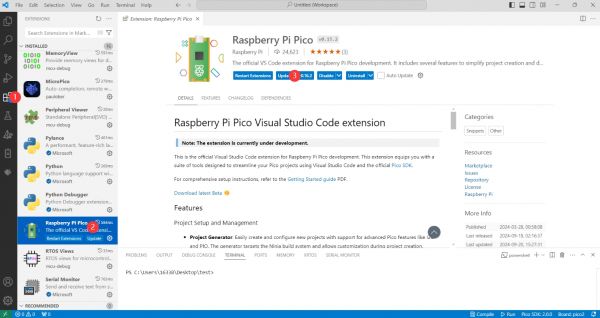
- Then vscode will automatically install raspberry-pi-pico and its dependency extensions, you can click Refresh to check the installation progress
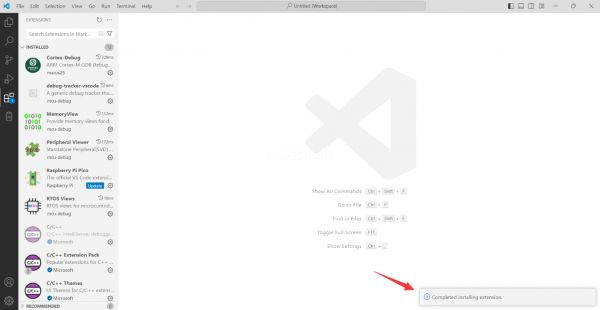
- The text in the right lower corner shows that the installation is complete. Close VSCode
Configure Extension
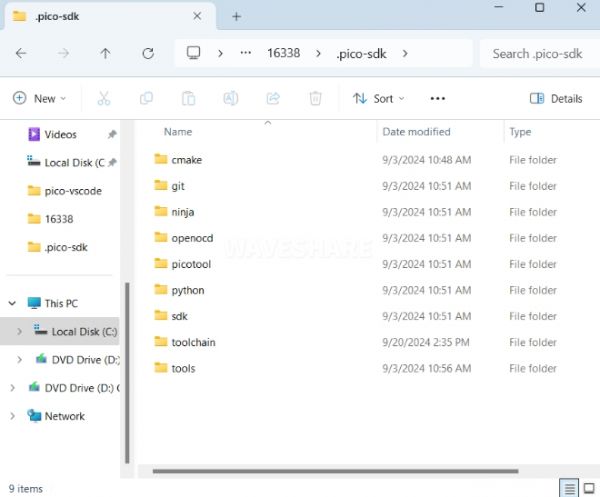
- Open directory C:\Users\username and copy the entire .pico-sdk to that directory
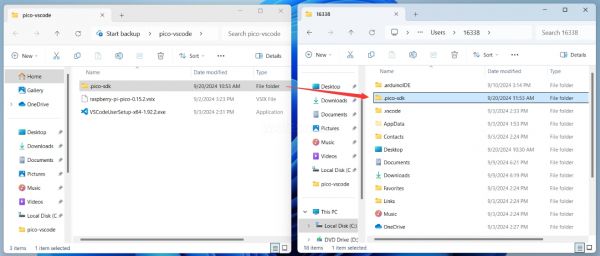
- The copy is completed
- Open vscode and configure the paths for the Raspberry Pi Pico extensions

The configuration is as follows:Cmake Path: ${HOME}/.pico-sdk/cmake/v3.28.6/bin/cmake.exe Git Path: ${HOME}/.pico-sdk/git/cmd/git.exe Ninja Path: ${HOME}/.pico-sdk/ninja/v1.12.1/ninja.exe Python3 Path: ${HOME}/.pico-sdk/python/3.12.1/python.exe

New Project
- The configuration is complete, create a new project, enter the project name, select the path, and click Create to create the project
To test the official example, you can click on the Example next to the project name to select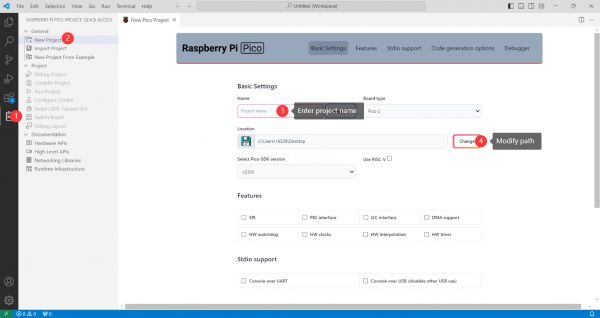
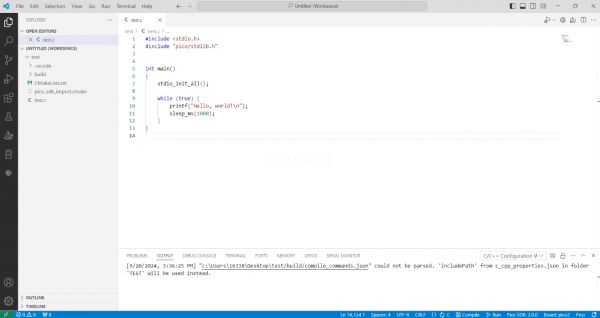
- The project is created successfully
Compile Project
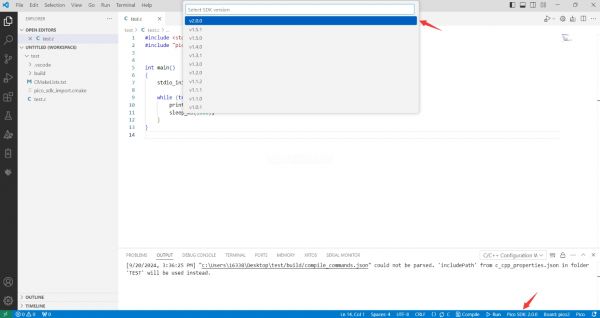
- Select the SDK version
- Select Yes for advanced configuration

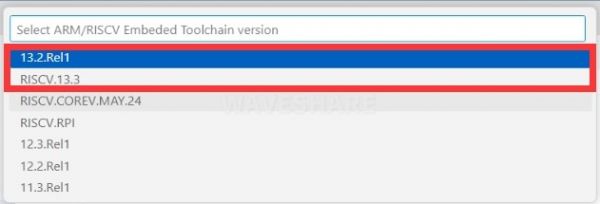
- Choose the cross-compilation chain, 13.2.Rel1 is applicable for ARM cores, RISCV.13.3 is applicable for RISCV cores. You can select either based on your requirements
- Select Default for CMake version (the path configured earlier)

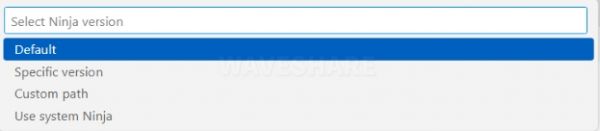
- Select Default for Ninjaversion
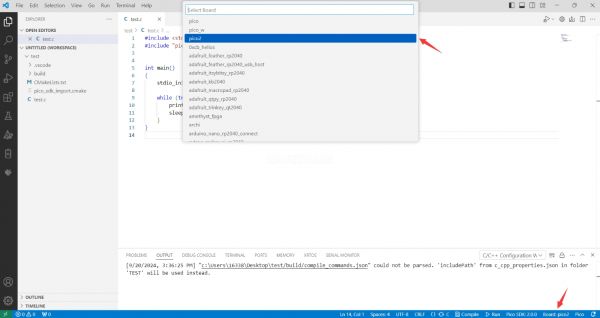
- Select the development board
- Click Complie to compile
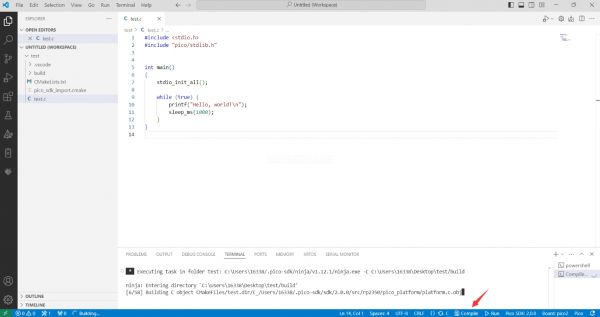
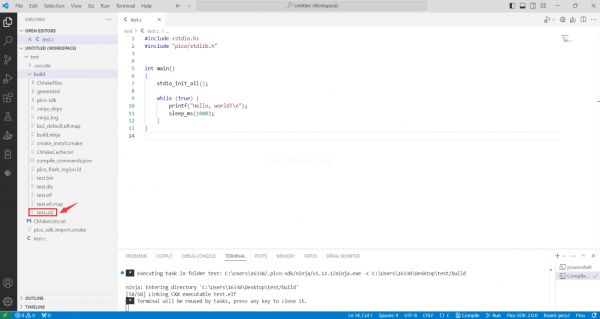
- The uf2 format file is successfully compiled
Flash Firmware
Here are two methods for flashing firmware
- Flash firmware using the pico-vscode plugin
Connect the development board to the computer, click Run to flash the firmware directly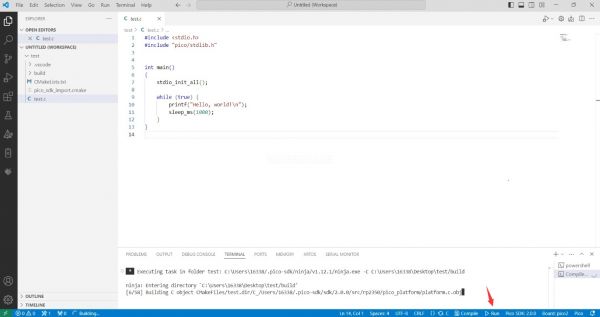
- Flash the firmware manually
1. Press and hold the Boot button
2. Connect the development board to the computer
3. Then the computer will recognize the development board as a USB device.
4. Copy the .uf2 file to the USB drive, and the device will automatically restart, indicating successful program flashing.
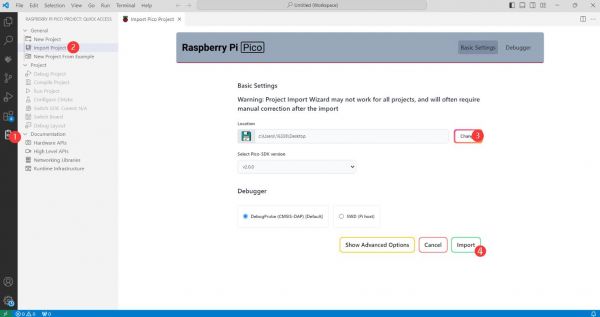
Import Project
- Select the project directory and import the project
- The Cmake file of the imported project cannot have Chinese (including comments), otherwise the import may fail
- To import your own project, you need to add a line of code to the Cmake file to switch between pico and pico2 normally, otherwise even if pico2 is selected, the compiled firmware will still be suitable for pico
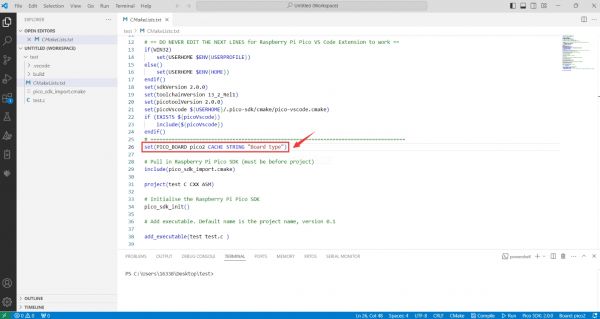
set(PICO_BOARD pico CACHE STRING "Board type")
Update Extension
- The extension version in the offline package is 0.15.2, and you can also choose to update to the latest version after the installation is complete
Arduino IDE Series
Install Arduino IDE
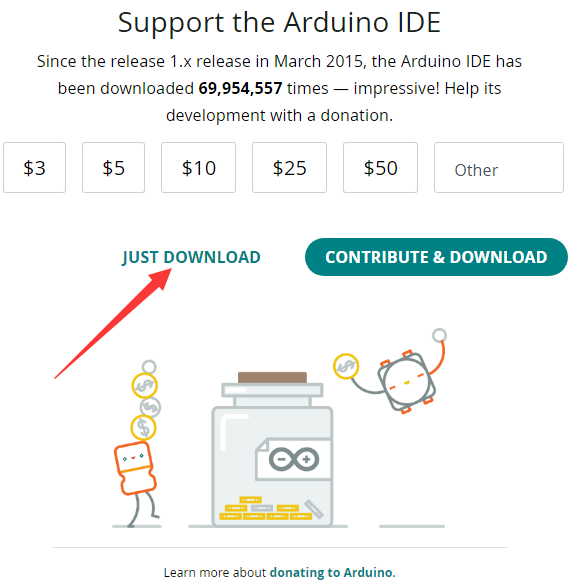
- First, go to Arduino official website to download the installation package of the Arduino IDE.

- Here, you can select Just Download.
- Once the download is complete, click Install.
Notice: During the installation process, it will prompt you to install the driver, just click Install
Arduino IDE Interface
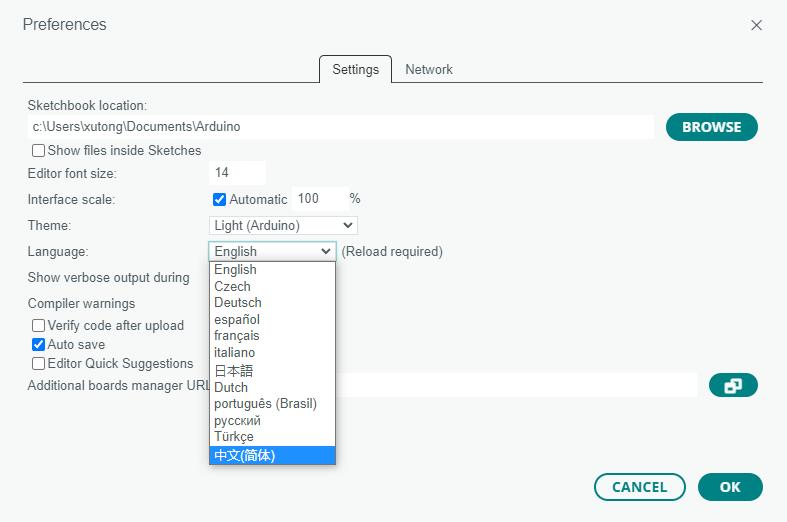
- After the first installation, when you open the Arduino IDE, it will be in English. You can switch to other languages in File --> Preferences, or continue using the English interface.

- In the Language field, select the language you want to switch to, and click OK.
Install Arduino-Pico Core in Arduino IDE
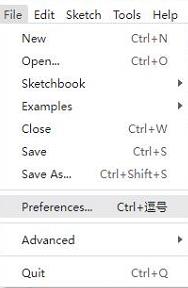
- Open the Arduino IDE, click on the file in the top left corner, and select Preferences
- Add the following link to the attached board manager URL, and then click OK
This link already includes board versions such as RP2040 and RP2350. Please visit arduino-pico for the latest version fileshttps://github.com/earlephilhower/arduino-pico/releases/download/4.5.2/package_rp2040_index.json
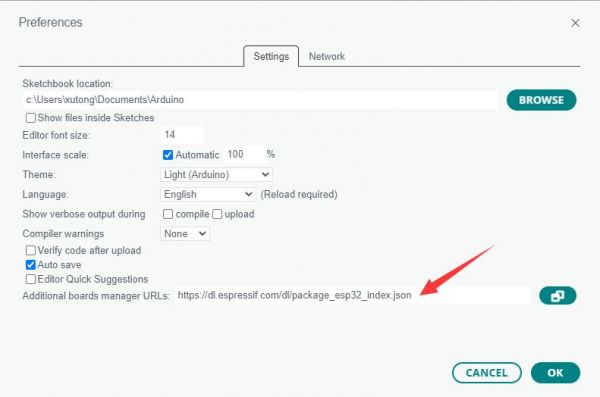
Note: If you already have an ESP32 board URL, you can use a comma to separate the URLs as follows:https://dl.espressif.com/dl/package_esp32_index.json,https://github.com/earlephilhower/arduino-pico/releases/download/4.5.2/package_rp2040_index.json
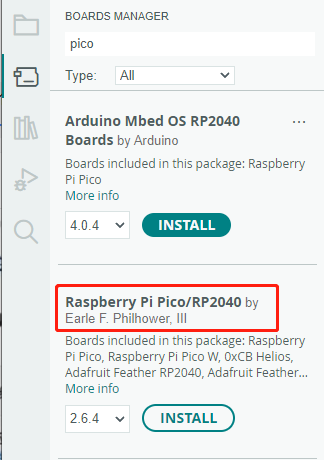
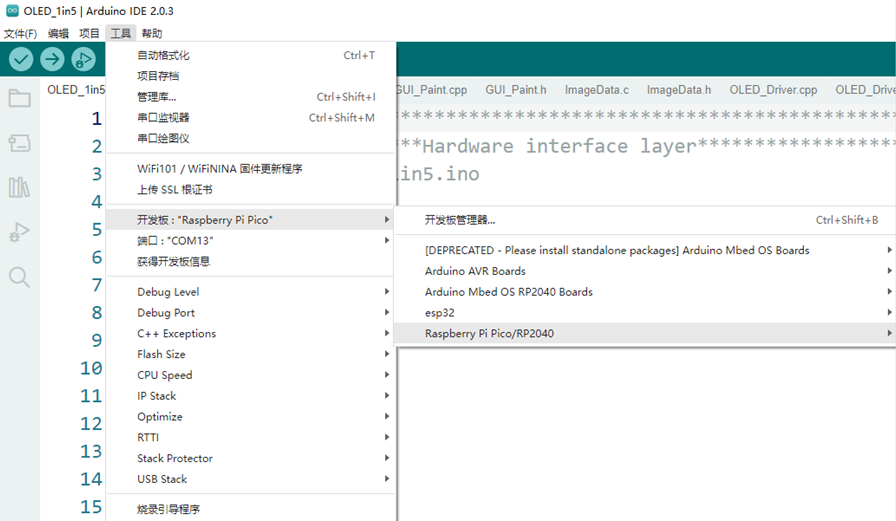
- Click Tools > Development Board > Board Manager > Search pico, as my computer has already been installed, it shows that it is installed
Upload Demo at the First Time
- Press and hold the BOOTSET button on the Pico board, connect the pico to the USB port of the computer via the Micro USB cable, and release the button after the computer recognizes a removable hard disk (RPI-RP2).
- Download the program and open D1-LED.ino under the arduino\PWM\D1-LED path
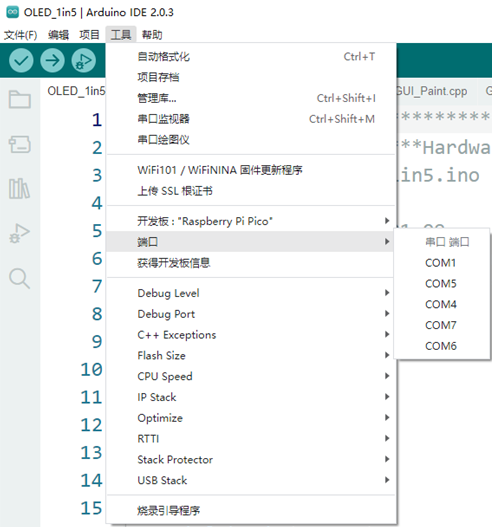
- Click Tools --> Port, remember the existing COM, do not click this COM (the COM displayed is different on different computers, remember the COM on your own computer)
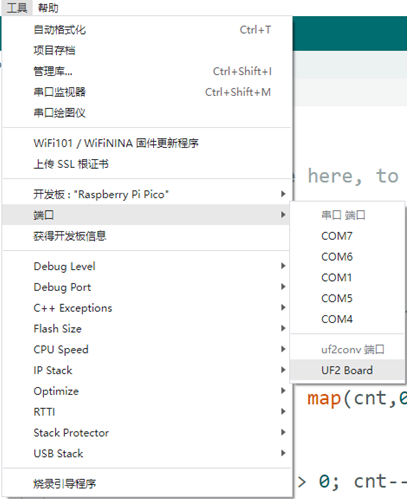
- Connect the driver board to the computer using a USB cable. Then, go to Tools > Port. For the first connection, select uf2 Board. After uploading, when you connect again, an additional COM port will appear
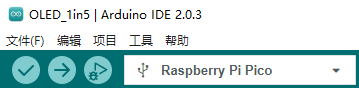
- Click Tools > Development Board > Raspberry Pi Pico > Compatible versions (Raspberry Pi Pico, Raspberry Pi Pico 2, etc.)

- After setting it up, click the right arrow to upload the program
- If issues arise during this period, and if you need to reinstall or update the Arduino IDE version, it is necessary to uninstall the Arduino IDE completely. After uninstalling the software, you need to manually delete all contents within the C:\Users\[name]\AppData\Local\Arduino15 folder (you need to show hidden files to see this folder). Then, proceed with a fresh installation.
Open Source Demos
MircoPython video demo (github)
MicroPython firmware/Blink demos (C)
Raspberry Pi official C/C++ demo (github)
Raspberry Pi official micropython demo (github)
Arduino official C/C++ demo (github)
Support
Monday-Friday (9:30-6:30) Saturday (9:30-5:30)
Email: services01@spotpear.com
[Tutorial Navigation]
- Overview
- Introduction
- Features
- Specifications
- Hardware Description
- Dimensions
- NMEA0183
- Environment Setup
- Demo Download
- Demo
- Resources
- Documents
- Demo
- Datasheets
- Pico Getting Started
- Firmware Download
- Basic Introduction
- MicroPython Series
- C/C++ Series
- Install VSCode
- Install Extension
- Configure Extension
- New Project
- Compile Project
- Flash Firmware
- Import Project
- Update Extension
- Arduino IDE Series
- Install Arduino IDE
- Arduino IDE Interface
- Install Arduino-Pico Core in Arduino IDE
- Upload Demo at the First Time
- Open Source Demos
- Support