- sales/support
Google Chat:---
- sales
+86-0755-88291180
- sales01
sales@spotpear.com
- sales02
dragon_manager@163.com
- support
tech-support@spotpear.com
- CEO-Complaints
zhoujie@spotpear.com
- Only Tech-Support
WhatsApp:13246739196
- Purchase/Shipping/Refund
WhatsApp:13424403025
- HOME
- >
- ARTICLES
- >
- Jetson Series
- >
- Jetson Kits
UGV Rover PT ROS2 Pi Kit User Guide
Introduction
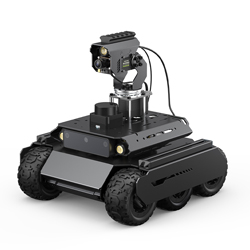
The UGV Rover is an open-source mobile robot based on ROS2 with a 6-wheel 4WD architecture. Designed using a dual-controller structure, the ESP32 slave device controls the motor PID, IMU sensors, OLED screen, servo, LED ON/OFF, and so on, which greatly reduces the IO resources for the host computer and provides high-performance communication interfaces. The host device uses Raspberry Pi 4B or Raspberry Pi 5 to ensure the realization of advanced functions such as high-end computing power and specified strategies.
The robot body structure adopts an all-aluminum alloy shell with a thickness of 2mm, which has high structural strength and good durability.。 It adopts soft anti-skid rubber tires with 4 geared motors with encoder for closed-loop speed control to prevent vibrations and achieve excellent sporty performance up to a maximum speed of 1.3m/s. The built-in 3S lithium battery UPS power supply module provides strong and long-lasting power, supporting use while charging, meeting the needs of long-term development and use.
The Raspberry Pi 4B/5 is equipped with a USB camera, which allows users to enjoy a smooth visual experience through the live camera with high frame rate and low latency, and can capture different wonderful moments through functions such as taking photos and videos. In addition, various information feedback from the robot, including battery voltage, CPU usage, etc., are displayed in real time through the WEB application, allowing users to monitor the status of the robot in real time.
The robot's vision system is equipped with a 2-degree-of-freedom high-torque flexible pan-tilt and a 160° ultra-wide-angle 5-million-pixel camera, providing users with a wide viewing angle, flexible observation angles, and a variety of AI machine vision functions. The high-brightness LED spotlight next to the pan-tilt ensures clear use even in low-light environments. In addition, through the design of the Picatinny rails, users can easily expand more tactical accessories, further enhancing the functionality of the robot.
Based on the ROS2 robot operating system, it is equipped with lidar and depth camera, which can build 2D maps and 3D modeling in real time to assist robots in path planning and auto navigation. Using large-scale language model technology, users can control robots through natural language, improving the human-computer interaction experience. Through the WEB application console, users can directly control the robot and easily perform task management and real-time debugging. At the same time, the Gazebo simulation environment provides developers with a virtual testing platform to ensure system stability before actual deployment.
To enable users to fully exploit the potential of this robot, we provide extensive documentation and tutorials, including JupyterLab's WEB application and ROS2 functional documentation. Whether you are a beginner or experienced developer in robotics, these resources can help you learn, study, and create in depth, step by step.
Features
- High-performance Dual Controller: The The main control of the slave device is ESP32, which is responsible for precise motor PID control and multiple sensor readings. The host device Raspberry Pi 4B or 5 provides high-end computing power. The two-layer architecture makes the robot run more efficiently.
- Open-source Code: The host device is developed based on the latest version of the Raspberry Pi system (Debain Bookworm), the ROS2 function is developed based on the Humble version, the WEB application is based on Flask and Python languages, and the software platform is all open source, which is convenient for users to learn and redevelop.
- Rich Tutorials: Provide a wealth of JupyterLab interactive tutorials, graphic tutorials, video tutorials and ROS2 function tutorials, from introductory functions to advanced functions, users can learn how to control the robot while watching the tutorials, reducing the learning curve for beginners in robot technology.
- Wide Viewing Angle: Equipped with a 2-degree-of-freedom high-torque flexible pan-tilt, providing a wide 360° viewing angle horizontally; equipped with a 160° ultra-wide-angle 5-million-pixel camera to capture a wider range of images .
- Robot Vision: Integrate robot vision functions such as color, object, gesture recognition, face, and motion detection, and can be expanded to more applications.
- Abundant Interaction: Real-time video streaming, digital zoom, photography, video recording and other functions, and WEB application real-time video function and robot information displayed on the screen to improve user interaction experience.
- Cross-platform Support: Support cross-platform remote control without installing APP. You can follow tutorials to implement remote control beyond the local network using solutions such as Pgyer, Cpolar, LocalTunnel, and others.
- Expandability: The structure is equipped with an expansion plate and Picatinny rails to facilitate the expansion of other tactical accessories; in terms of hardware, there are spare LED light interfaces that can be used to expand other peripherals such as water guns. The product can also be expanded with 4G and 5G modules to facilitate users to realize more possibilities.
- Durable Structure: 2mm thick all-aluminum alloy shell provides excellent structural strength and durability.
- High-Performance Drive Motors: Equipped with four geared motors with encoder to achieve closed-loop speed control, the maximum speed can reach 1.3m/s, providing strong power.
- All-Drive and High-Quality Tires: Four-wheel drive system with soft anti-skid rubber tires to ensure that the robot has good grip and stability on various terrains.
- Long Battery Life: Using 3S lithium battery UPS power supply system, it supports continuous use while charging, ensuring long-lasting endurance.
Product Assembly
This assembly tutorial mainly includes two parts. The first is a tutorial on installing Raspberry Pi 4B/5 for ACCE model products, and the second is a tutorial for installing lithium batteries.
[Assembly tutorial for ugv rover & ugv beast]
Product Basic Usage
Precautions
Please ensure you understand the following before use:
- This product does not have lithium batteries installed at the factory. Customers need to install three 18650 lithium batteries before they can be used normally. Customers who purchase the ACCE model need to bring their own Raspberry Pi motherboards, and the Raspberry Pi must be installed before normal use. Customers outside China need to purchase three 18650 lithium batteries by themselves, 18650 lithium batteries with a capacity of 2200mA or above and a discharge rate of 4C are recommended. Please refer to Product Assembly for these two installation tutorials.
- When connecting the battery for the first time, pay attention to whether the LED light is on on the battery module. If the LED light is on, it means that the positive and negative electrodes of the battery are connected inversely. If the battery is not connected inversely, the LED light will not be on. Do not charge the battery when it is reversed, otherwise it may cause an explosion.
- This product can not suffer severe impact and is not waterproof.
First Time Use
The TF card shipped with the product is an image with already configured software and ROS2 functions. Just insert the TF card into the Raspberry Pi and use it.
For first time use, you need to use the configured 12V 5A power cable to connect to the power interface of the product. After turning on the power switch, the product will initialize, and the OLED screen will display a series of initialization information. The Raspberry Pi will automatically create a hotspot, and the IP address will be displayed on the OLED screen after the main program of the project runs automatically. After the startup is completed, the OLED screen displays the following meanings:
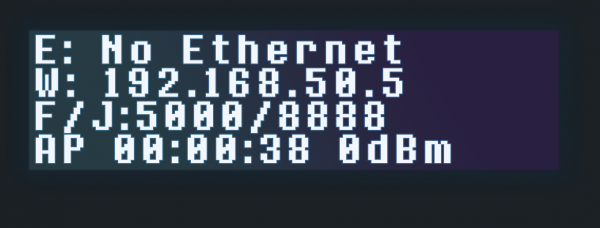
- The first line E: The IP address of the network port, which can be used to remotely connect to the Raspberry Pi; No Ethernet indicates that the Raspberry Pi is connected without a network cable at this time.
- The second line W: After establishing a hotspot in AP mode, the default IP will be displayed as 192.168.50.5; in STA mode, connect to the IP address assigned by a known WIFI; the displayed IP address can be used to connect to the Raspberry Pi wirelessly.
- The third line F/J: Network port number. When the Raspberry Pi main program is running, 5000 is used to access the product main program control page, and 8888 is used to access the JupyterLab page.
- The fourth line AP indicates that the WIFI is in AP mode at this time, and the time indicates the usage time of the device; the value in dBm indicates the signal strength RSSI of the WIFI in STA mode.
After the Raspberry Pi boots up,
- If the product is not connected to a known WIFI, it will automatically establish a hotspot, use your mobile phone/computer to connect to the hotspot. The name of the hotspot is AccessPopup and the password is 1234567890. Open the browser after connecting , enter the default IP address of the device in AP mode (the address will be displayed on the W line on the OLED screen), that is, enter 192.168.50.5:5000 in the URL bar to access the WEB control interface of the product's main program.
- If the product is connected to a known WIFI, you can access the WEB control interface of the product's main program by accessing the Raspberry Pi IP address: 5000. For example: 192.168.10.156:5000.
Note: The accessed device must be in the same LAN as the Raspberry Pi device to access successfully.
Network Configuration
If you want to connect to your own WIFI network, this section explains how to configure the network. Network configuration needs to be completed by entering the JupyterLab page. There are two ways to open the JupyterLab page:
- You can click the
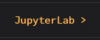 button in the control interface of the main program to enter the JupyterLab page;
 - You can enter the JupyterLab page by accessing the robot IP address:8888. The product ships in AP mode by default, so enter 192.168.50.5:8888 in the URL bar to open the JupyterLab page.
First time to connect a known WIFI
Generally, the default WIFI mode of the configured image of the product is AP mode. To switch to STA mode to connect to a known WIFI for the first time, follow the following steps:
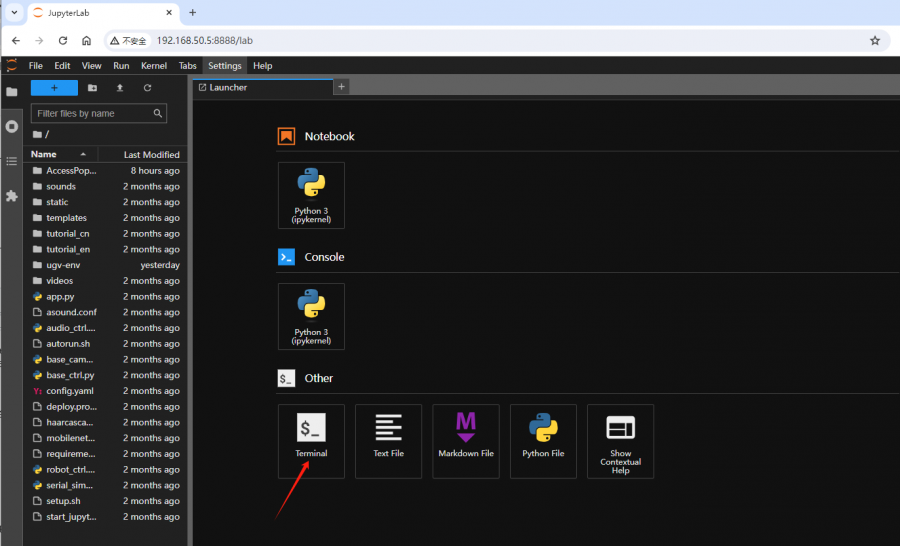
1. After entering the JupyterLab page, click Terminal at the bottom of the page, enter the following command and press Enter to enter the project folder.
bash
2. You can see that the current location is ~/ugv_rpi, then enter the folder of the WIFI configuration tool, enter the following command and press Enter.
cd AccessPopup/
3. Enter the following command to grant executable permission to the WiFi configuration script in the AccessPopup folder.
sudo chmod +x installconfig.sh
4. Run the WIFI configuration script by entering the following command and press Enter.
sudo ./installconfig.sh
5. After running the script, the following interface is displayed. Here, you need to set up a connection to a known WIFI, so enter 5 and press Enter to set up a new WIFI connection.
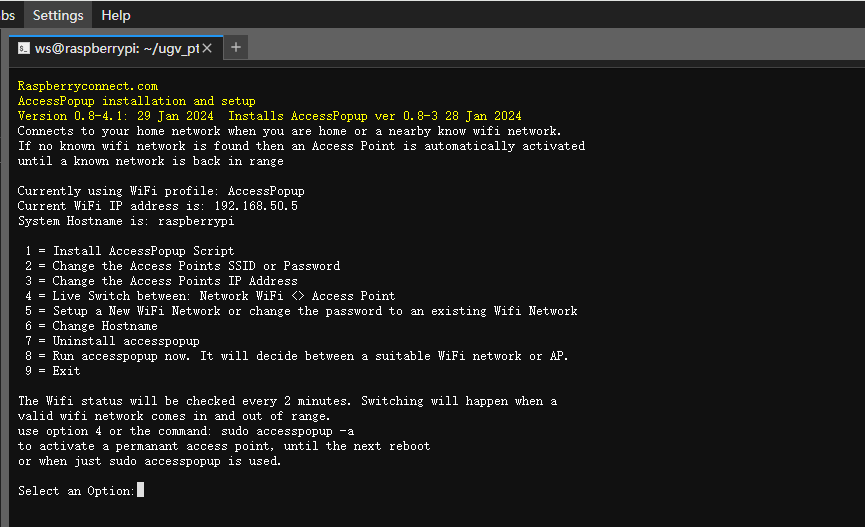
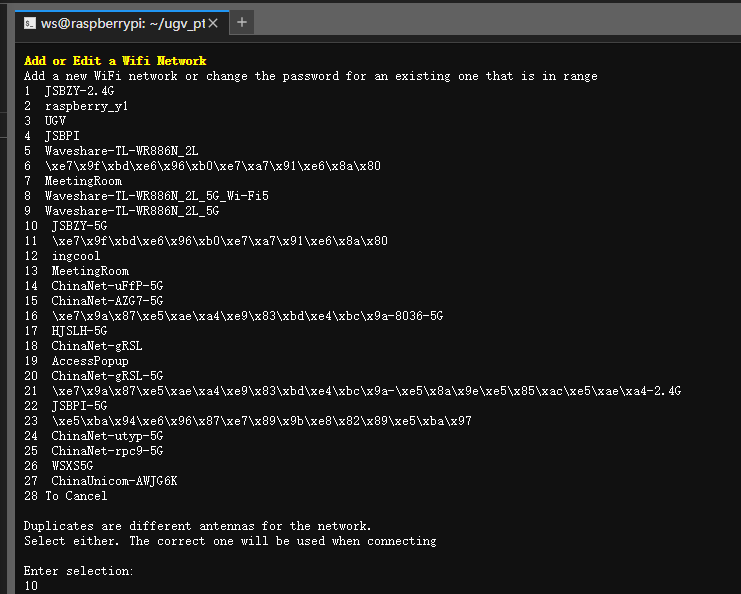
6. Then it will jump to the add or edit WIFI network interface. After a while, this page will output the WIFI names near the current device, as shown below. There is a serial number in front of each WIFI. Enter the serial number of the WIFI to be connected and press Enter.
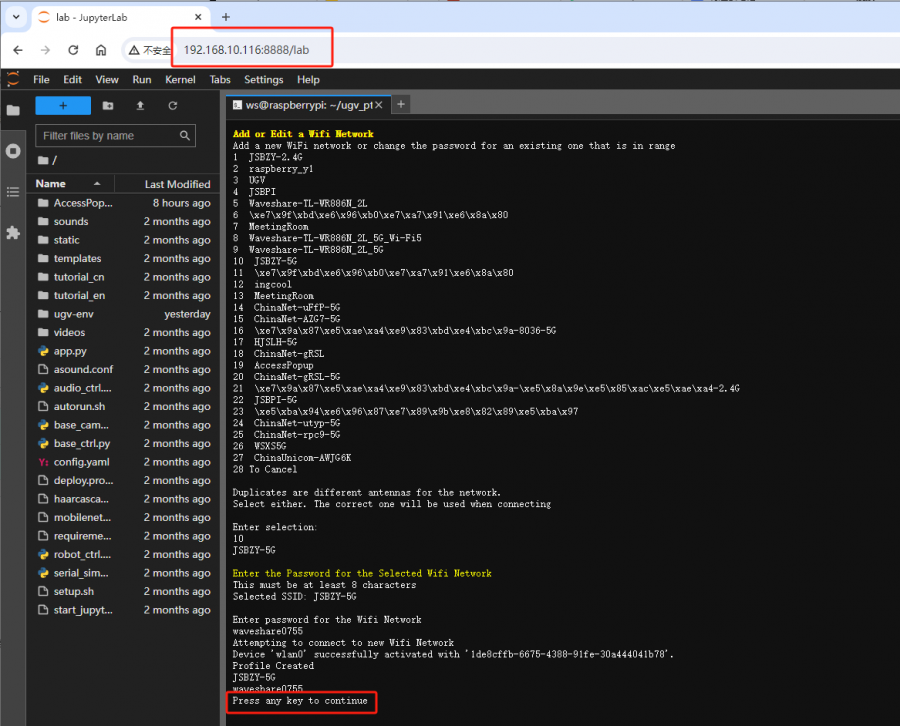
7. Then enter the WIFI password to be connected, and after pressing Enter, the product will connect to the set WIFI hotspot. After the connection is successful, you can see the IP address change of the W line on the OLED screen of the product.
8. The JupyterLab page has to be accessed again with the IP address of the W line on the current OLED screen because the IP address has changed. The product is in STA mode after a successful connection and enters the JupyterLab page with the same screen as before, as shown below, press any key to continue.
9. Then you can press 9 and press Enter to exit the WiFi configuration script.
After connecting to a known WIFI successfully, if the product runs out of the range of the known WIFI when it is powered on thereafter, the product will automatically establish a hotspot, and the hotspot will still be AccessPopup by default.
Switch WIFI mode
- Switch STA mode to AP mode
To switch the device to AP mode to establish a hotspot when connected to a known WIFI, open Terminal on the JupyterLab page, enter bash to enter the project folder, and then enter the following command to establish a hotspot.
sudo accesspopup -a
- Switch back from AP mode to STA mode
To switch the device from AP mode to STA mode after a known WIFI configuration has been performed, enter the following command to reconnect to the known WIFI.
sudo accesspopup
Note: As long as the WIFI mode is switched, the control interface of the product's main program and the IP address of the JupyterLab page must be refreshed accordingly to be accessible.
Delete a known WIFI
- Open the Terminal of the JupyterLab page and enter bash to enter the project folder.
- Enter the following command to view information about all network connections.
nmcli connection show
- Enter the following command to delete a known WIFI. You need to replace <connection_name> in the following command with the name of the WIFI that needs to be deleted.
sudo nmcli connection delete <connection_name>
Note: If you delete a known WIFI that the current device is connected to, the product will automatically create a hotspot after deletion. The hotspot will still be AccessPopup by default. The IP address that accesses the JupyterLab page must be refreshed before it can be used again.
Enable SSH service
If you are burning an image from method 1, you can enable the SSH service according to this part. The SSH service can still be enabled by entering the JupyterLab page. There are two ways to open the JupyterLab page:
- You can click the button in the control interface of the main program to enter the JupyterLab page;
- You can enter the JupyterLab page by accessing the robot IP address:8888. If you are burning the image of method 1, the product defaults to AP mode, so enter 192.168.50.5:8888 in the URL bar to open the JupyterLab page.
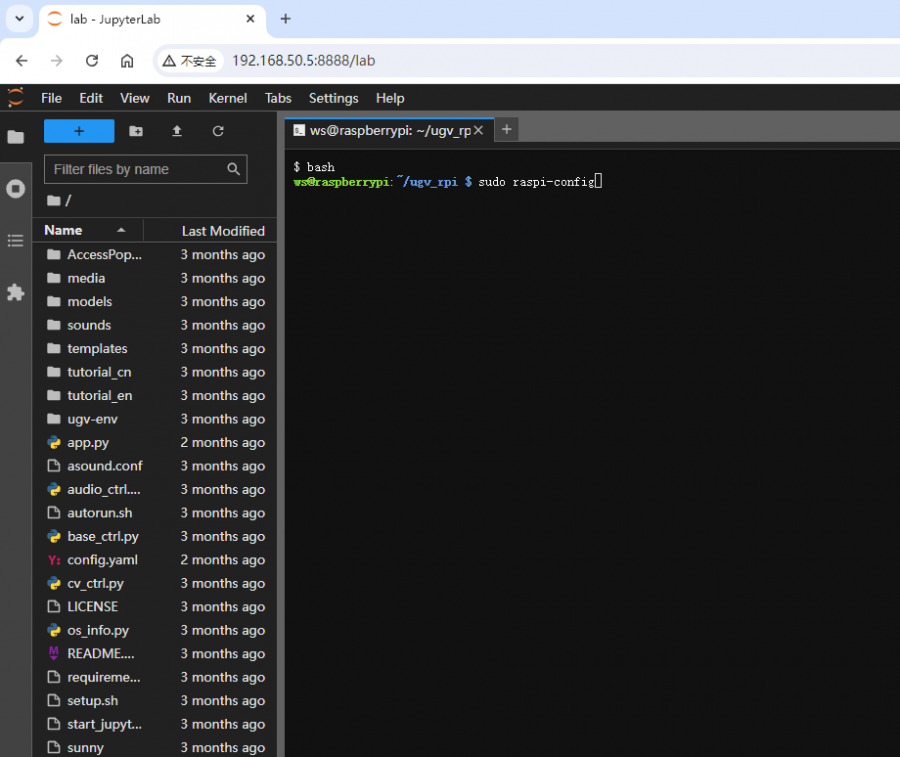
1. After entering the JupyterLab page, click Terminal at the bottom of the page, enter the following command and press Enter to enter the project folder.
bash
2. Enter the following command in the terminal and use the raspi-config official configuration tool to enable the SSH service.
sudo raspi-config
3. Enter the raspi-config tool, use the keyboard arrow keys to select Interface Options up and down, and press Enter.

4. Select SSH and press Enter.

5. Select Yes to enable the SSH service.
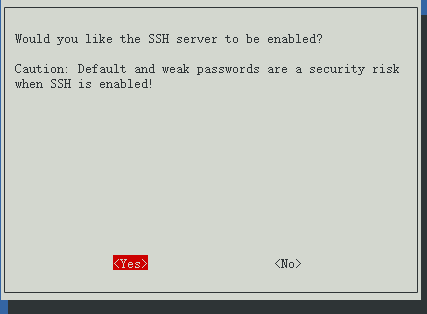
6. When the SSH service id enabled, use the left and right arrow keys to select Finish and then exit. Enter sudo reboot to restart the system.
How to Use Product ROS2
Resources
3D diagram
STEP model
ROS2 open source project
- Project address: UGV Rover ROS2 function package
Product open source program
Support
Monday-Friday (9:30-6:30) Saturday (9:30-5:30)
Mobile: +86 13434470212
Email: services01@spotpear.com