


- sales/support
Google Chat:---
- sales
+86-0755-88291180
- sales01
sales@spotpear.com
- sales02
dragon_manager@163.com
- support
tech-support@spotpear.com
- CEO-Complaints
zhoujie@spotpear.com
- Only Tech-Support
WhatsApp:13246739196
- Purchase/Shipping/Refund
WhatsApp:13424403025
- HOME
- >
- ARTICLES
- >
- Common Moudle
- >
- Camera
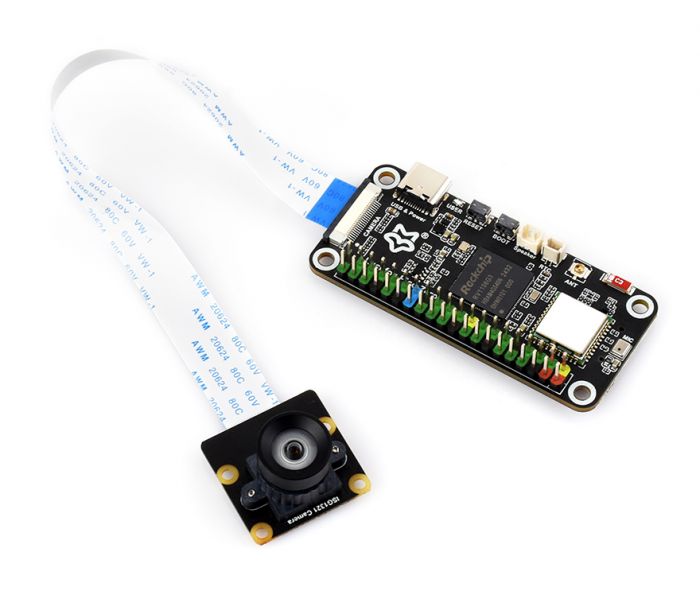
ISG1321 Camera User Guide
Overview
Currently only supports Luckfox Pico Zero motherboard
Module Parameters
- 1.38MP pixels
- Photosensitive chip: ISG1321
- Camera type: Black and white
- Shutter type: Global shutter
- Resolution: 1280 x 1080
- Camera parameters:
- CMOS size: 1/4 inch
- Wide-angle distortion-free lens
- 4 screw holes:
- Can be used for fixing positions
- Size: 25mm × 24mm
Lens Parameters
| Wide-angle distortion-free lens | |
 | |
| Focal Length | 2.88mm |
| Aperture (F) | 2.4 |
| Diagonal Field of View (FOV-D) | 95.5° |
| Horizontal Field of View (FOV-H) | 87.5° |
| Vertical Field of View (FOV-V) | 56.5° |
| Distortion | <1% |
| Relative illumination | >65% |
Interfaces
| NO. | SYMBOL |
| 1 | +3.3V |
| 2 | SDA |
| 3 | SCL |
| 4 | GND |
| 5 | NC |
| 6 | RESET |
| 7 | GND |
| 8 | NC |
| 9 | NC |
| 10 | GND |
| 11 | NC |
| 12 | NC |
| 13 | GND |
| 14 | MCP |
| 15 | MCN |
| 16 | GND |
| 17 | MDP1 |
| 18 | MDN1 |
| 19 | GND |
| 20 | MDP0 |
| 21 | MDP0 |
| 22 | GND |
Hardware Connection
- Connect to Luckox Pico Zero
- Ensure the camera cable is connected downward
User Guide
The user guide is only applicable to buildroot system
V4L2 Read Raw Image
Note: The data captured using V4l2 is raw images that have not been processed by ISP
v4l2-utils is a set of utilities for testing and configuring V4L2 devices, providing access to the V4L2 interface through a command-line interface. v4l2-utils tools are included by default in the buildroot configuration of the Luckfox Pico SDK.
Capture Image
- List all video devices
v4l2-ctl --list-devices
# v4l2-ctl --list-devices
rkisp-statistics (platform: rkisp):
        /dev/video23
        /dev/video24

rkcif-mipi-lvds (platform:rkcif):
        /dev/media2

rkcif (platform:rkcif-mipi-lvds):
        /dev/video4
        /dev/video5
        /dev/video6
        /dev/video7
        /dev/video8
        /dev/video9
        /dev/video10
        /dev/video11
        /dev/video12
        /dev/video13
        /dev/video14

rkisp_mainpath (platform:rkisp-vir0):
        /dev/video15
        /dev/video16
        /dev/video17
        /dev/video18
        /dev/video19
        /dev/video20
        /dev/video21
        /dev/video22
        /dev/media3

USB Camera: USB Camera (usb-xhci-hcd.0.auto-1.1):
        /dev/video0
        /dev/video1
        /dev/media0

USB 2.0 Camera: USB Camera (usb-xhci-hcd.0.auto-1.2):
        /dev/video2
        /dev/video3
        /dev/media1
USB Camera: USB Camera
- List the formats supported by video devices
v4l2-ctl --device=/dev/video15 --list-formats-ext
- Display camera parameters
v4l2-ctl --device=/dev/video15 --list-ctrls
- Capture images
- -device: The device file corresponding to the camera
- --set-fmt-video: Specifies the width, height, and pxiel format (indicating the pixel format)
- --stream-mmap: Specifies that the type of buffer is mmap, i.e., a physically contiguous or iommu-mapped buffer allocated by the kernel
- --stream-to: Specifies the file path where the frame data is saved
- --stream-count: Specify the number of frames captured, excluding the number discarded by--stream-skip
#CSI Camera (need to disable the built-in RKIPC first)
RkLunch-stop.sh
v4l2-ctl --device=/dev/video15 --set-fmt-video=width=640,height=480,pixelformat=NV12 --stream-mmap --stream-to=video50.yuv --stream-count=30
- If the message "The pixelformat 'UYVY' is invalid" appears, it indicates that the camera does not support this format. Use the method from the second step to check the formats supported by the camera
- If the message "<<<<<<<<25 fps" appears, it indicates successful image capture

Display Image
The captured images can be copied to a computer and viewed using the ffplay tool. ffplay is a command-line tool in the FFmpeg toolkit used to play audio and video files, allowing real-time playback or preview of multimedia content from the command line.
- Play video
- -video_size: Sets frame size
- -pixel_format: Sets the pixel format
- -framerate 10: Set the frame rate of the video to 10 frames per second
ffplay -video_size 640x480 -pixel_format nv12 -framerate 10 -i video50.yuv
RTSP Streaming
Get IP Address
The board obtains the IP address of the camera, records the IP address of USB0 as 172.32.0.93, or you can choose to use the IP address of network port eth0
# ifconfig
eth0      Link encap:Ethernet  HWaddr 82:D8:B7:D8:94:5A
          inet addr:192.168.10.86  Bcast:192.168.11.255  Mask:255.255.252.0
          UP BROADCAST RUNNING MULTICAST  MTU:1500  Metric:1
          RX packets:144 errors:0 dropped:0 overruns:0 frame:0
          TX packets:2 errors:0 dropped:0 overruns:0 carrier:0
          collisions:0 txqueuelen:1000
          RX bytes:11210 (10.9 KiB)  TX bytes:684 (684.0 B)
          Interrupt:51

lo        Link encap:Local Loopback
          inet addr:127.0.0.1  Mask:255.0.0.0
          UP LOOPBACK RUNNING  MTU:65536  Metric:1
          RX packets:0 errors:0 dropped:0 overruns:0 frame:0
          TX packets:0 errors:0 dropped:0 overruns:0 carrier:0
          collisions:0 txqueuelen:1000
          RX bytes:0 (0.0 B)  TX bytes:0 (0.0 B)

usb0      Link encap:Ethernet  HWaddr F2:84:8E:BA:A0:E8
          inet addr:172.32.0.93  Bcast:172.32.255.255  Mask:255.255.0.0
          UP BROADCAST RUNNING MULTICAST  MTU:1500  Metric:1
          RX packets:85 errors:0 dropped:39 overruns:0 frame:0
          TX packets:4 errors:0 dropped:0 overruns:0 carrier:0
          collisions:0 txqueuelen:1000
          RX bytes:13126 (12.8 KiB)  TX bytes:1544 (1.5 KiB)
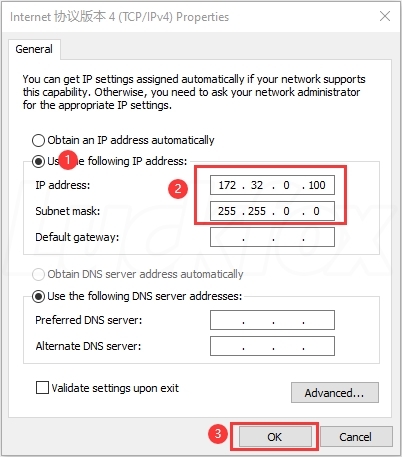
Configure RNDIS Virtual NIC
Configure the RNDIS virtual NIC on your computer to ensure that the NIC places the computer on the same LAN as the board.
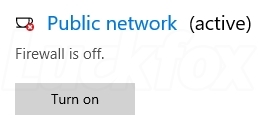
- Windows Security—> Firewall & Network Protection—> Turn off firewall
- To configure the static IP of the RNDIS network card, open Settings - > Advanced Network Settings - > Change adapter options
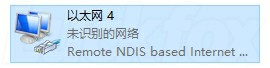
- The NIC is generally named Remote NDIS based nternet Sharing Device, right-click Properties
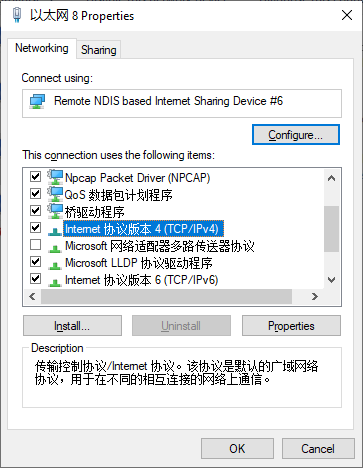
- Double-click Internet Protocol Version (TCP/IPv4), set the IPv4 address to 172.32.0.100, to avoid conflicts with other network devices
Run Streaming Program
The default image on the board will automatically run the rkipc demo, and the motherboard will be set as a streaming server after booting up.
- Start rkipc (it is already started by default, so there is no need to execute it again)
RkLunch.sh
- Close rkipc
RkLunch-stop.sh
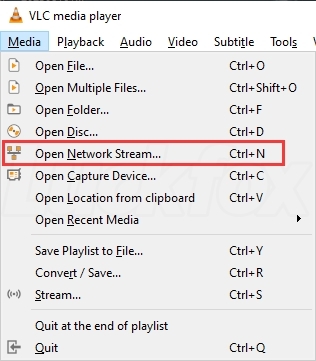
Pull Video Stream
- Download and install VLC media player on your computer
- Open VLC media player software, go to Media ->Open Network Stream
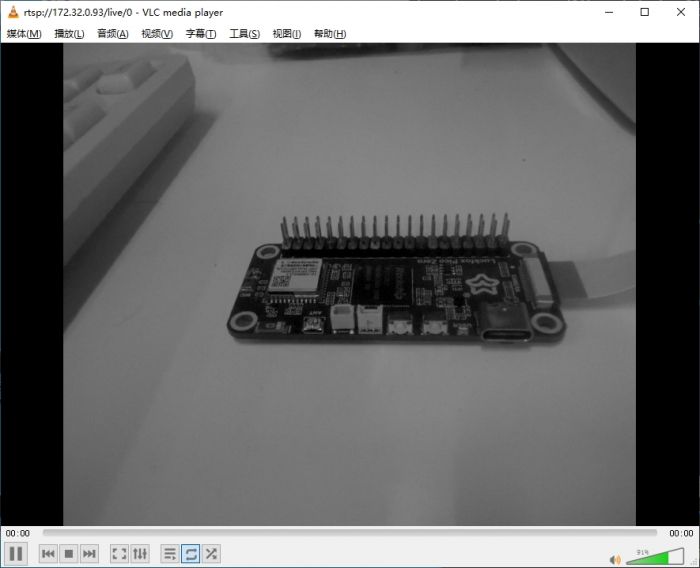
- Enter the streaming address corresponding to the IP address on the board, taking the USB0 IP address 172.32.0.93 on the board as an example: rtsp://172.32.0.93/live/0
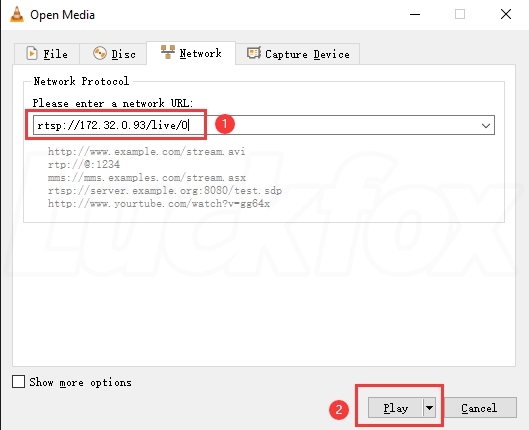
- Click Play and view the live camera feed. You can rotate the lens to adjust the focus
Optimize VLC Network Streaming Delay
VLC software defaults to caching 1 second (1000ms=1s) of video. The cache time can be appropriately reduced based on network conditions to improve real-time performance. If the cache time is too short, it may cause packet loss or stuttering. It is recommended to be not less than 300ms.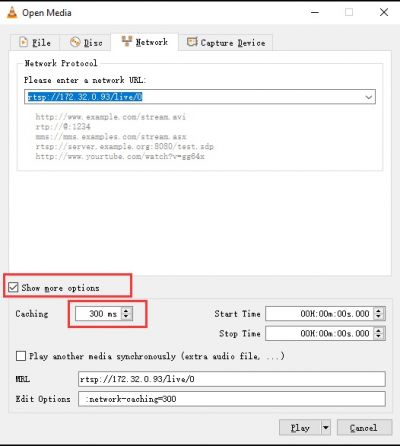
Resources
Related Links
FAQ
Question: After flashing the image, there is no response when connecting the camera to Luckfox Pico Ultra or Luckfox Pico Ultra W. What should you do?
Use luckfox-config to enable the CSI interface and reboot.
Question: The captured image is blurry. What should I do?
Rotate the camera manually to focus according to the actual shooting situation, and be careful not to turn it too much and cause the lens to fall off.
Support
Monday-Friday (9:30-6:30) Saturday (9:30-5:30)
Email: services01@spotpear.com
