


- sales/support
Google Chat:---
- sales
+86-0755-88291180
- sales01
sales@spotpear.com
- sales02
dragon_manager@163.com
- support
tech-support@spotpear.com
- CEO-Complaints
zhoujie@spotpear.com
- Only Tech-Support
WhatsApp:13246739196
- Purchase/Shipping/Refund
WhatsApp:13424403025
14inch-Dual-Monitor User Guide
Features
•14/15.6/18.5inch dual screen display with dual 1080P high-definition hardware resolution
•100% sRGB high color gamut, IPS display panel, 178° viewing angle
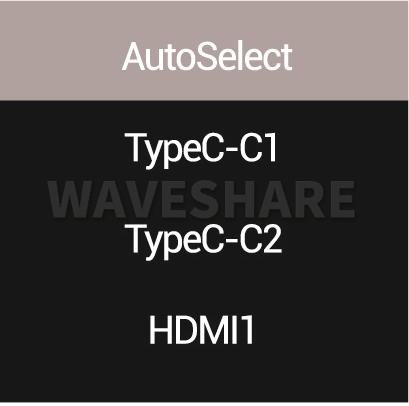
•Support standard HDMI and full-featured Type-C display signals
•Support Windows 11/10/8.1/8/7 when used as a computer monitor
•Support Raspberry Pi OS/Ubuntu/Kali and Retropie when working with Raspberry Pi
•Support multi language OSD menu (used for power control, adjusting brightness/contrast, etc.)
•Support HDMI/Type-C audio output, onboard 3.5mm headphone jack and 4PIN speaker output
Interface and Button Functions
Interface Introduction
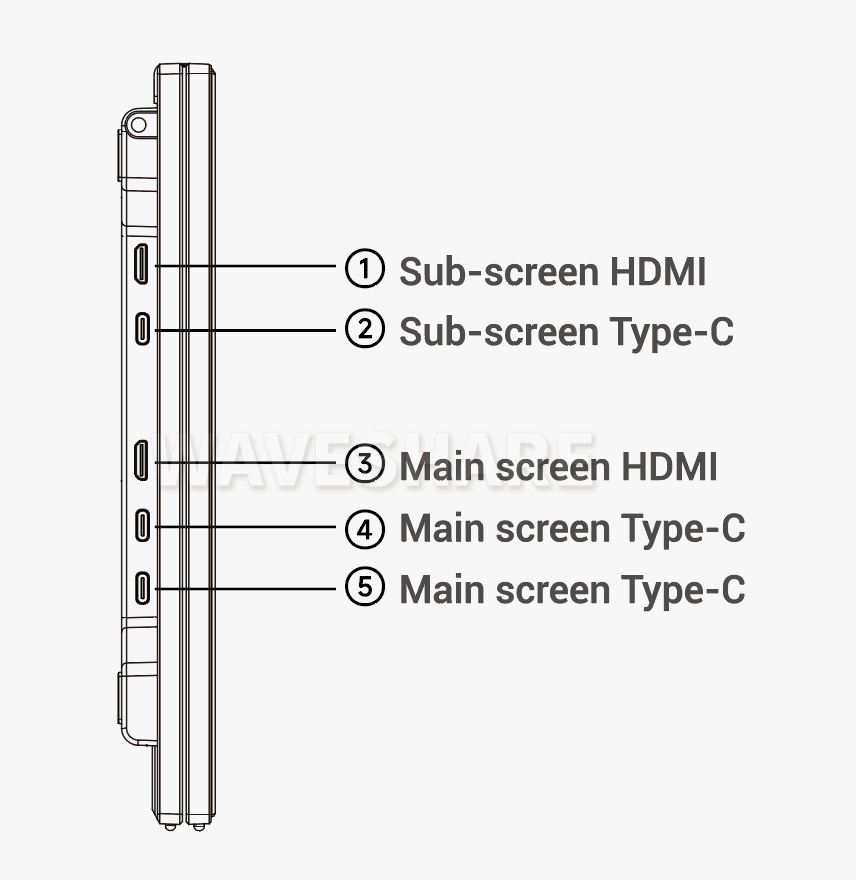
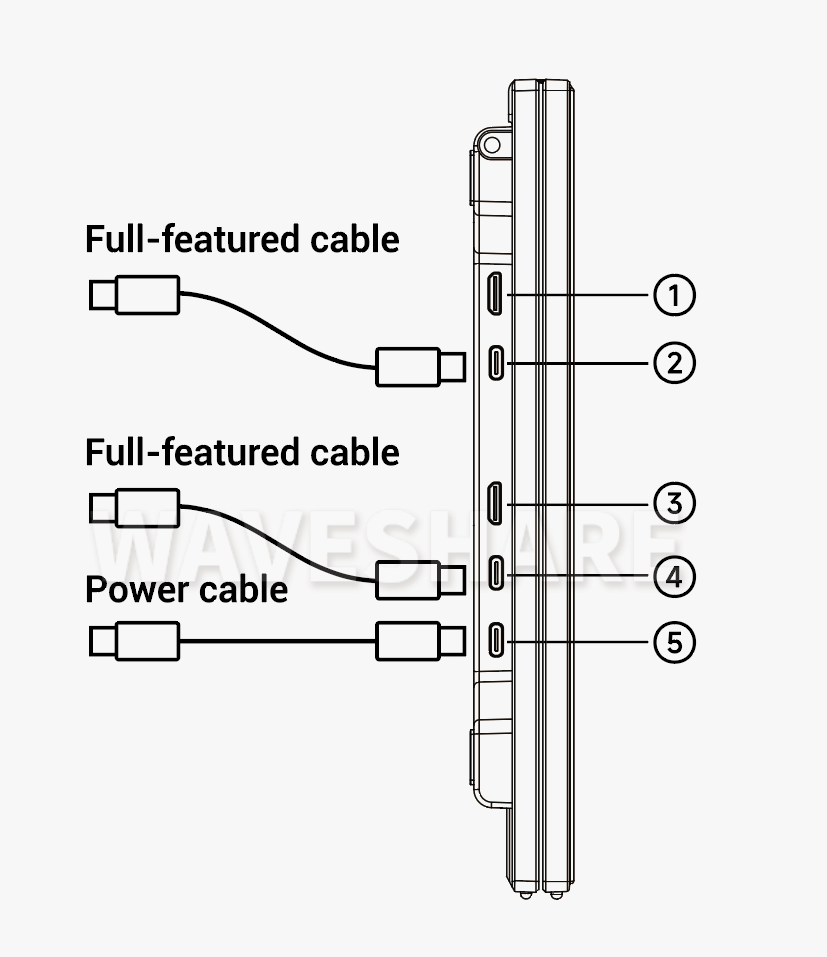
The upper screen (sub-screen) interface introduction
①Only supports video signal input, does not support power input.
②Only supports video signal input, does not support power input.
The lower screen (main screen) interface introduction
③Only supports video signal input, does not support power input.
④Supports both video signal input and power input.
⑤Supports both video signal input and power input.
Key Functions Introduction
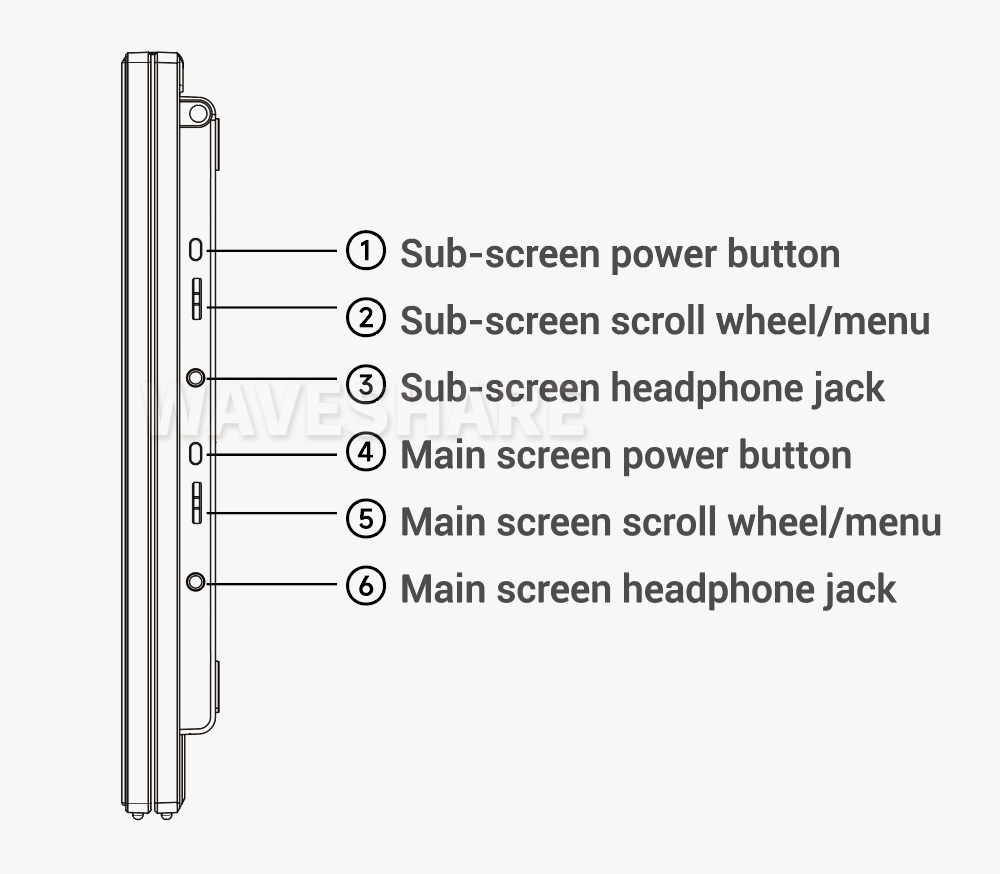
Menu invocation and closure
- You can invoke the menu for the main screen or the sub-screen by using the main screen menu key ⑤ or the sub-screen menu key ②, respectively.
- Once you have invoked the menu function, you can move the cursor up or down using the scroll wheel. If you need to confirm your selection, press the scroll wheel button. To exit the menu, press the power button.
- Press and hold the power button ①/④ to turn on or off the screen.
- Pressing the scroll wheel up or down can bring up the brightness adjustment for the corresponding screen, or it can bring up the volume adjustment. Then, by rolling the scroll wheel up or down, you can adjust the corresponding brightness or volume settings.
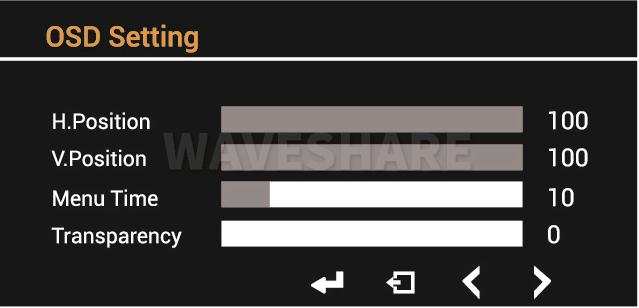
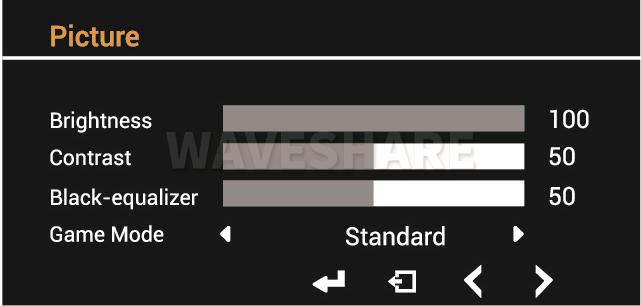
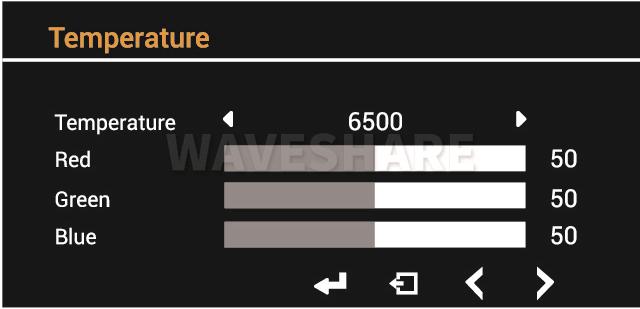
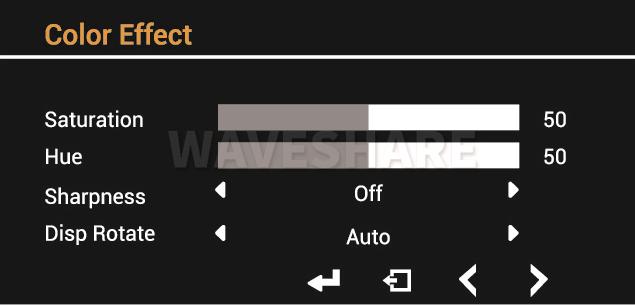
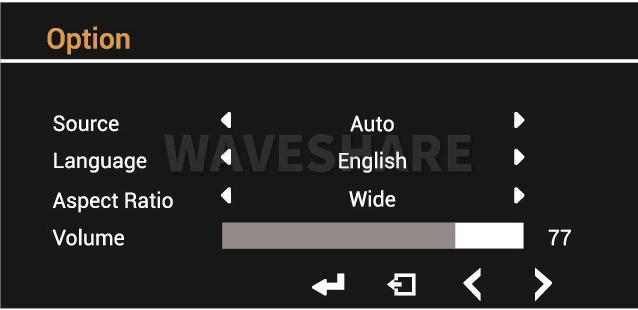
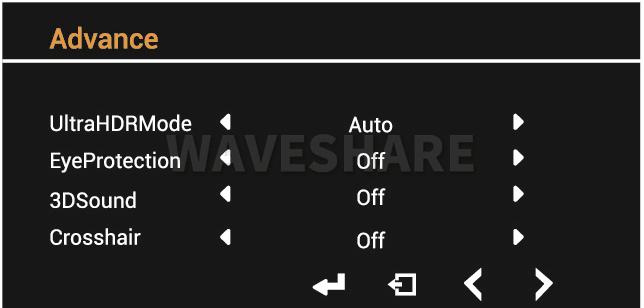
OSD Menu Introduction
Basic Functions
Color Settings
Language and Modes
Dual Screen Display Mode Adjustment Interface
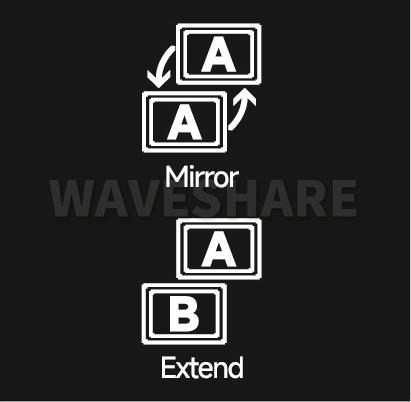
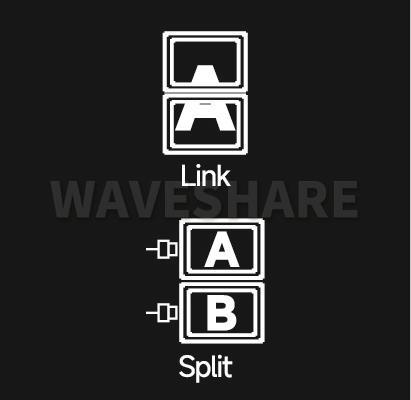
This setting is for adjusting the connection relationship between the dual screens of this monitor
- Mirror Mode
In this mode, the sub-screen of the dual screens duplicates the main screen, displaying the same image. It shows one signal in the device, and under device adjustment, it can be mirrored or extended with other monitors (or the built-in screen of a laptop).
- Extension Mode
This mode is only available for Windows system devices connected to the dual screens via Type-C interface at port ④ or port ⑤. In this mode, the dual screens display different images, showing two signals in the device, equivalent to connecting two monitors simultaneously. (This mode requires the computer to set the screen to extension mode first, and then select extension in the screen's OSD menu. This mode occupies two of the device's external monitor connection slots.)
- Waterfall Screen Mode
Also known as the vertical merge mode, in this mode, the dual screens are combined into one unit, showing one signal in the device. Under device adjustment, it can be mirrored or extended with other monitors (or the built-in screen of a laptop).
- Independent Picture Mode
In this mode, the main and sub-screens of the dual screens have independent signals, allowing for the connection of two different devices.
User Guide
Working with Raspberry Pi
Hardware Connection
1. Use a 5V 3A power adapter to power the LCD.
2. Connect the mini HDMI interface of LCD to the HDMI interface of Raspberry Pi.
Software Setting
For Raspberry Pi OS/Ubuntu/Kali and Retropie systems.
- 1. Connect TF card to PC, download and use Raspberry Pi Imager to burn the corresponding system image.
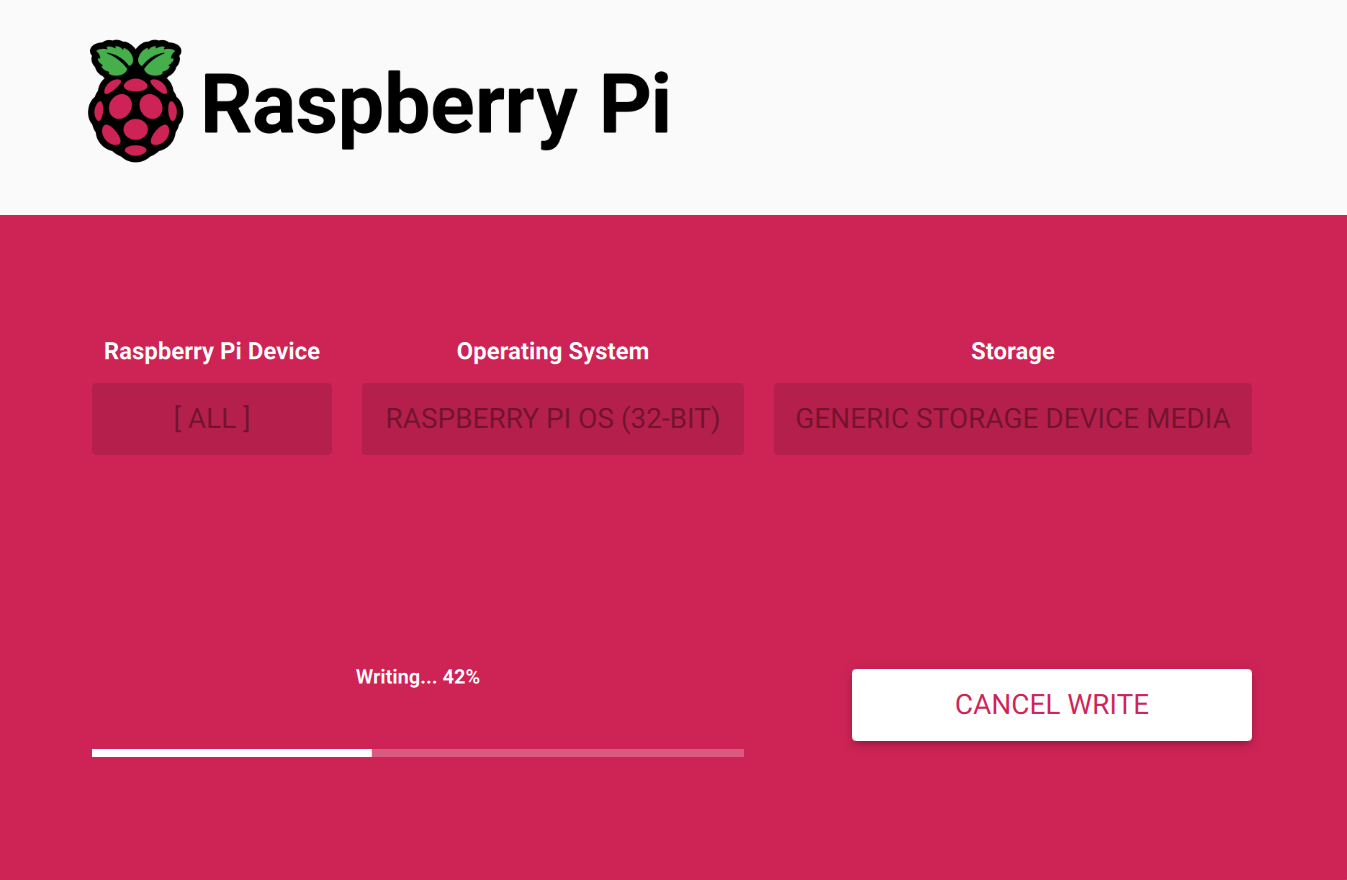
- 2. After image burning is completed, insert TF card into Raspberry Pi and power on Raspberry Pi, and wait for a few seconds before entering the system display interface.
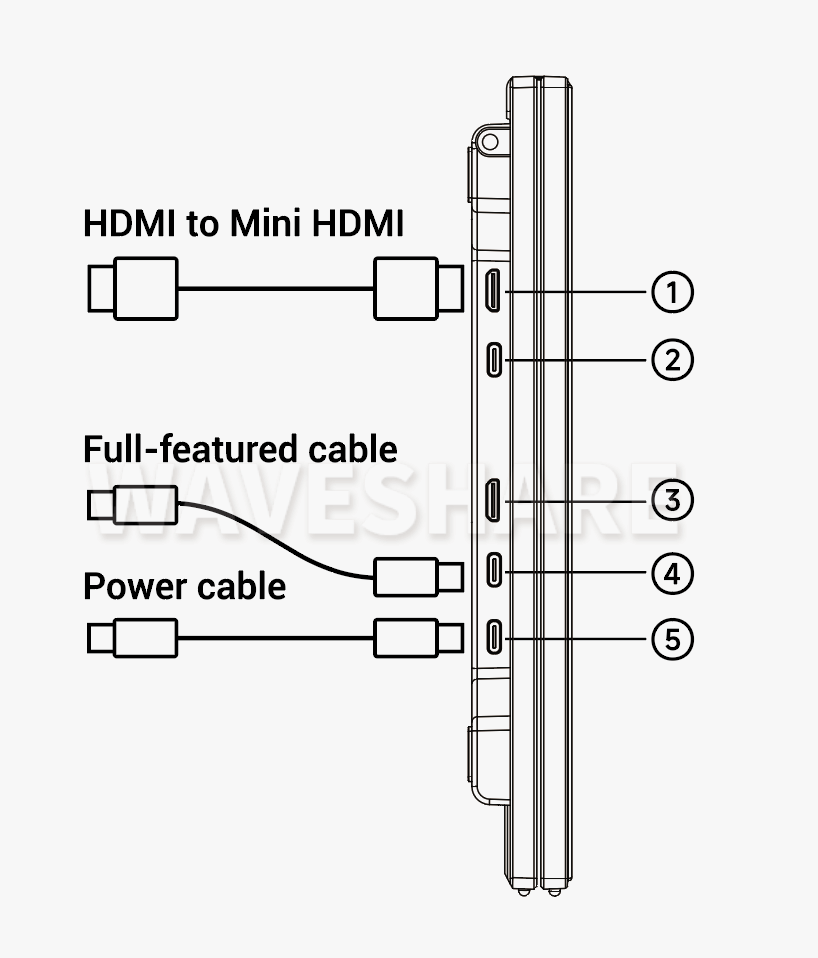
Use a single multi-function cable to connect
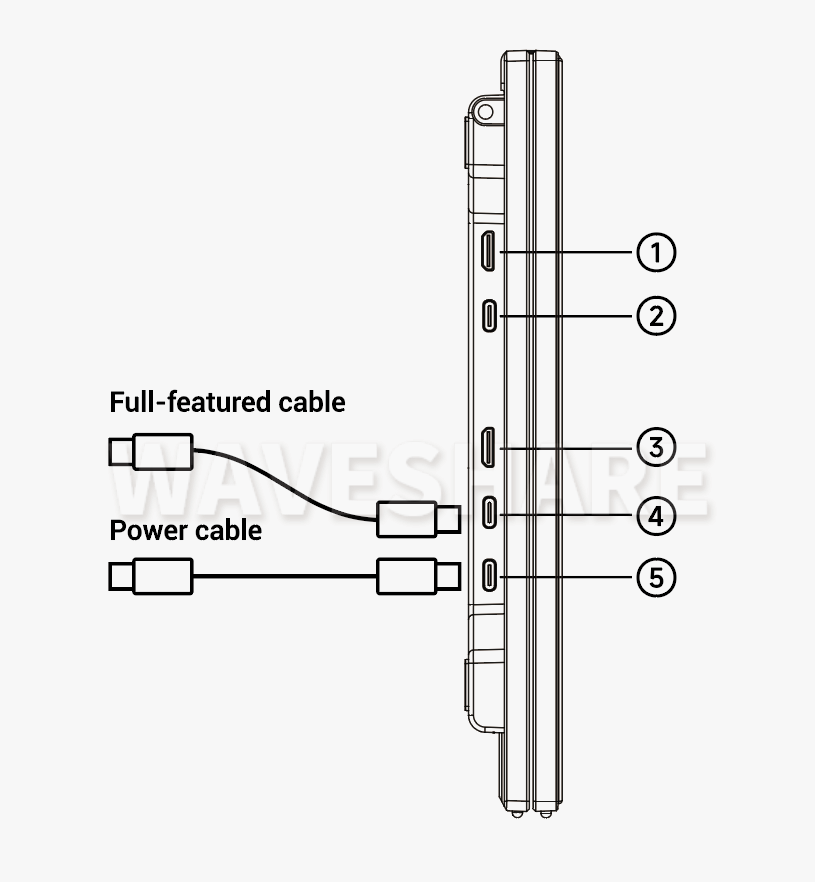
Connect the device's multi-function port to the monitor's port ④ using the included multi-function cable, and then connect the power cable from port ⑤ to the adapter to power the monitor for normal use.
Note 1: This connection method supports the monitor's mirror, waterfall, and independent modes.
Note 2: Suitable for devices with a multi-function port.
Use a HDMI cable to connect
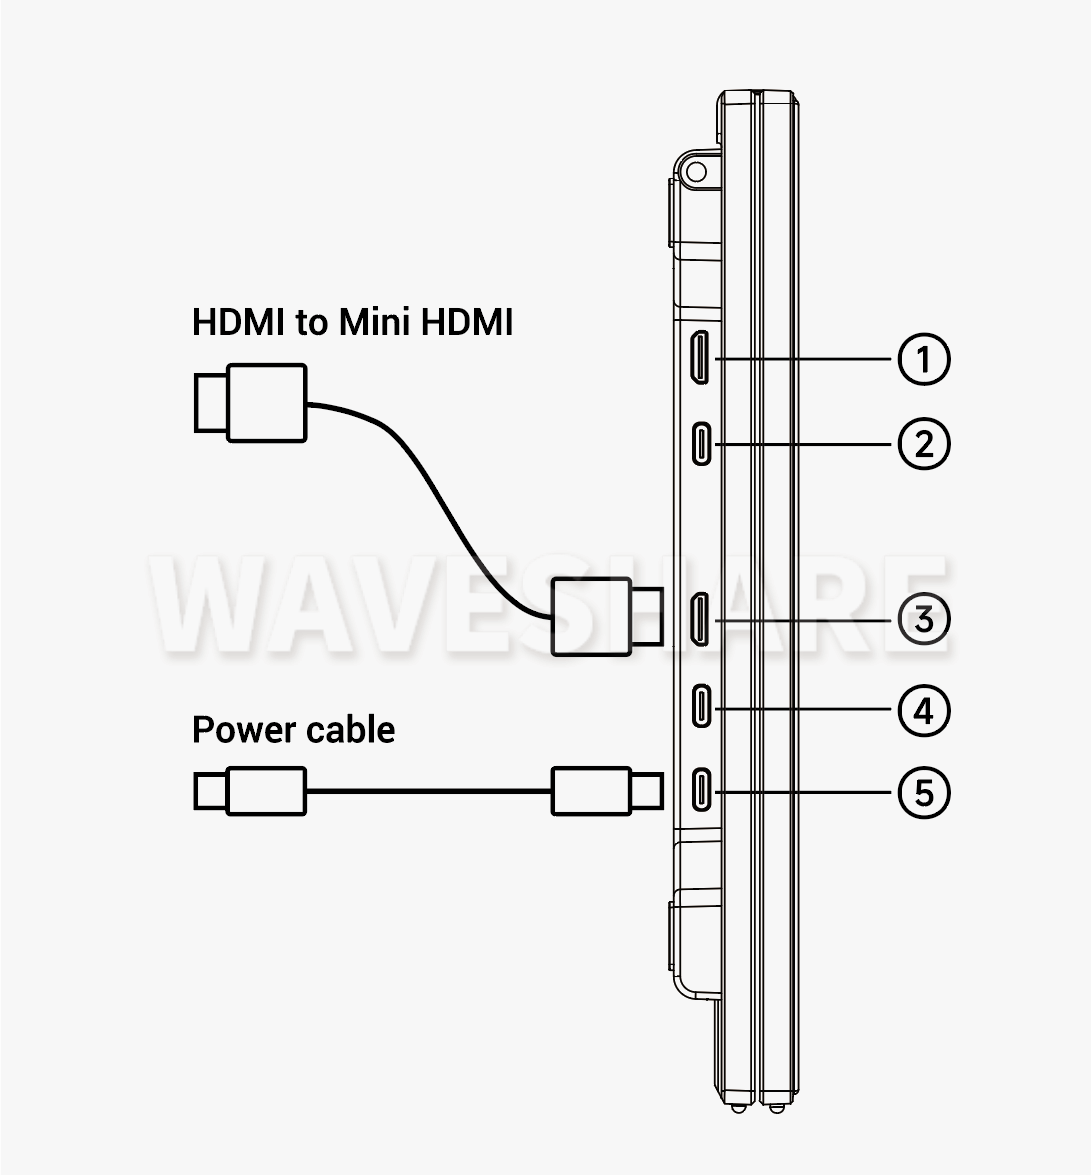
Connect the device's HDMI to the monitor's port ③ using the included HDMI to Mini HDMI cable, and then connect the power cable to port ⑤ to power the monitor for normal use.
Note 1: This connection method supports the monitor's mirror, waterfall, and independent modes.
Note 2: Suitable for desktop and laptop computers with only one HDMI interface (or other video output ports converted to HDMI).
Use two HDMI cables to connect
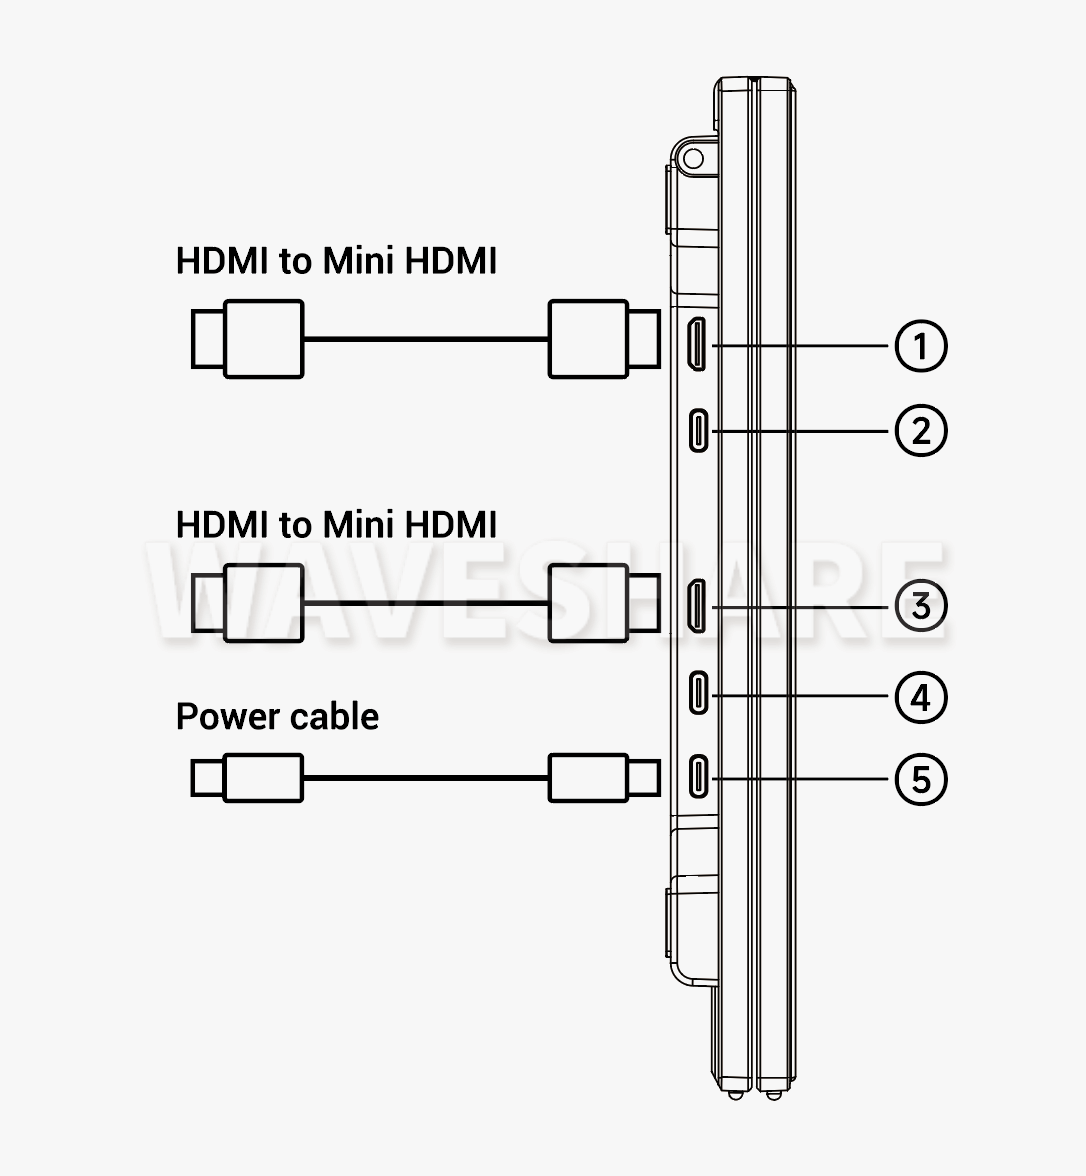
Connect the device's HDMI to the monitor's ports ① and ③ using two HDMI to Mini HDMI cables from the included accessories, and then connect the power cable to port ⑤ to power the monitor for normal use.
Note 1: This connection method supports the monitor's mirror, waterfall, and independent modes.
Note 2: Suitable for desktop and laptop computers with two HDMI interfaces (or other video output ports converted to HDMI).
Note 3: Using the independent mode can achieve an extended display effect.
Use MacOS system products (including Mac book, Mac mini, etc.)
Use a single multi-function cable to connect
Connect the device's multi-function port to the monitor's port ④ using the included multi-function cable, and then connect the power cable from port ⑤ to the adapter to power the monitor for normal use.
Note 1: This connection method supports the monitor's mirror, waterfall, and independent modes.
Note 2: Suitable for devices with only one external monitor connection, such as Mac Book with MI/2/3.
Use two multi-function cables to connect
Connect the device's multi-function ports to the monitor's ports ② and ④ using two multi-function cables from the included accessories, and then connect the power cable to port ⑤ to power the monitor for normal use.
Note 1: This connection method supports the monitor's mirror, waterfall, and independent modes.
Note 2: Suitable for devices with two or more external monitor connections, such as M1/2/3 Mac mini, M1/2/3 Pro/Max Mac Book and Mac mini.
Note 3: Using the independent mode can achieve an extended display effect.
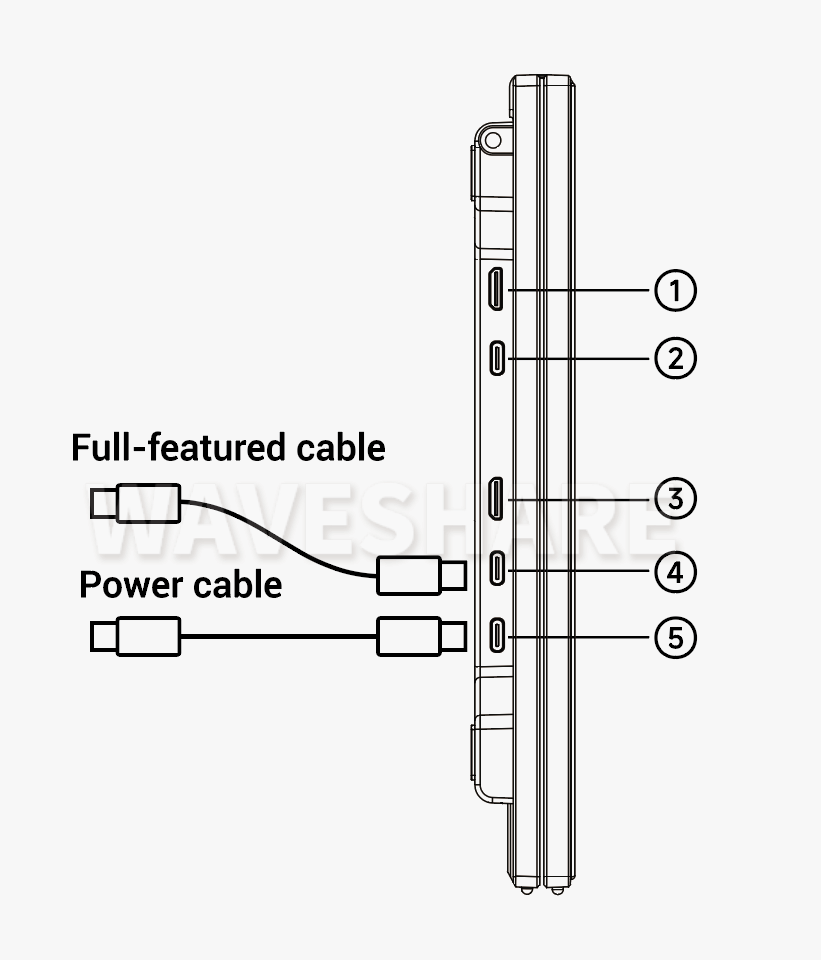
Use one multi-function cable and one HDMI cable to connect
Connect the device's multi-function port to the monitor's port ④ using the included multi-function cable, then connect the HDMI to Mini HDMI cable to port ①, and then connect the power cable to port ⑤ to power the monitor for normal use.
Note 1: This connection method supports the monitor's mirror, waterfall, and independent modes.
Note 2: Suitable for desktop and laptop computers with two HDMI interfaces (or other video output ports converted to HDMI).
Note 3: Using the independent mode can achieve an extended display effect.
Work with smartphones/tablets

Connect the device's multi-function port to the monitor's port ④ using the included multi-function cable, and then connect the power cable from port ⑤ to the adapter to power the monitor for normal use.
Note 1: This connection method supports the monitor's mirror, waterfall, and independent modes.
Note 2: Only supports smartphones and tablets with a Type-C interface and wired screen casting capabilities. It is recommended to use the independent mode in conjunction with other devices.
Work with gaming consoles/TV boxes/cameras
Use a HDMI cable to connect

Connect the device's HDMI to the monitor's port ③ using the included HDMI to Mini HDMI cable, and then connect the power cable to port ⑤ to power the monitor for normal use.
Note 1: This connection method supports the monitor's mirror, waterfall, and independent modes.
Note 2: Suitable for most devices with an HDMI port, such as PS5, X BOX, TV boxes, cameras.
Note 3: Some devices do not support a 16:10 aspect ratio, which may cause the image to be stretched.
Use a multi-function cable to connect

Connect the device's multi-function port to the monitor's port ④ using the included multi-function cable, and then connect the power cable from port ⑤ to the adapter to power the monitor for normal use.
Note 1: This connection method supports the monitor's mirror, waterfall, and independent modes.
Note 2: Suitable for devices with a multi-function interface, such as the Nintendo Switch.
Note
- Only the main screen has speakers.
- MacOS devices are currently not compatible with the daisy-chain technology used by the monitor, which prevents the multi-function cable from outputting two video signals. Therefore, two multi-function cables are required for the connection methods mentioned earlier.
- If the system freezes when switching between dual-screen display modes, try switching the mode and then reconnecting the device.
- In independent mode, if the sub-screen has a signal input, it will not change when switching to mirror mode.
- The maximum number of external screens supported by an external device is determined by the hardware and performance of the device. The following are examples.
(For the exact number of screens supported by a specific external device, it is recommended to consult the customer service or the official website of the device, as actual support may vary.)
- It is recommended to use external power for all connections to avoid flickering and other issues.
- Frequent switching of display modes may cause excessive data throughput at the connection end, which could lead to abnormalities. If this occurs, you may need to reinsert or restart the connected device.
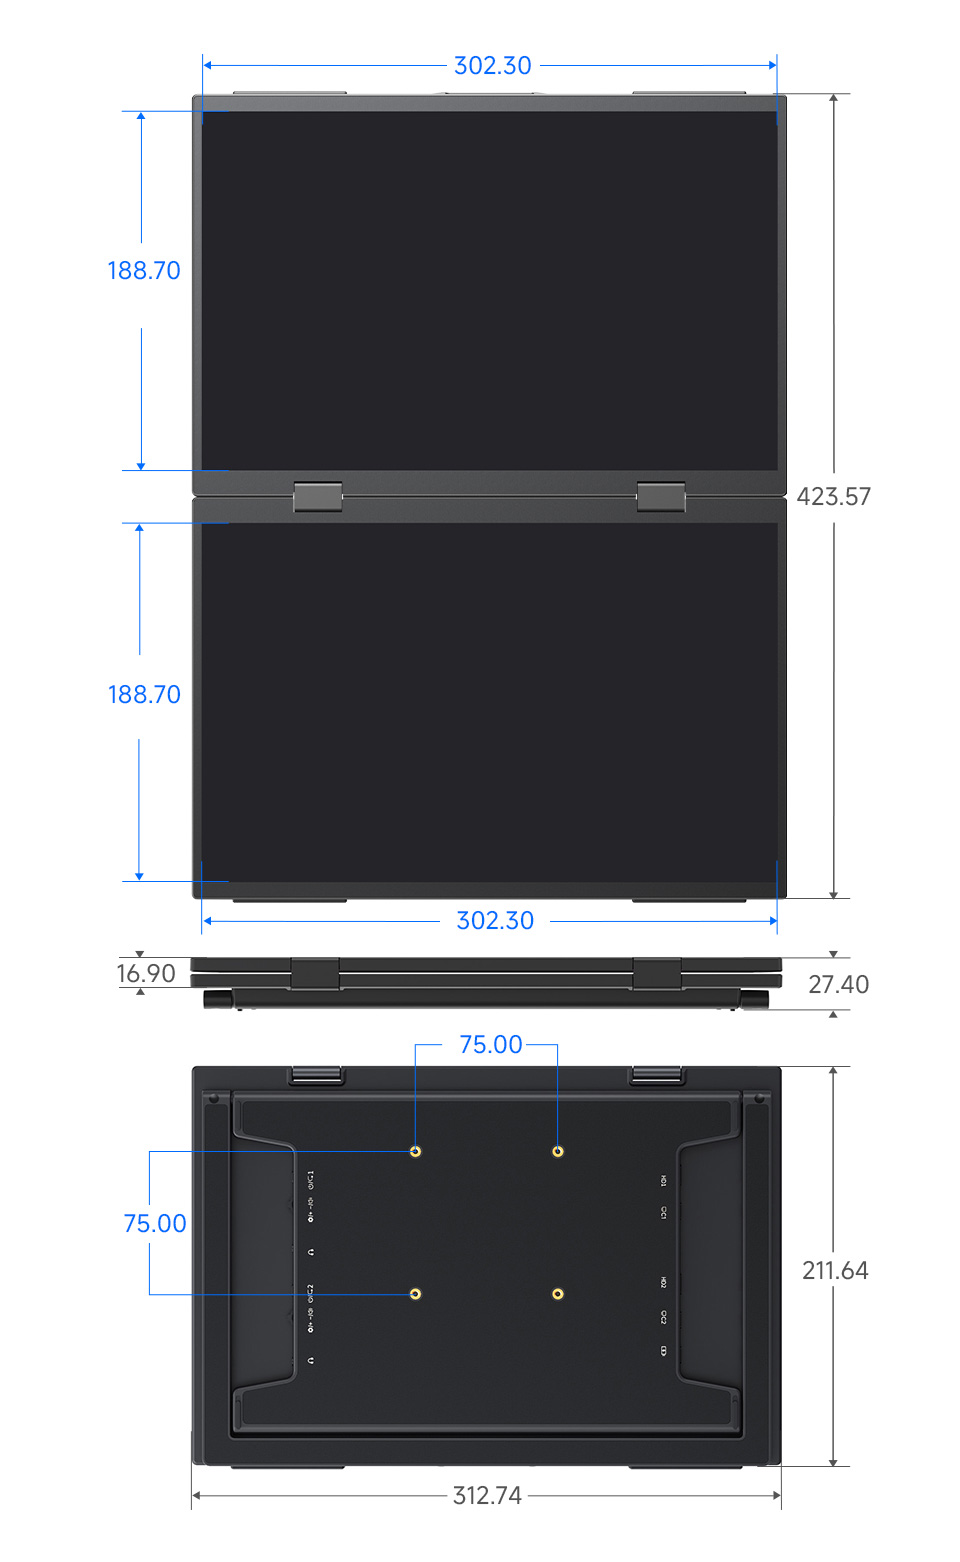
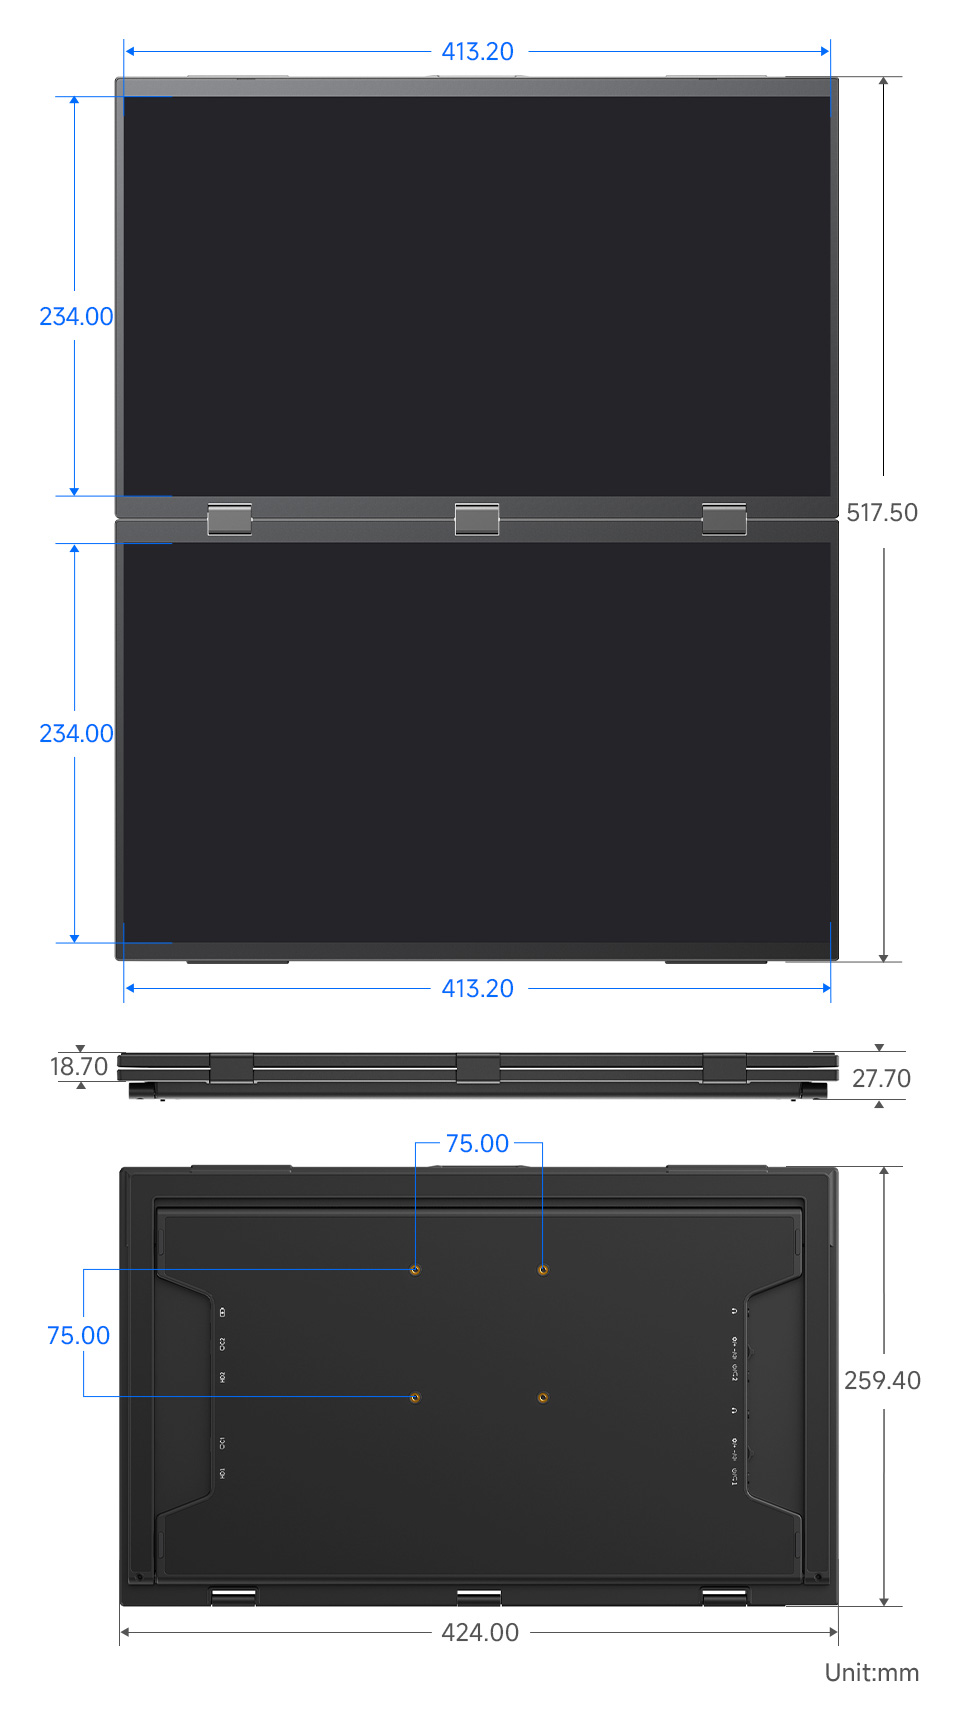
Dimensions
14inch dual-screen
15.6inch dual-screen
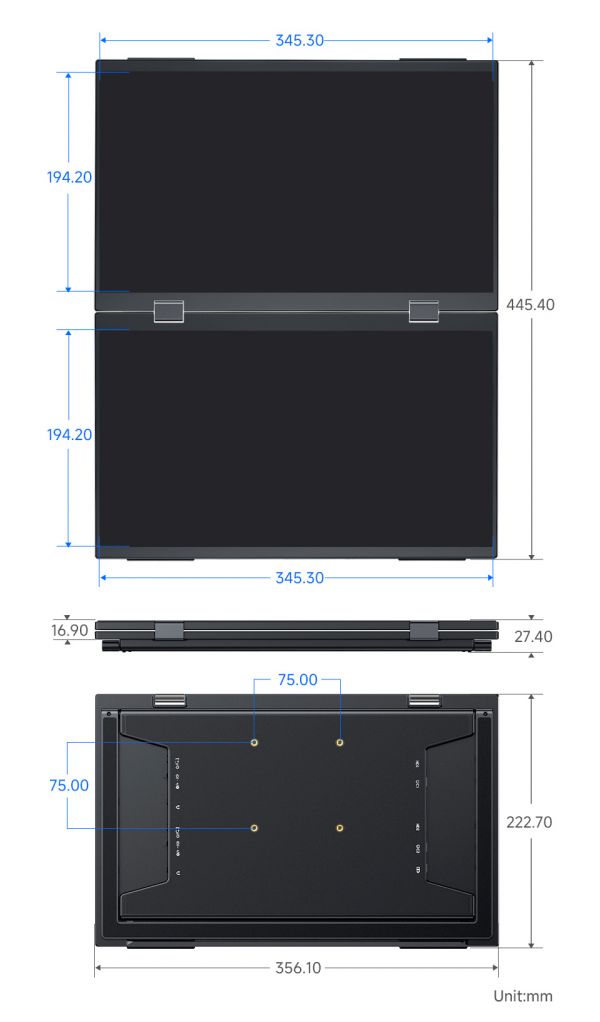
18.5inch dual-screen
Support
Monday-Friday (9:30-6:30) Saturday (9:30-5:30)
Email: services01@spotpear.com
[Tutorial Navigation]
- Features
- Interface and Button Functions
- Interface Introduction
- The upper screen (sub-screen) interface introduction
- The lower screen (main screen) interface introduction
- Key Functions Introduction
- OSD Menu Introduction
- User Guide
- Working with Raspberry Pi
- Work with Microsoft system related devices
- Use a single multi-function cable to connect
- Use a HDMI cable to connect
- Use two HDMI cables to connect
- Work with Apple related devices
- Use a single multi-function cable to connect
- Use two multi-function cables to connect
- Use one multi-function cable and one HDMI cable to connect
- Work with smartphones/tablets
- Work with gaming consoles/TV boxes/cameras
- Note
- Dimensions
- Support