- sales/support
Google Chat:---
- sales
+86-0755-88291180
- sales01
sales@spotpear.com
- sales02
dragon_manager@163.com
- support
tech-support@spotpear.com
- CEO-Complaints
zhoujie@spotpear.com
- sales/support
WhatsApp:13246739196
- HOME
- >
- ARTICLES
- >
- Common Moudle
- >
- Camera
OV5640 5MP USB Camera (A) User Guide
Introduction
USB Camera, OV5640 sensor. 5 megapixel. Supports UVC protocol.
Specification
- Pixel: 5MP
- Resolution: 2592 × 1944
- Sensor: OV5640
- DSP: Automatic white balance(AWB)\Automatic exposure(AEC)\Automatic gain control(AGC)
- Camera Specification:
- CCD Size: 1/4 inch
- Aperture (F): 2.1
- Focus Length (EFL): 2.5 mm
- Field of View (FOV): 135°(D) 95°(H) 70°(V)
- Focus Type: AF
- Interface: USB1.0
- Image:
- Image Format: MJPG, YVY2
- Image Resolution: 2592 × 1944
- Video:
- 5 FPS 2592 × 1944 (FULL)
- 15 FPS 1920 × 1080 (HD)
- 15 FPS 1280 × 720 (720P)
- Working voltage: 5V ± 5%
- Working Temperature: 0°C ~ 50°C
- Lens Size: 18.00 × 18.00 × 19.39 mm
- Dimension: 18.00 × 36.00 mm
- Support OS: Windows, Linux, MacOS
Working with Windows PC
Test Software
Most of the Windows 10 PC has pre-install Camera software, you can use it to test the USB camera.
If your PC doesn't have Camera software, you can also download the AMCap test software from Resouce->Software and test.
Testing
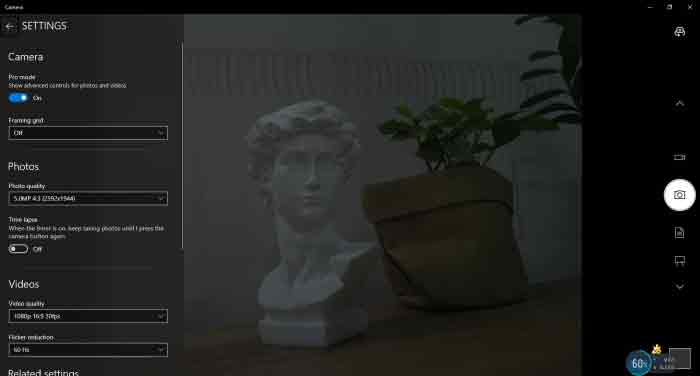
- Use Camera software of Windows
- Search "Camera" and open the software.
- Click the setting icon of the top-left to configure the image/video.

- You can click the icons on the right to switch between Image Capture or Video Recording.
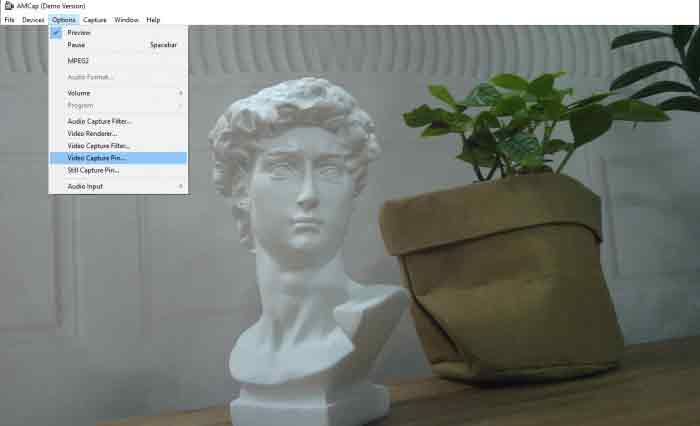
- AMCap Software
- Download and install the AMCap software.
- You can click the Options option, choose Video Capture Pin... or Still Capture Pin... to configure image/video.

Working with Raspberry Pi
- Open a terminal of Raspberry Pi (You can use Ctrl+Alt+T shortcut)
- Edit the modules file:
sudo nano /etc/modules
- Add the following command in the document and save:
bcm2835-v4l2
- Ues command sudo raspi-config to open the configuration
- Choose Interface Option -> Camera -> Yes to enable camera and reboot.
- Open a Terminal of Pi and install luvcview tool with the following command
- sudo apt-get install luvcview -y
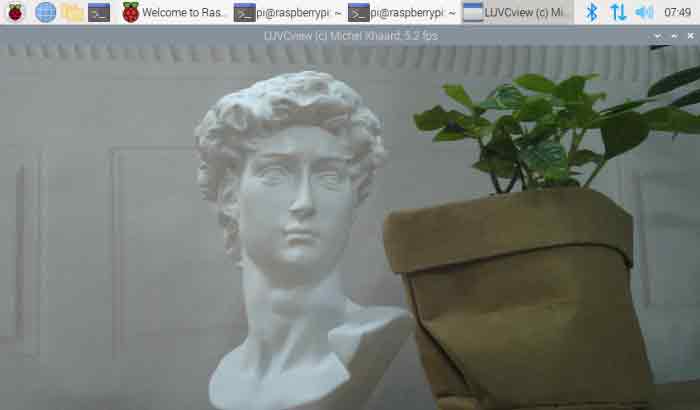
- After installing, use the following command to test the USB camera.
- sudo luvcview -s 1920 x 1080

Working with Jetson Nano Developer Kit
- Open a terminal of Jetson Nano Developer Kit (You can use the Ctrl+Alt+T shortcut or open it by Mouse)
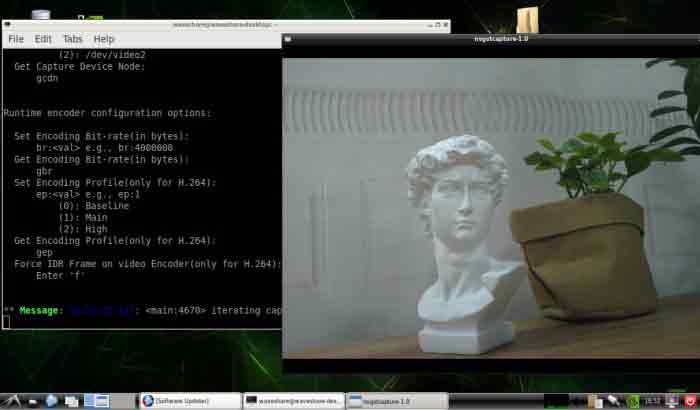
- Use the following command for previewing:
- nvgstcapture-1.0 --camsrc=0
- With the command, a preview window is opened

【Notice】You may need to use the camera by script/codes, in this case, you can refer to tools/libraries like Opencv yourself.
TAG:
RS485 to RJ45
Raspberry Pi 5 Box Case Ki-A PCIe to RJ45 Gigabit Ethernet All Ports To Pi's USB Side
Raspberry Pi UART
3D Display
NVIDIA
Raspberry Pi IR Thermal Imaging Camera
LuckFox Pico
USB To CAN
GC2083
LuckFox
CAN FD Analyzer
ESP32 MLX90641
ESP32 IR Thermal Imaging Camera
RTL8723 WIFI SDIO Expansion Module Board For Luckfox Pico Mini B /Luckfox Pico Plus /Luckfox Pico Pro /Luckfox Pico Max
STM32 1.54inch OLED
Raspberry Pi Autofocus Camera
PC Secondary Screen
Sipeed RISCV LicheeRV Nano Super-Mini SG2002 AI RAM-256MB
Modbus POE ETH Relay Waveshare User Guide
Raspberry Pi RTC WatchDog HAT (B)
TAG:
Raspberry Pi GPS GNSS Expansion Board L76K Beidou (BDS) GLONASS QZSS A-GNSS Also For Jeston
Microchip Official PICkit 5 Debugger Programmer Android MPLAB
Raspberry Pi
5inch USB Monitor
Case For VisionFive2 Lite Cooling Enclosure Aluminum Alloy Material Cooling Fan With Camera Mount
RDK X3 Case
Raspberry-Pi-Game-1.54inch-LCD-touchscreen-display-ST7789
SpeedyBee F405 WING APP Flight Controller FC ArduPilot INAV Drone
24GHz mmWave Radar Sensor for SeeedStudio-XIAO Human Static Presence FMCW Arduino Home Assistant ESPHome
Jetson Nano Fan
Raspberry Pi Official Original USB 3 Hub 4 High Speed USB
Raspberry Pi USB Camera 12MP IMX577 Distortion-Free USB 2.0 For Jeston RDK C/CS Mount Lens
Raspberry Pi 7inch DSI LCD B Display MIPI IPS 800x480 Capacitive TouchScreen
ESP32 C3 Round LCD Electronic EYE 0.71 inch Display Watch Screen GC9D01 160x160
Raspberry Pi 5 Argon-NEO-M.2-NVME-PCIE-Expansion-Board Argon NEO 5 Case
USB to SPI
Raspberry Pi USB Camera 12MP IMX577 Distortion-Free USB 2.0 For Jeston RDK
Raspberry Pi 5 27W
ESP32-S3 AI RLCD Total Reflection Screen 4.2 inch Development Board Deepseek
ESP32 C3 ST7789


