


- sales/support
Google Chat:---
- sales
+86-0755-88291180
- sales01
sales@spotpear.com
- sales02
dragon_manager@163.com
- support
tech-support@spotpear.com
- CEO-Complaints
zhoujie@spotpear.com
- Only Tech-Support
WhatsApp:13246739196
- Purchase/Shipping/Refund
WhatsApp:13424403025
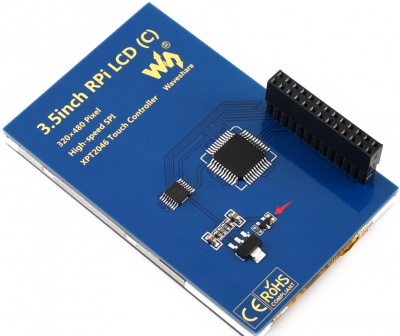
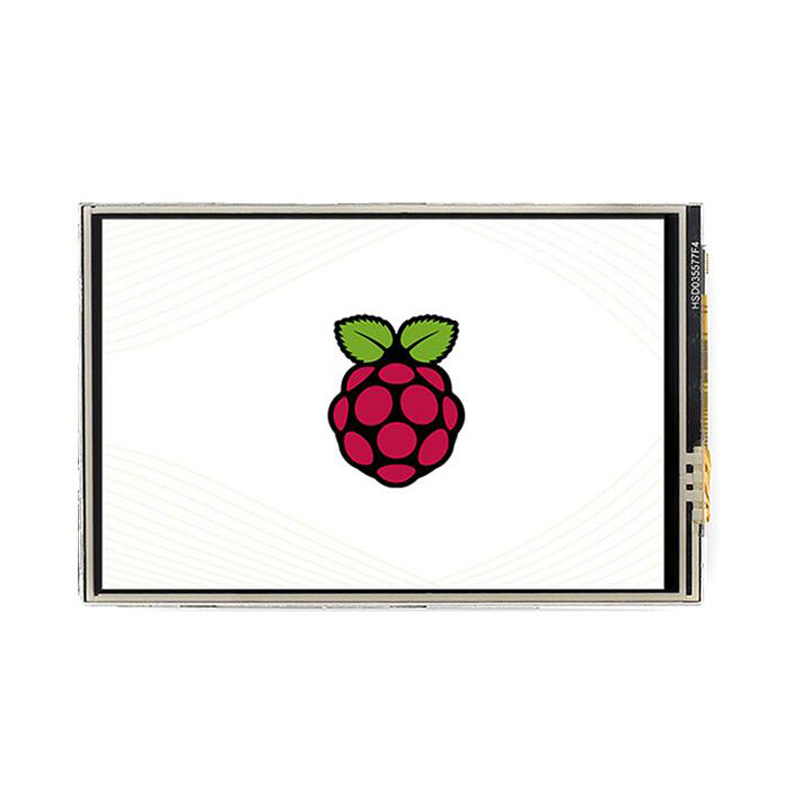
Raspberry Pi 3.5inch RPi LCD (C) User Guide
Introduction
480x320, 3.5 inch Touch Screen TFT LCD Designed for Raspberry Pi, 125MHz High-Speed SPIi
Features
- 800×480 hardware resolution
- Resistive touch control
- It is compatible and can be directly inserted in any version of Raspberry Pi.
- Support 125MHz high-speed SPI signal transmission, which makes the screen display clear and stable.
- Drivers provided (works with your own Raspbian/Ubuntu/Kali and Retropie system directly)
- Support FBCP software driver, can set the software resolution and dual screen display.
- Gold sinking process, fine carving.
Getting Started
Hardware Connection
- There are 40 pins on Raspberry Pi but only 26 pins on the LCD, so you should pay attention to connecting the pins to your Pi accordingly.
Install the touch driver
The RPi LCD can be driven in two ways: Method 1. install driver to your Raspbian OS. Method 2. use the Ready-to-use image file of which LCD driver was pre-installed.
Method 1. Driver installation
Please download the latest version of the image on the Raspberry Pi official website. (Raspbian/Ubuntu Mate/Kali or Retropie)
1) Download the compressed image file to the PC, and unzip it to get the .img file.
2) Connect the TF card to the PC, open the Win32DiskImager software, select the system image downloaded in step 1 and click‘Write’ to write the system image. ( How to write an image to a micro SD card for your Pi? See RPi Image Installation Guides for more details)
3) Connect the TF card to the Raspberry Pi, start the Raspberry Pi. The LCD will display after booting up, and then log in to the Raspberry Pi terminal.(You may need to connect a keyboard and HDMI LCD to Pi for driver installing, or log in remotely with SSH)
4) Then open the terminal of Raspberry Pi to install the touch driver.
git clone https://github.com/waveshare/LCD-show.git
cd LCD-show/
Note: The Raspberry Pi must be connected to the network, or else the touch driver won't be successfully installed.
chmod +x LCD35C-show
 ./LCD35C-show
The touch function will work after restart. For ease of use, you can set the screen orientation, see: #Screen orientation settings.
Notes:
- 1. Executing apt-get upgrade will cause the LCD to fail to work properly. In this case, you need to edit the config.txt file in the SD card and delete this sentence: dtoverlay=ads7846.
- 2. Using with Raspbian-lite, the command of the touch driver installation should be:
./LCD35C-show lite
Method 2. Using Ready-to-use image
The image file with pre-installed driver is located in the IMAGE directory of the CD, or you can download it from #Image. Extract the .7z file and you will get an .img file. Write the image to your micro SD card (How to write an image to a micro SD card for your Pi? See RPi Image Installation Guides for more details). Then insert the card to your Pi, power up and enjoy it.
Toggle between LCD and HDMI display
Once this LCD is enabled, meanwhile the default settings for HDMI are changed. If you want to use another HDMI monitor, please run the following command:
cd LCD-show/
 ./LCD-hdmi
This toggles the mode to LCD display:
./LCD35C-show
Screen orientation settings
After touch driver installed, the screen orientation can be set by these commands:
- 0 degree rotation
cd LCD-show/
./LCD35C-show 0
- 90 degree rotation
cd LCD-show/
./LCD35C-show 90
- 180 degree rotation
cd LCD-show/
./LCD35C-show 180
- 270 degree rotation
cd LCD-show/
./LCD35C-show 270
Touch screen calibration
This LCD can be calibrated through the xinput-calibrator program. Note: The Raspberry Pi must be connected to the network, or else the program won't be successfully installed.
- Run the following command to install:
sudo apt-get install xinput-calibrator
- Click the "Menu" button on the taskbar, choose "Preference" -> "Calibrate Touchscreen".
- Finish the touch calibration following the prompts. Maybe rebooting is required to make calibration active.
- You can create a 99-calibration.conf file to save the touch parameters (not necessary if file exists).
sudo mkdir /etc/X11/xorg.conf.d
sudo nano /etc/X11/xorg.conf.d/99-calibration.conf
- Save the touch parameters (may differ depending on LCD) to 99-calibration.conf, as shown in the picture:
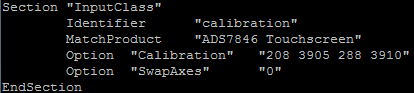
- Press the keys Ctrl+X, and select option Y to save the modification.
- The modification will be valid after rebooting the system. Enter the following command for system reboot:
sudo reboot
Notices: In case of inaccurate touch, please perform screen calibration again and reboot the system.
Install Virtual Keyabord
1. Install matchbox-keyboard
sudo apt-get install update
sudo apt-get install matchbox-keyboard
sudo nano /usr/bin/toggle-matchbox-keyboard.sh
2. Copy the statements below to toggle-matchbox-keyboard.sh and save.
#!/bin/bash
#This script toggle the virtual keyboard
PID=`pidof matchbox-keyboard`
if [ ! -e $PID ]; then
killall matchbox-keyboard
else
matchbox-keyboard -s 50 extended&
fi
3. Execute the commands:
sudo chmod +x /usr/bin/toggle-matchbox-keyboard.sh
sudo mkdir /usr/local/share/applications
sudo nano /usr/local/share/applications/toggle-matchbox-keyboard.desktop
4. Copy the statements to toggle-matchbox-keyboard.desktop and save.
[Desktop Entry]
Name=Toggle Matchbox Keyboard
Comment=Toggle Matchbox Keyboard`
Exec=toggle-matchbox-keyboard.sh
Type=Application
Icon=matchbox-keyboard.png
Categories=Panel;Utility;MB
X-MB-INPUT-MECHANSIM=True
5. Execute commands as below. Note that you need to use "Pi " user permission instead of root to execute this command
nano ~/.config/lxpanel/LXDE-pi/panels/panel
6. Find the statement which is similar to below: (It maybe different in different version)
Plugin {
type = launchbar
Config {
Button {
id=lxde-screenlock.desktop
}
Button {
id=lxde-logout.desktop
}
}
7. Append these statements to add an button option:
Button {
id=/usr/local/share/applications/toggle-matchbox-keyboard.desktop
}
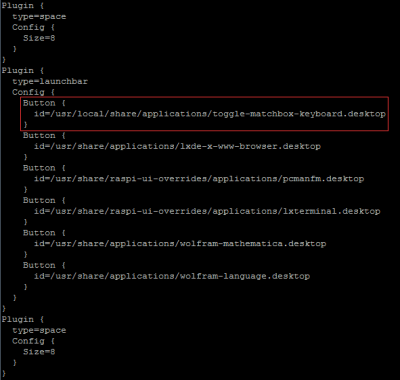
8. reboot your Raspberry Pi. If the virtual keyboard is installed correctly, you can find that there is a keyboard icon on the left of the bar
sudo reboot
How to work with a camera
1. Select "Enable Camera" -> "<YES>"
sudo raspi-config
2. Copy the Camera driver to the OS of Pi then:
unzip camera.zip
cd camera
sudo chmod 777 Camera
sudo cp update\ camera/95-stmpe.rules /etc/udev/rules.d/
3. Create a file called wheezy.list.
sudo nano /etc/apt/sources.list.d/wheezy.list
Append:
deb http://archive.raspbian.org/raspbian wheezy main
Exit with save.
4. Create a file called 10defaultRelease.
sudo nano /etc/apt/apt.conf.d/10defaultRelease
Append:
APT::Default-release \"stable";
Exit with save.
5. Create a file called libsdl.
sudo nano /etc/apt/preferences.d/libsdl
Append:
Package: libsdl1.2debian
Pin: release n=jessie
Pin-Priority: -10
Package: libsdl1.2debian
Pin: release n=wheezy
Pin-Priority: 900
Exit with save.
6. Last, execute the commands:
sudo apt-get update
sudo apt-get -y --force-yes install libsdl1.2debian/wheezy
sudo apt-get install evtest tslib libts-bin xinput
sudo apt-get install python-pip
sudo apt-get install python2.7-dev
sudo pip install picamera==1.10
sudo reboot
sudo TSLIB_FBDEVICE=/dev/fb1 TSLIB_TSDEVICE=/dev/input/touchscreen ts_calibrate
Camera will be enabled by the steps above.
Interface
| PIN NO. | SYMBOL | DESCRIPTION |
|---|---|---|
| 1, 17 | 3.3V | Power positive (3.3V power input) |
| 2, 4 | 5V | Power positive (5V power input) |
| 3, 5, 7, 8, 10, 12, 13, 15, 16 | NC | NC |
| 6, 9, 14, 20, 25 | GND | Ground |
| 11 | TP_IRQ | Touch Panel interrupt, low level while the Touch Panel detects touching |
| 18 | LCD_RS | Command/data register selection |
| 19 | LCD_SI / TP_SI | LCD display/SPI data input of Touch Panel |
| 21 | TP_SO | SPI data output of Touch Panel |
| 22 | RST | Reset |
| 23 | LCD_SCK / TP_SCK | LCD display/SPI clock of Touch Panel |
| 24 | LCD_CS | LCD chip selection, low active |
| 26 | TP_CS | Touch Panel chip selection, low active |
Use GPIO to control backlight brightness
Solder a 0R resistor on this pand or solder directly to connect.
Execute the following commands in the Raspberry Pi terminal:
gpio -g pwm 18 1024
gpio -g mode 18 pwm
gpio pwmc 1000
Control brightness:
gpio -g pwm 18 X
X ranges from 0 to 1024