- sales/support
Google Chat:---
- sales
+86-0755-88291180
- sales01
sales@spotpear.com
- sales02
dragon_manager@163.com
- support
tech-support@spotpear.com
- CEO-Complaints
zhoujie@spotpear.com
- Only Tech-Support
WhatsApp:13246739196
- Purchase/Shipping/Refund
WhatsApp:13424403025
- HOME
- >
- ARTICLES
- >
- Common Moudle
- >
- LCD
10. Python drive LCD User Guide
Python drive LCD
1.Install python Development Environment
1.1 Install python library
sudo apt-get install python-pip python-dev build-essential
sudo pip install RPi.GPIO
During installation, if any prompt appears, select “Y” and press Enter key.
!Note:
If you have installed the python environment, it will be prompt you have installed it, you can ignore this step.
1.2 Install LCD drive library
Input following command:
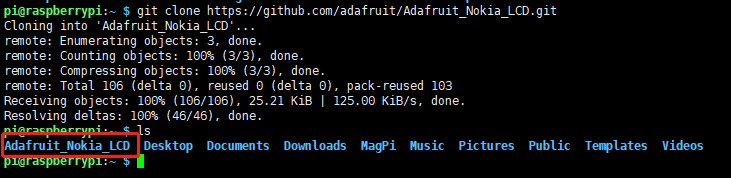
git clone https://github.com/adafruit/Adafruit_Nokia_LCD.git
After download is complete, you can see a Adafruit_Nokia_LCD folder in this directory.
As shown below:
Input following command to enter folder:
cd Adafruit_Nokia_LCD
sudo python setup.py install

After installation is complete, it will prompt version number of Adafruit_Nokia_LCD.

2. Import program
2.1 Transfer the driver file to the Raspberry Pi
You need to install the WinSCP tool on your computer. After connecting to the Raspberry Pi, transfer the lcd16_python.zip package from this folder to the pi directory of the Raspberry Pi. As shown blew, drag and drop lcd16_python.zip directly into the Raspberry Pi system.

2.2 Extract file
Open the Raspberry Pi terminal and find the lcd16_python.zip file.

Enter command:
unzip lcd16_python.zip
cd lcd16_python
ls
As shown below:
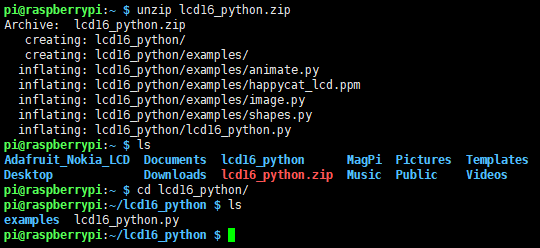
We can see lcd16_python.py file in lcd16_python folder, this is program drive LCD display Raspberry pi message. Some code in examples folder.
3. About code
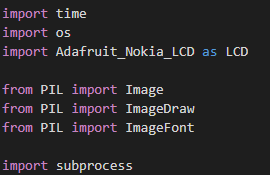
3.1 Import library we need.
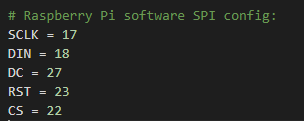
3.2 Define LCD pin.
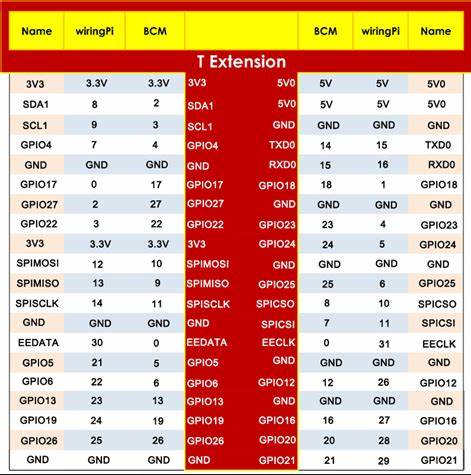
Pins comparison table, as shown below.
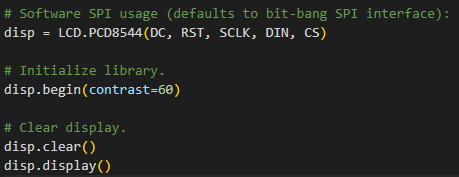
3.3 Initialize the LCD display and clear the screen display. Among them, the variable constrast sets contrast ratio (30 ~ 90). If the font display is not clear or dim, you can modify this value appropriately.
3.4 Create an Image object according to the size of the screen, and draw to perform the operation to be displayed.
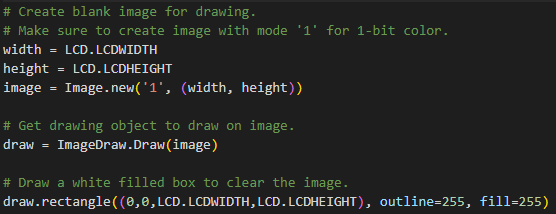
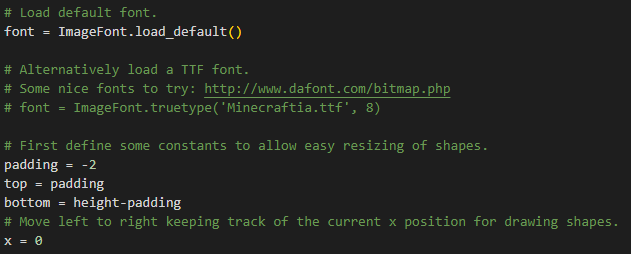
3.5 Set the Image font format as the default; set the initial position of the display, x represents the initial horizontal position, and top represents the initial vertical position.
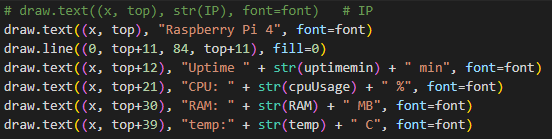
3.6 Obtain the IP address (not displayed by default, if necessary, you can cancel the previous # sign)

7. Get uptime, the default is the display format is minutes.

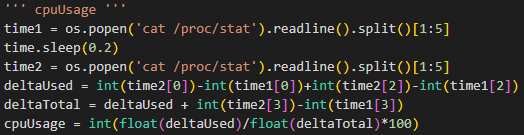
8. Obtain the CPU usage cpuUsage, and calculate the CPU usage by obtaining the system occupied resource time twice.
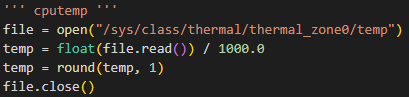
9. Get CPU current temperature cputemp, round (temp, 1) means save one decimal place.
10. Obtain the remaining memory freeRAM.

11. Add the value you just read to the draw. The IP is not displayed by default. If you need to display the IP, please remove “#” and add “#”the line where the Raspberry Pi 4 characters are displayed.
Note: This step just adds the data to the display, and it will not display it. You need to run disp.display () to display it normally.
12.Drive LCD display

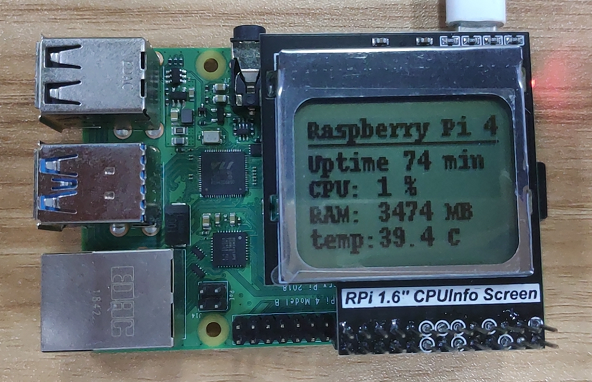
4. Experimental phenomena
Input following command:
python lcd16_python.py

We can see that the 1.6-inch LCD display already shows the information of the Raspberry Pi.