


- sales/support
Google Chat:---
- sales
+86-0755-88291180
- sales01
sales@spotpear.com
- sales02
dragon_manager@163.com
- support
tech-support@spotpear.com
- CEO-Complaints
zhoujie@spotpear.com
- Only Tech-Support
WhatsApp:13246739196
- Purchase/Shipping/Refund
WhatsApp:13424403025
- HOME
- >
- ARTICLES
- >
- Raspberry Pi
- >
- Raspberry Pi LCD
- >
- GPIO-SPI
L76K GPS HAT User Guide
Introduction
This item is a GNSS (Global Navigation Satellite System) module that supports multiple satellite systems including GPS, BeiDou (BDS), GLONASS, and QZSS, offering both multi-system joint positioning and single-system independent positioning. It supports A-GNSS functionality, features an internal low-noise amplifier and surface acoustic wave filter, and provides users with a fast, accurate, and high-performance positioning experience as a Raspberry Pi GNSS expansion board.
Specifications
| Specification Item | Specification | |
|---|---|---|
| GNSS System | Supported systems | GPS / GLONASS / BDS / QZSS |
| Chip platform | AT6558R | |
| L1 receiver | Channels | 32 tracking / 72 capturing |
| SBAS | Not supported | |
| A-GNSS | Supported | |
| Sensitivity | Auto-aquisition | -148dBm |
| Re-acquisition | -160dBm | |
| Tracking | -162dBm | |
| TTFF (Time to First Fix) | Cold start | 30s (Autonomous) 5.5s (With A-GNSS) |
| Warm start | 2s | |
| Accuracy metrics | Position accuracy | 2.0m CEP |
| Velocity accuracy | 0.1m/s | |
| Acceleration accuracy | 0.1m/s² | |
| Timing accuracy | 30ns | |
| Other items | Communication interface | UART |
| Serial baud rate | 4800bps~115200bps (Default 9600bps) | |
| Data update frequency | 1Hz (default) 5Hz (max) | |
| Supply voltage | 5V | |
| Total current | <55mA @5V (Continue mode) | |
| Communication protocol | NMEA 0183 CASIC proprietary protocol | |
| Operating temperature | -40℃ ~ 85℃ | |
| Product dimensions | 65.00mm×30.50mm | |
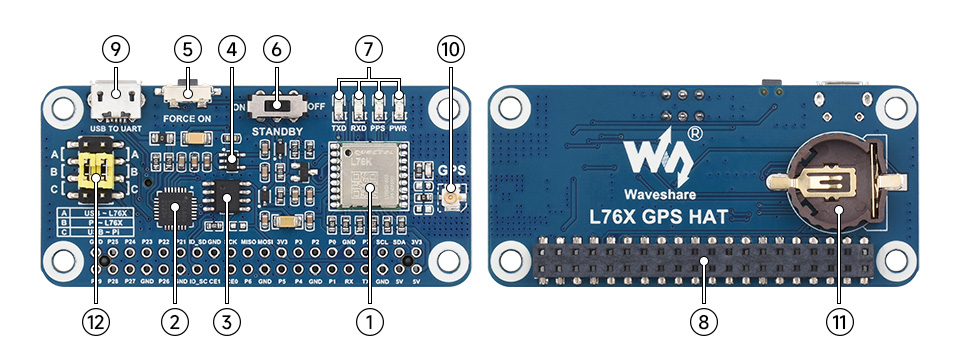
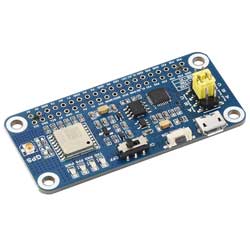
Onboard Resources
| Item | Description |
|---|---|
| ① L76K module | Main chip, supports GPS, Beidou (BDS), GLONASS, and QZSS multiple satellite systems |
| ② CP2102 | USB to UART chip |
| ③ CAT24C32 | EEPROM storage chip Provides ID EEPROM for Raspberry Pi (including vendor information, GPIO mapping, and valid device tree information). This was added because of the micro-HAT (uHAT) specification introduced by the Raspberry Pi (see for details). This is to ensure consistency and compatibility with future Raspberry Pi add-on boards and provide a better user experience. Note: We did not use this, so you can ignore it. |
| ④ RT9193-33 | Power chip |
| ⑤ Galaxy configuration button | Defaults to GPS + GLONASS combination; Press Force ON button and restart the module with a GPS + BDS combination |
| ⑥ Standby mode switch | Standby mode: Setting the STANDBY switch to ON allows the module to enter Standby mode, which is a low-power mode. In this mode, the module stops satellite search and navigation, and no positioning information (NMEA messages) is output, but it can still be accessed via commands or any other data. |
| ⑦ Status indicator | RXD/TXD: Serial port receive/transmit indicator; PPS: GPS status indicator; PWR: Power indicator |
| ⑧ Raspberry Pi GPIO interface | Convenient for connecting to Raspberry Pi |
| ⑨ USB TO UART interface | Convenient for connecting to PC and other hosts |
| ⑩ GNSS antenna interface | Connect GNSS antenna to be placed under visible sky |
| ⑪ ML1220 battery holder | Can connect to ML1220 rechargeable battery for power failure data preservation and warm start |
| ⑫ UART selection jumper cap | A: USB to serial port control L76K B: Raspberry Pi control L76K C: USB to serial port access Raspberry Pi |
Windows Serial Port Debugging
- Install the CP2102 driver; set the serial port of the module to A (yellow jumper), and communicate with the L76K via the USB port.
- Connect the antenna, plug in the USB cable, and then connect to the computer. As shown in the figure, after the connection, the power indicator (PWR) stays on.
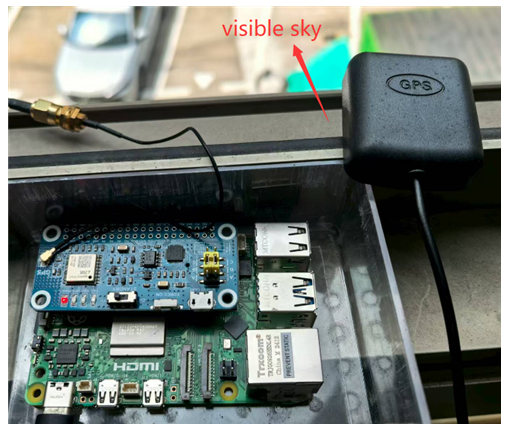
- Place the other end of the antenna where you can see the sky.
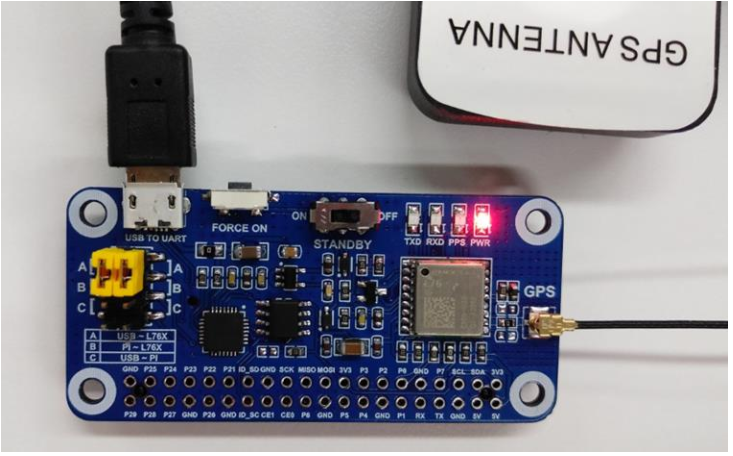
- Wait for about 1 second, the TXD indicator starts flashing, indicating data transmission
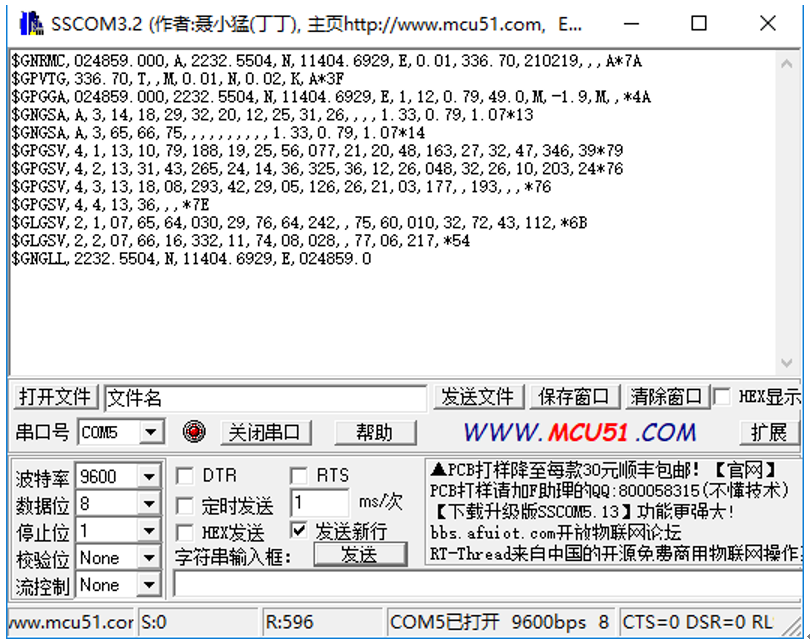
- Open the computer serial port debugging assistant, set the corresponding COM port (here it is COM5), baud rate 9600, 8 data bits, 1 stop bit, no parity bits, no flow control.
- Download the Serial Port Debugging Assistant
Note: 1. Due to unstable GPS signal acquisition indoors, please place the module or antenna on the balcony or next to the window, or conduct the experiment directly outdoors.
2. For the first module positioning (cold start), under normal conditions (outdoors, good weather, no large building obstruction), it takes 35 seconds to successfully locate. Please be patient. If the weather conditions are poor, it may require a longer positioning time, or even fail to position.
Note: Due to GPS static drift, the results seen in Google Earth may differ from actual conditions. The Baidu coordinate error calculated using the demo is particularly small.
Working with Raspberry Pi
Raspberry Pi provides control through C and Python demos
Enable UART Interface
Open the Raspberry Pi terminal and enter the following command to enter the configuration interface
sudo raspi-config
Select Interfacing Options -> Serial, disable shell access, and enable the hardware serial port

Install Relevant Function Libraries
Python Library
pip3 install pyserial
pip3 install pynmea2
pip3 install pynmeagps
BCM2835
#Open the Raspberry Pi terminal and run the following commands:
wget http://www.airspayce.com/mikem/bcm2835/bcm2835-1.71.tar.gz
tar zxvf bcm2835-1.71.tar.gz
cd bcm2835-1.71/
sudo ./configure && sudo make && sudo make check && sudo make install
# For more information, please refer to the official website: http://www.airspayce.com/mikem/bcm2835/
wiringPi
#Open the Raspberry Pi terminal and run the following commands:
cd
sudo apt-get install wiringpi
#For Raspberry Pi systems after May 2019 (those earlier may not require execution), an upgrade may be necessary:
wget https://files.waveshare.com/wiki/common/wiringpi-latest.deb
sudo dpkg -i wiringpi-latest.deb
gpio -v
# Run gpio -v and version 2.52 will appear. If it does not appear, there is an installation error

#Bullseye branch system uses the following command:
sudo git clone https://github.com/WiringPi/WiringPi
cd WiringPi
sudo ./build
gpio -v
# Run gpio -v and version 2.70 will appear. If it does not appear, there is an installation error
lgpio
sudo su
wget https://github.com/joan2937/lg/archive/master.zip
unzip master.zip
cd lg-master
sudo make install
# For more information, please refer to the official website: https://github.com/gpiozero/lg
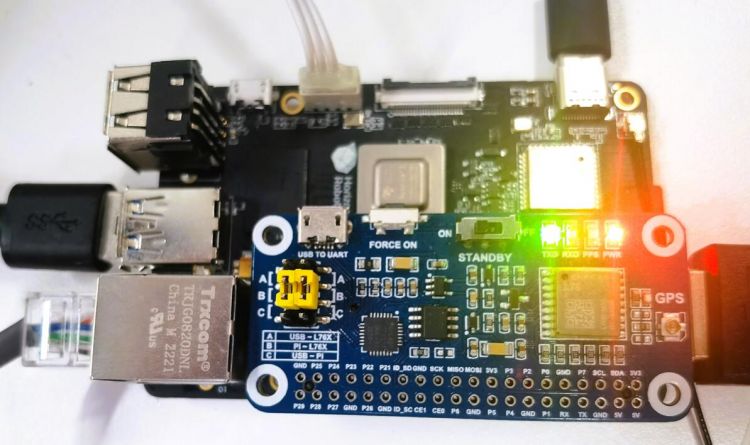
Hardware Connection
- Insert the module directly onto the Raspberry Pi, connect the yellow jumper to position B, place it under the visible sky to allow the module to receive satellite signals:
minicom Debugging
- Install minicom debugging assistant
sudo apt-get install minicom
# For Raspberry Pi 5\ZERO\2B
sudo minicom -D /dev/ttyAMA0 -b 9600
# For Raspberry Pi 4B\3B+\3B
sudo minicom -D /dev/ttyS0 -b 9600
The default baud rate is 115200. To set the baud rate to 9600, add the parameter -b 9600. -D represents the port, /dev/ttyS0 is similar to COM1 in Windows. The following image is a test using the serial port ttyS0 on Raspberry Pi 4B: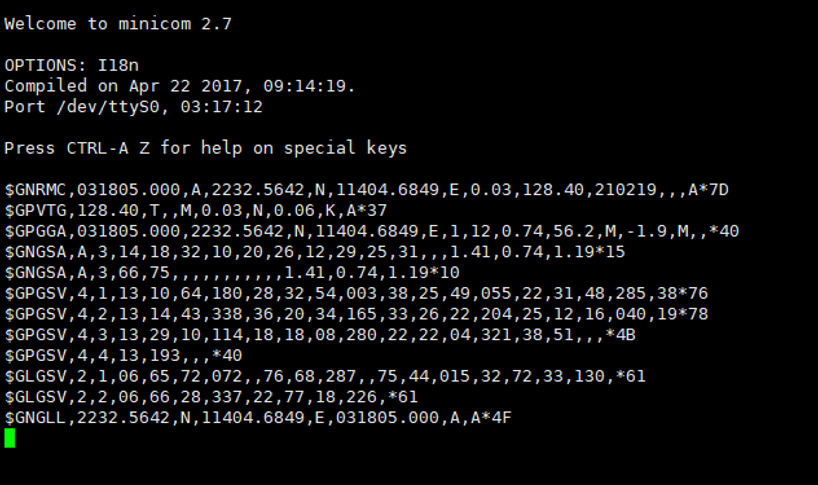
Exit: Ctrl+A then press X, YES, Enter
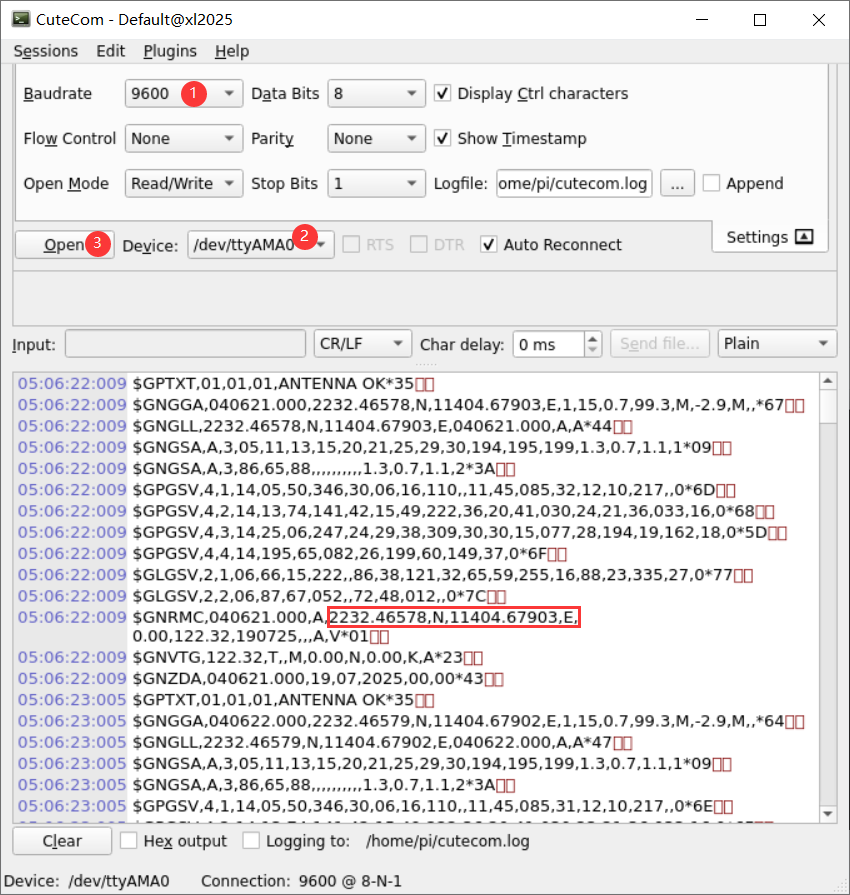
cutecom Testing
- Install cutecom debugging assistant
sudo apt-get install cutecom
- Run cutecom, a graphical serial port assistant interface appears, similar to sscom for Windows:
cutecom
- The following figure was tested using Raspberry Pi 5 with a baud rate of 9600 and a serial port ttyAMA0
Demo
- Download the demo:
wget https://files.waveshare.com/wiki/L76K-GPS-HAT/Demo/L76K_GPS_HAT_Code.zip
unzip L76K_GPS_HAT_Code.zip
sudo chmod 777 -R L76K_GPS_HAT_Code
cd L76K_GPS_HAT_Code/RaspberryPi
- C demo
cd wiringPi
make clean
make
sudo ./main
- Python demo
cd python
python3 main.py
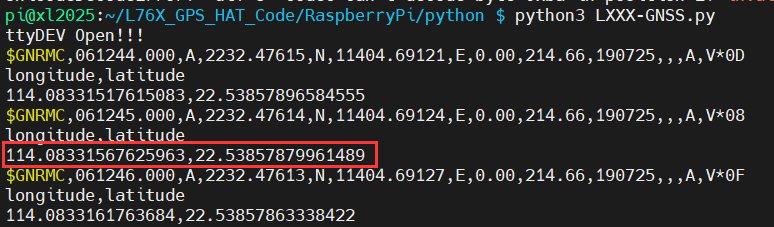
- Expected effect
The initial positioning of the module requires a waiting time of 35 seconds.
The first part is the raw data output by the module.
Time is the time output by L76X.
Latitude and longitude are the output latitude and longitude directions.
The converted map coordinates can be entered into Bing Map to search for the location, for example:
114.08331567625963,22.53857879961489
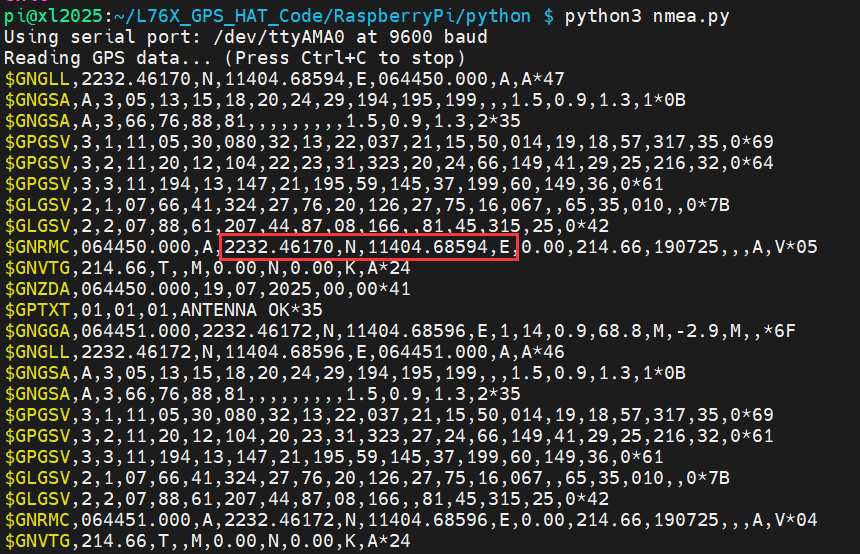
- Obtain the original NMEA data demo
python3 nmea.py

Working with RDK
Hardware Connection
- Insert the jumper cap into area B
- Insert the L76x GPS HAT directly into the 40PIN on the X3 PI
Install Libraries
Use the terminal and run the following commands to install the libraries:
pip3 install pyserial
pip3 install pynmea2
pip3 install pynmeagps
Test with minicom
- Install minicom debugging assistant
sudo apt-get install minicom
sudo minicom -D /dev/ttyS3 -b 9600
Exit: Ctrl+A then press X, YES, Enter
Working with Jetson Orin Nano
Install Libraries
Use the terminal and run the following commands to install the libraries:
pip3 install pyserial
pip3 install pynmea2
pip3 install pynmeagps
minicom Test
- Install minicom debugging assistant
sudo apt-get install minicom
Connect via UART Serial Port
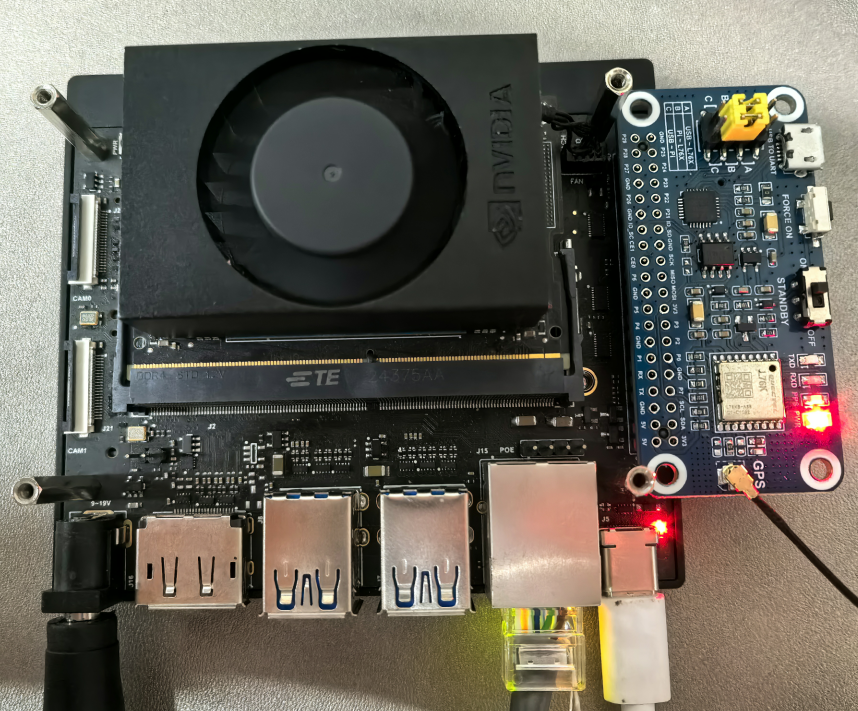
- Insert the jump cap in area B, and connect the L76K GPS HAT to the Jetson Orin Nano via the 40PIN header
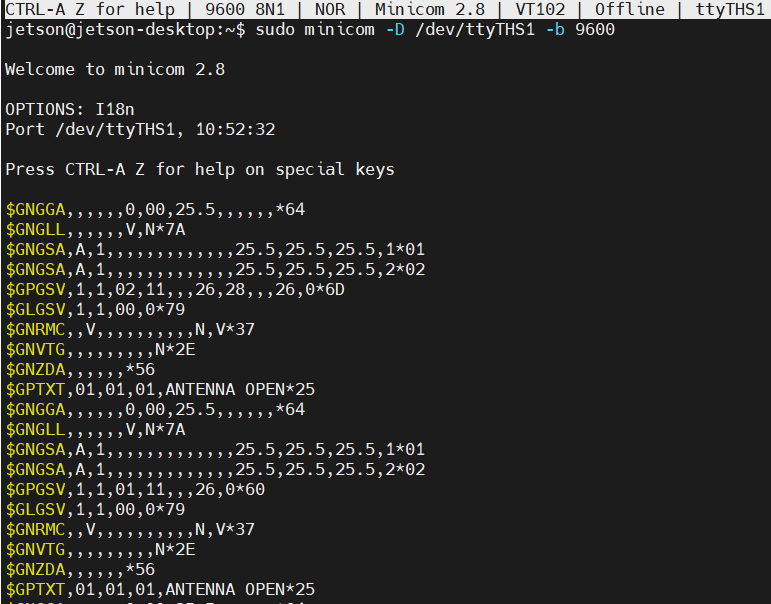
- Use minicom to control the UART serial port
sudo minicom -D /dev/ttyTHS1 -b 9600
Connect via USB Cable
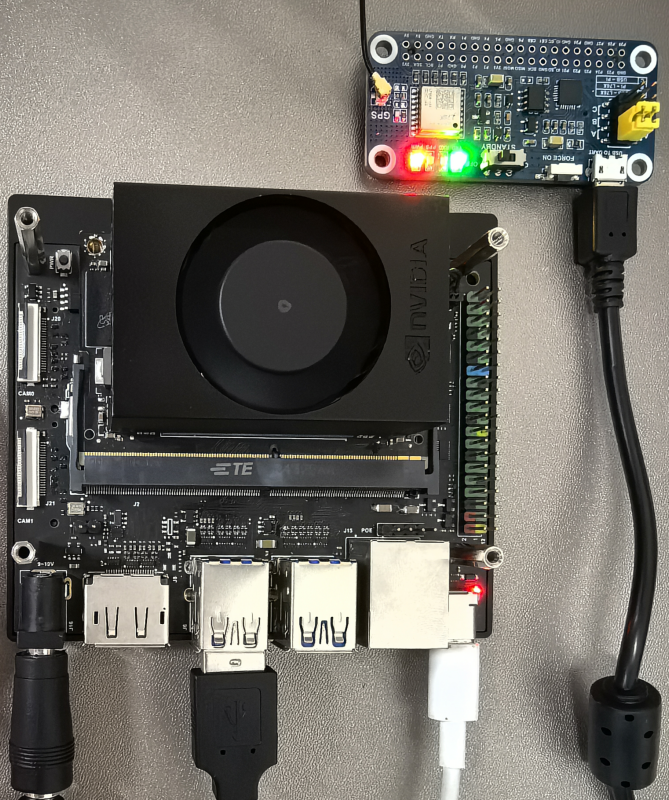
- Insert the jumper cap into area B
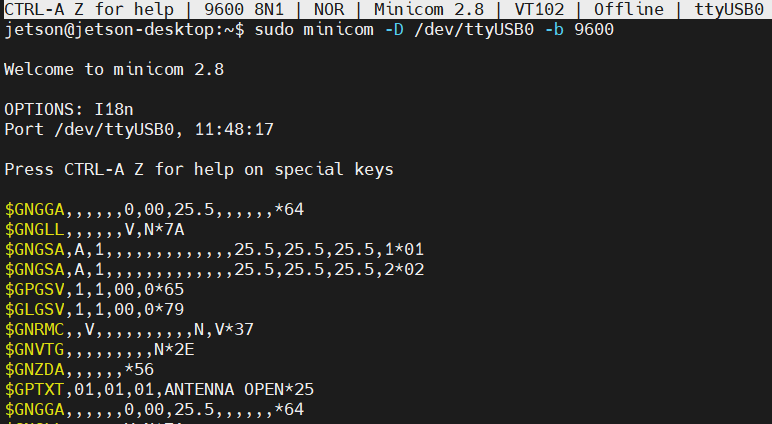
- Place the L76K GPS HAT jumper cap in A and connect it to the USB port on the Jetson Nano via a USB cable
sudo minicom -D /dev/ttyUSB0 -b 9600
Exit: Ctrl+A then press X, YES, Enter
Demo
- Download the demo:
wget https://files.waveshare.com/wiki/L76K-GPS-HAT/Demo/L76K_GPS_HAT_Code.zip
unzip L76K_GPS_HAT_Code.zip
sudo chmod 777 -R L76K_GPS_HAT_Code
cd L76K_GPS_HAT_Code/Jetson
- Obtain the original NMEA data demo
sudo python3 nmea.py
Resources
Documents
Demos
Softwares
- Serial Port Debugging Assistant
- U-centerV8.12
- TCP232
- Chinese characters and Unicode conversion
- Bluetooth serial terminal (Android mobile APP)
Datasheets
FAQ
Place the antenna in an open outdoor area with the text side down. Effective positioning data will be received 45 seconds after turning it on
- Send the following command to change the baud rate to 115200
$PMTK251,115200*1F<CR><LF>
- Send the following command to restore the baud rate to the default 9600:
$PMTK251,9600*17<CR><LF>
As shown in the figure below, make sure to choose No in the first step to avoid outputting the login shell information of the Raspberry Pi to the serial port, which could cause a serial port conflict. Then choose Yes in the second step.

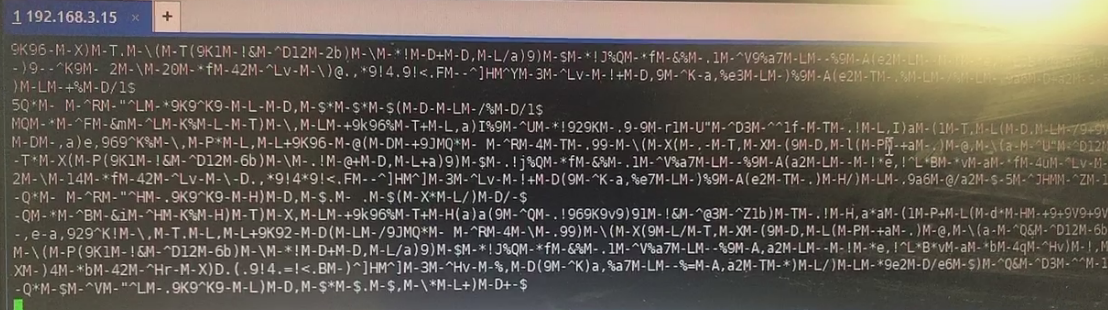
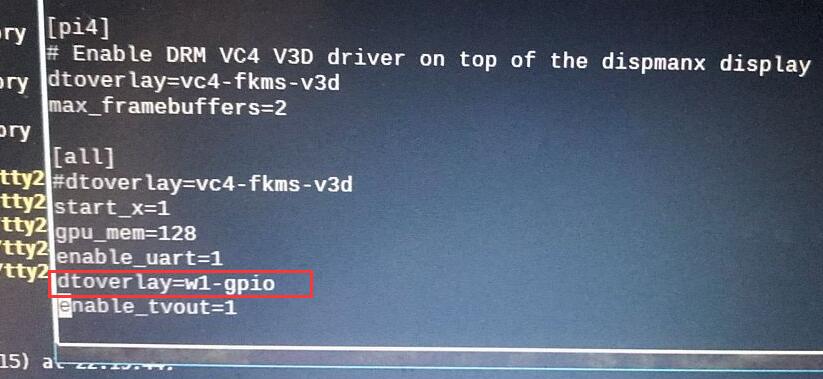
If the above phenomenon occurs when in use, please check the Raspberry Pi config.txt configuration by running `sudo nano /boot/config.txt`. Please comment out the following statement, as it is the temperature sensor occupying the serial communication line;
It is standby mode, please put it to OFF, otherwise it will be standby when it is turned on, and there is no GPS output
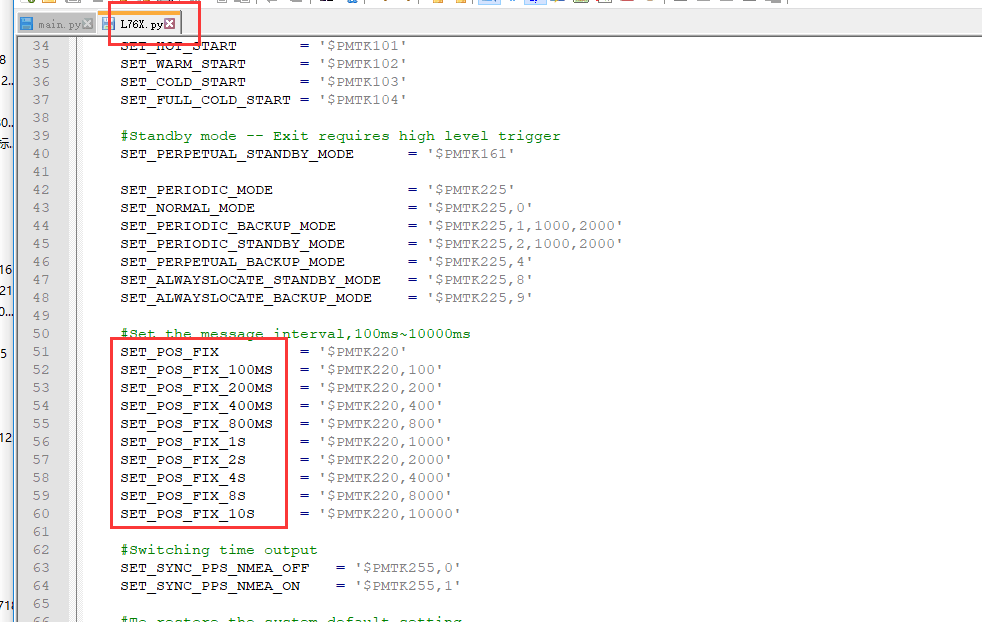
In the main.py of the Python program, the update rate is modified on line 12, which defaults to 400ms. You can find the corresponding macro definition in L76X.py and replace it as needed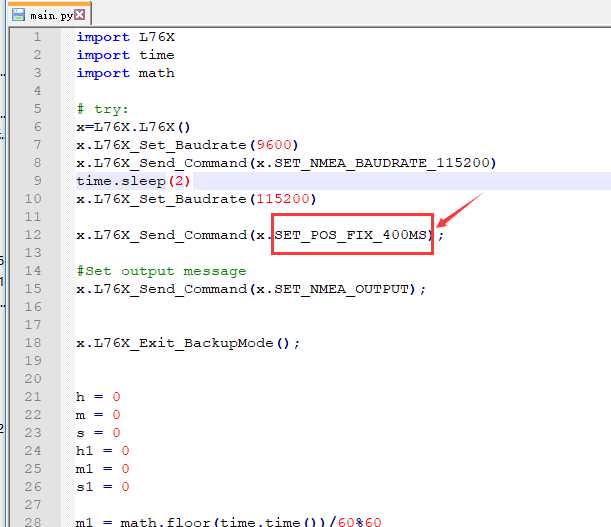
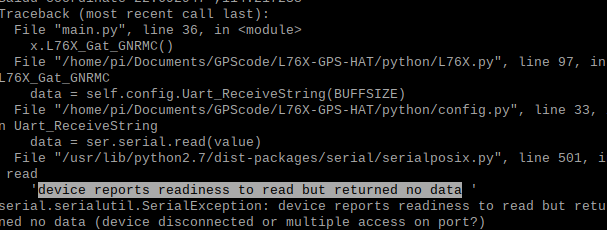
Question: About a minute after powering on, the power indicator light (PWR) turns on, TXD does not blink, and there is no data output from the serial port. What is the reason?
Check if the STANDBY switch is in the OFF position, then press the FORCE_ON button for about 1 second and observe if there is any data output on the serial port. If there is still no data output, check if the TXD and RXD pins are connected correctly
Question: Why is the location not accurate?
Question: Why can't I receive data when I'm outdoors?
Question: Why is it inconsistent with the positioning of the mobile phone?
Question: Why does the baud rate of the module still not change when I send the command to modify the baud rate?
Question: What is the role of the three jumper caps A, B, and C on board?
The function of the jumper cap is to switch the serial port device. When the jumper cap is connected to A, L76B will connect to the USB interface; when connected to B, L76B connects to the Raspberry Pi; when connected to C, the Raspberry Pi connects to the USB (at this time, the module can can be used as a USB to TTL module)
Question: Why is there no corresponding demo for CAT24C32, and what is its function?
Question: Does button battery support charging?
Question: Why are the GPS coordinates not accurate when placed on Baidu Maps or Google Maps?
Question: Why does the Raspberry Pi print a location of 0,0, or why does the demo freeze and fail to locate?
Question: What is the positioning error of the L76X GPS HAT?
Testing in an open and clear weather environment, the error is within 2.5 meters.
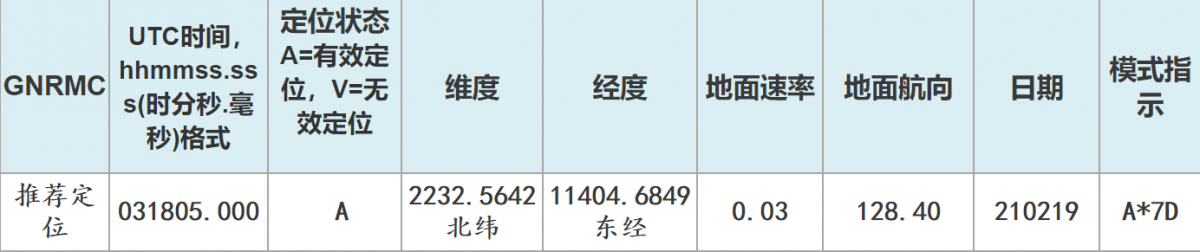
Question: How to parse the obtained location information?
The following takes GNRMC as an example to parse the obtained positioning information, as follows: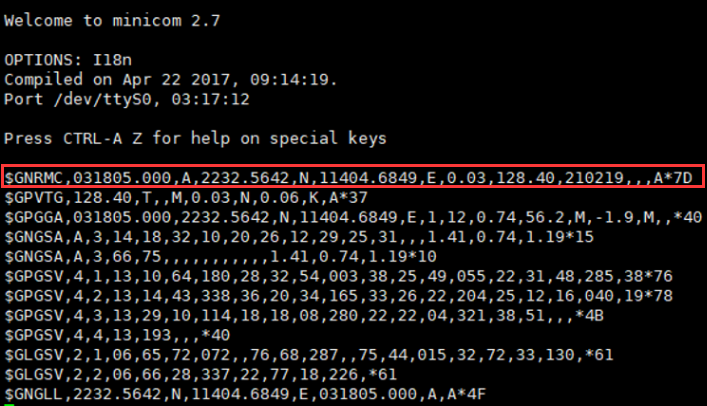
Support
Monday-Friday (9:30-6:30) Saturday (9:30-5:30)
Email: services01@spotpear.com
[Tutorial Navigation]
- Introduction
- Windows Serial Port Debugging
- Working with Raspberry Pi
- Enable UART Interface
- Install Relevant Function Libraries
- Hardware Connection
- minicom Debugging
- cutecom Testing
- Demo
- Working with RDK
- Working with Jetson Orin Nano
- Resources
- Documents
- Demos
- Softwares
- Datasheets
- FAQ
- Question: Why is the demo location at 00, 00 when running?
- Question: How to change the baud rate to 115200?
- Question: What should I do if the demo reports an error or exits immediately when run once?
- Question: Why is the demo and minicom debugging also garbled, while USB to serial port works normally?
- Question: What is the function of the STANDBY switch?
- Question: How does a Python program modify the GPS update rate?
- Question: About a minute after powering on, the power indicator light (PWR) turns on, TXD does not blink, and there is no data output from the serial port. What is the reason?
- Question: Why is the location not accurate?
- Question: Why can't I receive data when I'm outdoors?
- Question: Why is it inconsistent with the positioning of the mobile phone?
- Question: Why does the baud rate of the module still not change when I send the command to modify the baud rate?
- Question: What is the role of the three jumper caps A, B, and C on board?
- Question: Why is there no corresponding demo for CAT24C32, and what is its function?
- Question: Does button battery support charging?
- Question: Why are the GPS coordinates not accurate when placed on Baidu Maps or Google Maps?
- Question: Why does the Raspberry Pi print a location of 0,0, or why does the demo freeze and fail to locate?
- Question: What is the positioning error of the L76X GPS HAT?
- Question: How to parse the obtained location information?
- Support