


- sales/support
Google Chat:---
- sales
+86-0755-88291180
- sales01
sales@spotpear.com
- sales02
dragon_manager@163.com
- support
tech-support@spotpear.com
- CEO-Complaints
zhoujie@spotpear.com
- Only Tech-Support
WhatsApp:13246739196
- Purchase/Shipping/Refund
WhatsApp:13424403025
3.5inch DSI LCD (H) User Guide
Features
- 3.5inch IPS screen, 480 x 800 hardware resolution
- Capacitive touch panel, supports 5-point touch control
- Toughened glass touch panel, hardness up to 6H
- Compatible with Pi5 / CM5 / 4B / CM4 / 3B+ / 3A+ / 3B / CM3 / CM3+ / 2B / B+ / A+
- Directly drive the LCD by the DSI interface on the Raspberry Pi, with up to 60Hz refreshing rate
Pin Definition
| PIN | Mark |
|---|---|
| 1 | GND |
| 2 | DSI1_DN1 |
| 3 | DSI1_DP1 |
| 4 | GND |
| 5 | DSI1_CN |
| 6 | DSI1_CP |
| 7 | GND |
| 8 | DSI1_DN0 |
| 9 | DSI1_DP0 |
| 10 | GND |
| 11 | SCL0 |
| 12 | SDA0 |
| 13 | GND |
| 14 | 3V3 |
| 15 | 3V3 |
Hardware Connection
Working with Pi 5/CM5/CM4/CM3+/CM3
- Use a DSI-Cable-12cm cable to connect the 3.5inch DSI LCD (H) to the 22PIN DSI1 interface on the Raspberry Pi board.
- For easy installation, the Raspberry Pi 5 can be attached to the back of a 3.5inch DSI LCD (H).
When assembling, please place the short copper pillars from the accessory pack between the screen and the motherboard, then secure them with screws as shown in the figure: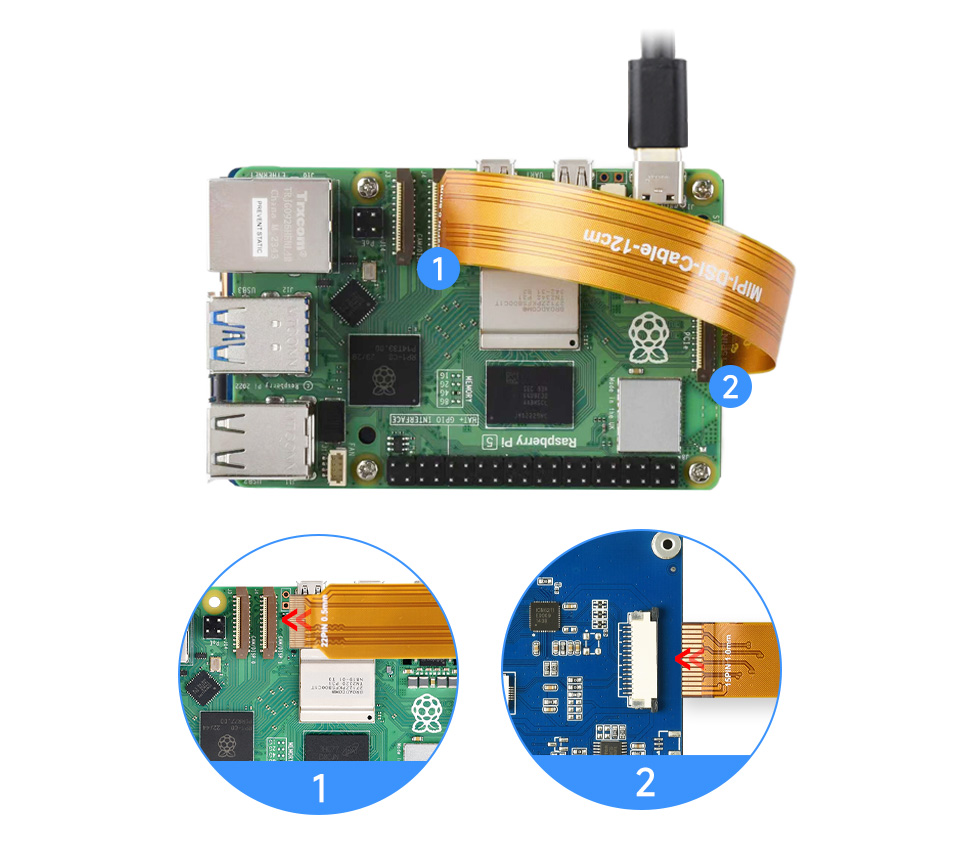
Working with Pi 4B/3B+/3A+/3B/2B/B+/A+
- Use an FFC cable to connect the 3.5inch DSI LCD (H) to the 15PIN DSI interface on the Raspberry Pi board.
- For convenience, you can fix the Raspberry Pi board on the backside of the 3.5inch DSI LCD (H) with screws and assemble the copper columns.
When assembling, please place the short copper pillars from the accessory pack between the screen and the motherboard, then secure them with screws as shown in the figure: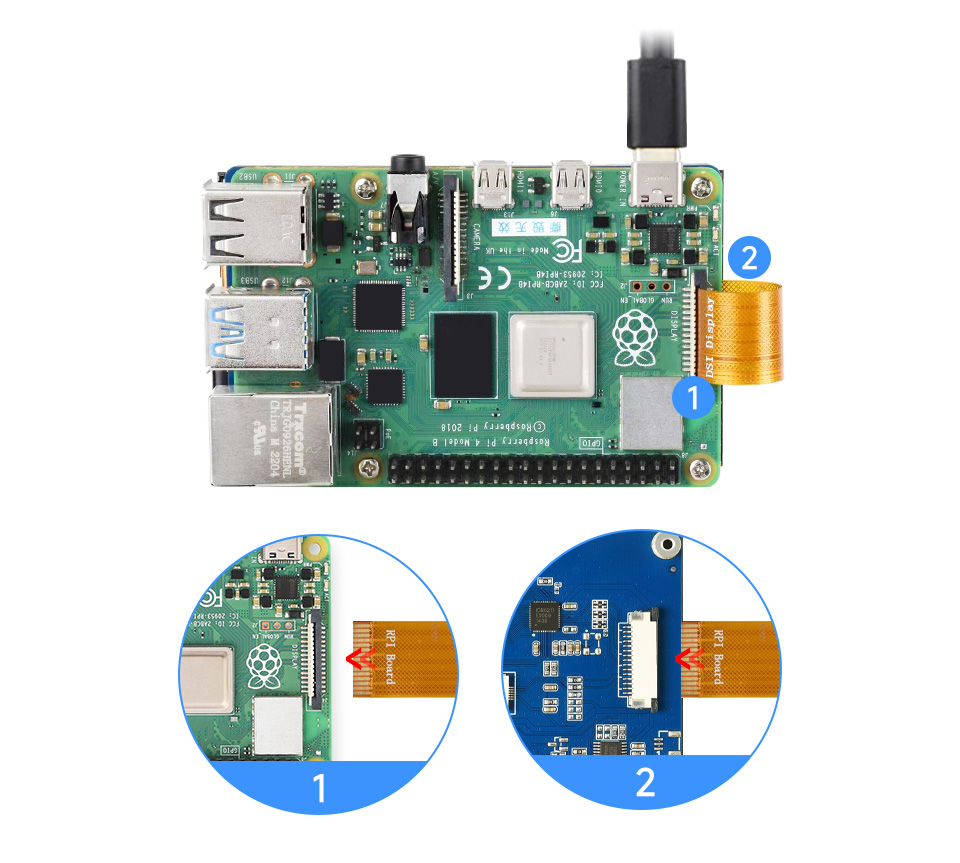
Software Settings
Working with Trixie and Bookworm (recommended)
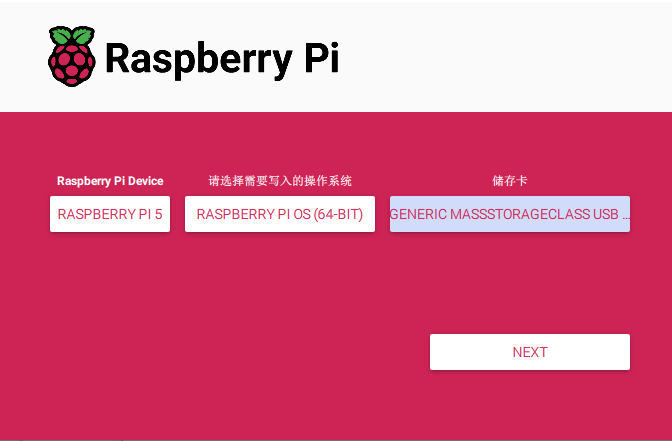
- 1. Connect the TF card to the PC, download and use Raspberry Pi Imager to flash the corresponding system image.
- 2. After the image flashing is completed, open the config.txt file in the root directory of the TF card, add the following code at the end of the file and save:
dtoverlay=vc4-kms-v3d
#DSI1 Use
dtoverlay=waveshare_35DSI,35H,dsi1
#DSI0 Use
#dtoverlay=waveshare_35DSI,35H,dsi0- 3. Download the Waveshare_35DSI.dtbo file and copy to the overlays directory (/boot/overlays/)
- 4. Insert the TF card and start the Raspberry Pi, wait for about 30 seconds for it to display.
Trixie / Bookworm Display Rotation
GUI Interface Rotation
The following steps are based on the Trixie system:
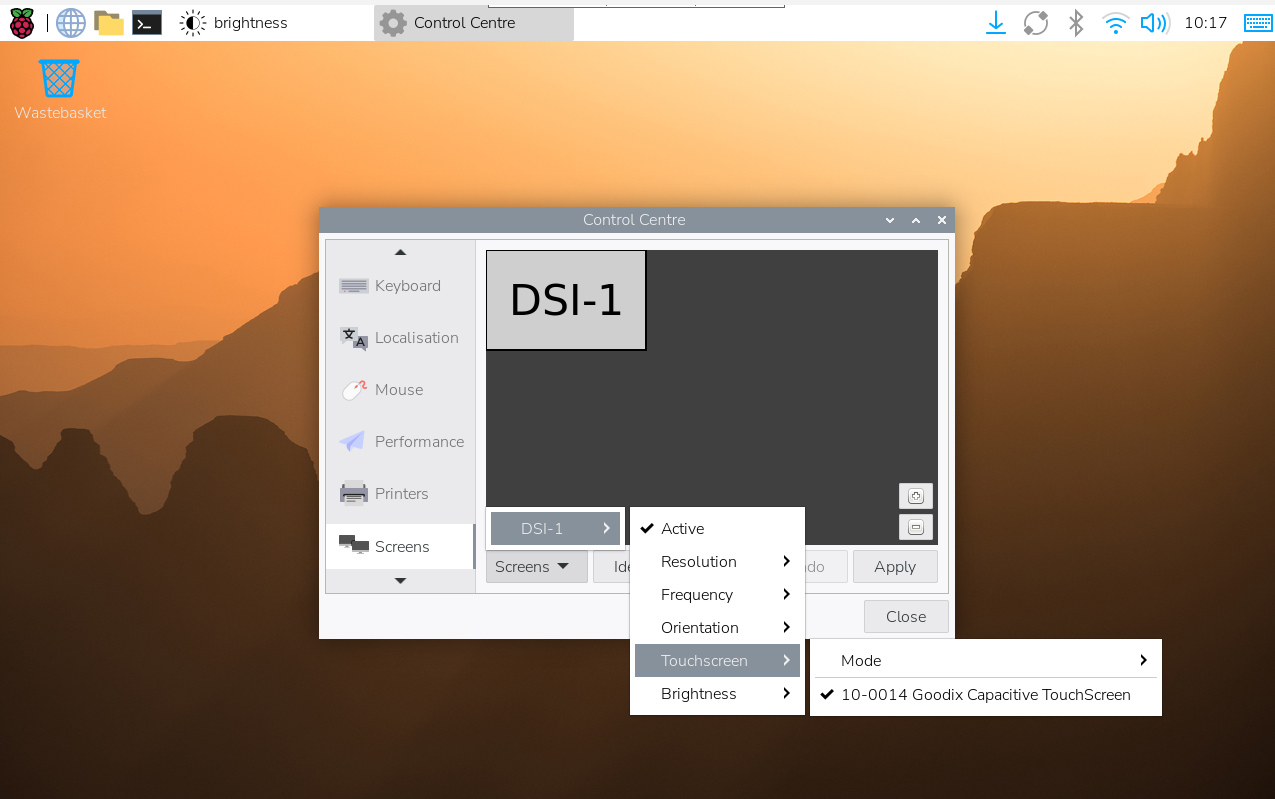
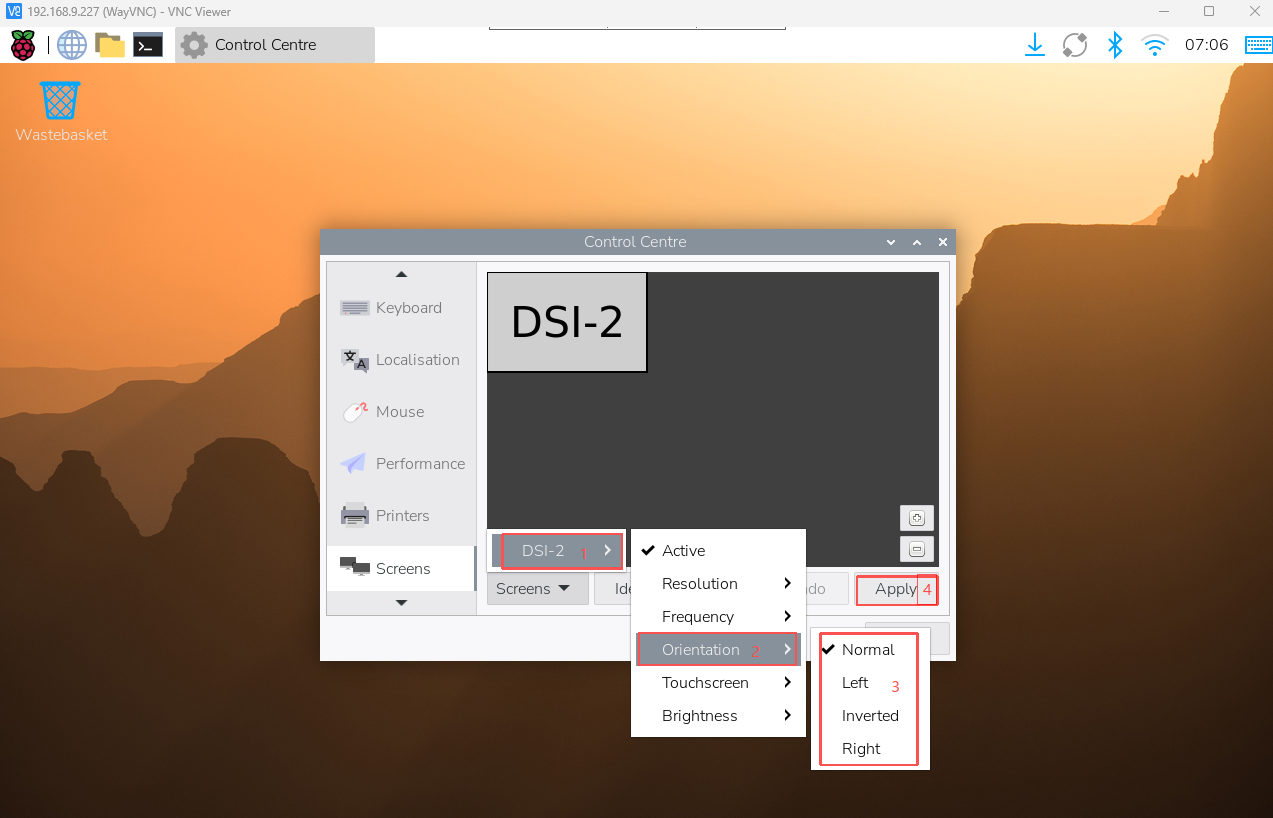
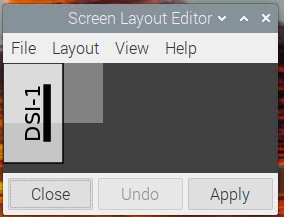
- 1. Click the menu in the upper left corner, then go to Preferences → Control Center, and select Screens;
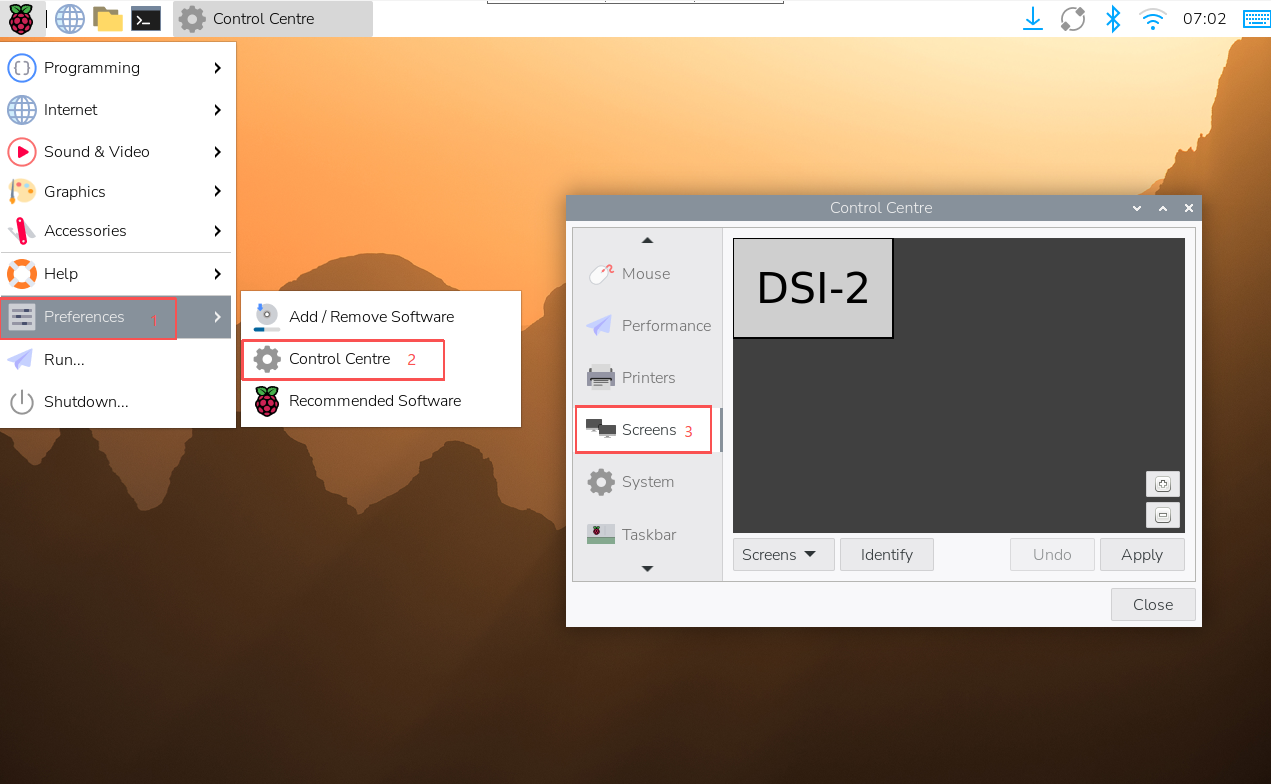
- 2. Go to Screen - > DSI-1 - > Touchscreen and check "10-0014 Goodix Capacitive TouchScreen";
- 3. Go to Screen -> DSI-2 -> Orientation, check the direction you need to rotate, and finally click "Apply" to complete the display and touch synchronous rotation.
- In the Bookworm system, this setting entry is located at Screen Configuration → Screen.
lite Version Display Rotation
sudo nano /boot/firmware/cmdline.txt
#Add the display resolution and rotation commands at the beginning of the cmdline.txt file to take effect after a reboot
#For example, the DSI-1 display has a 720x1280 resolution and the display rotation is 90 degrees
video=DSI-1:480x800e,rotate=90
#For example, the DSI-1 display has a 720x1280 resolution and the display rotation is 180 degrees
video=DSI-1:480x800e,rotate=180
#For example, the DSI-1 display has a 720x1280 resolution and the display rotation is 270 degrees
video=DSI-1:480x800e,rotate=270
Note:
- 1. Based on actual display resolution.
- 2. If using Pi5/CM5, use the actual DSI display number identified, for example, "DSI-2".
- 3. Unable to rotate DSI monitor and HDMI monitor separately using cmdline.txt. When you use both DSI and HDMI simultaneously, they share the same rotation value.
Working with Bullseye System (requires driver compilation)
Flash Official Bullseye System
- 1. Please download the system image for Bullseye from the official Raspberry Pi website (choose 32-bit or 64-bit as needed):
- 2. Use Win32DiskImager.exe to flash the image to a TF card, then insert it into the Raspberry Pi and boot the system.
Install Header Files and Drivers
sudo apt-get update
sudo apt-get install unzip -y
sudo apt-get install cmake -y
sudo apt-get install raspberrypi-kernel-headers
sudo wget https://files.waveshare.com/wiki/common/Waveshare_35DSI.dtbo
sudo wget https://files.waveshare.com/wiki/common/Vc4-kms-dsi-generic.dtbo
sudo wget https://files.waveshare.com/wiki/3.5inch_DSI_LCD_H/3inch5_DSI_H_Drives_Bullseye.zip
sudo cp Waveshare_35DSI.dtbo /boot/overlays/
sudo cp Vc4-kms-dsi-generic.dtbo /boot/overlays/
sudo unzip ./3inch5_DSI_H_Drives_Bullseye.zip
cd 3inch5_DSI_H_Drives_Bullseye
Edit config.txt File
sudo nano /boot/config.txt
Add the following at the end of [all]:
display_auto_detect=0
disable_splash=1
display_auto_detect=1
dtoverlay=vc4-kms-dsi-generic,hactive=480,hfp=48,hsync=32,hbp=80,vactive=800,vfp=3,vsync=10,vbp=62
dtoverlay=Waveshare_35DSI
Don't restart the Raspberry Pi yet.
Check Current System Kernel Version
uname -r
You will see one of the following two:
Please follow the steps corresponding to the kernel version
6.1.21-v7+
- Compile panel-simple
cd ~/3inch5_DSI_H-RPi3_6.1.21-v7+/panel_simple-ko
sudo make
sudo xz panel-simple.ko
sudo cp panel-simple.ko.xz /lib/modules/6.1.21-v7+/kernel/drivers/gpu/drm/panel/
- Compile touch driver goodix_ts
cd ~/3inch5_DSI_H-RPi3_6.1.21-v7+/goodix_gt911-ko
sudo make
sudo xz goodix_ts.ko
sudo cp goodix_ts.ko.xz /lib/modules/6.1.21-v7+/kernel/drivers/input/touchscreen/
sudo depmod -a
After rebooting with `sudo reboot`, the screen will display and touch normally
6.1.21-v8+
- Replace panel-simple
cd ~/3inch5_DSI_H-RPi4_6.1.21-v8+/panel_simple-ko
sudo cp panel-simple.ko.xz /lib/modules/6.1.21-v8+/kernel/drivers/gpu/drm/panel/
- Replace touch driver
cd ..
cd ~/3inch5_DSI_H-RPi4_6.1.21-v8+/goodix_gt911-ko
sudo cp goodix_ts.ko.xz /lib/modules/6.1.21-v8+/kernel/drivers/input/touchscreen/
sudo depmod -a
After rebooting with `sudo reboot`, the screen will display and touch normally
Bullseye Display Rotation
GUI interface rotation
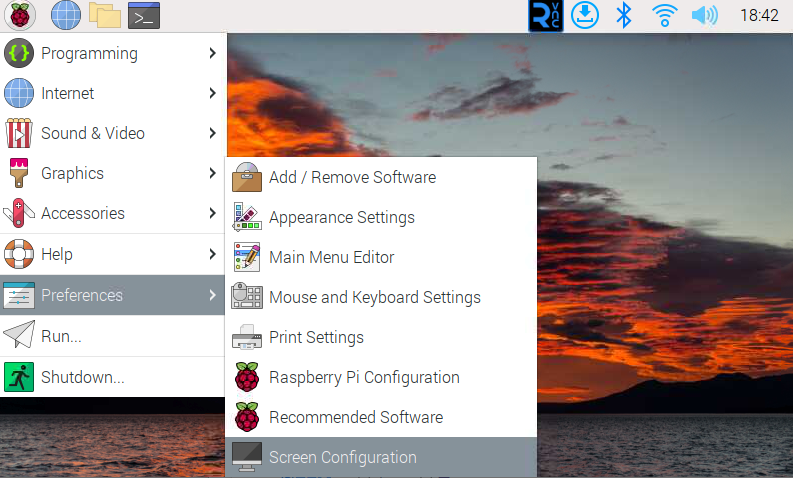
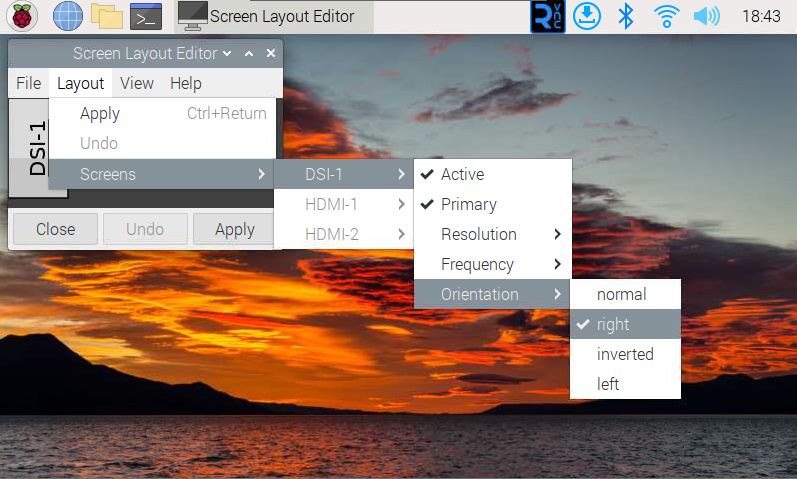
- 1. Open the "Screen Configuration" application;
- 2. Go to "Screen" -> "DSI-1" -> "Orientation", check the direction you need to rotate, and finally click "Apply" to complete the display rotation.
lite version display rotation
- 1. Need to modify the /boot/cmdline.txt file:
sudo nano /boot/cmdline.txt
- 2. At the beginning of the cmdline.txt file, add the command for displaying the rotation angle: (Please note, this command needs to be on the same line, with each command separated by a space.)
video=DSI-1:480x800M@60,rotate=90
Change the display rotation angle by modifying the rotate value to 90, 180, or 270.
- 3. Save and restart
sudo reboot
Bullseye Touch Rotation
After some systems display rotation, the touch direction is inconsistent, and you need to perform the following operations to perform touch rotation:
1. Install libinput
sudo apt-get install xserver-xorg-input-libinput
- If you have Ubuntu or Jetson Nano installed. The installation code is:
sudo apt install xserver-xorg-input-synaptics
2. Create the xorg.conf.d directory under /etc/X11 (if the directory already exists, proceed directly to step 3).
sudo mkdir /etc/X11/xorg.conf.d
3. Copy the 40-libinput-conf file to the directory you created just now.
sudo cp /usr/share/X11/xorg.conf.d/40-libinput.conf /etc/X11/xorg.conf.d/
4. Edit this file
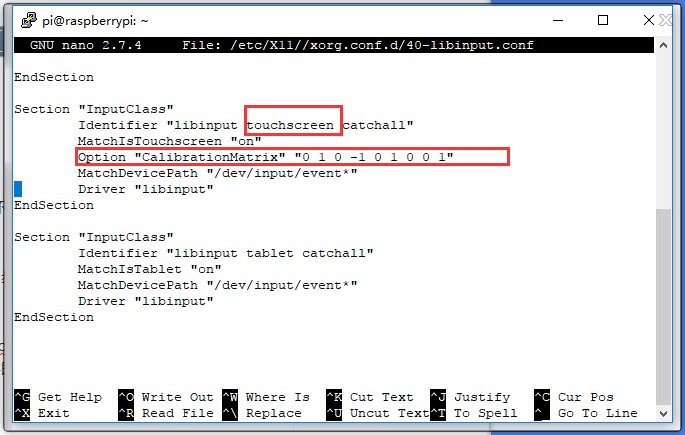
sudo nano /etc/X11/xorg.conf.d/40-libinput.conf
#Find the touchscreen section, add the corresponding rotation angle command in it, and save it
#"90° Right touch rotation:
Option "CalibrationMatrix" "0 1 0 -1 0 1 0 0 1"
#180° Inverted touch rotation:
#Option "CalibrationMatrix" "-1 0 1 0 -1 1 0 0 1"
#270° Left touch rotation:
#Option "CalibrationMatrix" "0 -1 1 1 0 0 0 0 1"
Similar to the position in the following image:
5. Reboot Raspberry Pi
sudo reboot
After completing the above steps, touch will cause a rotation.
Pre-installed Image
Related Resources
Diagrams
Software
FAQ
Question: What is the brightness of this screen?
270cd/m²
Question: What is the power consumption of this screen?
3.3v 180mA
Question: Does this screen support backlight adjustment?
Not currently supported.
Question: Does the screen not automatically go off, or do I have to execute a command to go into screen off mode?
It depends on the system, if the system has hibernation, the screen will also be black.
Question: How to completely turn on or off the screen on a Raspberry Pi Trixie / Bookworm?
When using the Wayland environment (such as Raspberry Pi OS Trixie or Bookworm), you can control the screen display status with the wlr-randr command.
#Turn off the screen
wlr-randr --output DSI-2 --off
#Turn on the screen
wlr-randr --output DSI-2 --on
Support
Monday-Friday (9:30-6:30) Saturday (9:30-5:30)
Email: services01@spotpear.com
[Tutorial Navigation]
- Features
- Pin Definition
- Hardware Connection
- Software Settings
- Working with Trixie and Bookworm (recommended)
- Working with Bullseye System (requires driver compilation)
- Flash Official Bullseye System
- Install Header Files and Drivers
- Edit config.txt File
- Check Current System Kernel Version
- Bullseye Display Rotation
- Bullseye Touch Rotation
- Pre-installed Image
- Related Resources
- Software
- FAQ
- Question: What is the brightness of this screen?
- Question: What is the power consumption of this screen?
- Question: Does this screen support backlight adjustment?
- Question: Does the screen not automatically go off, or do I have to execute a command to go into screen off mode?
- Question: How to completely turn on or off the screen on a Raspberry Pi Trixie / Bookworm?
- Support