


- sales/support
Google Chat:---
- sales
+86-0755-88291180
- sales01
sales@spotpear.com
- sales02
dragon_manager@163.com
- support
tech-support@spotpear.com
- CEO-Complaints
zhoujie@spotpear.com
- Only Tech-Support
WhatsApp:13246739196
- Purchase/Shipping/Refund
WhatsApp:13424403025
- HOME
- >
- ARTICLES
- >
- Common Moudle
- >
- ESP
ESP32-C6-LCD-1.47 User Guide
Overview
Introduction
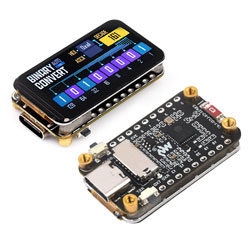
ESP32-C6-LCD-1.47 is a microcontroller development board that supports 2.4GHz Wi-Fi 6 and BLE 5. It integrates 4MB Flash and has onboard 1.47inch LCD screen, can smoothly run GUI programs such as LVGL. Combined with various peripheral interfaces, it is suitable for the quick development of the HMI and other ESP32-C6 applications.
Features
- Equipped with a high-performance 32-bit RISC-V processor with clock speed up to 160 MHz, and a low-power 32-bit RISC-V processor with clock speed as low as 20MHz
- Supports 2.4 GHz Wi-Fi 6 (802.11 ax/b/g/n) and Bluetooth 5 (BLE), with onboard antenna
- Built-in 320KB ROM, 512KB HP SRAM, 16KB LP SRAM, and 4MB flash
- Onboard 1.47inch LCD display, 172×320 resolution, 262K color
- Adapting most GPIOs, integrates full-speed USB serial port
- Onboard TF card slot, supporting external TF card storage for pictures or files
- Supports accurate control such as flexible clock and multiple power modes to realize low power consumption in different scenarios
- Onboard RGB color light beads, paired with transparent acrylic interlayer for cool lighting effects
Onboard Resources
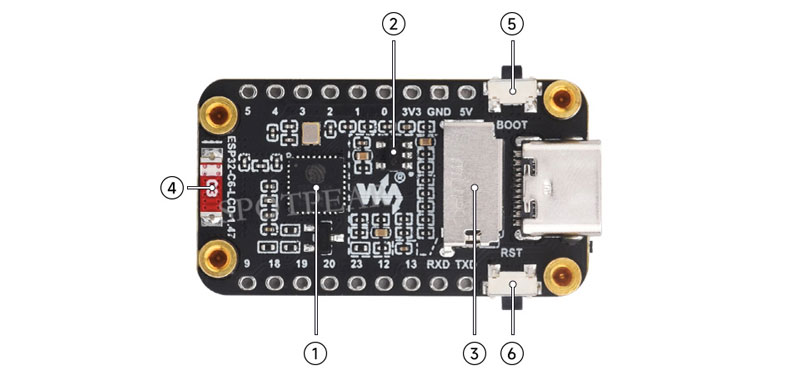
1. ESP32-C6FH4 2. ME6217C33M5G 3. TF card slot | 4. Patch ceramic antenna 5. BOOT button 6. RESET button |
Interfaces
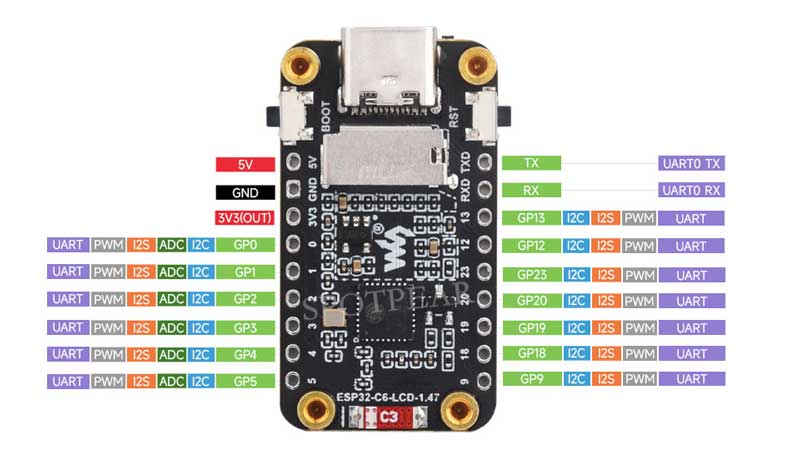
- LCD
| LCD Pin | ESP32C6 |
| MOSI | GPIO6 |
| SCLK | GPIO7 |
| LCD_CS | GPIO14 |
| LCD_DC | GPIO15 |
| LCD_RST | GPIO21 |
| LCD_BL | GPIO22 |
- RGB light beads
| RGB light beads | ESP32C6 |
| RGB_Control | GPIO8 |
- TF Card
| TF Card | ESP32C6 |
| MISO | GPIO5 |
| MOSI | GPIO6 |
| SCLK | GPIO7 |
| CS | GPIO4 |
| SD_D1 | NC |
| SD_D2 | NC |
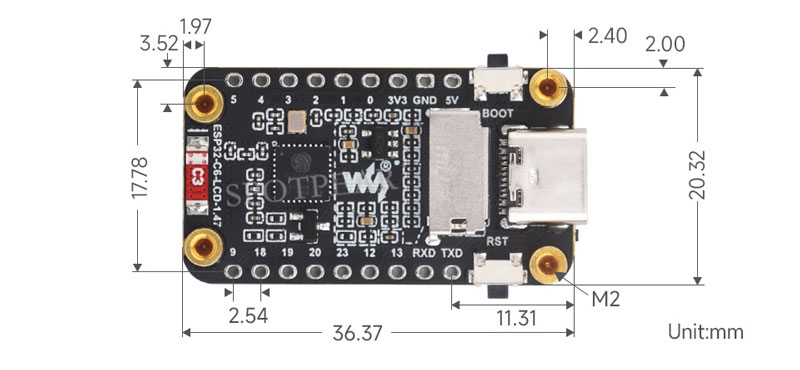
Dimensions
Specifications
| Parameter Name | Parameter |
| Interface | USB Type-C |
| Controller chip | ESP32-C6 |
| LCD type | TFT |
| LCD controller chip | Display: ST7789 |
| Onboard devices | TF |
Usage Instructions
ESP32-C6-LCD-1.47 currently provides two development tools and frameworks, Arduino IDE and ESP-IDF, providing flexible development options, you can choose the right development tool according to your project needs and personal habits.
Development Tools
Arduino IDEArduino IDE is an open source electronic prototyping platform, convenient and flexible, easy to get started. After a simple learning, you can start to develop quickly. At the same time, Arduino has a large global user community, providing an abundance of open source code, project examples and tutorials, as well as rich library resources, encapsulating complex functions, allowing developers to quickly implement various functions. | |
ESP-IDFESP-IDF, or full name Espressif IDE, is a professional development framework introduced by Espressif Technology for the ESP series chips. It is developed using the C language, including a compiler, debugger, and flashing tools, etc., and can be developed via the command lines or through an integrated development environment (such as Visual Studio Code with the Espressif IDF plugin). The plugin offers features such as code navigation, project management, and debugging. |
Each of these two development approaches has its own advantages, and developers can choose according to their needs and skill levels. Arduino are suitable for beginners and non-professionals because they are easy to learn and quick to get started. ESP-IDF is a better choice for developers with a professional background or high performance requirements, as it provides more advanced development tools and greater control capabilities for the development of complex projects.
Components Preparation
- ESP32-C6-LCD-1.47 x1
- TF card x 1
- USB cable (Type-A to Type-C) x 1
- Card reader x1
Working with Arduino
This chapter introduces setting up the Arduino environment, including the Arduino IDE, management of ESP32 boards, installation of related libraries, program compilation and downloading, as well as testing demos. It aims to help users master the development board and facilitate secondary development. ![]()
Environment Setup
Download and install Arduino IDE
- Click to visit the Arduino official website, select the corresponding system and system bit to download
- Run the installer and install all by default
Install ESP32 development board
- Regarding ESP32-related motherboards used with the Arduino IDE, the esp32 by Espressif Systems library must be installed first.
- According to Board installation requirement, it is generally recommended to use Install Online. If online installation fails, use Install Offline
- For the installation tutorial, please refer to Arduino board manager tutorial
- esp32 by Espressif Systems development board comes with an offline package. Click here to download: esp32_package_3.0.2_arduino offline package
| Board name | Board installation requirement | Version number requirement |
|---|---|---|
| esp32 by Espressif Systems | "Install Offline" / "Install Online" | ≥3.0.0 |
Install library
- When installing Arduino libraries, there are usually two ways to choose from: Install online and Install offline. If the library installation requires offline installation, you must use the provided library file
For most libraries, users can easily search and install them through the online library manager of the Arduino software. However, some open-source libraries or custom libraries are not synchronized to the Arduino Library Manager, so they cannot be acquired through online searches. In this case, users can only manually install these libraries offline. - For library installation tutorial, please refer to Arduino library manager tutorial
- ESP32-C6-LCD-1.47 library file is stored in the sample program, click here to jump: ESP32-C6-LCD-1.47 Demo
| Library Name | Description | Version | Library Installation Requirement |
|---|---|---|---|
| LVGL | Graphical library | v8.3.10 | "Install Offline" |
| PNGdec | Decode PNG image formats | v1.0.2 | "Install Offline" |
Demo

| Demo | Basic Description | Dependency Library |
|---|---|---|
| LVGL_Arduino | Test onboard device functionality | LVGL |
| LCD_Image | Display TF card root directory PNG file at intervals | PNGdec |
Arduino project parameter setting
LVGL_Arduino
Demo description
- This example demonstrates the functions of each device on the board, LCD page displays SD Card, Flash Size, Wireless scan and other parameters
Hardware connection
- Connect the development board to the computer
- Insert the TF card into the board
Code analysis
- setup()
Flash_test(): Tests and prints the flash memory size information of the deviceLCD_Init(): Initializes the displayLvgl_Init(): Initializes the LVGL graphics librarySD_Init(): Initializes the TF cardLvgl_Example1(): Calls the specific LVGL example functionWireless_Test2(): Calls the test function for wireless communication
- loop()
Timer_Loop(): Functions that handle timer-related tasks
Demo flashing
- Select the development board ESP32S3 Dev Module and port
- Flash the demo
Result demonstration
- LCD screen display

LCD_Image
TF card preparation
- Add the image examples provided by Waveshare into the TF card, and you can also add your own images (pixel ≤ 172×320)


Hardware connection
- Insert the TF card containing example images into the device
- Connect the development board to the computer
Code analysis
- void Display_Image(const char* directory, const char* fileExtension, uint16_t ID)
- First, call
Search_Image(directory, fileExtension)search for image files with the specified extension in a given directory, and store the count of found images in the global variableImage_CNT - If
Image_CNTis not zero, one or more images have been found. Construct the full path of the image file based on whether the directory is a root directory, convert it to a C-style string for debugging purposes, and finally call theShow_Imagefunction to display the image - If no image is found (
Image_CNTis zero), an error message is printed indicating that a file with the specified extension was not found in the given directory
- First, call
Result demonstration
- The LCD displays PNG files in the root directory of the TF card in sequence at regular intervals


Working with ESP-IDF
This chapter introduces setting up the ESP-IDF environment setup, including the installation of Visual Studio and the Espressif IDF plugin, program compilation, downloading, and testing of example programs, to assist users in mastering the development board and facilitating secondary development. 
Environment Setup
Download and install Visual Studio
- Open the download page of VScode official website, choose the corresponding system and system bit to download
- After running the installation package, the rest can be installed by default, but here for the subsequent experience, it is recommended to check boxes 1, 2, and 3
- After the first two items are enabled, you can open VSCode directly by right-clicking files or directories, which can improve the subsequent user experience.
- After the third item is enabled, you can select VSCode directly when you choose how to open it.
Install Espressif IDF Plugin
- It is generally recommended to use Install Online. If online installation fails due to network factor, use Install OIffline
- For more information about how to install the Espressif IDF plugin, see Install Espressif IDF Plugin
| Plugin name | Plugin installation requirement | Version number requirement |
|---|---|---|
| Espressif IDF | "Install Offline" / "Install Online" | ≥5.3.1 |
Demo

| Demo | Basic Description | Dependency Library |
|---|---|---|
| ESP32-C6-LCD-1.47-Test | Test onboard device functionality | LVGL |
ESP32-C6-LCD-1.47-Test
Demo description
- This example demonstrates the functions of each device on the board, LCD page displays SD Card, Flash Size, Wireless scan parameters and CPU utilization
Hardware connection
- Connect the development board to the computer
- Insert the TF card into the board

Code analysis
- setup()
Wireless_Init(): Initializes the wireless communication moduleFlash_Searching(): Tests and prints the flash memory size information of the deviceRGB_Init(): Initializes RGB-related functionsRGB_Example(): Displays example functions of RGBSD_Init(): Initializes the TF cardLCD_Init(): Initializes the displayBK_Light(50): Sets the backlight brightness to 50LVGL_Init(): Initializes the LVGL graphics libraryLvgl_Example1(): Calls the specific LVGL example function
- while(1)
vTaskDelay(pdMS_TO_TICKS(10)): Short delay, every 10 millisecondslv_timer_handler(): Timer handling function for LVGL, used to handle events and animations related to time
Demo flashing
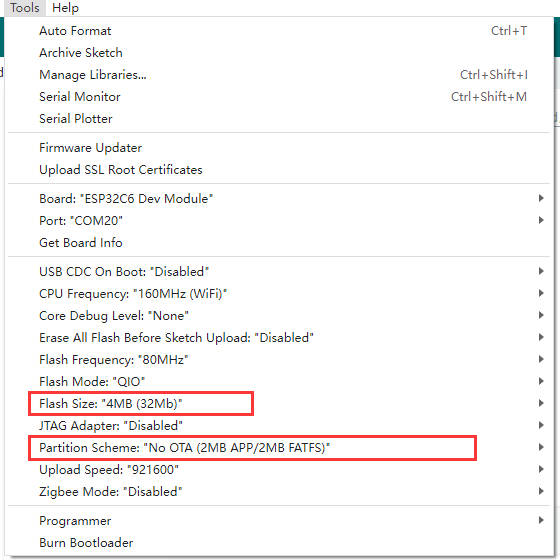
- Select the development board model ESP32C6 and port
- UART download
- Flash the demo
Result demonstration
- LCD displays onboard parameters:

Flash Firmware Flashing and Erasing
- The current demo provides test firmware, which can be used to test whether the onboard device functions properly by directly flashing the test firmware
- bin file path:
..\ESP32-C6-LCD-1.47-Demo\Firmware
Resources
Schematic diagram
Demo
Project Diagram
Application Examples
Datasheets
ESP32-C6
Other components
Software tools
Arduino
VScode
Debugging tool
Other resource link
Project Resources
This section features third - party project resources. We merely provide links and bear no responsibility for content updates or maintenance. Thank you for your understanding.
Volos Projects-How to Interact with Your UI - LVGL and Squareline Studio
- Youtube: https://www.youtube.com/watch?v=KEcr22qZAVE
- Github: https://github.com/VolosR/WaveShareC6lvglexample
FAQ
Question: After the module downloads the demo and re-downloads it, why sometimes it can't connect to the serial port or the flashing fails?
- Long press the BOOT button, press RESET at the same time, then release RESET, then release the BOOT button, at this time the module can enter the download mode, which can solve most of the problems that can not be downloaded.
Question: Why does the module keep resetting and flicker when viewed the recognition status from the device manager?
- It may be due to Flash blank and the USB port is not stable, you can long-press the BOOT button, press RESET at the same time, and then release RESET, and then release the BOOT button, at this time the module can enter the download mode to flash the firmware (demo) to solve the situation.
Question: How to deal with the first compilation of the program being extremely slow?
- It's normal for the first compilation to be slow, just be patient
Question: How to handle the display "waiting for download..." on the serial port after successfully ESP-IDF flashing?
- If there is a reset button on the development board, press the reset button; if there is no reset button, please power it on again
Question: What should I do if I can't find the AppData folder?
- Some AppData folders are hidden by default and can be set to show.
- English system: Explorer->View->Check "Hidden items"
- Chinese system: File Explorer -> View -> Display -> Check "Hidden Items"
Question: How do I check the COM port I use?
- Windows system:
①View through Device Manager: Press the Windows + R keys to open the "Run" dialog box; input devmgmt.msc and press Enter to open the Device Manager; expand the "Ports (COM and LPT)" section, where all COM ports and their current statuses will be listed.
②Use the command prompt to view: Open the Command Prompt (CMD), enter the "mode" command, which will display status information for all COM ports.
③Check hardware connections: If you have already connected external devices to the COM port, the device usually occupies a port number, which can be determined by checking the connected hardware.
- Linux system:
①Use the dmesg command to view: Open the terminal.
①Use the ls command to view: Enter ls /dev/ttyS* or ls /dev/ttyUSB* to list all serial port devices.
③Use the setserial command to view: Enter setserial -g /dev/ttyS* to view the configuration information of all serial port devices.
Question: Why does the program flashing fail when using a MAC device?
- Install MAC Driver and flash again.
Question: Why is there no output after successfully burning the code with no issues?
- Check the schematic diagram for different development boards with Type-C interfaces, and handle the output accordingly:
- For development boards with direct USB output, printf function is supported for printing output. If you want to support output via the Serial function, you will need to enable the USB CDC On Boot feature or declare HWCDC.
- For development boards with UART to USB conversion, both printf and Serial functions are supported for printing output, and there is no need to enable USB CDC On Boot.
Question: How to use SquareLine Studio to design interfaces?
- Refer to SquareLine Studio tutorial
Support
Monday-Friday (9:30-6:30) Saturday (9:30-5:30)
Email: services01@spotpear.com
[Tutorial Navigation]
- Overview
- Usage Instructions
- Working with Arduino
- Working with ESP-IDF
- Flash Firmware Flashing and Erasing
- Resources
- Schematic diagram
- Demo
- Project Diagram
- Application Examples
- Datasheets
- Software tools
- Other resource link
- Project Resources
- FAQ
- Question: After the module downloads the demo and re-downloads it, why sometimes it can't connect to the serial port or the flashing fails?
- Question: Why does the module keep resetting and flicker when viewed the recognition status from the device manager?
- Question: How to deal with the first compilation of the program being extremely slow?
- Question: How to handle the display "waiting for download..." on the serial port after successfully ESP-IDF flashing?
- Question: What should I do if I can't find the AppData folder?
- Question: How do I check the COM port I use?
- Question: Why does the program flashing fail when using a MAC device?
- Question: Why is there no output after successfully burning the code with no issues?
- Question: How to use SquareLine Studio to design interfaces?
- Support