




- sales/support
Google Chat:---
- sales
+86-0755-88291180
- sales01
sales@spotpear.com
- sales02
dragon_manager@163.com
- support
tech-support@spotpear.com
- CEO-Complaints
zhoujie@spotpear.com
- Only Tech-Support
WhatsApp:13246739196
- Purchase/Shipping/Refund
WhatsApp:13424403025
- HOME
- >
- ARTICLES
- >
- Common Moudle
- >
- ESP
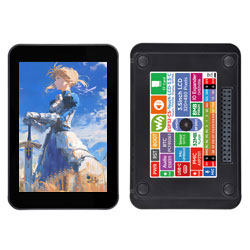
ESP32-C5-Touch-LCD-3.5 User Guide
Features
- Utilizes the ESP32-C5-WROOM-1U series module, equipped with a RISC-V 32-bit processor running at up to 240 MHz.
- Integrated 384 KB SRAM, 320 KB ROM, 8 MB PSRAM, and 32 MB Flash, balancing program execution, graphical interface, and data storage requirements.
- Integrated 2.4 GHz and 5 GHz dual‑band Wi‑Fi, Bluetooth 5 (LE), and IEEE 802.15.4 (supporting Zigbee 3.0 and Thread) wireless communication.
- Onboard camera interface, supporting the BF3901 camera.
- Onboard battery charging management module, with a reserved 3.7 V MX1.25 lithium battery connector for external battery power.
- Type-C interface for power supply, program download, and communication.
- Onboard 3.5inch capacitive touch IPS screen with a resolution of 320 × 480, supporting 262K color display.
- Built-in ST7796 display driver chip and FT6336 capacitive touch chip, communicating via SPI and I2C interfaces respectively.
- Exposes UART, I2C, and some I/O interfaces; integrated full‑speed USB serial port.
- Onboard QMI8658 six-axis sensor, PCF85063 RTC chip, SHTC3 temperature and humidity sensor, and TF card slot, etc.
- Onboard PWR and BOOT side buttons, both supporting custom functions.
- Onboard ES8311 audio codec chip, NS4150B amplifier chip, microphone, and speaker, suitable for voice interaction and audio playback.
- Supports development environments such as ESP-IDF and Arduino
Onboard Resources
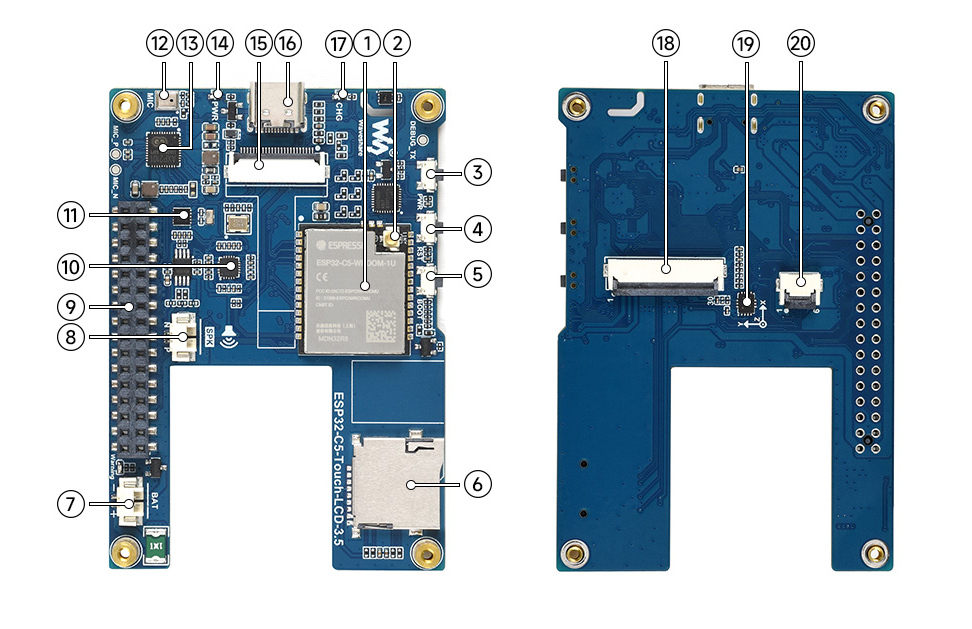
- ESP32-C5-WROOM-1U main control module
- IPEX Gen 1 antenna connector for connecting the included FPC dual-band Wi-Fi antenna
- PWR button controls power on/off, supports custom functions
- RESET button for resetting the development board
- BOOT button for entering download mode, can also be used as a regular button
- TF card slot for connecting a TF card
- MX1.25 lithium battery header MX1.25 2PIN connector for connecting a 3.7 V lithium battery, supports charging and discharging
- MX1.25 2PIN speaker header audio output interface, for connecting an external speaker
- 2.54 mm female header exposes available GPIOs
- ES8311 low-power audio codec chip
- PCF85063 RTC clock chip
- Microphone for audio input
- AXP2101 highly integrated power management chip
- Power indicator indicates the device power status
- Camera interface for connecting a camera module
- Type-C port for power supply, program download, and communication
- Charging indicator indicates battery charging status
- 3.5inch display panel connector for connecting the LCD
- QMI8658 6-axis IMU includes a 3-axis gyroscope and a 3-axis accelerometer
- 3.5inch display touch connector for connecting the touch panel
Interface Introduction
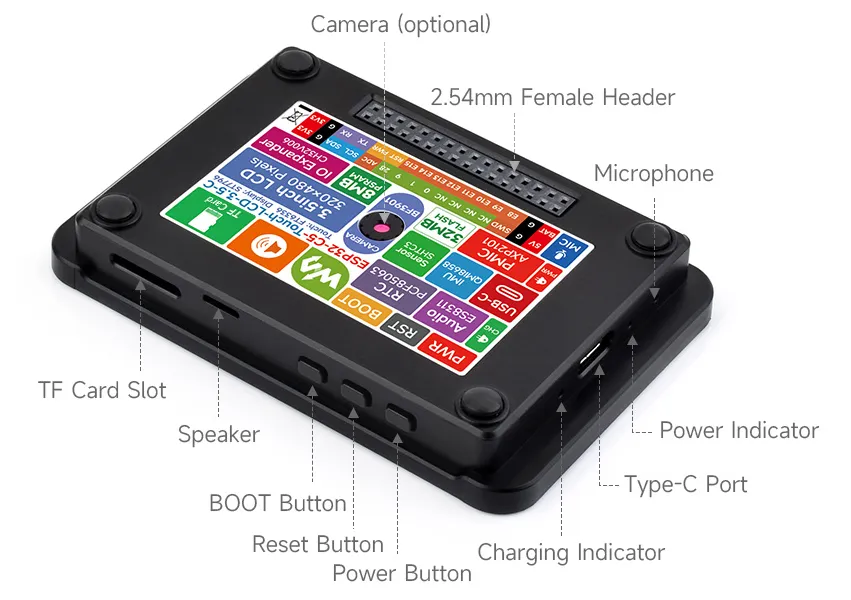
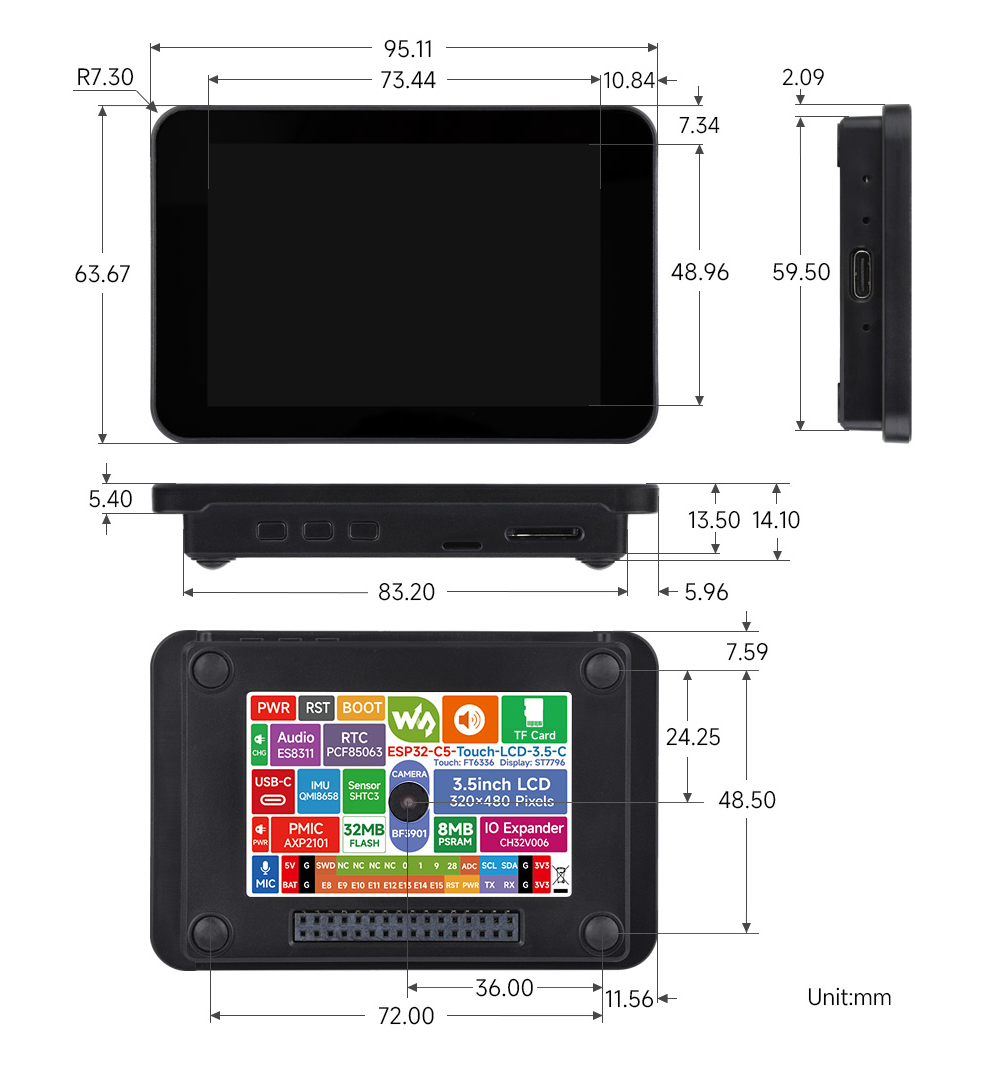
Dimensions
ESP32-C5-Touch-LCD-3.5 Factory Firmware Instructions
This section describes the basic functions and usage of each application (APP) in the ESP32-C5-Touch-LCD-3.5 factory firmware. Before running the factory firmware, prepare the following components:
Required Components
- ESP32-C5-Touch-LCD-3.5 ×1
- USB data cable ×1
- TF card ×1 (optional; used for taking photos and recording audio; a capacity of 64 GB or less is recommended, formatted as FAT32)
- BF3901 camera module ×1 (optional; required when using the Camera APP)
First-Time Use
- If you need to use the Camera APP, connect the BF3901 camera module to the development board.
- If you need to use the photo or audio recording features, insert a FAT32-formatted TF card.
- Connect the development board to a computer using a USB data cable, or connect a 3.7 V lithium battery for power.
- After powering on, wait for system initialization to complete, then you can select the corresponding APP on the main screen.
Wi-Fi Scanning
- Go to the
WLANscreen and tap the scan button in the upper-right corner to scan for nearby Wi-Fi networks.
Precautions
USB Download Precautions
If the port cannot be recognized, enter Boot Mode:
- Press and hold the BOOT button.
- Connect the development board to a USB port on the computer.
- Release the BOOT button.
After the download is complete, power cycle the board to run the program.
TF Card Precautions
- Before using features that involve file storage, such as the camera and Mic, insert a TF card first.
- Only FAT32-formatted TF cards are supported; a capacity of 64 GB or less is recommended.
- Do not remove the TF card while it is being read from or written to, as this may corrupt files.
PWR Button
- The
PWRbutton supports custom functions. - Whether powered by Type-C alone, battery alone, or both Type-C and battery at the same time, you can press and hold the
PWRbutton for about 5 to 7 seconds to power off. - When powered off, press the
PWRbutton once briefly to power on. - In addition to being used to enter download mode, the
BOOTbutton can also be used as a regular function button.
Firmware Download
The factory firmware and its source code will be provided in Resources. For flashing instructions, see Firmware Flashing and Erasing.
Example Overview
The factory firmware uses an APP-style interface and includes APPs such as Settings, Camera, Music Player, Sensor, Drawing, and Mic. It can be used to try out and verify the development board's main onboard resources.
App Example Introduction
- Tap the APP icon on the main screen to enter the corresponding app.
- To exit an APP, swipe up from the bottom of the screen to return to the main screen.
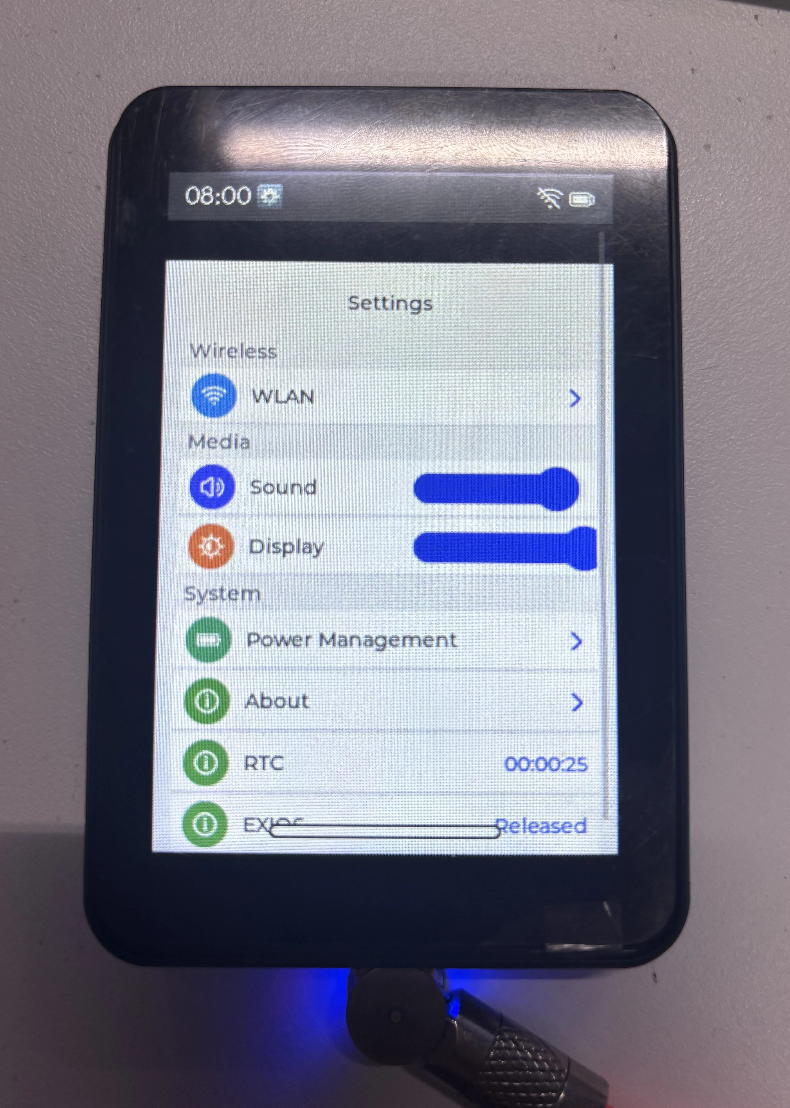
Settings APP
WLANis used to scan for and display nearby Wi-Fi networks.SoundandDisplayare used to adjust the volume and screen brightness, respectively.- You can also open pages such as Power Management, Product Information, RTC, and EXIO to view or configure related functions.
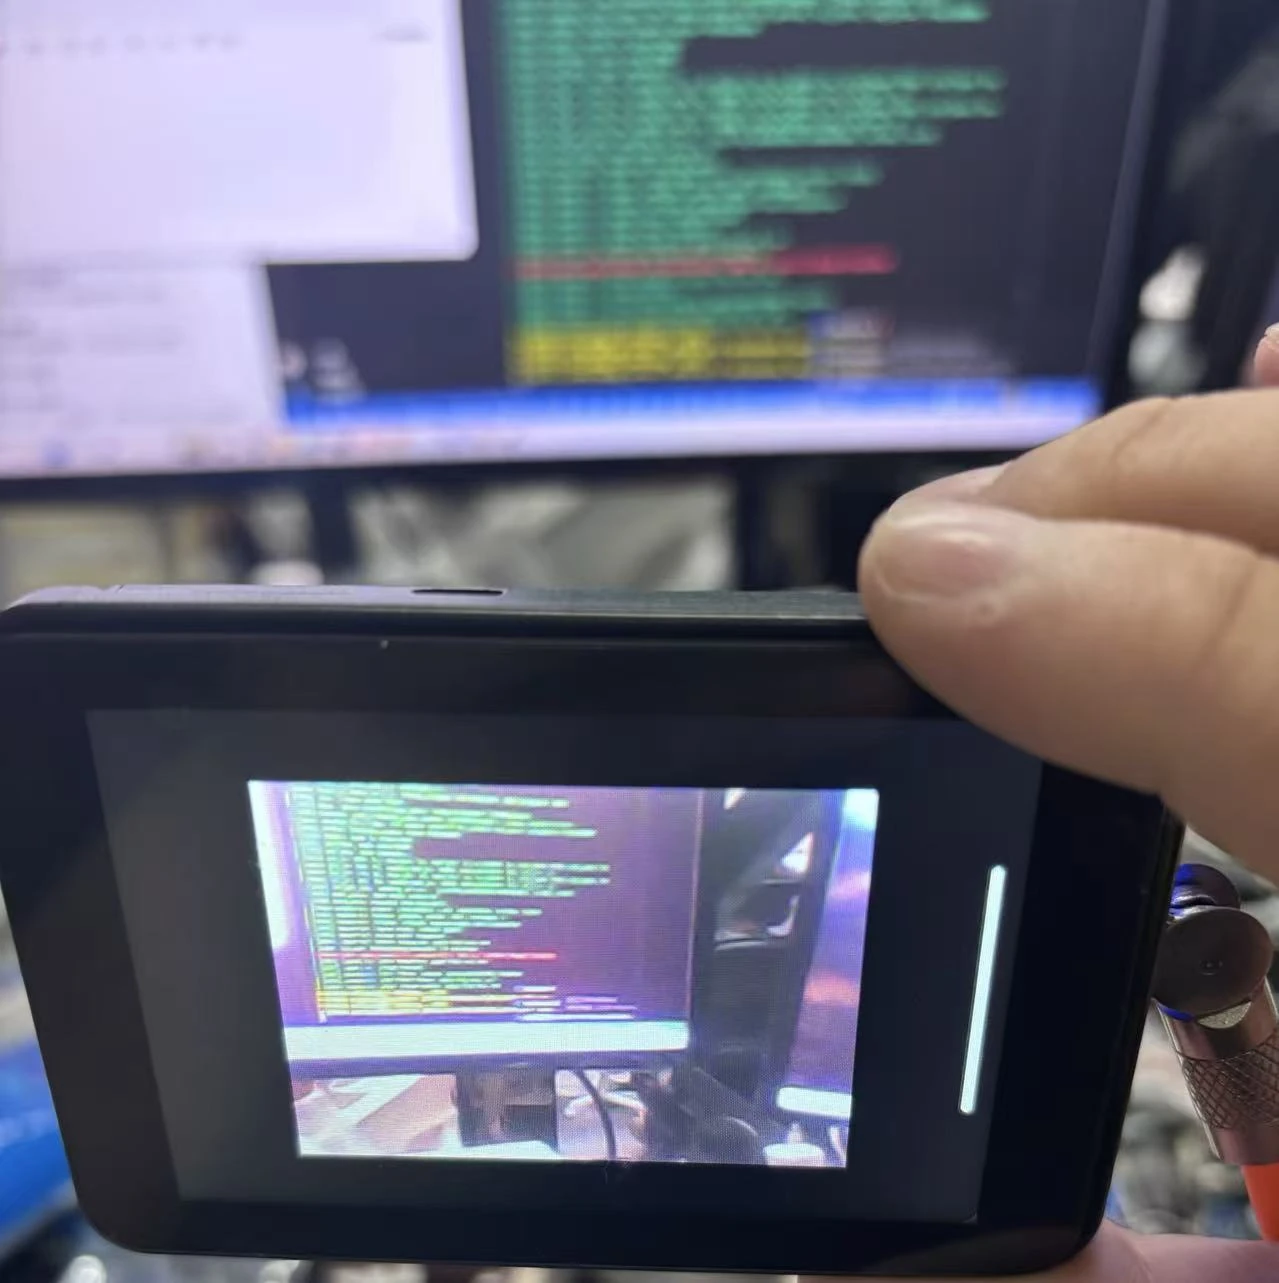
Camera APP
- Supports camera preview; press the BOOT button to take a photo.
- Captured photos are automatically saved to the TF card and can be viewed in the album.
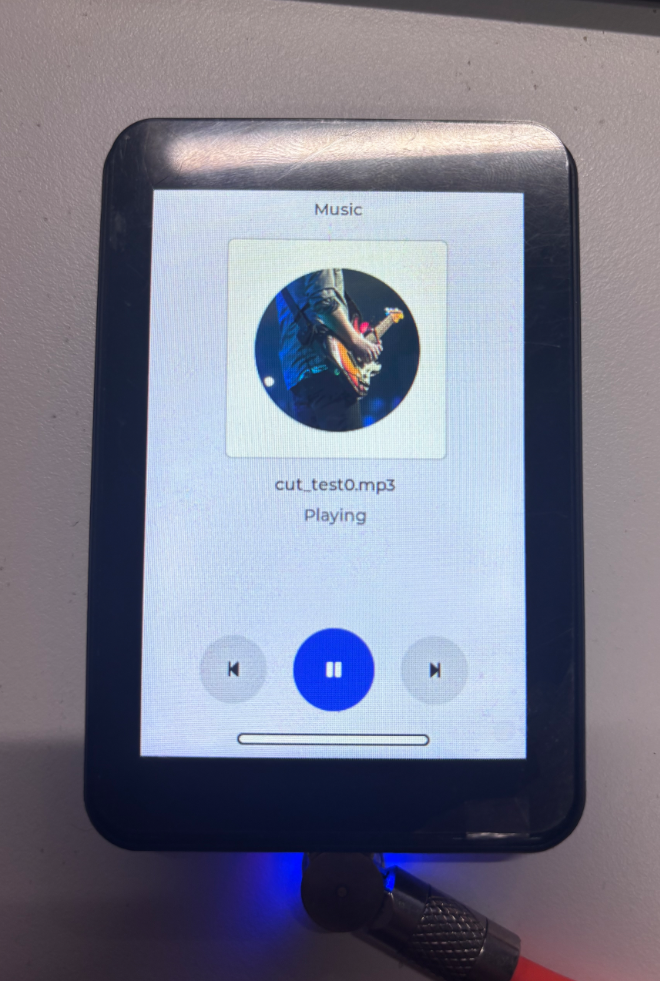
Music APP
- Supports playback of MP3 audio files stored in SPIFFS.
- Before use, make sure the speaker is connected properly, then tap the play button to play audio.
- The current example only supports play and pause; switching songs is not supported.
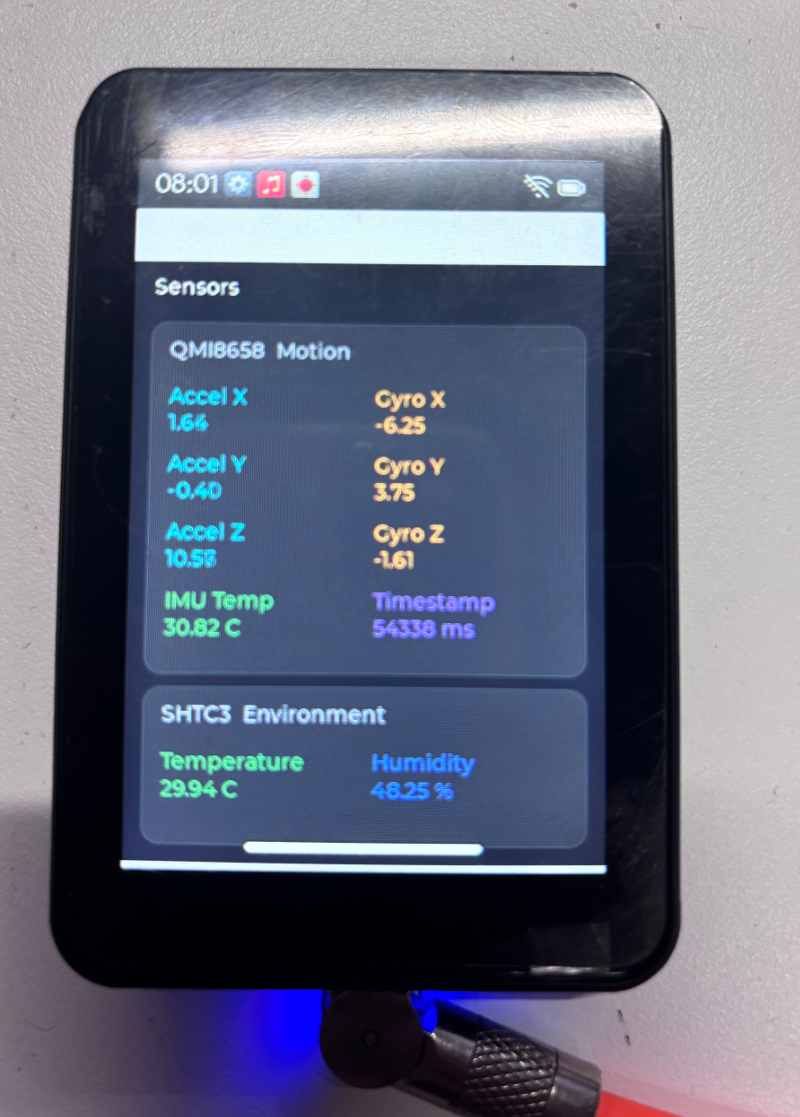
Sensor APP
- Displays real-time acceleration, angular velocity, and chip temperature data from the QMI8658 six-axis sensor.
- Also displays ambient temperature and humidity data collected by the SHTC3.
- When you rotate the development board or change the surrounding environment, the on-screen data updates accordingly.
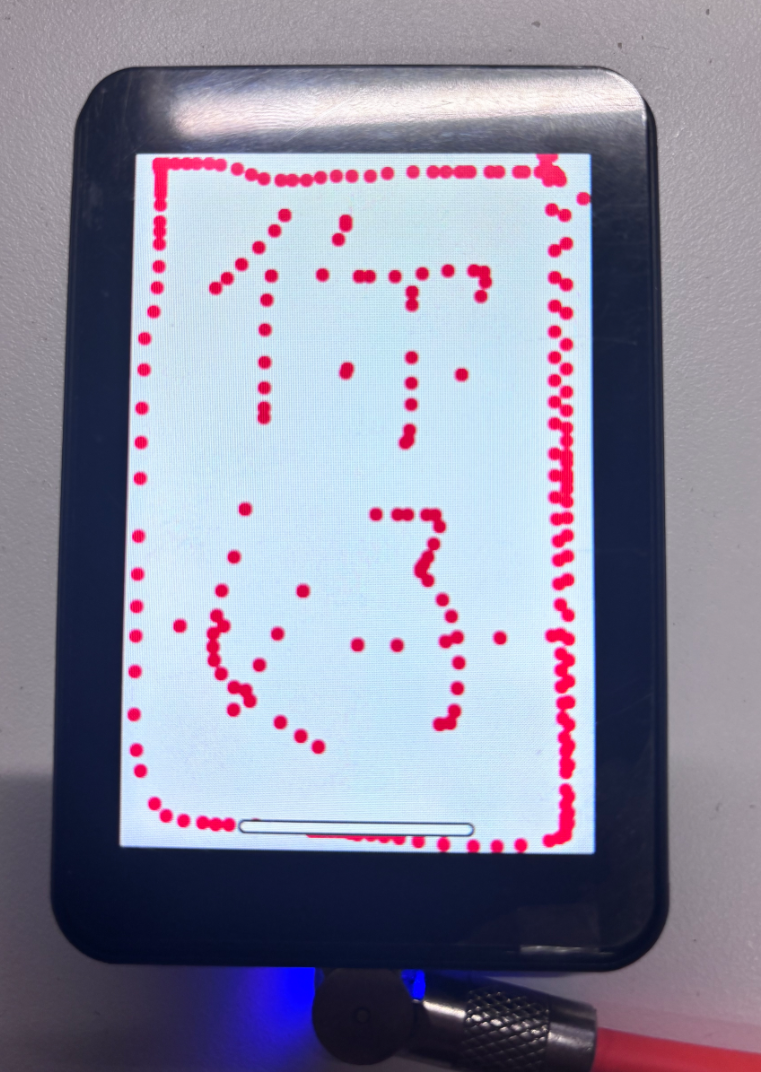
Draw APP
- Supports freehand drawing via the touchscreen.
- Can be used to try out the drawing feature or quickly check whether touch positions are working properly.
Mic APP
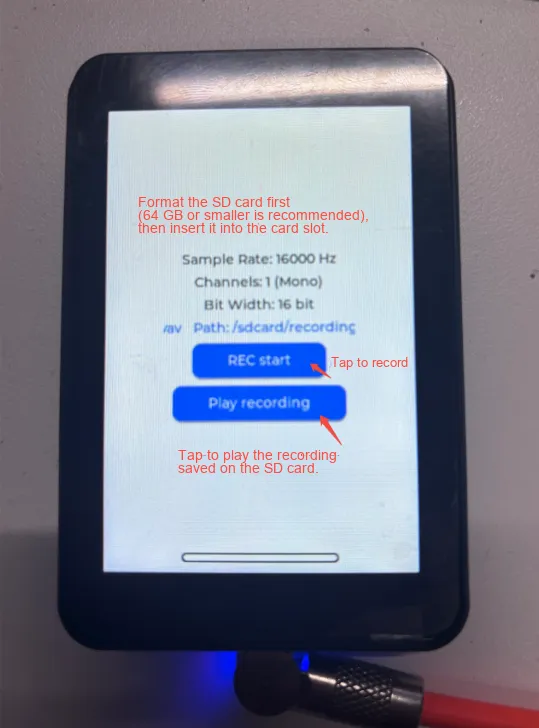
- Supports audio recording through the onboard microphone; recording parameters are 16 kHz, mono, 16-bit.
- Tap
REC startto start recording; recordings are saved in the/sdcard/recordingsdirectory on the TF card. - Tap
Play recordingto play saved recording files.
Working with Arduino
This chapter includes the following sections, please read as needed:
Before running the examples, please ensure the following conditions are met:
- The ESP32-C5-Touch-LCD-3.5 development board is ready.
- The board is connected to the PC via a USB data cable.
- Arduino IDE is installed.
- Arduino ESP32 Core v3.3.10 is installed.
Arduino Getting Started
New to Arduino ESP32 development and looking for a quick start? We have prepared a comprehensive Getting Started Tutorial for you.
- Section 0: Getting to Know ESP32
- Section 1: Installing and Configuring Arduino IDE
- Section 2: Arduino Basics
- Section 3: Digital Output/Input
- Section 4: Analog Input
- Section 5: Pulse Width Modulation (PWM)
- Section 6: Serial Communication (UART)
- Section 7: I2C Communication
- Section 8: SPI Communication
- Section 9: Wi-Fi Basics
- Section 10: Web Server
- Section 11: Bluetooth
- Section 12: LVGL GUI Development
- Section 13: Comprehensive Project
Note: This tutorial uses the ESP32-S3-Zero as a reference example, and all hardware code is based on its pinout. Before you start, we recommend checking the pinout of your development board to ensure the pin configuration is correct.
Setting Up the Development Environment
1. Installing and Configuring the Arduino IDE
Please refer to the tutorial Installing and Configuring the Arduino IDE to download and install the Arduino IDE.
2. Installing the ESP32 Board Support Package
Install the esp32 by Espressif Systems board support package in the Arduino IDE Board Manager.
The ESP32-C5-Touch-LCD-3.5 board uses the ESP32-C5-WROOM-1U series module. Please use version v3.3.10 of esp32 by Espressif Systems.
If an older version of Arduino ESP32 Core is used, the board may not be recognized correctly, resulting in serial download failure or inability to flash programs.
ESP32-C5-Touch-LCD-3.5 Board Installation Requirements:
| Board Name | Board Installation Requirement | Version Requirement |
|---|---|---|
| ESP32 by Espressif Systems | Online or offline installation | v3.3.10 |
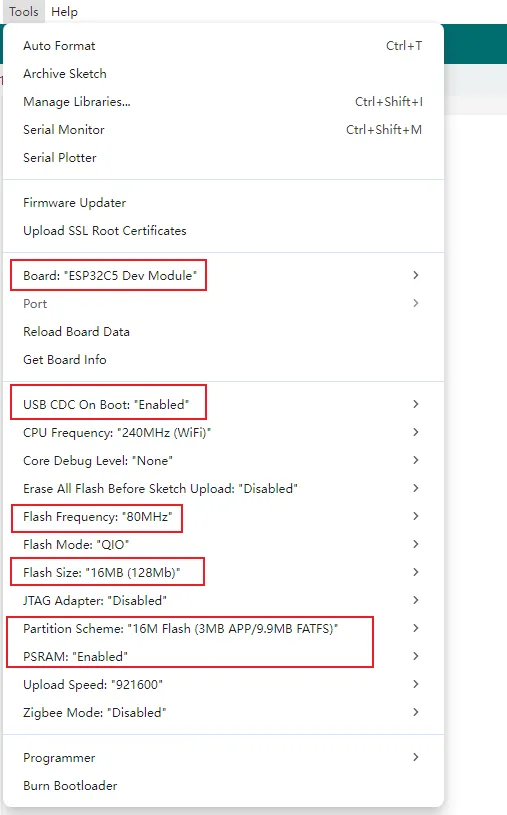
After installation, select the appropriate ESP32-C5 board in Arduino IDE and select the USB serial port currently connected.
In the Arduino project settings for the ESP32-C5-Touch-LCD-3.5, select ESP32C5 Dev Module as the board.
Working with ESP-IDF
This chapter includes the following sections, please read as needed:
ESP-IDF Getting Started
New to ESP32 ESP-IDF development and looking to get started quickly? We have prepared a general Getting Started Tutorial for you.
- Section 1: Environment Setup
- Section 2: Running Examples
- Section 3: Creating a Project
- Section 4: Using Components
- Section 5: Debugging
- Section 6: FreeRTOS
- Section 7: Peripherals
- Section 8: Wi-Fi Programming
- Section 9: BLE Programming
Please Note: This tutorial uses the ESP32-S3-Zero as a teaching example, and all hardware code is based on its pinout. Before you start, it is recommended that you check the pinout of your development board to ensure the pin configuration is correct.
Setting Up the ESP-IDF Development Environment
The following guide uses Windows as an example, demonstrating development using VS Code + the ESP-IDF extension. macOS and Linux users should refer to the official documentation.
The screenshots in this section use ESP-IDF V5.5.2 as an example. When installing, please select the ESP-IDF version that matches your board's example.
Install the ESP-IDF Development Environment
Download the installation manager from the ESP-IDF Installation Manager page. This is Espressif's latest cross-platform installer. The following steps demonstrate how to use its offline installation feature.
Click the Offline Installer tab on the page, then select Windows as the operating system and the ESP-IDF version you need (the version shown in the screenshot is for reference only — choose the version that fits your actual needs).
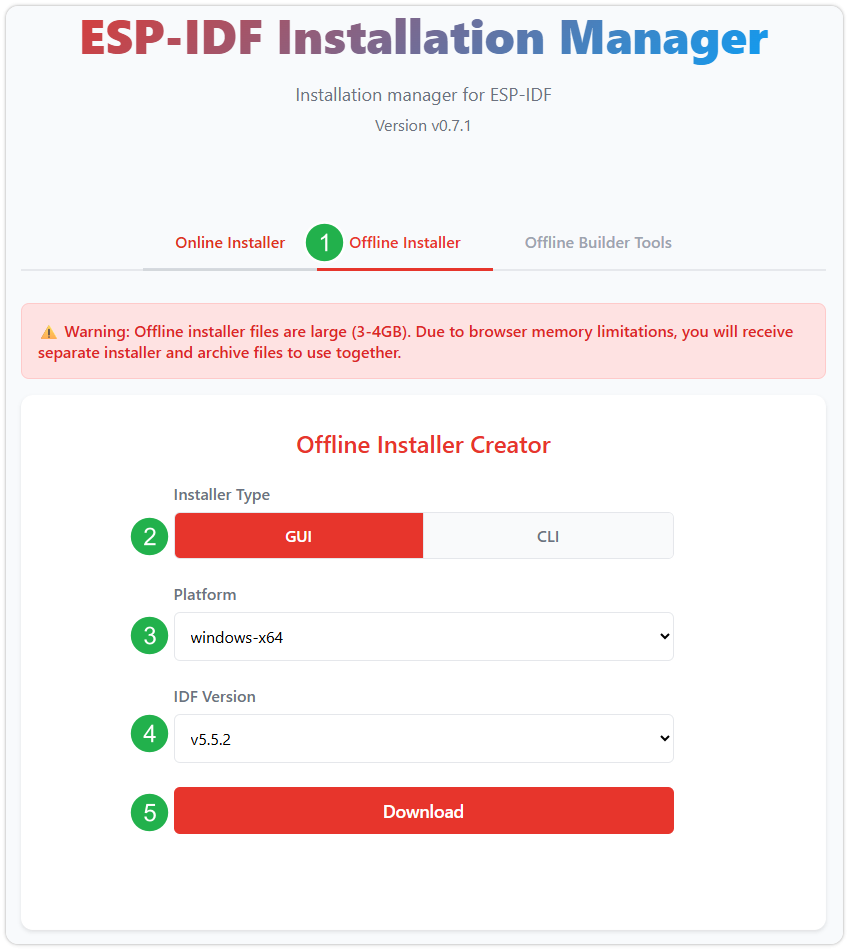
After confirming your selection, click the download button. The browser will automatically download two files: the ESP-IDF Offline Package (.zst) and the ESP-IDF Installer (.exe).
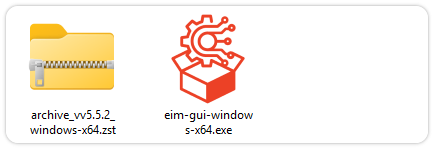
Please wait for both files to finish downloading.
Once the download is complete, double-click to run the ESP-IDF Installer (eim-gui-windows-x64.exe).
The installer will automatically detect if the offline package exists in the same directory. Click Install from archive.
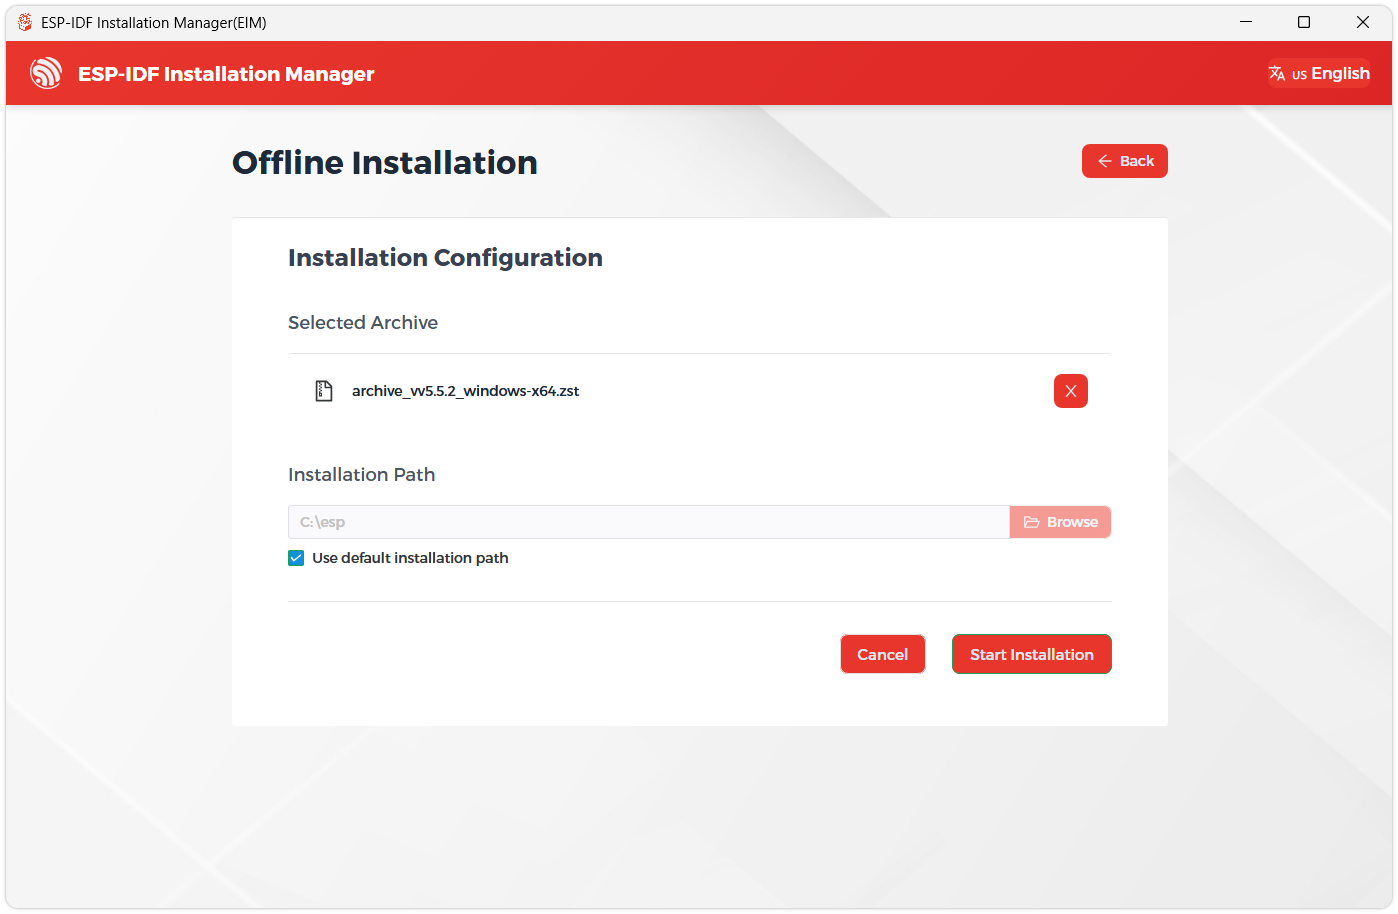
Next, select the installation path. We recommend using the default path. If you need to customize it, ensure the path does not contain Chinese characters or spaces. Click Start installation to proceed.
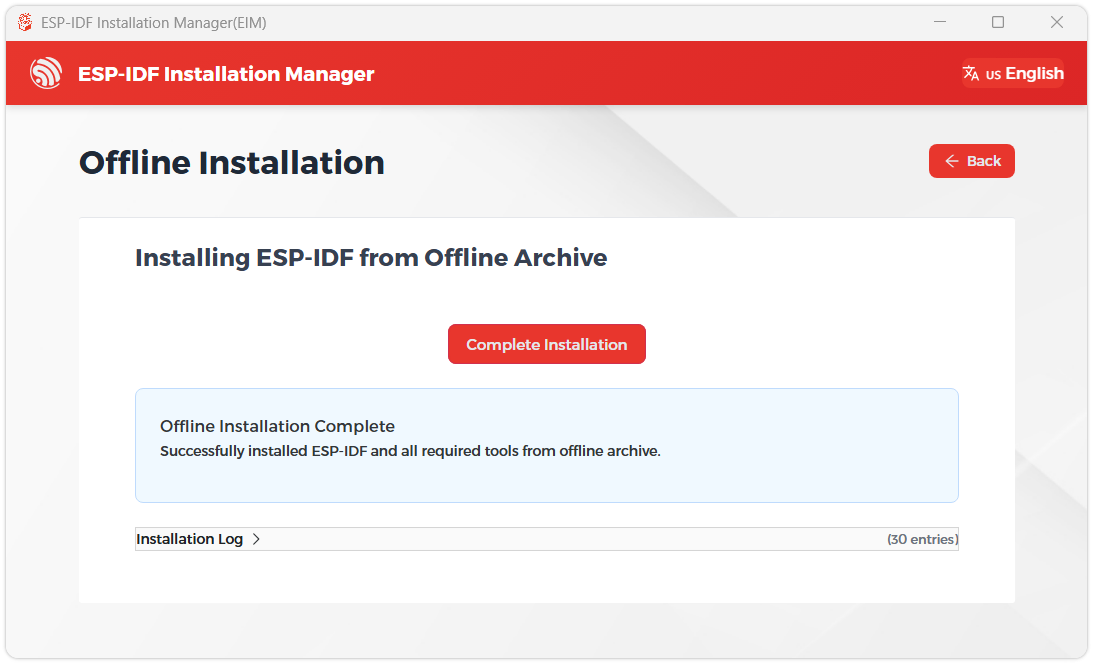
When you see the following screen, the ESP-IDF installation is successful.
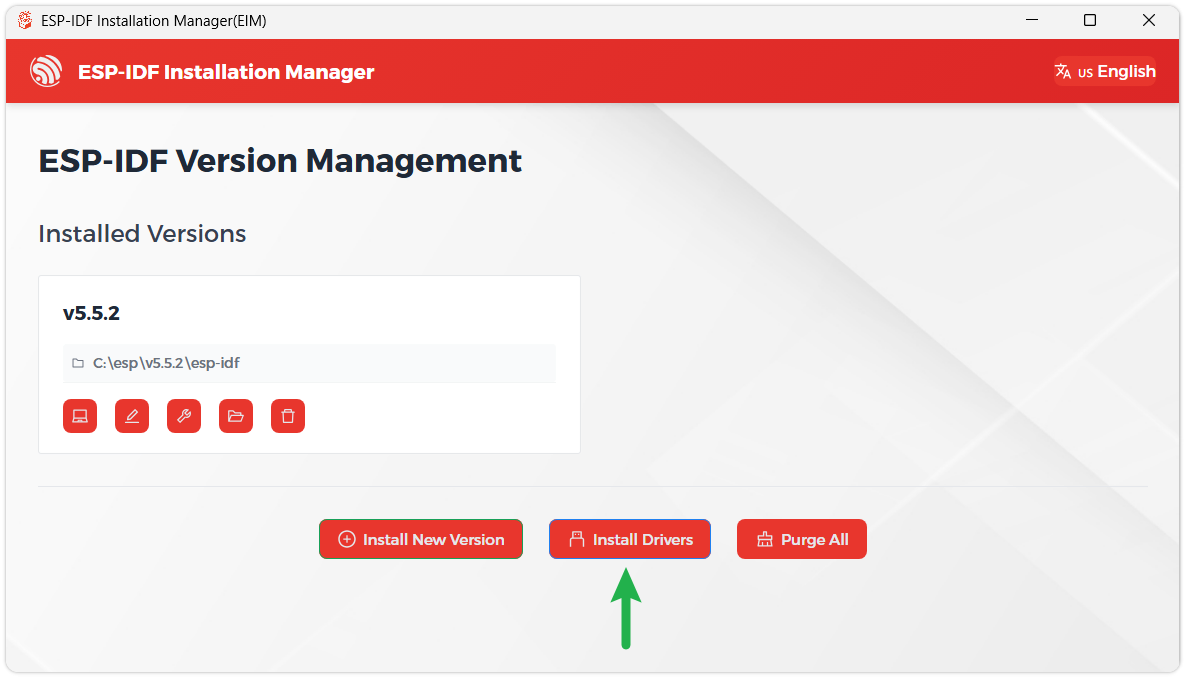
We recommend installing the drivers as well. Click Finish installation, then select Install driver.
Install Visual Studio Code and the ESP-IDF Extension
Download and install Visual Studio Code.
During installation, it is recommended to check Add "Open with Code" action to Windows Explorer file context menu to facilitate opening project folders quickly.
In VS Code, click the Extensions icon
 in the Activity Bar on the side (or use the shortcut Ctrl + Shift + X) to open the Extensions view.
Enter ESP-IDF in the search box, locate the ESP-IDF extension, and click Install.
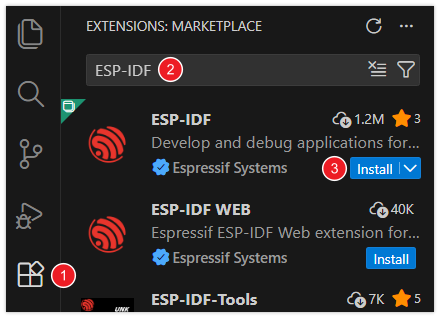
For ESP-IDF extension versions ≥ 2.0, the extension will automatically detect and recognize the ESP-IDF environment installed in the previous steps, requiring no manual configuration.
ESP32-C5-Touch-LCD-3.5 Firmware Flashing and Erasing
The test firmware is still in preparation and will be available for download from Resources once released.
- Flash address:
0x00
- Firmware Flashing
- Firmware Erasing
The following steps apply to the firmware provided on this page.
Download and extract Espressif's official Flash Download Tool (Download)
Run Flash Download Tool and select the options that match the development board's MCU and download interface. The screenshot below uses ESP32-S3 and USB as an example; use the options required by the product's hardware design.
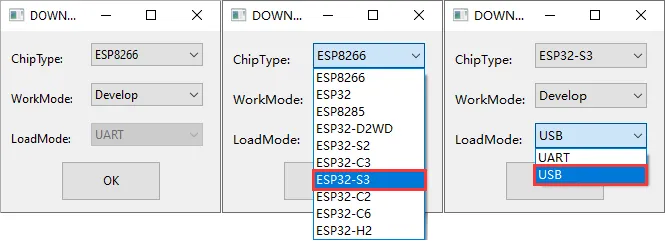
Parameter settings
- Select the COM port for the development board
- Set BAUD to the maximum value, 1152000
- Click the "..." button in the row, select the bin file provided by Waveshare, manually enter the flash address given at the top of this page in the field to its right, and select the leftmost checkbox in the row
- Click START to begin flashing
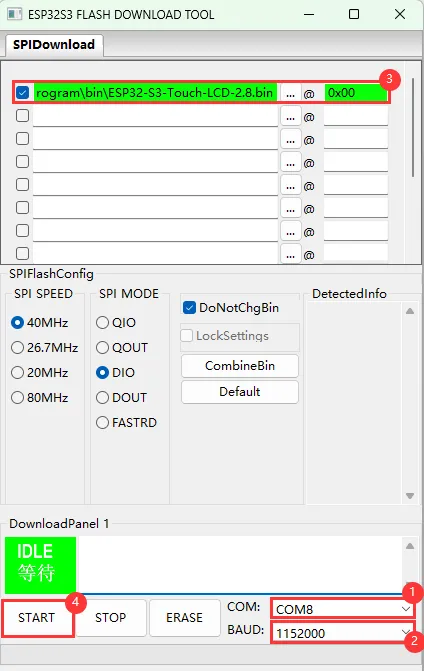
Wait for flashing to complete (this may take some time; please be patient)
Press the reset button and verify the result
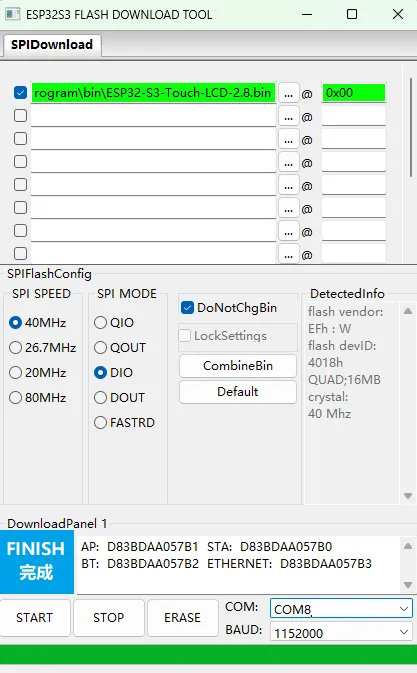
Resources
3. Technical Manuals
ESP32-C5 Chip Official Manuals
Onboard Component Datasheets: Related resources are still being prepared.
4. Software Tools
- Arduino IDE Official Download
- Visual Studio Code Official Download
- Serial Port Debug Assistant
- Flash Download Tool
5. Other Resources
Support
Monday-Friday (9:30-6:30) Saturday (9:30-5:30)
Email: services01@spotpear.com
[Tutorial Navigation]
- Features
- Onboard Resources
- Interface Introduction
- Dimensions
- ESP32-C5-Touch-LCD-3.5 Factory Firmware Instructions
- Required Components
- First-Time Use
- Wi-Fi Scanning
- Precautions
- PWR Button
- Firmware Download
- Example Overview
- App Example Introduction
- Working with Arduino
- Working with ESP-IDF
- ESP32-C5-Touch-LCD-3.5 Firmware Flashing and Erasing
- Resources
- Support