


- sales/support
Google Chat:---
- sales
+86-0755-88291180
- sales01
sales@spotpear.com
- sales02
dragon_manager@163.com
- support
tech-support@spotpear.com
- CEO-Complaints
zhoujie@spotpear.com
- Only Tech-Support
WhatsApp:13246739196
- Purchase/Shipping/Refund
WhatsApp:13424403025
RDK-X3-MD User Guide
Introduction
The RDK X3 Module is a fully-featured, high-performance intelligent module equipped with the D-Robotics Sunrise ® 3 high-performance AI chip, delivering both general-purpose and AI computing power at the edge. It is compatible with Raspberry Pi CM4, enabling quick integration and rapid product deployment for users. The module features a quad-core Cortex A53 ARM processor and 2GB/4GB of memory, supporting 5TOPS computing power, which makes it easy to complete various tasks. It also supports 4K@60fps video encoding and decoding, providing a high-quality video experience.
The main ports include HDMI, Gigabit Ethernet, USB 3.0, MIPI CSI, and MIPI DSI for diverse peripheral connectivity. It provides options for Wireless / RAM / eMMC. Users can select different specifications based on their specific requirements, enabling more flexible and efficient solutions.
Specifications
| Processor | D-Robotics Sunrise ® X3M chip |
|---|---|
| CPU | Quad-core ARM Cortex-A53@1.2GHz |
| BPU | Dual-core @1GHz, equivalent computing power 5 TOPS |
| Memory | 2G/4G Byte LPDDR4 |
| Memory | Optional 16GB, 32GB or 64GB eMMC Flash |
| Camera | 2 × 2-lane MIPI CSI camera port; 1 × 4-lane MIPI CSI camera port |
| Display port | HDMI × 1 (up to 1920 × 1080); MIPI-DSI × 1 (up to 1920 × 1080); |
| USB port | 1 × USB 3.0 port |
| Wired network | Support for Gigabit Ethernet |
| Wireless network | Optional dual-band (2.4GHz/5.0GHz) IEEE 802.11b/g/n/ac wireless WiFi |
| Bluetooth | Bluetooth 4.2 × 1 |
| Other ports | TF card slot; 28 GPIO pins; |
| Power | 5V/3A DC |
| Operating temperature | -25°C ~ 60 °C |
Usage Guide
Software Preparation
Baseboard
RDK X3 MD is the core module, and users need to use it with a baseboard. Since RDK X3 MD is compatible with the Raspberry Pi CM4 in hardware design, the CM4 baseboard can be used directly here.
- Mini Base Board (A)
- Mini Base Board (B)
Power Supply
The base board is powered through the USB Type-C port and requires a power adapter that supports 5V 3A to power the development board.
Note: Please do not power the development board using the computer's USB port. Otherwise, it may cause the development board to experience unexpected power loss, repeated reboots, and other abnormal conditions.
- 5V 3A Type-C AC adapter
Display
The RDK X3 Module development board supports HDMI display port. By connecting the development board and the monitor with an HDMI cable, it supports graphical desktop display.
After entering the system configuration, you can switch to DSI interface display. Users who need it can also choose DSI touchscreen
System Installation
Image Download
Download the Ubuntu image compressed package and extract the Ubuntu system image file.
Note: For the RDK X3 Module, it is recommended to use a new image of version 3.0 or higher.
- Go to the image download page and click on the desired version
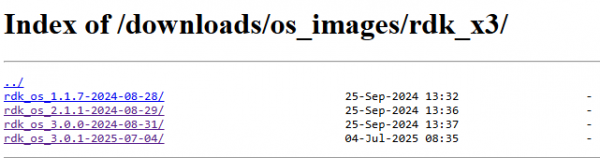
- Go to the version page and click to release

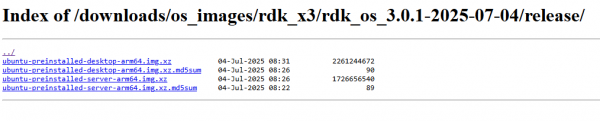
- Click on the desired image file to download
Flash System to eMMC
- Download flashing tool
The RDK X3 module supports eMMC storage. When flashing the system to eMMC, you need to use the D-robotics hbupdate flashing tool. Please follow the steps below to download and install the tool:
- Download hbupdate flashing tool, download link: hbupdate.
- Tools are available in Windows and Linux versions, named respectively as hbupdate_win64_vx.x.x_rdk.tar.gz and hbupdate_linux_gui_vx.x.x_rdk.tar.gz.
- Decompress the flashing tool, the decompression directory should not contain spaces, Chinese characters, or special characters.
- Install USB driver
The driver installation is only needed the first time it is used.
- Download the driver andriod_hobot
- Decompress android_hobot.zip, enter the decompressed directory, run 5-runasadmin_register-CA-cer.cmd as an administrator to complete the driver registration.
- Set the BootPin of the development board to ON mode, connect the development board to the PC via a USB cable, and then power on the development board.
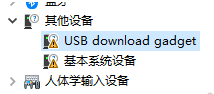
- If the PC device manager shows an unknown USB download gadget device, you need to update the device driver. Select the extracted driver folder andriod_hobot, then click Next to complete the driver installation, as shown in the figure below
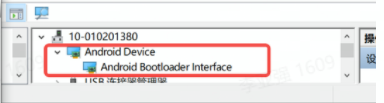
- After the driver installation is completed, the Device Manager will show the fastboot device as Android Device, as shown in the following image:
- Flashing system (official baseplate)
1. After confirming that the PC device manager displays the fastboot device as Android Device, run hbupdate.exe to open the flashing tool and follow the following steps for flashing:
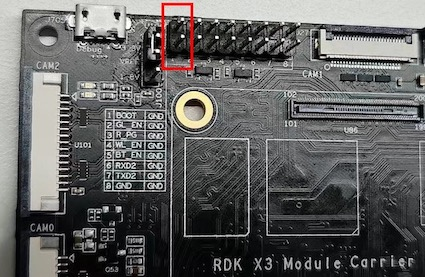
2. Use the jumper cap to ground the Boot pin of the RDK X3 Module carrier board, and refer to the figure below for the pin position
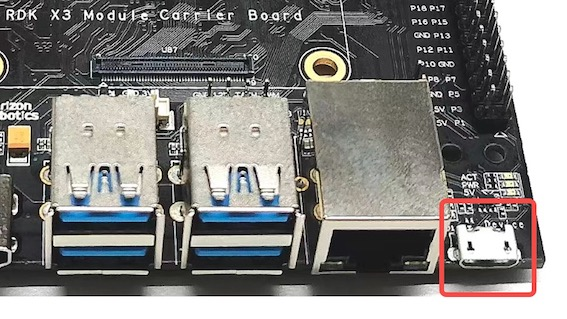
3. Connect the Micro USB port of the carrier board to the computer through a USB cable, and refer to the following figure for the port location.
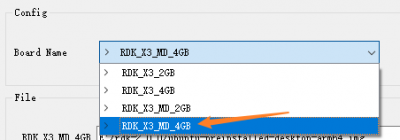
4. Select the development board model.
- RDK_X3_2GB: RDK X3 (Sunrise X3 Pi), 2GB memory version, only supports flashing minimum system images
- RDK_X3_4GB: RDK X3 (Sunrise X3 Pi), 4GB memory version, only supports flashing minimum system images
- RDK_X3_MD_2GB: RDK X3 Module, 2GB memory version
- RDK_X3_MD_4GB: RDK X3 Module, 4GB memory version
5. Click Browse button to select the image file to be flashed![]()
6. Click Start button to begin the flashing process and proceed according to the pop-up prompts for flashing: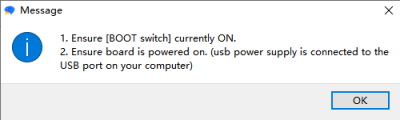
7. When the image is flashed successfully, the tooltip is as follows:
8. After flashing, disconnect the power supply, disconnect the cable to the computer, unplug the short-circuit jump cap on the BOOT of the base plate, and power it on again
9. The system will perform default environment configuration upon first startup, which takes around 45 seconds, and will display the Ubuntu system desktop after the configuration is completed.
- Flashing system (CM4 baseplate)
1. After confirming that the PC device manager displays the fastboot device as Android Device, run hbupdate.exe to open the flashing tool and follow the following steps for flashing:
2. Turn the BOOT switch on the base plate to ON and connect to the computer via the Type-C USB port
3. Select the development board model.
- RDK_X3_2GB: RDK X3 (Sunrise X3 Pi), 2GB memory version, only supports flashing minimum system images
- RDK_X3_4GB: RDK X3 (Sunrise X3 Pi), 4GB memory version, only supports flashing minimum system images
- RDK_X3_MD_2GB: RDK X3 Module, 2GB memory version
- RDK_X3_MD_4GB: RDK X3 Module, 4GB memory version

4. Click Browse button to select the image file to be flashed![]()
5. Click Start button to begin the flashing process and proceed according to the pop-up prompts for flashing:
6. When the image is flashed successfully, the tooltip is as follows: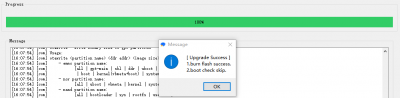
7. After flashing, disconnect the power supply, disconnect the cable to the computer, turn the BOOT switch on the base plate to OFF, and power it on again
8. The system will perform default environment configuration upon first startup, which takes around 45 seconds, and will display the Ubuntu system desktop after the configuration is completed.
Remote Login
When remotely logging in using VNC or SSH, you will need to use the device IP address. Therefore, users need to obtain the development board's IP address in advance. The login username is: sunrise, and the password is: sunrise.
SSH Login
- We need to configure the computer IP before SSH login.
- The first three segments of the IP address of the development board and PC are the same, for example, the development board: 192.168.127.10 and the PC: 192.168.127.100
- The subnet mask and gateway of the development board and PC are consistent
- The PC network firewall is turned off
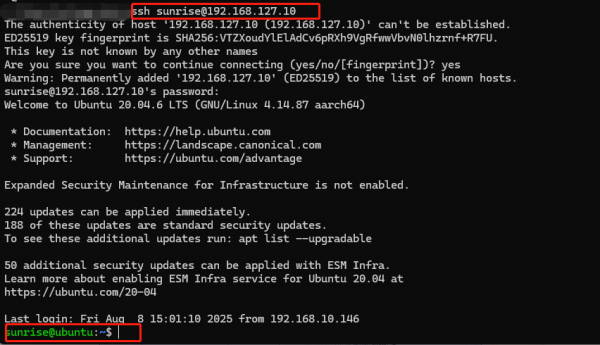
We have obtained the IP address of RDK X3 (192.168.127.10) from logging in via serial port.
To enable communication between the computer and RDK X3, the following operations need to be performed:
- The main steps for configuring a computer IP are as follows:
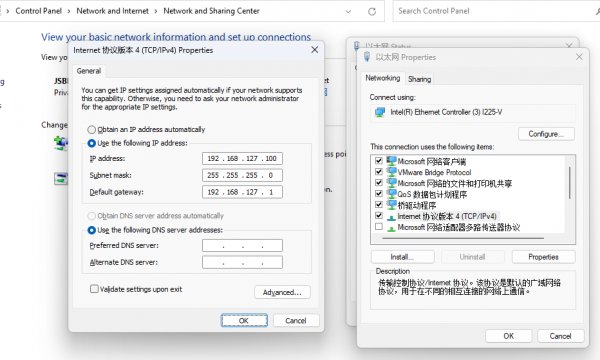
- Find the corresponding Ethernet device in the network connection and right-click to select Properties

- Find the Internet Protocol version 4 option and double-click to open it
- Fill in the corresponding network parameters in the red box in the following figure, and then click OK
- MobaXterm login
Note: The username and password must be entered within 60 seconds upon startup. If not completed, you can try again within the next 60 seconds.
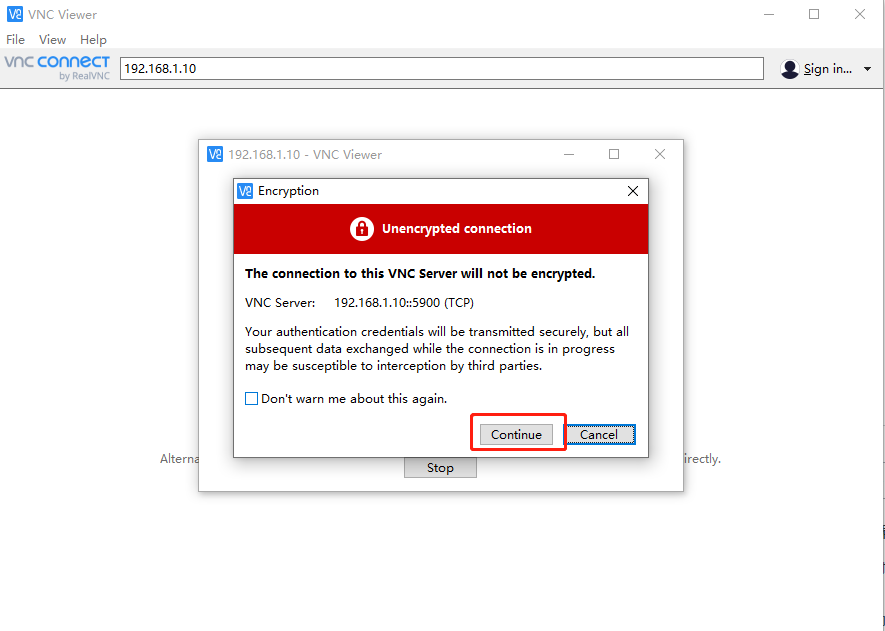
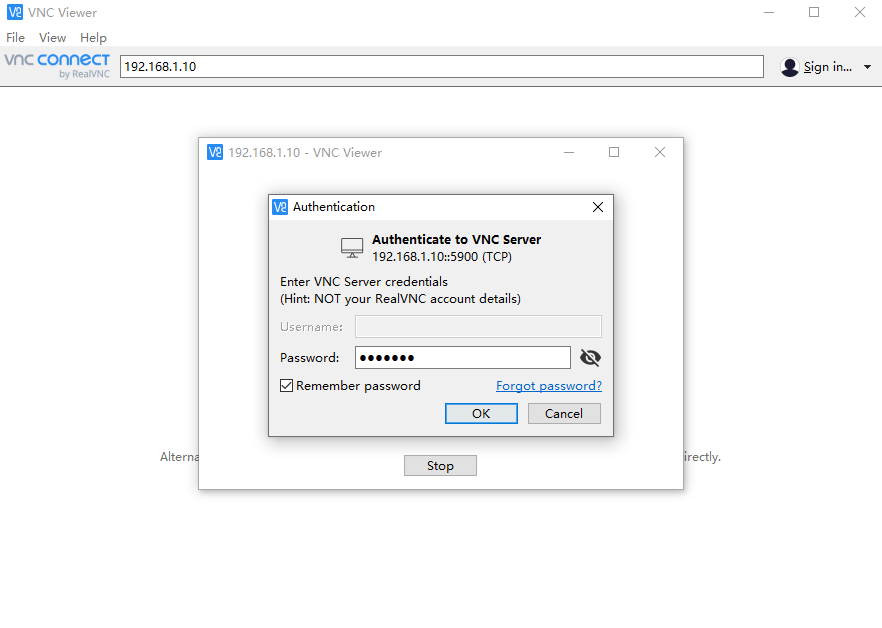
- VNC login
Open the VNC software, enter the IP address of RDK X3 in the address bar, press Enter, and configure as shown in the following image
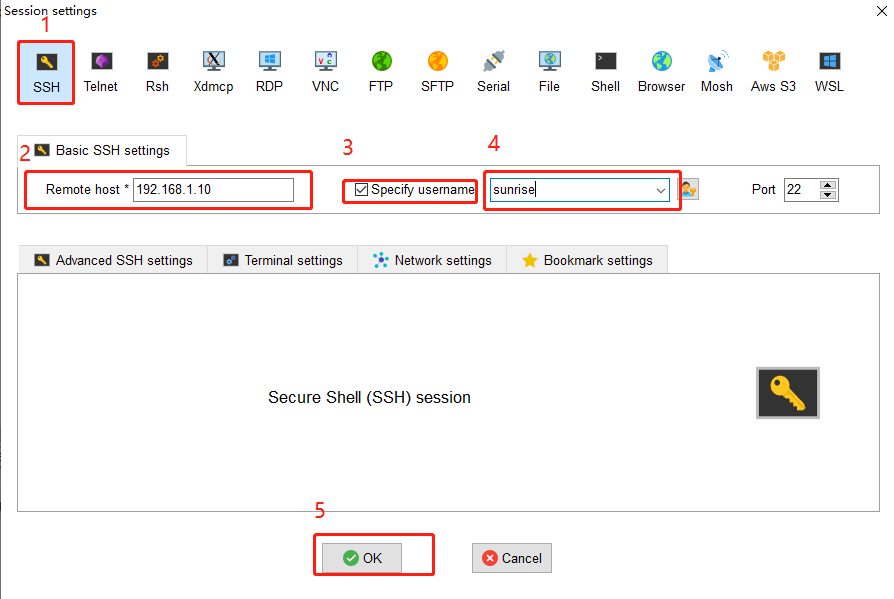
- Command line login
Open the terminal in the Ubuntu virtual machine and input:
ssh sunrise@192.168.127.10
Cable and Network Configuration
The network configuration for the development board is saved in the /etc/network/interfaces file When saving in the vim editor, please first press the Esc key, then input
:wq!
The nano editor is recommended, and the installation command is as follows:
sudo apt update
sudo apt-get install nano
Static IP Modification
You can modify the static IP configuration by modifying fields such as address, netmask, and gateway
For example:
sudo vim /etc/network/interfaces
# interfaces(5) file used by ifup(8) and ifdown(8)
# Include files from/etc/network/interfaces.d:
source-directory /etc/network/interfaces.d
auto eth0
iface eth0 inet static
    address 192.168.1.10
    netmask 255.255.255.0
    gateway 192.168.1.1
    metric 700
After the modification is completed, enter in the command line
sudo systemctl restart NetworkManager
to make the configuration take effect.
Restart and update network frequency band:
sudo reboot
Modify DHCP Configuration
DHCP (Dynamic Host Configuration Protocol) is usually used in large LAN environments, and its main function is to centrally manage and assign IP addresses, so that hosts in the network environment can dynamically obtain IP addresses, gateway addresses, DNS server addresses and other information, and can improve the utilization rate of addresses. The DHCP network configuration for the development board is saved in the /etc/network/interfaces file. By modifying the configuration related to eth0, you can change the DHCP mode. For example, you can input:
sudo vim /etc/network/interfaces
Modify the following:
source-directory /etc/network/interfaces.d
auto lo
iface lo inet loopback
auto eth0
iface eth0 inet dhcp
    metric 700
After the modifications are completed, input the command line, enter the following command in the command line:sudo systemctl restart NetworkManager
to make the configuration take effect.
Restart and update network frequency band:
sudo reboot
Modify MAC Address Configuration
To modify the default MAC address of the development board, you can add pre-up configuration information to the /etc/network/interfaces file to specify the MAC address the user needs, for example:
sudo vim /etc/network/interfaces
Modify the following:
# interfaces(5) file used by ifup(8) and ifdown(8)# Include files from
/etc/network/interfaces.d:
source-directory /etc/network/interfaces.d
auto eth0
iface eth0 inet static
    address 192.168.1.10
    netmask 255.255.255.0
    gateway 192.168.1.1
    pre-up ifconfig eth0 hw ether 00:11:22:9f:51:27
After the modification is completed, enter in the command line
sudo systemctl restart NetworkManager
to make the configuration take effect.
Restart to update network frequency band
sudo reboot
With DSI Screen
Since the RDK X3 Module system defaults to HDMI output, you need to switch to LCD display mode using a command. First, execute the following command to backup the DTB:
sudo cp /boot/hobot/hobot-x3-cm.dtb /boot/hobot/hobot-x3-cm_backup.dtb
Execute the following command to determine the current display type:
sudo fdtget /boot/hobot/hobot-x3-cm.dtb /chosen bootargs
Taking HDMI as an example, executing the above command will print:
sunrise@ubuntu:~$ sudo fdtget /boot/hobot/hobot-x3-cm.dtb /chosen bootargs
earlycon loglevel=8 kgdboc=ttyS0 video=hobot:x3sdb-hdmi
Execute the following command to modify the chosen node:
sudo fdtput -t s /boot/hobot/hobot-x3-cm.dtb /chosen bootargs "earlycon loglevel=8 kgdboc=ttyS0 video=hobot:cm480p"
Execute the following command to print out the modified node and confirm the modification was successful:
sudo fdtget /boot/hobot/hobot-x3-cm.dtb /chosen bootargs
Enter the following command to reboot the development board:
sync
sudo reboot
The display mode switches from HDMI to DSI at this time.
If you want to switch back to the HDMI display, enter the kernel and run the following command:
sudo cp /boot/hobot/hobot-x3-cm_backup.dtb /boot/hobot/hobot-x3-cm.dtb
sync
sudo reboot
With CSI Camera
Hardware Connection
To test the camera, you need to connect an HDMI screen to the RDK X3 Module
- Insert the cable with the metal side facing inward into the camera port.
Test Camera
The camera interface of the X3 is turned on by default, and it can be used when powered on. The AI demo that comes with the system can be used to test the camera. Please ensure that the HDMI screen is connected and can display the preview image.
Open the terminal and input the following command:
- If you logged in via SSH, you need to specify the output to the screen first
export DISPLAY=:0
- Test with AI demo
cd /app/ai_inference/03_mipi_camera_sample
sudo python3 mipi_camera.py
The camera will normally turn on the preview and display the image and the corresponding object recognition result.
USB Camera
Terminal input, check the changes before and after insertion, and detect if the camera is recognized
ls /dev/video*
Terminal input, check if the camera is working properly
sudo v4l2-ctl -d /dev/video8 --all
Ubuntu Server Image Operation
First, perform the desktop VNC installation
Install the xfce4 desktop using the following command:
sudo apt update
sudo apt install xfce4 xfce4-goodies xorg dbus-x11 x11-xserver-utils
Install the VNC server using the following command:
sudo apt install tightvncserver
After installation, use the following command to check if the VNC service has started:
ps -ef | grep vnc
If it starts normally, you can see that it is listening on port 5900
General Operations
Log in to the VNC host and install ffmpeg
sudo apt install ffmpeg
Before and after connecting the USB camera, use the following command to view the current video device and determine the device number of the camera:
ls /dev/video*
Enter the command to start the camera
sudo ffplay /dev/video8
System Configuration
System Update
For system security and stability reasons, it is recommended that users update the system through APT commands after installing the system.
In the /etc/apt/source.list file, a list of software sources for the APT command is saved. Before installing software, you need to update the package list using the apt command.
First, open the terminal command line and enter the following command:
sudo apt update
Next, upgrade all installed packages to the latest versions with the following command:
sudo apt full-upgrade
Note: It is recommended to use full-upgrade instead of the simple upgrade command, as this will also update the dependent packages when related dependencies change.
When running the sudo apt full upgrade command, the system will prompt for data download and disk usage size, but apt will not check if the disk space is sufficient. It is recommended that users use
df -h
command to check manually. Additionally, the deb files downloaded during the upgrade process will be saved in the /var/cache/apt/archives directory, and users can use
sudo apt clean
command to delete cache files to free up disk space.
After executing full-upgrade, you may reinstall the driver and upgrade the RDK X3 kernel, so it is recommended to restart the device with the following command:
sudo reboot
- L76X GPS HAT for BDS and GPS module
- SIM868 module for GSM/GPRS/GNSS HAT
- SIM7600CE-CNSE 4G HAT for SIM7600 module
- 5inch HDMI LCD (H)
- 7inch HDMI LCD (H)
- 7HP-CAPQLED
- 10.1inch HDMI LCD (E)
- 10.1HP-CAPQLED
- 11.6inch HDMI LCD (H)
- 13.3inch HDMI LCD (H)
- 15.6inch HDMI LCD
- 15.6inch HDMI LCD (H)
- 15.6HP-CAPQLED
Resources
Official Resources
Compatible Peripheral Modules
USB Expansion Module
SIM/GPS Modules
Displays
Camera Modules
USB Ports
CSI Port
OV5647 5MP Camera Modules
- RPi Camera (B)
- RPi Camera (D)
- RPi Camera (E)
- RPi Camera (F)
- RPi Camera (G)
- RPi Camera (H)
- RPi Camera (I)
- RPi Camera (M)
- RPi FPC Camera
- RPi FPC Camera (B)
- RPi IR-CUT Camera
- RPi IR-CUT Camera (B)
- OV5647-70 5MP OIS Camera
IMX219 8MP Camera Modules
- IMX219-77 Camera
- IMX219-77IR Camera
- IMX219-120 Camera
- IMX219-160 Camera
- IMX219-160IR Camera
- IMX219-160 IR-CUT Camera
- IMX219-170 Camera
- IMX219-200 Camera
IMX477 12.3MP Camera Modules
- IMX477 12.3MP Camera
- IMX477-160 12.3MP Camera
Motors, Relays and Sensors
Currently, the D-robotics official is developing and adapting various C language libraries, so only Python programs are supported at the moment
Supported Modules
- Motor Driver HAT |Motor driver board - I2C port 2-ch DC motors
- RPi Relay Board | Relay expansion board 3-ch relay control
- RPi Relay Board (B) | Relay expansion board B-type 8-ch relay control
- Sensor
Audio Module
- Audio Driver HAT | RDK X3 dedicated audio driver board
- USB TO AUDIO | USB to audio module, driver-free sound card
Official Resources
Softwares
FAQ
Question: What is the operating temperature range of the board?
- -25°C ~ 95°C (X3M chip temperature).
Question: What is the root password?
- sunrise.
Question: Does RDK X3 support target tracking (yolov5 with deepsort)?
- It supports object tracking, and YOLOv5 is supported. For deepsort, you need to check with D-robotics officially to confirm whether it is supported.
Question: Does this board support pytorch? Can I run my own trained deep learning model?
- It supports PyTorch. If you need to run the model, you may need to perform conversions. Specific conversion operations can be referred to in D-robotics official documentation.
Question: Which lithium-ion battery-powered UPS module can be used together?
- Modules with UPS pin header are acceptable, others are not.
Question: Can the RDK X3 human pose detection function support the simultaneous detection of multiple people? How many FPS?
- Supports multi-person detection, 30 FPS.
Question: If RDK X3 uses a USB camera, which system is better, server or desktop?
- It's all good, no difference.
Question: Does the RDK X3 support inserting a solid-state drive?
- It doesn't have a solid-state drive interface and cannot connect to a solid-state drive.
Question: Is there any POE module available for RDK X3?
- No, currently the motherboard does not have a PoE port, so PoE modules are not applicable.
Question: How to deploy YOLOv5 on RDK X3?
Question: Why can't the program be flashed?
- Please do not include Chinese characters in the image path.
Support
Monday-Friday (9:30-6:30) Saturday (9:30-5:30)
Email: services01@spotpear.com
[Tutorial Navigation]
- Introduction
- Specifications
- Usage Guide
- Software Preparation
- Power Supply
- System Installation
- Remote Login
- Cable and Network Configuration
- With DSI Screen
- With CSI Camera
- USB Camera
- System Configuration
- Resources
- Official Resources
- Compatible Peripheral Modules
- Official Resources
- Softwares
- FAQ
- Question: What is the operating temperature range of the board?
- Question: What is the root password?
- Question: Does RDK X3 support target tracking (yolov5 with deepsort)?
- Question: Does this board support pytorch? Can I run my own trained deep learning model?
- Question: Which lithium-ion battery-powered UPS module can be used together?
- Question: Can the RDK X3 human pose detection function support the simultaneous detection of multiple people? How many FPS?
- Question: If RDK X3 uses a USB camera, which system is better, server or desktop?
- Question: Does the RDK X3 support inserting a solid-state drive?
- Question: Is there any POE module available for RDK X3?
- Question: How to deploy YOLOv5 on RDK X3?
- Question: Why can't the program be flashed?
- Support