- sales/support
Google Chat:---
- sales
+86-0755-88291180
- sales01
sales@spotpear.com
- sales02
dragon_manager@163.com
- support
tech-support@spotpear.com
- CEO-Complaints
zhoujie@spotpear.com
- sales/support
WhatsApp:13246739196
- HOME
- >
- ARTICLES
- >
- Common Moudle
- >
- LCD
1.9inch Segment e-Paper/Module User Guide
Feature
- Dimension: 1.9 inch
- Outline dimension (raw panel): 49.35 × 32.11 × 1.13 mm
- Outline dimension (driver board): 51 × 34 mm
- Display dimension: 41.35 × 28.11 mm
- Working voltage: 3.3V/5V
- Communication interfaces: IIC
- Segment code: 91 segments
- Display color: Black, White
- Gray level: 2
- Partial refreshing time: 0.3 s
- Full refreshing time: 2s
- Refresh Power Consumption: <5mW (typ.)
- Standby current: <0.01uA (close to0)
- Note:
- Refresh time: The refresh time is the experimental results, the actual refresh time will have errors, and the actual effect shall prevail. There will be a flickering effect during the global refresh process, this is a normal phenomenon.
- Power consumption: The power consumption data is the experimental results. The actual power consumption will have a certain error due to the existence of the driver board and the actual use situation. The actual effect shall prevail.
SPI Communication Timing
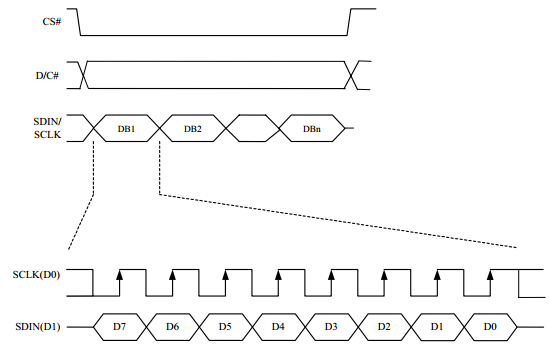
Since the ink screen only needs to be displayed, the data cable (MISO) sent from the machine and received by the host is hidden here.
- CS: Slave chip select, when CS is low, the chip is enabled.
- DC: data/command control pin, write command when DC=0; write data when DC=1.
- SCLK: SPI communication clock.
- SDIN: SPI communication master sends, the slave receives.
- Timing: CPHL=0, CPOL=0 (SPI0).
[Remarks] For specific information about SPI, you can search for information online.
E-ink Refresh Principle
Working Principle
This product is an E-paper device adopting the image display technology of Microencapsulated Electrophoretic Display. The basic principle is that charged nanoparticles suspended in a liquid migrate under the action of an electric field. The E-paper screen display patterns by reflecting the ambient light, so it has no background light requirement. Under ambient light, the E-paper screen still has high visibility with a wide viewing angle of 180 degrees. It is the ideal choice for E-reading.
Pixel & Byte
We define the pixels in a monochrome picture, 0 is black and 1 is white.
White:□: Bit 1
Black:■: Bit 0
- The dot in the figure is called a pixel. As we know, 1 and 0 are used to define the color, therefore we can use one bit to define the color of one pixel, and 1 byte = 8pixels
- For example, If we set the first 8 pixels to black and the last 8 pixels to white, we show it by codes, they will be 16 bit as below:

For computer, the data is saved in MSB format:

So we can use two bytes for 16 pixels.
Segment Code Table
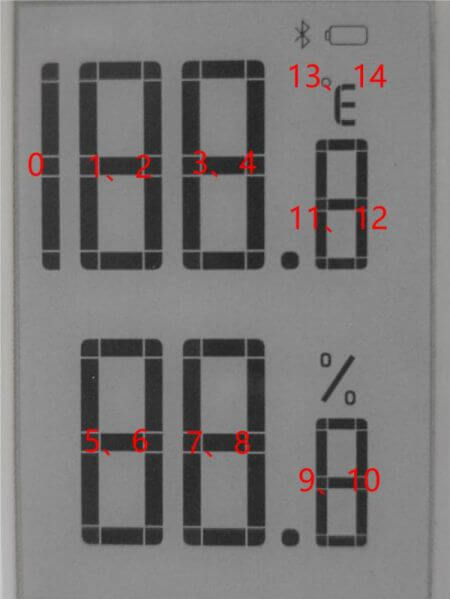
Number correspondence table (without decimal point):
0: 0 x bf, 0 x 1f
1: 0 x 1f (position 1), 0 x 00, 0 x 1f (other positions)
2: 0 x fd, 0 x 17
3: 0 x f5, 0 x 1f
4: 0 x 47, 0 x 1f
5: 0 x f7, 0 x 1d
6: 0 x ff, 0 x 1d
7: 0 x 21, 0 x 1f
8: 0 x ff, 0 x 1f
9: 0 x f7, 0 x 1f
The decimal point and % are the 5th place in the 4th, 8th, and 10th positions respectively.
The 13th position can display Celsius (0 x 05) and Fahrenheit (0 x 06), the 0th position is the bottom line, the 1st position is the middle line, the 2nd position is other displays, the 3rd position shows the Bluetooth logo, and the 4th position Bit shows the power identification, number 14 is useless.
Precautions
- For E-paper displays that support partial refresh, please note that you cannot refresh them with the partial refresh mode all the time. After refreshing partially several times, you need to fully refresh EPD once. Otherwise, the display effect will be abnormal, which cannot be repaired!
- It is a normal phenomenon that the three-color EPD will have a certain color difference in different batches. Hence, It is recommended to use the program to clear all the pictures on the EPD and store it facing up. Please clear the screen several times before powering on.
- Note that the screen cannot be powered on for a long time. When the screen is not refreshed, please set the screen to sleep mode or power off it. Otherwise, the screen will remain in a high voltage state for a long time, which will damage the e-Paper and cannot be repaired!
- When using the e-Paper display, it is recommended that the refresh interval be at least 180s, and refresh at least once every 24 hours. If the e-Paper is not used for a long time, you should use the program to clear the screen before storing it. (Refer to the datasheet for specific storage environment requirements.)
- After the screen enters sleep mode, the sent image data will be ignored, and it can be refreshed normally only after initializing again.
- The working voltage of the e-Paper display is 3.3V. If you buy the raw panel and you need to add a level convert circuit for compatibility with 5V voltage. The new version of the driver board (V2.1 and subsequent versions) has added a level processing circuit, which can support both 3.3V and 5V. The old version only supports a 3.3V working environment. You can confirm the version before using it. (The one with the 20-pin chip on the PCB is generally the new version.)
- The FPC cable of the screen is relatively fragile, pay attention to bending the cable along the horizontal direction of the screen when using it, and do not bend the cable along the vertical direction of the screen.
- The screen of e-Paper is relatively fragile, please try to avoid dropping, bumping, and pressing hard.
- We recommend that customers use the sample program provided by us to test with the corresponding development board.
Raspberry Pi
Provides BCM2835, WiringPi, IO, RPI (Python) libraries and demos.
Hardwware Connection
If the e-Paper you have is the HAT version which has 40pin GPIO, you can directly attach the e-Paper HAT on Raspberry Pi, otherwise, you can connect your e-Paper to Raspberry Pi by an 8pins cable provided.
To connect the e-Paper, you can follow the table below:
| e-Paper | Raspberry Pi | |
| BCM2835 | Board | |
| VCC | 3.3V | 3.3V |
| GND | GND | GND |
| SDA | SDA.1 | 3 |
| SCL | SCL.1 | 5 |
| RST | 4 | 7 |
| BUSY | 17 | 11 |
Enable I2C Interface
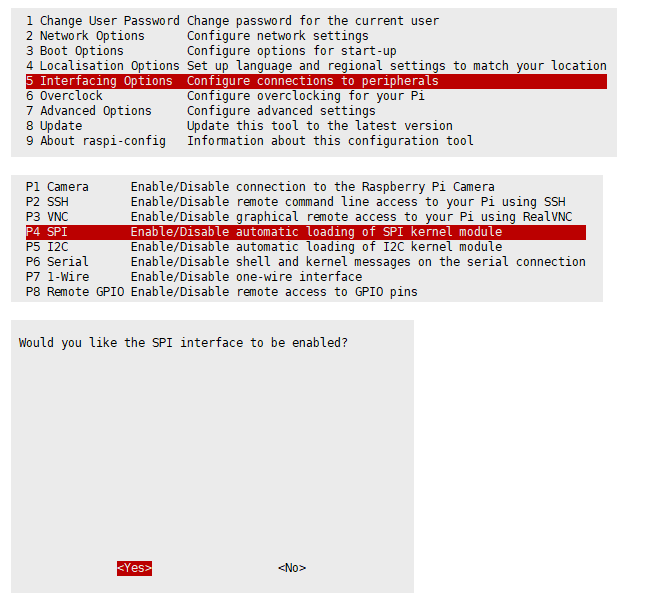
- The communication interface of e-Paper is SPI, to use it, we should firstly enable the SPI interface.
- Open terminal of Raspberry Pi, and open the configuration by the following command:
sudo raspi-config
- Choose Interfacing Options -> SPI -> Yes
- Restart Raspberry Pi
sudo reboot
Install libraries
Open the terminal of Raspberry Pi and run the following commands to install corresponding libraries:
- Install BCM2835 libraries
#Open the Raspberry Pi terminal and run the following command
wget http://www.airspayce.com/mikem/bcm2835/bcm2835-1.71.tar.gz
tar zxvf bcm2835-1.71.tar.gz
cd bcm2835-1.71/
sudo ./configure && sudo make && sudo make check && sudo make install
# For more information, please refer to the official website: http://www.airspayce.com/mikem/bcm2835/
- Install WiringPi libraries
#Open the Raspberry Pi terminal and run the following command
sudo apt-get install wiringpi
#For Raspberry Pi systems after May 2019 (earlier than before, you may not need to execute), you may need to upgrade:
wget https://project-downloads.drogon.net/wiringpi-latest.deb
sudo dpkg -i wiringpi-latest.deb
gpio -v
# Run gpio -v and version 2.52 will appear. If it does not appear, the installation is wrong
#Bullseye branch system use the following command:
git clone https://github.com/WiringPi/WiringPi
cd WiringPi
./build
gpio -v
# Run gpio -v and version 2.60 will appear. If it does not appear, it means that there is an installation error
- Install Python2 libraries
 sudo apt-get update
 sudo apt-get install python-pip
 sudo apt-get install python-pil
 sudo apt-get install python-numpy
 sudo pip install RPi.GPIO
 sudo pip install spidev
- Install Python3 libraries
sudo apt-get update
sudo apt-get install python3-pip
sudo apt-get install python3-pil
sudo apt-get install python3-numpy
sudo pip3 install RPi.GPIO
sudo pip3 install spidev
Download Test Program
Open the terminal of Raspberry Pi and execute:
sudo apt-get install p7zip-full
wget  https://www.waveshare.com/w/upload/f/f6/E-Paper-Segment-Code.zip
7z x E-Paper-Segment-Code.zip -O./e-Paper
cd e-Paper/RaspberryPi/
Run the Program
Please execute the following commands under RaspberryPi_JetsonNano, otherwise the directory will not be indexed;
C
- Open main.c to select the screen of the corresponding size:
cd c
sudo nano examples/main.c
If you are using 1.9inch Segment e-paper, please remove the "//" in front of the "EPD_1IN9_test()" function, then press Ctrl+c, press Y and Enter to save and exit, as shown in the figure: (The picture may be updated Not in time, the specific demo shall prevail.)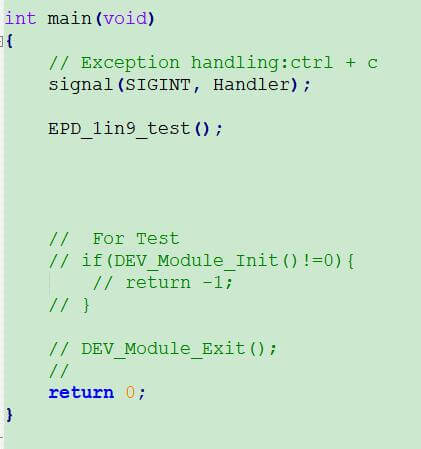
You can view test programs for all screen sizes, sorted by size:
1.9 inches:
EPD_1in9_test(): corresponds to the 1.9inch Segment e-paper test program;
- Note: The above time is for reference only, please refer to the screen logo for the specific version.
- Compile again and wait for seconds:
Return to the c directory and run the following command
make clean
make
sudo ./main
Python
- Enter the python program directory and run the command ls -al
cd python
ls -al

You can view test programs for all screen sizes, sorted by size:
1.9 inches:
The 1inch9_E-paper directory corresponds to the 1.9inch Segment e-paper test program;
- Note: The above time is for reference only, please refer to the screen logo for the specific version.
- Just run the program corresponding to the screen, the program supports python2/3, take 1.54 V2 as an example:
# python2
cd 1in9_E-paper
sudo python main.py
# python3
cd 1in9_E-paper
sudo python3 main.py
STM32
The program provided is based on STM32F103RBT6, so you should connect it according to the pins of STM32F103RBT6. If you want to port the program, you must connect it based on the actual pins.
Hardware Connection
| e-Paper | STM32 |
| VCC | 3.3V |
| GND | GND |
| SDA | PB9/D14 |
| SCL | PB8/D15 |
| RST | PA9/D8 |
| BUSY | PA8/D7 |
Take our XNUCLEO-F103RB as an example, the connection is as follows: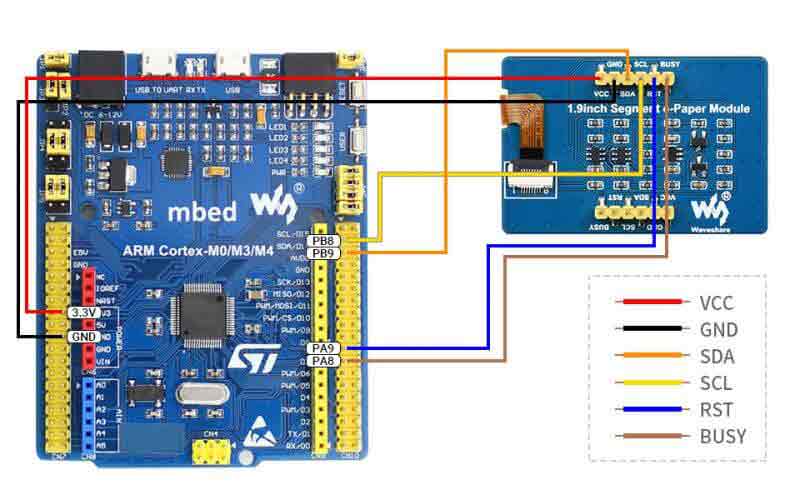
Software
The demos are developed based on the HAL library. Download the program, find the STM32 program file directory, and open epd-demo.uvprojx in the STM32\STM32-F103ZET6\MDK-ARM directory to see the program.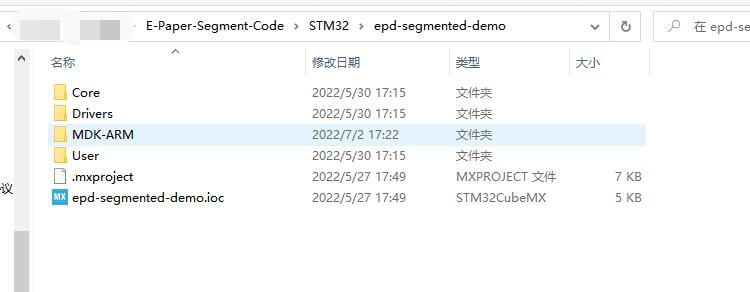
Open main. c and you can see all the test programs. Remove the comment in front of the test program of the corresponding screen, and then recompile and download.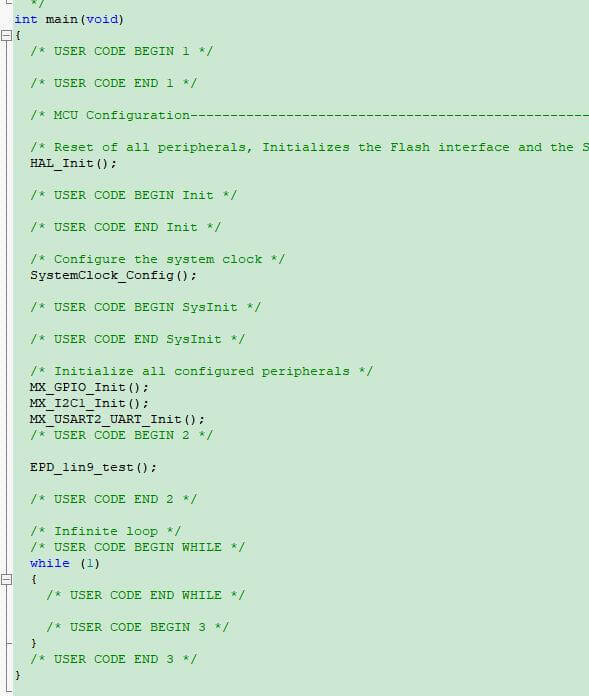
You can view test programs for all screen sizes, sorted by size:
1.9 inches:
EPD_1in9_test(): Corresponds to 1.9inch Segment e-paper test program
- Note: The above time is for reference only, please refer to the screen logo for the specific version.
Arduino
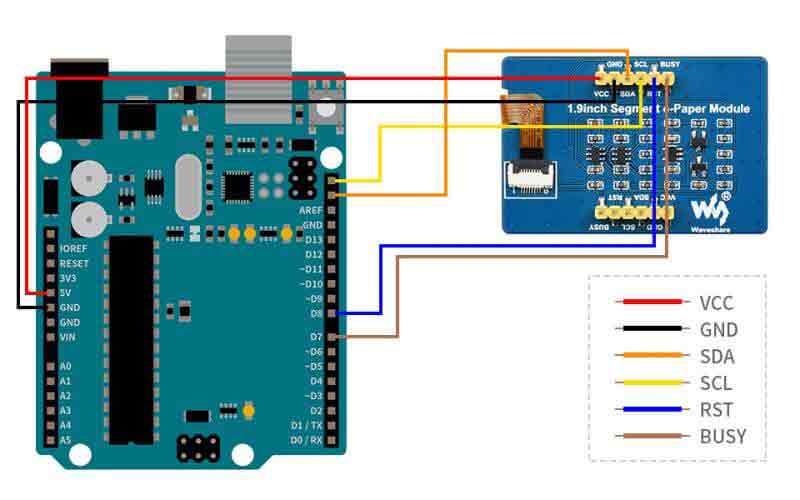
All demos have been tested in Arduino uno. If you use Arduino in different models, you need to check the connection of the pins.
Hardware Connection
| e-Paper | Arduino UNO | Mega2560 |
| Vcc | 5V | 5V |
| GND | GND | GND |
| SDA | SDA | SDA |
| SCL | SCL | SCL |
| RST | D8 | D8 |
| BUSY | D7 | D7 |
Install Compile Software (Windows)
Run the Program
Please download E-paper-segment-code and unzip it. Arduino program is in "~/Arduino/…"
Please open the corresponding program according to the EPD model.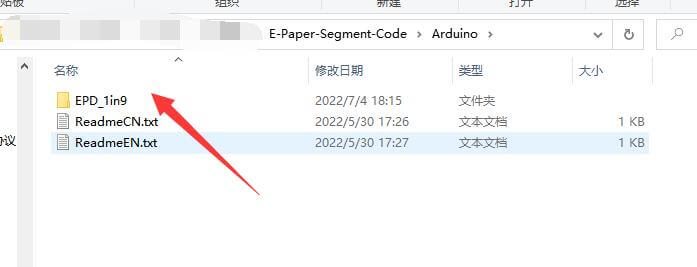
You can view test programs for all screen sizes, sorted by size:
1.9 inches:
EPD_1in9: Corresponds to 1.9inch segment e-paper test program;
- Note: The above time is for reference only, please refer to the screen logo for the specific version.
For example, 1.54inch e-Paper Module. Open the epd1in54 folder and run the epd1in54.ino file.
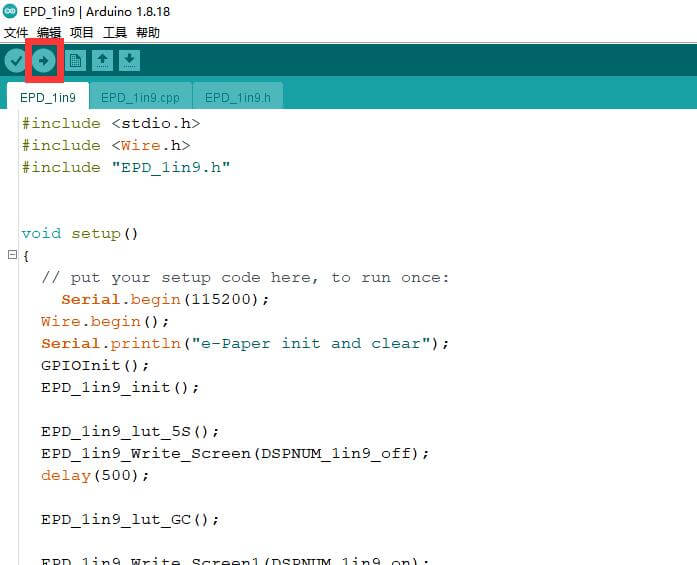
Open the program, and select the development board model Arduino UNO.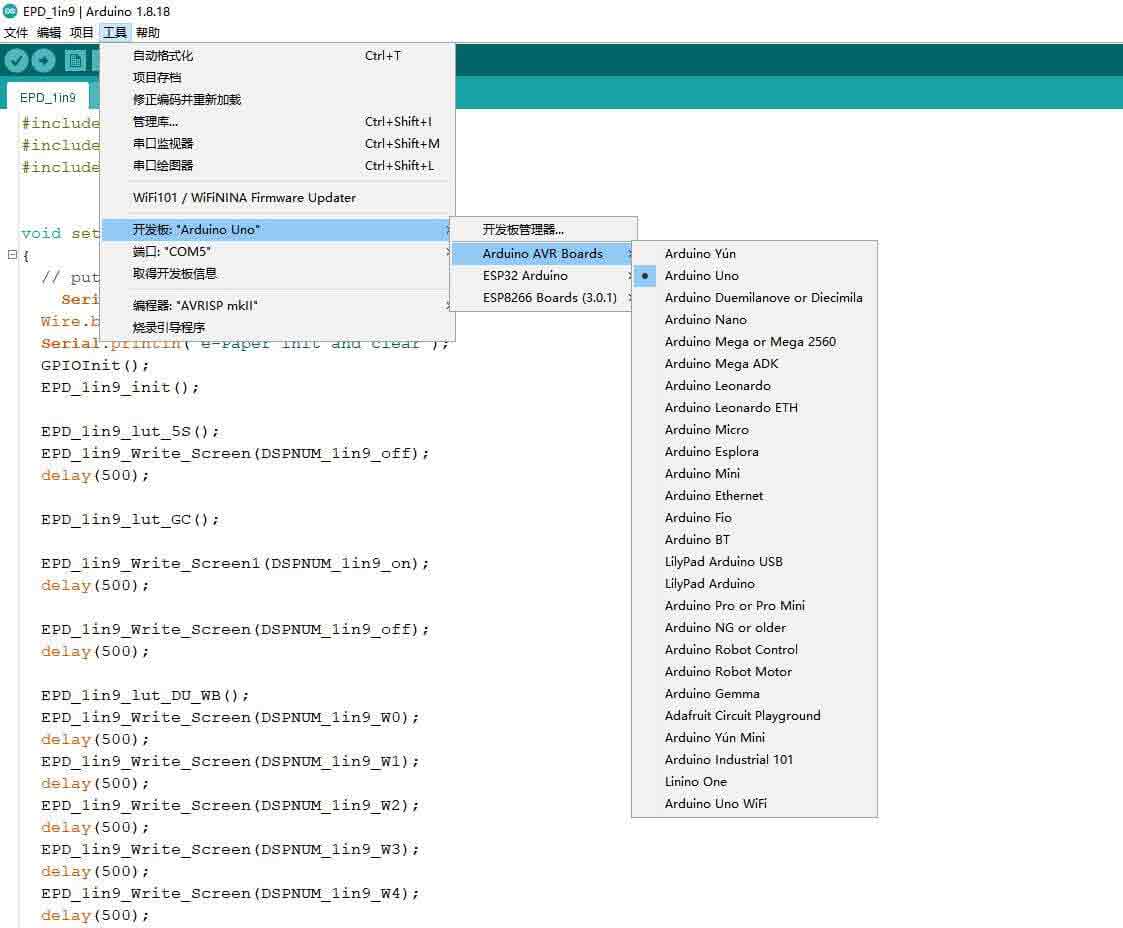
Choose the corresponding COM.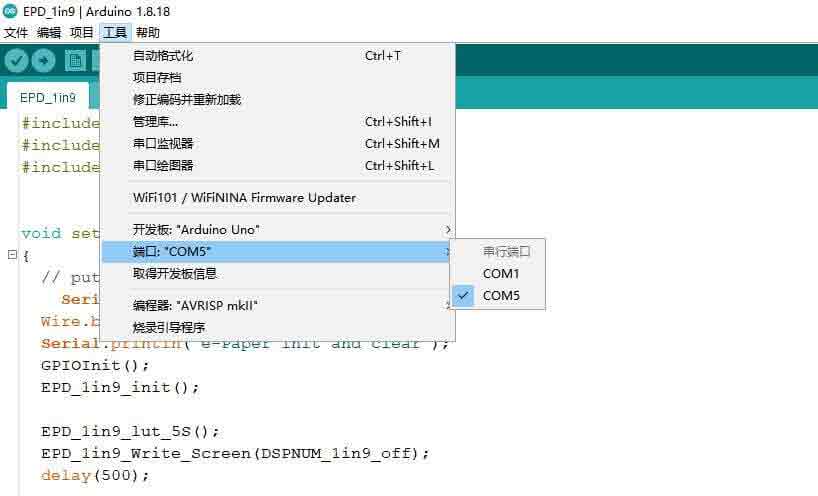
Then click to compile and download.