- sales/support
Google Chat:---
- sales
+86-0755-88291180
- sales01
sales@spotpear.com
- sales02
dragon_manager@163.com
- support
tech-support@spotpear.com
- CEO-Complaints
zhoujie@spotpear.com
- sales/support
WhatsApp:13246739196
Jetson Nano Audio Card for Jetson Nano User Guide
This is a USB sound card, support recording and playback, stereo codec, built-in microphone, and speaker. It is suitable for Jetson Nano. driver-free, plug, and play.
Features
- USB connector, suits Jetson Nano Developer Kit series, multi-systems compatible
- Incorporates SSS1629 audio chip, using USB bus, driver-free, plug and play
- 2x quality MEMS si-microphone, dual soundtrack recording, better sound quality
- Standard 3.5mm audio jack for connecting earphone
- Dual channel speaker header for direct driving speakers, with volume adjustment knob
- Providing demo codes for speech synthesis, speech dictation, speech wake-up, and speech dialog
Specification
- Power voltage:5V
- Audo Encoder/Decoder:SSS1629A5
- Control port:USB
Using with Jetson Nano
Hardware connection
1. Connect the Audio Card for Jetson Nano to Jetson Nano with the USB adapter
2. Connect the 8Ω5W speaker to the speaker connector.
3. Start the Jetson Nano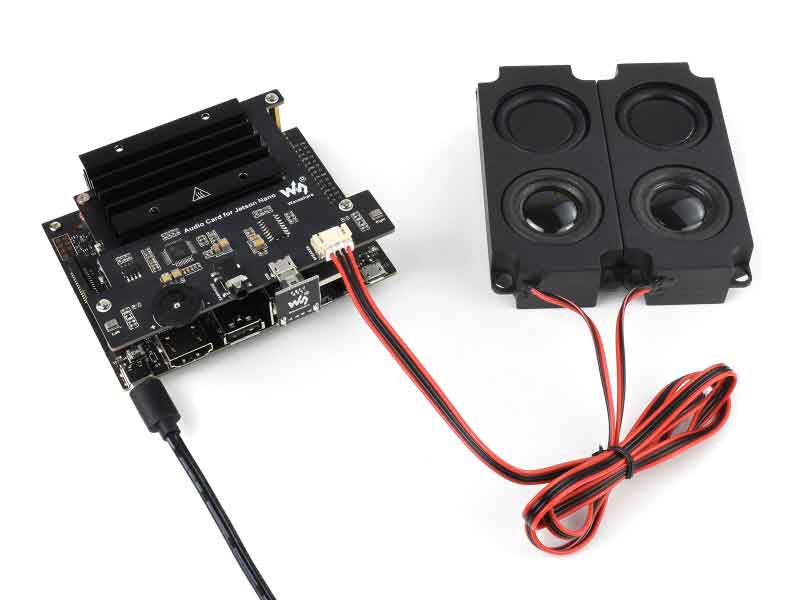
Check the Audio card
- Test playing:aplay -l
jetson@linux:~$ aplay -l
**** List of PLAYBACK Hardware Devices ****
... ...
... ...
card 2: Device [USB PnP Audio Device], device 0: USB Audio [USB Audio]
  Subdevices: 1/1
  Subdevice #0: subdevice #0
- Test recording:arecord -l
jetson@linux:~$ arecord -l
**** List of CAPTURE Hardware Devices ****
... ...
... ...
card 2: Device [USB PnP Audio Device], device 0: USB Audio [USB Audio]
  Subdevices: 1/1
  Subdevice #0: subdevice #0
Recording test
- Record
jetson@linux:~$ arecord -D plughw:2,0 -f S16_LE -r 48000 -c 2 test.wav
Recording WAVE 'test.wav' : Signed 16 bit Little Endian, Rate 48000 Hz, Stereo
-D "plughw:1,0": stands for card 1 , device 0, that is the USB card connected.
-f S16_LE: Little-endian signed 16 bits;
-c 2: Dual-track;
test.wav: The avido file saved
Youc an press Ctrl+C to stop recording.
- Playing
jetson@linux:~$ aplay -D hw:2,0 test.wav
Playing WAVE 'test.wav' : Signed 16 bit Little Endian, Rate 48000 Hz, Stereo
Play the audio recorded
Adjust volume
sudo alsamixer
You can press F6 to select the audio device if you didn't set the USB audio card as the default audio device.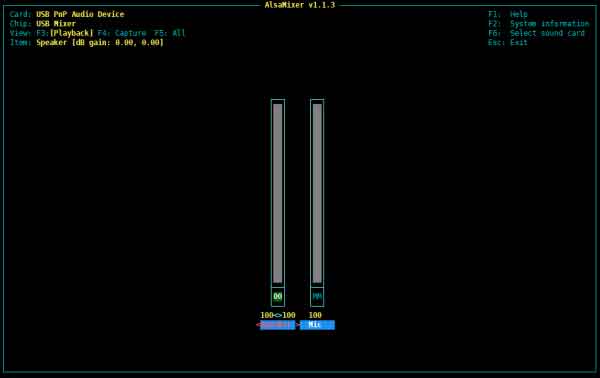
Speaker is the volume of the speaker and the Mic is the volume of the Microphone.
Configure default audio card
Becase the GUI of Jetson Nano 4GB and the 2GB version are different, please read the guide according to your Jetson Nano Board
Note: If you didn't set the Audio Card for Jetson Nano as the default audio card, the examples may not work normally.
Jetson nano 4G
Enter the GUI, and click the audio icon to configure the audio. Choose USB PnP Audio Device for Output/Input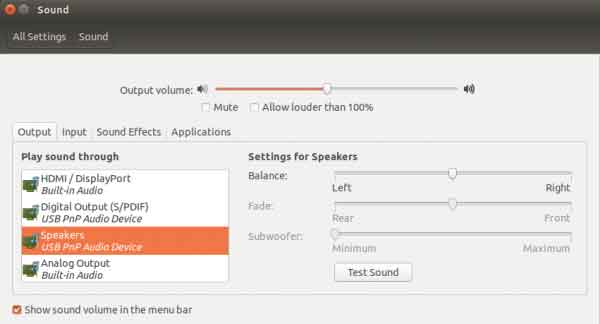
Jetson nano 2G
Enter the GUI, click the Menu on the right-bottom. Choose Sound & Video - >PulseAudio Volume Control and open.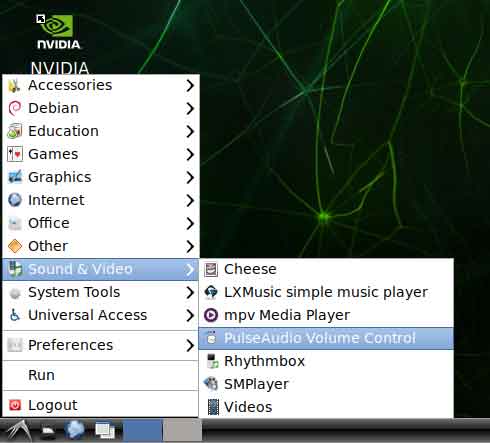
On the Playback/Recording page, set the audio output as USB PnP Audio Device.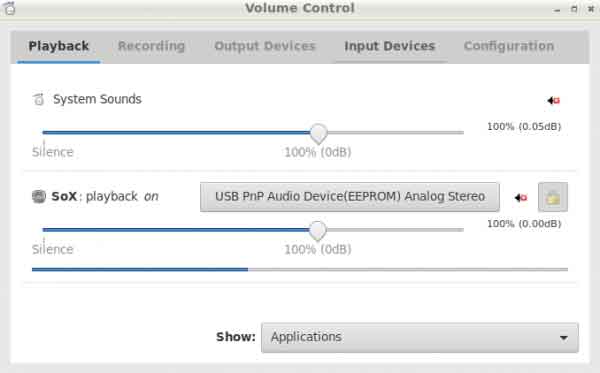
Note: The options can only work when your run the codes, otherwise, you can only find the System Sounds option but not the SoX. If you didn't read the sound when running the codes, please check if you have set the USB PnP Audio Device as the default audio output
Download the Examples
wget https://www.waveshare.com/w/upload/a/ae/Audio_Card_for_jetson_nano.tar.gz
tar zxvf Audio_Card_for_jetson_nano.tar.gz
Audio examples
Install Python3 virtual environment
sudo apt-get update
sudo apt-get install python3-dev python3-venv
python3 -m venv env
env/bin/python -m pip install --upgrade pip setuptools wheel
source env/bin/activate
- Note: The commands below are all run in the virtual environment. If you exit the env, please run the following command to enter the env.
source ~/env/bin/activate
Install Google Assistant Service
To use Google Assistant, you need to first install the Google Assistant Service
Official guides: https://developers.google.com/assistant/sdk/guides/service/python
Please follow step 3 of the guides to configure the developer project and the account, and then create an OAuth Client ID JSON file. And you need to copy the JSON file to your jetson nano.
Please follow step 4 to register the device model.
Install Google Assistant SDK
(env) $ sudo apt-get install portaudio19-dev libffi-dev libssl-dev
(env) $ python -m pip install --upgrade google-assistant-sdk[samples]
Authorize the Google Assistant SDK Install or update the authorization tools.
(env) $ python -m pip install --upgrade google-auth-oauthlib[tool]
Generate the credential for running examples and tools. Import the JSON file downloaed before. Please directly copy the JSON file and do not rename it,
(env) $ google-oauthlib-tool --scope https://www.googleapis.com/auth/assistant-sdk-prototype \
      --save --headless --client-secrets /path/to/client_secret_ client-id .json
Following the command you will get a URL:
Please visit this URL to authorize this application: https://...
Copy the URL and go to the website by the browser. The link is the login page of Google, you should log in with your Google account (Please use the developer account created before) Allow the license request from the API, and you will get a CODE like “ 4 / XXXX”, please copy the code to the terminal of Jetson nano:
Please go to this URL: https://...
Enter the authorization code:
If the authorize successfully, you will get the response as below. If you get InvalidGrantError response, you may input the wrong code, please try it again.
credentials saved: /path/to/.config/google-oauthlib-tool/credentials.json
Running examples
Button Toggle
Run the following command to test my-dev-project is the Google Cloud Platform device ID of Action Console project created. You need to find the project ID in Actions Console, my-model
is the devcie model registered.
(env) $ googlesamples-assistant-pushtotalk --project-id my-dev-project --device-model-id my-model
Press Enter and try to test: Who am I? What time is it? Google Assitant will answer if all the settings are correct.
snowboy Wakeup
cd ~/Audio_Card_for_jetson_nano/google
deactivate   #Exit env
python3 demo.py hotword.pmdl
Run the command and you will get the information that "Listening...", means that the examples are standby and you can speaker keyword to wake up the assistant and talk. For example: "ok google, Who am I? What time is it?". The assistants will respond with a tone.
Note 1: The hotword.pmd is the voice model of Waveshare, and you need to train your own voice model and replace it, otherwise you may fail to wake it up.
Note 2: The account used in the demo codes is a personal account and it has limitations of login times. Please create your own account and modify the device_model_id and device_id in audiofileinput.py.
Snowboy Guide
snowboy is an open-source project for audio detecting. You can use it for sound wake-up.
Install libraries
sudo apt-get install swig
sudo apt-get install libatlas-base-dev
sudo apt-get install portaudio19-dev
sudo apt-get install flac
pip3 install PyAudio
pip3 install SpeechRecognition
Download the souces code and compile
- Download snowboy
git clone https://github.com/Kitt-AI/snowboy.git
cd snowboy/swig/Python3
- Modify the Makefile, find the line and add the contens.
vi Makefile
 ifneq (,$(findstring aarch64,$(shell uname -m)))
     SNOWBOYDETECTLIBFILE = $(TOPDIR)/lib/aarch64-ubuntu1604/libsnowboy-detect.a
 endif
And then compile
make
Run the examples
cd ../../examples/Python3
- Modify snowboydecoder.py file and change from . import snowboydetect to import snowboydetect
- Test to wake up with snowboy
cd ~/snowboy/examples/Python3
python3 demo.py resources/models/smart_mirror.umdl
- Say smart_mirror, the device will sound ding and display information:
INFO:snowboy:Keyword 1 detected at time: 2019-12-03 11:30:16
Note: The keyword use public model, you can train you own model and change the keyword for better detecting.


