


- sales/support
Google Chat:---
- sales
+86-0755-88291180
- sales01
sales@spotpear.com
- sales02
dragon_manager@163.com
- support
tech-support@spotpear.com
- CEO-Complaints
zhoujie@spotpear.com
- Only Tech-Support
WhatsApp:13246739196
- Purchase/Shipping/Refund
WhatsApp:13424403025
Raspberry Pi Compute module 4CM4 IO Board User Guide
Write Image for Compute Module Boards eMMC version
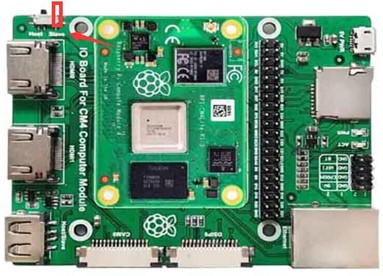
1. The switch go to slave
2. Connect USB to your computer by USB Adapter
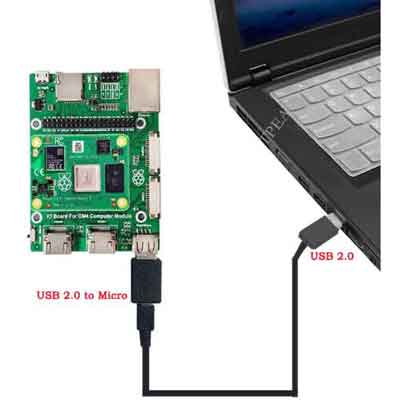
3. Install and run the rpiboot, the computer recognizes the CM4 as a U disk, and then you can write an image to the CM4.
CM4 Camera and DSI configuration
1. Put dt-blob.bin to /boot/
CM4 USB enable
USB2.0 is closed by default, if you need to open it, you need to add dtoverlay=dwc2,dr_mode=host at config.txt
TAG:
Spotpear
Raspberry-Pi-1.54inch-LCD-Display-Touchscreen-configuration-Bookworm-Lite For Pi5
ESP32 ST7789 tutorial
Raspberry Pi 5 Silver-Shadow Case
SC09 Serial UART Bus Servo Motor Switchable 2.3kg 300Angle
Core3566104000
UART Serial TTL To RS232 B Built-In Protection Circuits Rail-mount
spotpear
Raspberry Pi LCD
Jetson Nano
RDK X5 PoE Module For Power Over Ethernet/ IEEE 802.3af/at PoE For D-Robotics RDK X5
ESP32 IR Thermal Imaging Camera
Jetson Orin 5G/4G/3G expansion board GNSS GPS SIM8260G-M2 SIM8262E-M2
Jetson Orin Case
JETSON NANO MINI Fan
LuckFox Pico max
Raspberry Pi Pico 2 RP2350A PoE ETH Ethernet Module W6300
Raspberry Pi Mipi
RS485 Interface
Raspberry Pi 1.3inch LCD
TAG:
Raspberry Pi 5
ESP32 S3 3.5 inch LCD 480x320 Display Capacitive TouchScreen PC Tablet MP3 Video Player Weather Clock JC3248W535 LVGL
ISX031 GMSL Camera H100 H190 Image Sensor IP67 protection rating For Jetson Orin And MAX96717 GMSL camera
Raspberry Pi IR Thermal Imaging Camera
PiKVM-A3 Raspberry Pi 4 Operation and maintenance of Over IP Server
8inch LCD 1280x800 Computer PC Monitor Display Secondary Screen TypeC USB CPU RAM
LuckFox Pico
Jetson Xavier TX2 NX JETSON-IO-BASE-B
Solar
SpeedyBee F405 WING APP Flight Controller FC ArduPilot INAV Drone
ESP32-S3 1.28
TOF Time-Of-Flight Laser Range Radar
13.3 inch e Paper E6 Full color Ink Screen Display Arduino Raspberry Pi STM32 ESP32
LuckFox Pico SC3336
USB IR Infrared Thermal Imaging Camera C 45°/88° 160x120 For Phone/PC High Temp Warning/Take Photo /Recording video
Raspberry Pi 5 PWM FAN
ESP32-S3 A7670E 4G development board supports LTE Cat-1/2G/GNSS positioning/WiFi/Bluetooth
Raspberry Pi 5 inch e-Paper ink screen display black white 960×552 For Arduino /Jetson /STM32 /ESP32
ESP32-S3
ST7701S