


- sales/support
Google Chat:---
- sales
+86-0755-88291180
- sales01
sales@spotpear.com
- sales02
dragon_manager@163.com
- support
tech-support@spotpear.com
- CEO-Complaints
zhoujie@spotpear.com
- Only Tech-Support
WhatsApp:13246739196
- Purchase/Shipping/Refund
WhatsApp:13424403025
SIM820X RNDIS Dail-up
Method 1: Python Dail-up
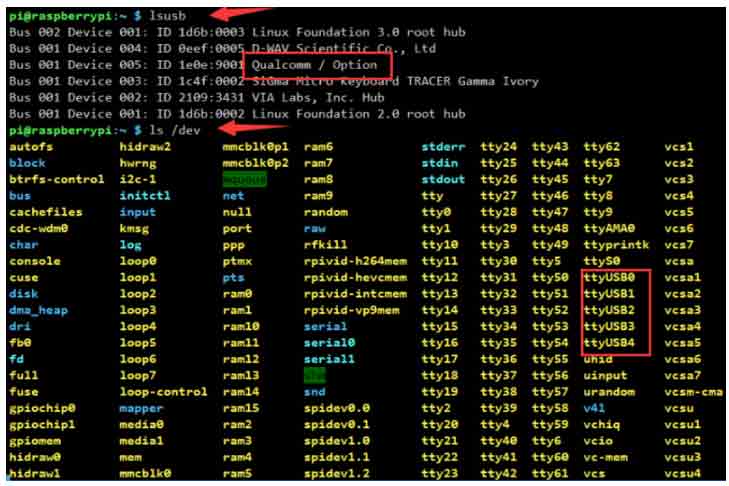
- Check whether SIM820X and Raspberry Pi are connected well by the following command:
lsusb
ls /dev
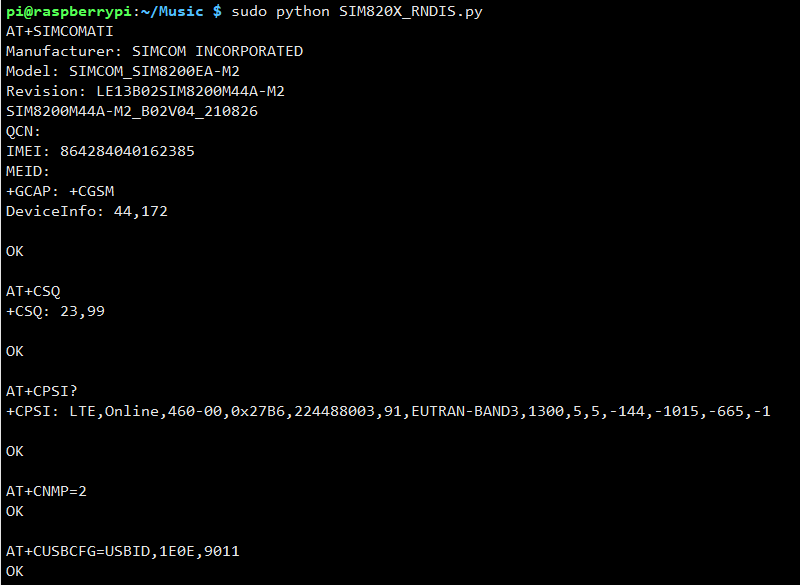
- After connecting the device, copy the following commands to the Terminal:
wget https://www.waveshare.com/w/upload/1/1e/SIM820X_RNDIS.zip
sudo apt-get install python3-pip
sudo pip3 install pyserial
sudo apt-get install unzip
unzip SIM820X_RNDIS.zip
sudo chmod 777 SIM820X_RNDIS.py
sudo python3 SIM820X_RNDIS.py
Method 2: AT Command Dail-up
- Open that port via minicom:
ls /dev/ttyUSB*
sudo apt-get install minicom
sudo minicom -D /dev/ttyUSB2
- Send the following command via minicom, and wait for the module to restart.
at+cusbcfg=usbid,1e0e,9011
Test Networking
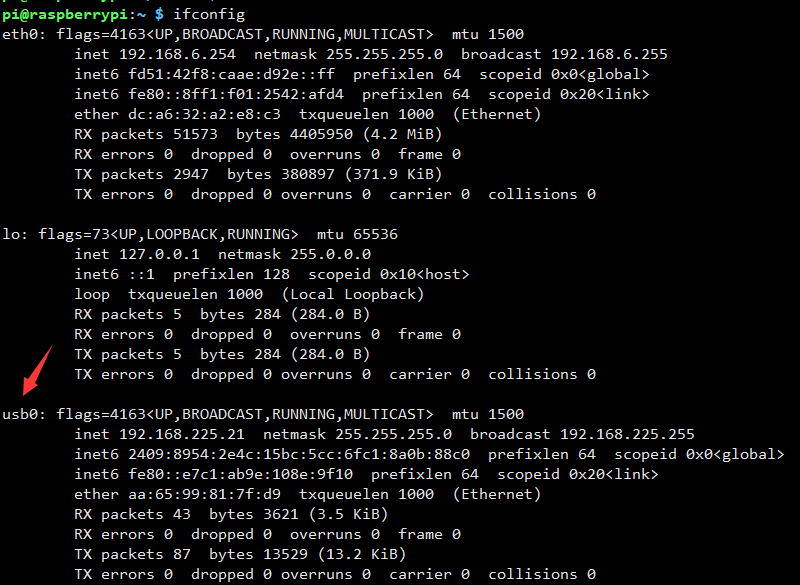
- After dialing, the Raspberry Pi can see that usb0 has obtained the ip through the following command:
ifconfig
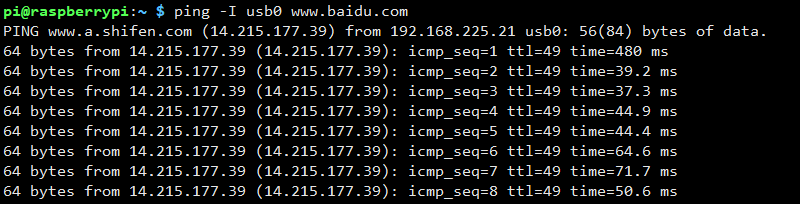
- Test usb0 networking status:
ping -I usb0 www.baidu.com
- If failed to obtain IP or to connect successfully, you can use the following command to obtain IP and connect:
sudo dhclient -v usb0
sudo apt-get install udhcpc
sudo udhcpc -i usb0
sudo route add -net 0.0.0.0 usb0
- Some systems may not be able to obtain the usb0 network card, please use the following command to obtain the next usb0 network card:
sudo ifconfig usb0 up
- If you need to switch to the Windows system, or restore the default settings of the module, you can send the following command to restore through the serial port:
at+cusbcfg=usbid,1e0e,9001
Config DNS (Optional)
- If you can ping the IP, but ping the URL, it is a DNS server problem, you can configure it according to the following steps:
sudo nano /etc/dhcpcd.conf
Add the national DNS address at the top of the text:
static domain_name_servers=8.8.8.8 114.114.114.114

- After restarting the Raspberry Pi, you can see that the DNS setting is successful through the following command.
sudo nano /etc/resolv.conf

- Save the file, exit, and ping test again.
Optional Network Card
If you are connected to WIFI, ETH, and 5G at the same time, if you want to use one of them to access the Internet first, for example, usb0 has priority over the eth0 network card to access the Internet, you can configure it according to the following steps:
- Edit the network configuration file dhcpcd.conf:
sudo nano /etc/dhcpcd.conf
- Add the following statement at the end:
interface usb0
metric 200
interface eth0
metric 300
TAG:
Cortex-A7
Workstation electronic Nameplate
NVIDIA Jetson Orin Nano Developer Kit Official Original 8GB AI 40Tops For Embedded and Edge Systems
ESP32 S3 AI 1.85 inch Development Board with 1.85inch LCD Touchscreen Round Screen Electronic Badge Deepseek
Horizontal Drag Instructions
Zero LCD HAT (A)
800x480
Raspberry Pi RTC WatchDog HAT (B) Real time clock Onboard DS3231SN High Precision RTC Chip
ESP32-S3 Development Board 1.47 inch LCD Screen Display 172x320 SD-Port LVGL USB
USB to UART
Jetson Nano Development Board
MEGA2560 R3
Black
EoAT Setting
Power
ESP32 C3
NanoKVM-USB Quick Start
800×480
Raspberry Pi LCD Capacitive TouchScreen Display HDMI 6.25inch 720x1560
Raspberry Pi 5 DSI
TAG:
Raspberry Pi 5 Rainbow Acrylic Case Colorful Translucent Acrylic Case Supports Installing Official Active Cooler
ESP32 desktop trinket
3D printed shell Case For Xiaozhi AI charging Robot Body Case
CM4 ADAPTER Interface protection board For Raspberry Pi Compute Module 4 Lite/eMMC
Raspberry Pi Camera Module 3 Sensor Assembly IMX708 Official Original 11.9MP Camera
Raspberry Pi 5 Argon-NEO-M.2-NVME-PCIE-Expansion-Board Argon NEO 5 Case
Core3566002000
Raspberry Pi UPS
ESP32 S3
22Pin to 15Pin Cable
Rasperry Pico2 RP2350 e-Paper PhotoPainter
Raspberry Pi 4 Model B Aluminum Alloy Case Cooling Ultra Thin case for Raspberry Pi 4B
ESP32-S3 GEEK
Zero LCD HAT (A)
Raspberry Pi 1.3inch LCD
ESP32-S3 1.28inch Round LCD
USB TO TTL FT232 UART Mini Communication Converter FT232RNL
Raspberry Pi Pico 2 RP2350A USB-C Mini Development Board
Flipper Zero Modification Module 3IN1 NRF24 ESP32 CC110
Raspberry Pi 0.85inch LCD