


- sales/support
Google Chat:---
- sales
+86-0755-88291180
- sales01
sales@spotpear.com
- sales02
dragon_manager@163.com
- support
tech-support@spotpear.com
- CEO-Complaints
zhoujie@spotpear.com
- Only Tech-Support
WhatsApp:13246739196
- Purchase/Shipping/Refund
WhatsApp:13424403025
- HOME
- >
- ARTICLES
- >
- Common Moudle
- >
- GSM-GPS
SIM8230G-M2 User Guide
Introduction
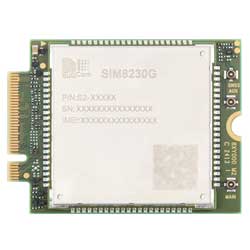
SIM8230G-M2 is a multi-band 5G communication module in M.2 package, supporting SA mode and compatible with SIM series AT commands, featuring high-speed data rates, rich interfaces, and protocol support, and capable of providing efficient, secure, and flexible data communication in various wireless environments. It is suitable for multiple fields of application and helps customers reduce costs and accelerate product launch.
Features
- Standard M.2 B KEY interface
- Low-power and lightweight 5G RedCap module
- AT commands are compatible with SIM7600 / SIM8200 / SIM8260 series modules
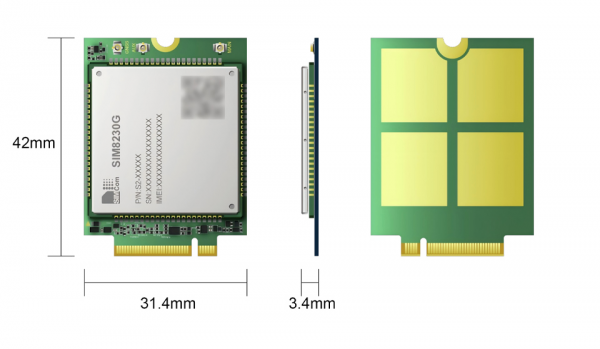
Dimensions
About Internet Speed
Due to many inconsistencies between actual and laboratory conditions, the 5G speed cannot ideally reach 220Mbps of the SIMCOM laboratory. Please see the following points:
- Base station distance: The closer you are to the 5G base station, the better the signal and the faster the speed;
- Indoor signal is worse than outdoor: building penetration attenuation, and indoor diffraction attenuation;
- Base station load: The fewer people use, the faster the speed will be, and it will be slower during peak commuting hours;
- Number of base stations: Due to spectrum constraints, the same amount of 4G coverage requires twice as many 5G base stations;
- Base station layout: The density of base stations varies in different locations, so the internet speed measured at different places is also somewhat different;
- Operator differences: You need to confirm if your 5G card is being throttled, and you can regularly request the operator to reset your network;
- Host differences: The 5G network speed bottleneck will be constrained by the SOC performance of the host, and high-performance hosts such as computers can fully realize the potential of 5G modules
Working with Windows
Driver Installation
Download the driver (Resources -> Softwares -> SIM8200 Driver) to your computer and unzip the package.
Enter the SIM8200_OS_Driver\Windows directory.
For most computers, enter the 1_install directory and run the setup.exe file to install.
Install Driver Manually
For some hosts, the COM port may not appear even after installing 1_install, in this case you need to use the file in the 2_AddManully to add it manually. The way to use it is to find an unrecognized device in the device manager and right-click to add the driver, as follows:
Power on the G module, switch it ON and the module boots, and then the PC will recognize four unrecognized devices (For some motherboards, 5 or 6 devices are recognized). Here the picture only shows 5 devices.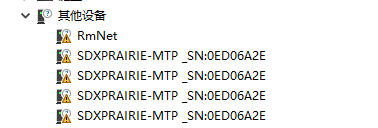
Right-click to update the driver, choose to add it manually, and select the path as SIM8200_OS_Driver\Windows. Please select it according to your system (WIN7\WIN8\WIN10), and there are up to 6 devices that can be selected, and then the PC will generate the following devices.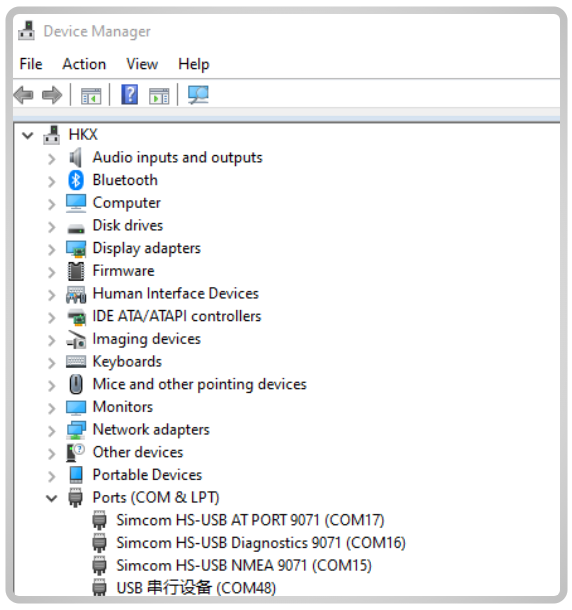
Four COM ports: AT is used for AT command control, Audio is used for dialing, Diagnostics is used for debugging, and NMEA is used for GPS.
Dial-up Internet Access
The differences between different dialing modes are shown in the table below:
| Interface | Connection Method | PID | Module | Kernel Configuration | Device Node | Network Card/IP | Features |
|---|---|---|---|---|---|---|---|
| Physical serial/USB to serial port | PPP | — | Qualcomm/ASR | CONFIG_PPP CONFIG_USB_SERIAL CONFIG_USB_SERIAL_WWAN CONFIG_USB_SERIAL_OPTION | ttyUSB | ppp0 (Operator IP) |
|
| USB network card | RNDIS | 9011 | CONFIG_NETDEVICES CONFIG_USB_USBNET CONFIG_USB_RNDIS_HOST | usb0 | Operator domain network IP; ASR: Operator IP |
| |
| ECM | 9018/9011 | CONFIG_NETDEVICES CONFIG_USB_USBNET CONFIG_USB_NET_CDCETHER | usb0 | Operator domain network IP; ASR: Operator IP |
|
RNDIS Dail-up
Remote NDIS (RNDIS) does not require hardware vendors to write NDIS miniport device drivers for network devices attached to the USB bus. Remote NDIS achieves this by defining a message set independent of the bus and specifying how this message set operates over the USB bus. Since this remote NDIS interface is standardized, a set of host drivers can support any number of network devices attached to the USB bus. This greatly reduces the development burden on device manufacturers, improves the overall stability of the system, as no new drivers are required, and enhances the end-user experience:
- Install the SIM card and antenna on the device, use USB to connect to the computer, and provide power supply
- Install USB driver
- If the network registration is successful, the SIM7600X sends AT commands to enable USB dial-up Internet access:
at+cusbcfg=usbid,1e0e,907b
- Sent successfully, returns OK, and the Dongle will automatically restart.
- Observe the Device Manager and find some unidentified devices, such as RNDIS (with an exclamation mark):
- Right-click RNDIS, search for device software in the prompt window, choose "Browse My Computer". Choose "Network Adapter" from the device list.
- Select Microsoft Corporation in the Manufacturer list of the Network Adapters window, and then select "Remote NDIS Compatible Device" in the list on the right-hand list, which is a remote NDK compatible device.
Click Next and wait for the installation to finish, the RNDIS Kitl device will be installed successfully. At this point, the dial-up feature is set up and you can see that the PC can access the Internet through Dongle. 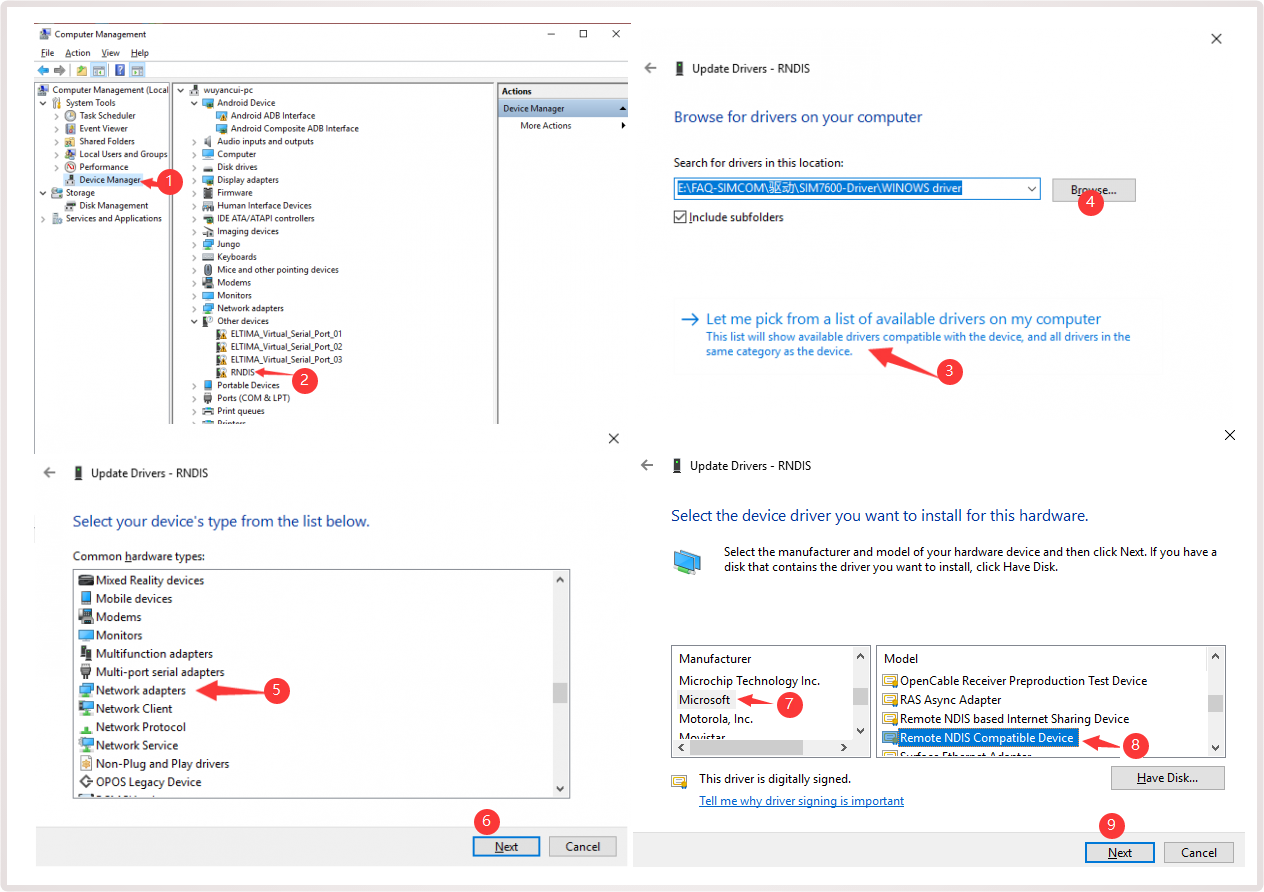
GPS Positioning
Please plug the GPS antenna into the GNSS antenna mount, and place the receiver tag face down in the open outdoor visual sky (note that the test cannot be done in rainy weather), and wait for about 1-5 minutes (the specific time depends on the test environment) to receive the positioning signal;
- After turning on GPS at the AT port debugging serial port, then open the NMEA port to obtain dynamic information:
AT+CGPS=1	    //Turn on GPS
AT+CGPSINFO         //Print GPS information to serial port
AT+CGPSAUTO=1       //Enable auto-location on startup

Working with Linux
Please don't type the wrong letters, it's best to copy and paste the following command line:
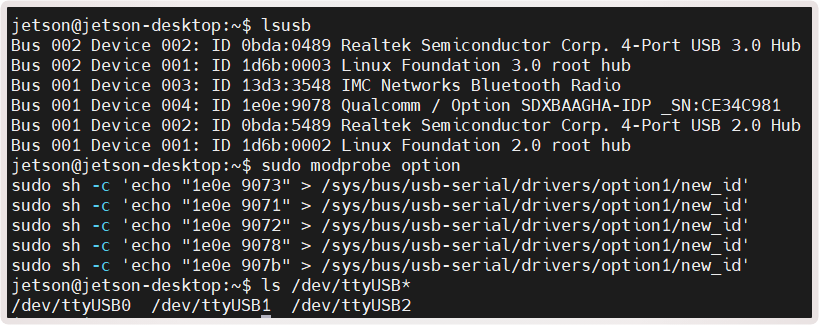
Check USB Device
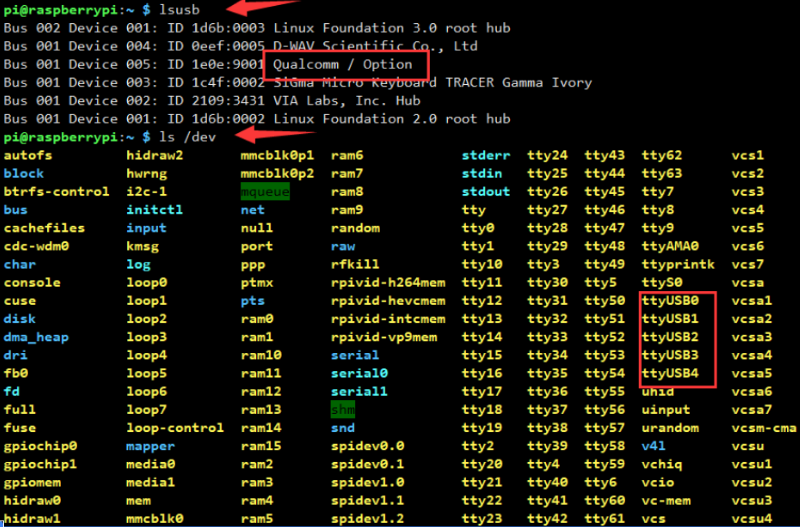
- You can use the following commands to check if devices such as SIM82XX and Orin Nano or Raspberry Pi are well connected. If there are no issues, you can see Qualcomm device and ttyUSB0-USB4:
lsusb
- Dynamically load the driver descriptor with the following commands
sudo modprobe option
sudo sh -c 'echo "1e0e 9073" > /sys/bus/usb-serial/drivers/option1/new_id'
sudo sh -c 'echo "1e0e 9071" > /sys/bus/usb-serial/drivers/option1/new_id'
sudo sh -c 'echo "1e0e 9072" > /sys/bus/usb-serial/drivers/option1/new_id'
sudo sh -c 'echo "1e0e 9078" > /sys/bus/usb-serial/drivers/option1/new_id'
sudo sh -c 'echo "1e0e 907b" > /sys/bus/usb-serial/drivers/option1/new_id'
- View ttyUSB* descriptor
ls /dev/ttyUSB*
Install minicom Serial Tool
sudo apt-get install minicom
sudo minicom -D /dev/ttyUSB2
ECM Dail-up
- Open ttyUSB2 through minicom:
ls /dev/ttyUSB*
sudo apt-get install minicom
sudo minicom -D /dev/ttyUSB2
- Send the following command via minicom, then wait for the module to restart
at+cusbcfg=usbid,1e0e,9078
Test Networking
- After dialing, you can see that usb1 gets the ip through the following command:
ifconfig
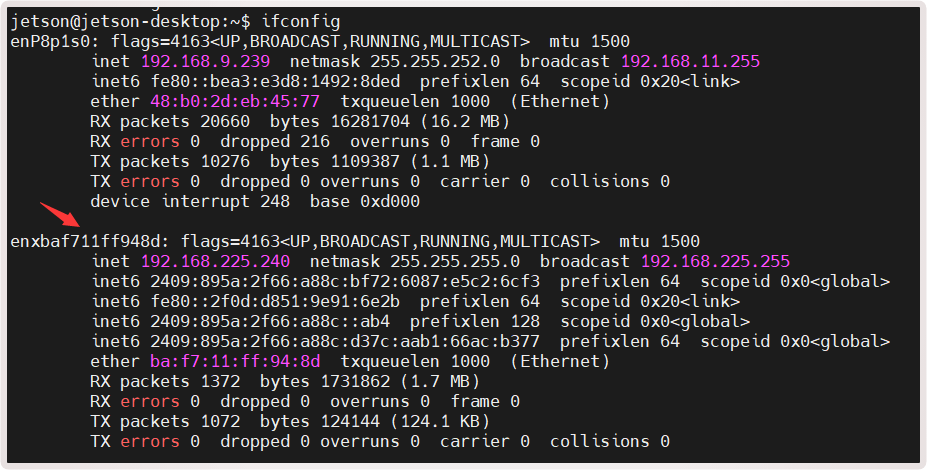
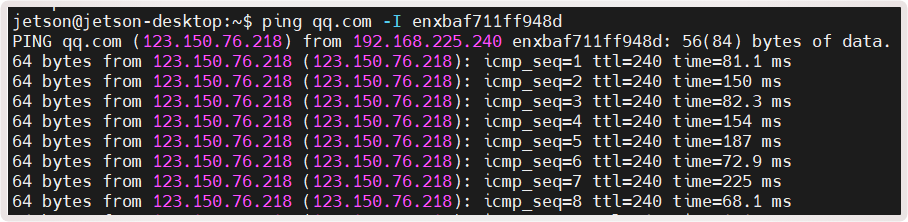
- Specify usb0 cellular network card here to test the networking status
ping qq.com -I enxbaf711ff948d
- If unable to obtain an IP or successfully connect to the Internet:
sudo apt-get install udhcpc
sudo dhclient -v enxbaf711ff948d
sudo udhcpc -i enxbaf711ff948d
sudo route add -net 0.0.0.0 enxbaf711ff948d
Configure DNS Server (Optional)
Sometimes you can ping an IP but not a domain name, which is a DNS server issue. Please refer to the following steps to configure the DNS server Check the current DNS
cat /etc/resolv.conf
- Back up the original DNS configuration file first
sudo mv /etc/resolv.conf resolv_bk.conf
- Re-edit a DNS configuration file
sudo nano /etc/resolv.conf
- Add a universal DNS server
nameserver 8.8.8.8
- Go ping the domain name for testing, use the corresponding network card, here usb0
ping qq.com -I usb0
- Lock the file to prevent tampering, unlock and change to - i
sudo chattr +i /etc/resolv.conf
Datasheets
Related Application Case
FAQ
Internet Speed
Question: Why is the actual internet speed not as fast as what is said online?
- First of all, there are slight differences between laboratory data and actual data. In practice, due to insufficient base stations, poor signal coverage, and many 5G coverage holes, the network speed may not reach the highest peak. Under normal circumstances, the 4G upload speed is stable at 20-40Mbps, and the 5G upload speed is stable at 100Mbps (the fewer people, the faster the speed is closer to the base station.)
- Using a high-performance host (connected to the same 5G module, under the same environment, the Internet speed of a laptop can reach several times that of a Raspberry Pi, and the host used in mainstream brand 5G smartphones is also quite good, the Internet speed won't be too bad), using high-gain antennas and trying to spread the antennas as far apart as possible in an inverted V shape (the internal antenna layout of the phone has a comparative advantage), can also effectively improve the bottleneck of Internet speed
- For different module frequency bands, communication performance and other parameters also vary. If you are pursuing the ultimate Internet speed, it is recommended to use high-performance Qualcomm modules (with a higher ceiling for high-performance mobile Internet speed), such as the SIM8262, RM520N, and other modules
- Ensure sufficient power supply; sometimes, to ensure stable Internet access, the module may appropriately reduce speed, especially when power supply is insufficient, so please provide sufficient power to the device
- Base stations are dense, not congested, resulting in smoother networks; using SIM cards and high-quality packages by operators with more base stations and wider coverage (under the same conditions, higher fees correspond to higher speed limits)
- Please replace SIM cards from multiple operators for comparative testing. Different operators support different 5G frequency bands, and the lack of frequency bands prevents registration to 5G. Even with the same bands, bandwidth differences can also lead to varying network speeds
- Speed tests on different nodes also vary, which can be felt when testing speed on a regular phone or computer. Therefore, you can switch to several different nodes or speed test servers for comparative testing and calculate the average network speed
- Actually, fast Internet speed isn't the only pursuit; stability is what matters. Therefore, you can switch different modules and SIM cards from different operators for comparison testing to quickly find a more suitable solution
Question: Why is the Raspberry Pi not as fast as a laptop using the same 5G cellular module, and the Internet speed on the computer is several times better than that of the Raspberry Pi?
- The x86 computer processor has higher efficiency in processing 5G data packets, while the Raspberry Pi's ARM architecture is prone to overload during encryption/protocol stack operations, resulting in reduced throughput.
- Computers typically use PCIe 3.0/4.0 to directly connect 5G modules, providing sufficient bandwidth, while Raspberry Pi often uses USB 3.0 to connect to actual module, resulting in a bottleneck.
Question: Why is the downlink speed more than 10 times faster than the uplink speed?
- Uneven distribution of spectrum resources: The network design optimization is biased towards the downlink, and most of the traffic demand is concentrated on receiving content; There are few uplink spectrum resources;
- Antenna transmission power limit: The uplink signal of the 5G module needs to be transmitted through the antenna of the device. SIM8202, for example, can be received by four antennas, and only two antennas can transmit data. The lower transmission power leads to a slower uplink speed.
- Network design priority level: The design of 5G networks usually gives priority to download traffic requirements. Most users' Internet usage behavior is mainly focused on receiving content, such as watching videos, browsing the Web, downloading files, etc.
Question: SIM820X-M2 5G HAT does not recognize the SIM card, what should I do?
- It may be switched to SIM card 2, please use the following command to switch to SIM card 1:
AT+SMSIMCFG=1,1
- To switch to SIM card 2, use the following command: (Some HATs have SIM2)
AT+SMSIMCFG=1,2
If it still does not work, consider that the flight mode is on, and turn off the flight mode with the following command:
AT+CFUN=1
Question: What should I do if my SIM820X Internet connection is slow?
Question: Why does the Raspberry Pi with a 5G cellular module not reach the same Internet speed as the phone, even when using the same SIM card and testing at the same location?
- The 5G frequency bands supported by the brand phone may be much more than the module, and the 5G frequency bands supported by the SIM card cover the phone but not the 5G module, so the phone may register to 5G, but the module may not;
Different operators' base stations support different 5G frequency bands. Please compare the Internet speed by testing the SIM cards of several frequency bands that cover the 5G module frequency bands.
- The mobile baseband chip (SOC) is more advanced, with faster data processing speeds, and is more powerful than the Raspberry Pi;
Please replace the 5G module with a computer host or other high-performance SOC for comparative testing
- The mobile cellular baseband is more advanced, and the baseband of brand smartphones can reach X75, while the baseband of SIM82XX is X55 or X62;
Replacing with a high-performance module can effectively improve Internet speed. If you aim for the ultimate Internet speed, it is recommended to use high-performance Qualcomm modules, such as SIM8262, RM520N, and other modules
- The mobile phone antenna design is stronger, and the device antenna may have weak signal reception;
Replace with a higher gain external antenna to enhance signal reception capability
- The phone may be deeply adapted to the operator, resulting in better network optimization, support for higher-order modulation, intelligent background connection management, and the device may maintain inefficient links while supporting higher-order modulation, with the device possibly limiting modulation methods; while the 5G module is still continuously optimizing and upgrading, it is believed that in the near future, network speeds can keep pace with ordinary phones
- Most smartphones' internal main controllers (SOC) and modules are not connected via USB, but rather use faster high-performance interfaces like PCIE;
Consider using a motherboard with PCIE direct connection, PCIE to network port, etc., to achieve the optimal network speed
Network
Question: Why does the NET light not flash after powering on for a while and cannot access the Internet?
In this case, the network connection may not be successful. Follow the steps below to troubleshoot:
1. First, check the hardware:
- Check whether the connected SIM card can communicate and surf the Internet normally on mobile phones and other devices. It is recommended to test with SIM cards from several different operators to rule out issues related to SIM card frequency bands;
- Check whether the antenna is connected properly;
- Check that the NET light is flashing, and it is always on, indicating that it is not registered to the network.
2. After confirming that the hardware is OK, you can use the following command (AT LOG) to further confirm the network situation:
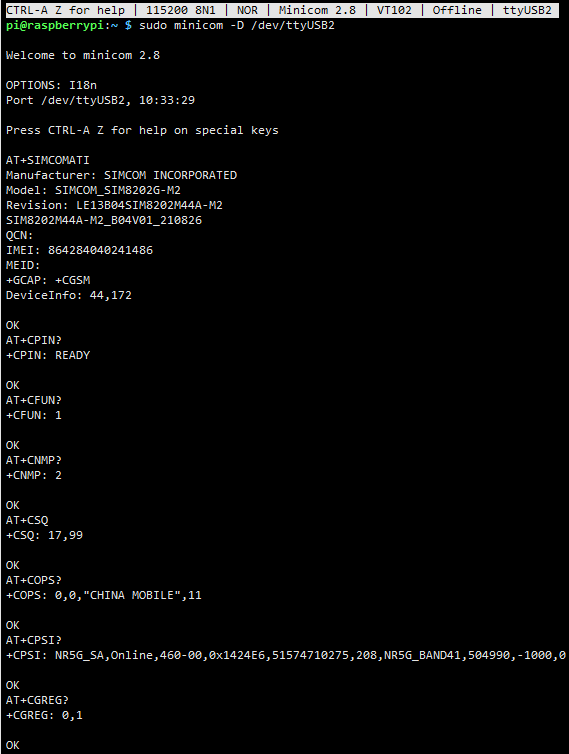
*Open ttyUSB2 through minicom:
 ls /dev/ttyUSB*
 sudo apt-get install minicom
 sudo minicom -D /dev/ttyUSB2
*Check the firmware version information:
AT+SIMCOMATI
*Check if the sim card is in good contact:
AT+CPIN?
*Turn the radio on (turn off airplane mode):
AT+CFUN=1
*Check that the network mode is set to auto-seek:
AT+CNMP=2
*Check the signal quality of the current environment:
AT+CSQ
*Check if the registration to the network is successful:
AT+CGREG?
*Check internet connection:
AT+CPSI?
*Check if the APN corresponds to the operator of the SIM card:
AT+CGDCONT?
*Check operator access:
AT+COPS?
Question: You can register to 4G, but you can't register to 5G. There is no service on a fixed 5G network. Can the SIM card be registered to the 5G network when it is connected to the mobile phone?
- It is recommended to replace the SIM card of different operators to test: different operators support different 5G frequency bands, change the card at the same time can also solve other problems with the card;
- There is no configuration of APN. APN determines the way to enter the network. It is the agent of the operator and the cellular module. Sometimes APN can be obtained automatically, but many times it needs to be obtained manually. You can set it through the following command:
AT+CGDCONT=1,"IP","APN"   //The APN of different operators is different. Here the APN is changed to that of the corresponding operator, for example:
China Mobile APN: CMNET; China Unicom APN: 3GNET; China Telecom APN: CTNET
You can check the APNS of major operators on the following website: APN query website
- You can switch to a different neighborhood or go to another district to test: Different areas cover different operators' networks, leading to different 5G frequency bands in different places.
- To ensure the module registers on the power-efficient LTE 4G network, it must have adequate power supply; insufficient power can also cause the module to register on the LTE 4G network.
- Although it shows 4G LTE network, 5G speed is already available, which do not affect usage, and you can also send the following command:
AT+CNMp=109
- It may be that the antenna's band does not cover the band of the operators you are using, please change to a full band high gain antenna suitable for your local area to test, and connect all antennas, all antennas are useful, otherwise it may also cause network problems;
All antennas are connected, and all antennas are useful; otherwise, it may also cause network issues;
- If you are using an IoT card, it is recommended to switch to a regular mobile SIM card (one that can make calls and send messages) for testing. Some pure data cards or IoT cards may be restricted on other devices or after switching devices and cannot register to the 5G network. You can also check the status of the card with the IoT card provider.
- The SIM card bands of 5G operators should cover the bands of SIM820X; sometimes, when querying 4G networks, speeds have reached 5G, and direct speed testing can confirm whether 5G speeds are available.
- Plug the SIM card into the phone to test if it can register to the 5G network. If the phone cannot register, it means the SIM card has not been activated for a 5G data package, or there is insufficient balance, etc.
- Confirm if there is 5G network coverage in the test environment and what frequency band it is registered to (whether the registered frequency band is one of the bands supported by the 5G module).
- Android phones can be installed with 5G phones to install Cellular-Z (available in major App stores) to view detailed network information:
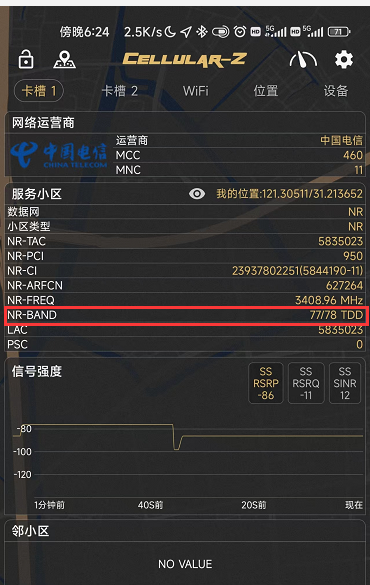
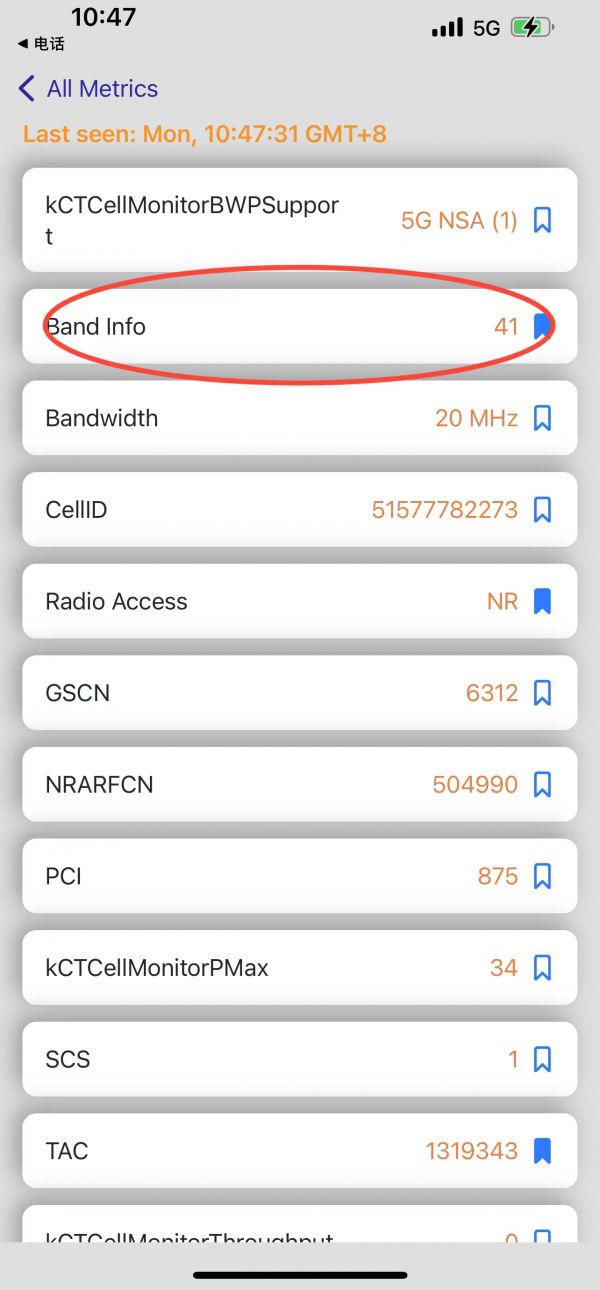
- iPhone can get band information by following these steps:
- Turn on your phone dialer, enter *3001#12345#*, and tap the dial button
- In the pop-up page, find and click on "Serving Cell Info", then find and click on "Freg Band Indicato".
- You can find out by making an inquiry according to the form sent by the operator
- iPhone can get band information by following these steps:
Question: How to fix a specific frequency band?
AT+CSYSSEL="nr5g_band",41:78
Question: What should I do if the SIM820X module NDIS dial-up fails and the driver cannot be installed?
- It is recommended to use the more convenient SIM820X RNDIS Dial Up.
- You can flash the latest Raspberry Pi Raspbian system and reconfigure the NDIS dial-up.
Question: How can check the 4G/5G module is successfully connected to the devices such as Raspberry Pi?
- You can use the following commands to check if the SIM820X and the Raspberry Pi are well connected. If the connection is OK, you can see Qualcomm device and ttyUSB0-USB4:
lsusb
ls /dev
Question: Why is the module never registered with any local operator when trying to use the SIM card?
- 1) It is recommended to replace the SIM card of different operators to test: different operators support different 5G frequency bands, change the card at the same time can also solve other problems with the card; If you are using an IoT card, it is recommended to switch to a regular mobile SIM card (one that can make calls and send messages) for testing. Some pure data cards or IoT cards may be restricted on other devices or after switching devices and cannot register to the 5G network. You can also check the status of the card with the IoT card provider.
- 2) Please configure the APN correctly. There is no configuration of APN. APN determines the way to enter the network. It is the agent of the operator and the cellular module. Sometimes APN can be obtained automatically, but many times it needs to be obtained manually. You can set it through the following command:
AT+CGDCONT=1,"IP","Your_APN"   //The APN of different operators is different. Here the APN is changed to that of the corresponding operator.
For example: China Mobile APN: CMNET; China Unicom APN: 3GNET; China Telecom APN: CTNET
- 3) It may be that the antenna's band does not cover the band of the operators you are using, please change to a full band high gain antenna suitable for your local area to test, and connect all antennas, all antennas are useful, otherwise it may also cause network problems;
- 4) If it still doesn't work, please refer to the following steps to print the network AT log and give the log to our service support team for analysis.
*Check the firmware version information:
AT+SIMCOMATI
*Check if the sim card is in good contact:
AT+CPIN?
*Turn the radio on (turn off airplane mode):
AT+CFUN=1
*Check that the network mode is set to auto-seek:
AT+CNMP=2
*Check the signal quality of the current environment:
AT+CSQ
*Check if the registration to the network is successful:
AT+CGREG?
*Check internet connection:
AT+CPSI?
*Check if the APN corresponds to the operator of the SIM card:
AT+CGDCONT?
*Check operator access:
AT+COPS?
- Open ttyUSB2 through minicom:
ls /dev/ttyUSB*
sudo apt-get install minicom
sudo minicom -D /dev/ttyUSB2

Location
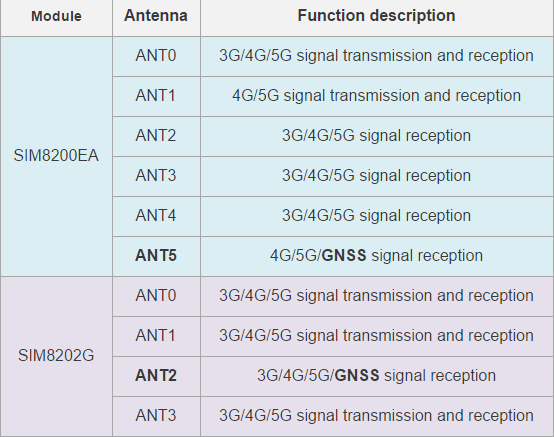
Question: The SIM820X has so many antenna ports, do they have to be connected? What is the function?
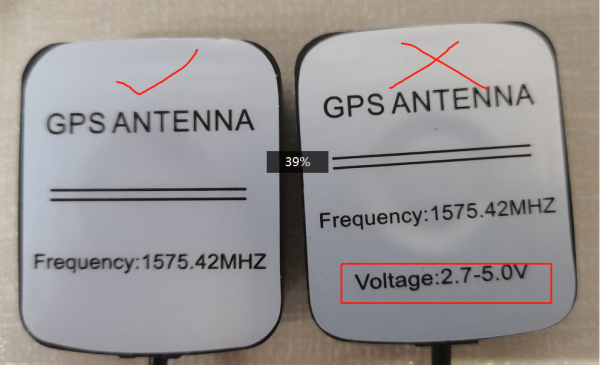
Question: What should I do if I can't receive the GPS signal and get the location information?
- Plug the GPS antenna into the GNSS antenna socket (SIM8200EA is ANT5; SIM8202G is ANT2), and place the receiver in the open air (note that it cannot be tested in rainy weather). It takes about 1 minute to receive the positioning signal after power-on.
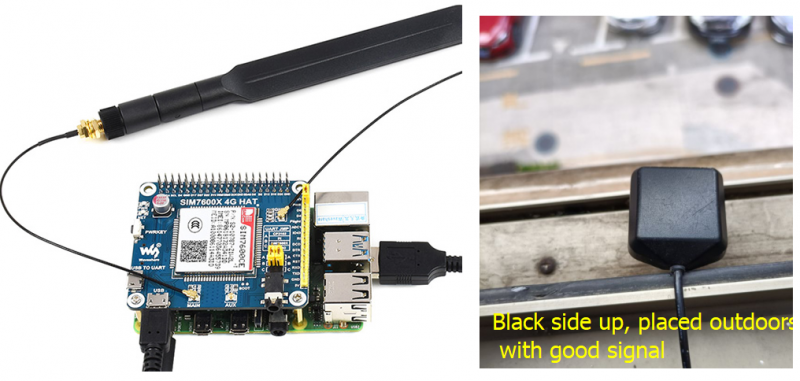
- M2 module needs to use a passive antenna to obtain positioning information. If you do not have a passive positioning antenna, a 5G antenna can also be used. Replace the 5G antenna and place the module outdoors for positioning (the 5G antenna does not come with an extension cable):
Question: Should data be transmitted using SPI or USB?
USB, when running sudo ./install on the Raspberry Pi, it will load the USB driver, and we will connect and communicate via the 3B/4B USB connector; following the tutorial on Windows will also load the USB driver, and when there is no USB driver, it will be displayed as an unknown device.
Question: Does Raspberry Pi control occupy the pins?
It is not occupied by default.
Question: Why does the Raspberry Pi fail to load when running sudo ./install?
Ensure your system kernel is 5.4 or higher. Do not use sudo update to upgrade to the latest version on Raspberry Pi, as this will upgrade the kernel version to a level higher than the current firmware, causing it to be unrecognizable.
Question: Can multiple 5G modules be used simultaneously?
sudo ./simcom-cm -i wwan0
sudo ./simcom-cm -i wwan1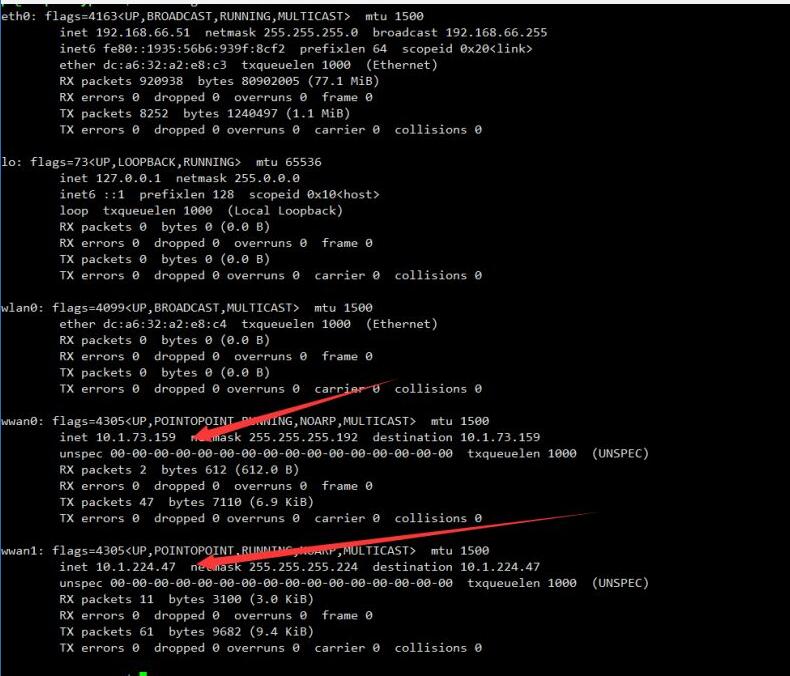
Question: Can the text message be saved to a location other than the SIM card?
You can use the following command to save the SMS to the module memory:
AT+CPMS="MT"
Question: Some SIM card operators require the VOLTE function to make calls. How to turn it on or off?
You can use the following command to enable VOLTE function:
 at+voltesetting=1
 at+cnv=/nv/item_files/modem/mmode/ue_usage_setting,1,01,1
You can use the following command to disable VOLTE function:
 at+voltesetting=0
 at+cnv=/nv/item_files/modem/mmode/ue_usage_setting,0,01,1
Hardware
Question: How to install a SIM card?
Please refer to the following figure for installation: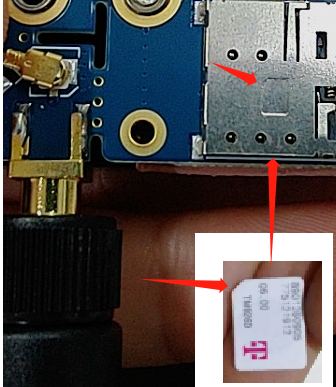
Question: What should I do if the IPX4 antenna socket of the 5G module is removed?
- ANT 0 and 1 functions can replace each other, and 2 and 3 functions can replace each other. Usually, if one antenna is missing, it does not affect the basic functions.
- If the copper foil has also come off, it usually cannot be repaired.
- When removing it, please wiggle it gently from side to side and pull it out evenly, avoiding forceful pulling.
- The IPEX4 generation connectors are relatively fragile, so please handle them with extra care.
Question: Can the SIM8202G-M2 5G for Jetson Nano be used on Nano NX or Orin nano?
- Yes, it needs to be connected with a USB cable. After connecting with a pin header, the USB adapter and USB socket are not fully aligned, and the USB cable is used for the connection
Question: How to determine if a module is recognized when using Linux?
You can use the following command to check if there is a Qualcomm device. If the COM driver has already been loaded (which is usually included in Raspberry Pi systems), a series of ttyUSB * will also appear:
lsusb
ls /dev/ttyUSB*

Question: Why is the fan noise noticeable after a period of use?
After the roller fan works for a long time, the lubricating oil may evaporate, resulting in increased noise, which is the general nature of the roller fan, not the fan fault:
Question: Can the 5G board be used with other M.2 B KEY interface modules?
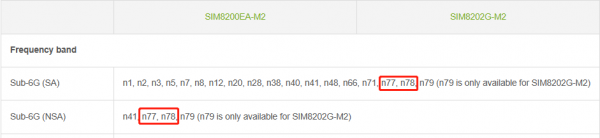
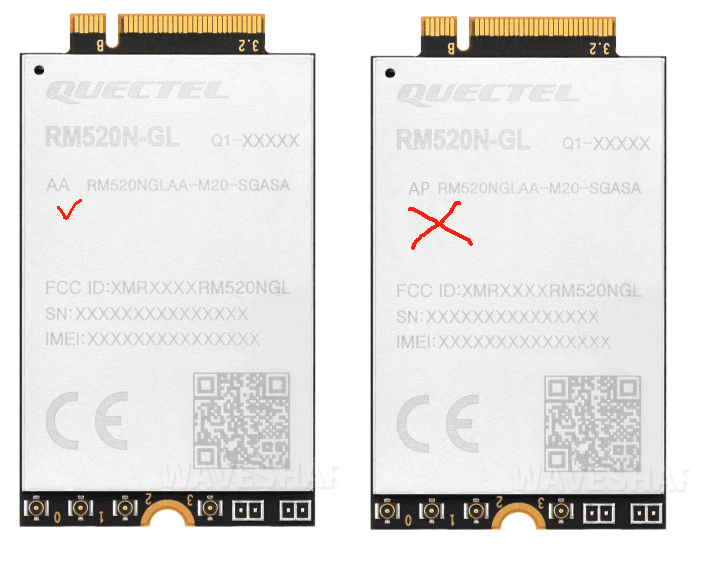
- We do not guarantee that the modules that have not been verified (including disassembled modules such as FM350X) will be supported, but the following modules have been verified and supported:
Fibocom: FM650-CN FM160-EAU
SIMCOM: SIM8202G-M2 SIM8262E-M2 SIM8262A-M2
Quectel (USB AA module): RM500U-CNV RM500Q-GL/RM502Q-AE RM520N-GL RM530N-GL
- Quectel module special instructions: This is a USB3.0 protocol module, you need to use Quectel AA modules that support USB, not the AP silk screen module (RM520 AP ~~) that does not support the PCIE protocol. It is not recommended to use modules bought from the second-hand market, as we do not provide support for them. It is suggested to choose modules that we have verified and listed, which is more guaranteed. As shown in the image, the RM520_AA module is supported:
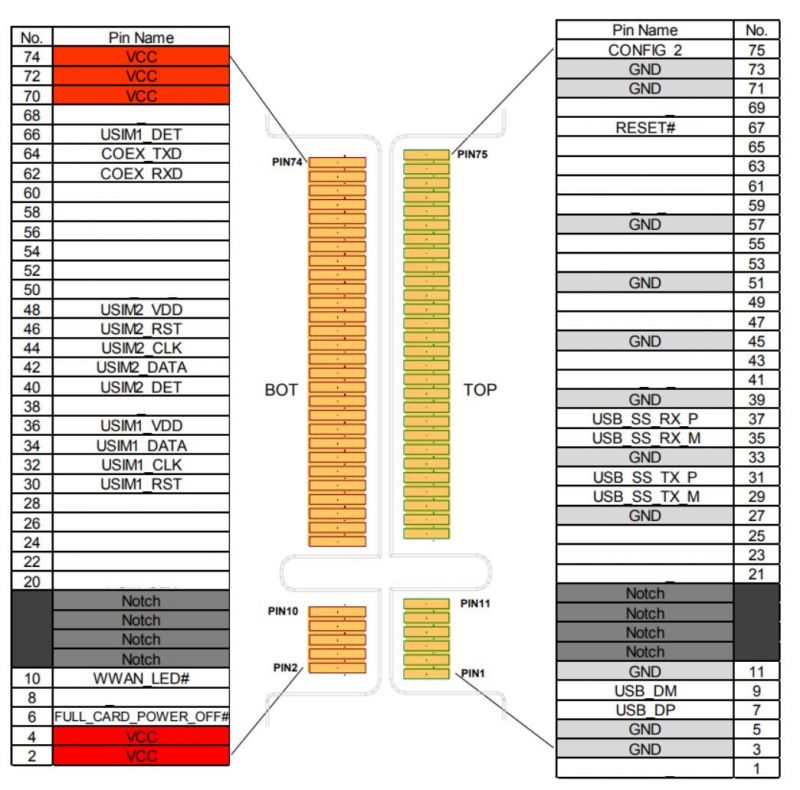
- If you need to use M.2 TO 4G/5G HAT for other 4G/5G modules, you can refer to the M.2 connection diagram in the figure below, check if there is a pin conflict, and then connect it for testing:
- USB 3.2 Gen1 5G DONGLE and USB TO M.2 B KEY kit does not include the 5G module, which must be purchased separately; if used with other modules, pin compatibility must be confirmed, and the actual measurement shall prevail.
Question: What is the power consumption of the 5G module?
For different work states, power consumption varies. With 5V power supply, the current generally ranges from 0.5 to 2.5A after successful networking, with an average of about 1.2A (this is for reference; the actual value depends on the network environment and networking work state).
Applications
Question: Can RM500U-CN 5G HAT and SIM8262E-M2 5G HAT achieve interconnection between two Raspberry Pi devices on a 5G network?
- Yes, it's like two mobile phones using 5G cellular networks that can interconnect through the operator's base stations
- The Raspberry Pi A and B are respectively registered to the network via the RM500U-CN 5G HAT and SIM8262E-M2 5G HAT cellular modules, and after going online (at this point, two phones are born), they can communicate via TCP, MQTT, email, or instant messaging tools, etc., to achieve interconnection on the 5G network.
- However, cellular modules cannot communicate point-to-point, and even at zero distance, the cellular network still needs to communicate with the operator's base station, which also incurs data costs; If point-to-point communication is required, Bluetooth, WiFi, or Lora can be used to bypass communication with the operator's base station
Support
Monday-Friday (9:30-6:30) Saturday (9:30-5:30)
Email: services01@spotpear.com
[Tutorial Navigation]
- Introduction
- Features
- Dimensions
- About Internet Speed
- Working with Windows
- Working with Linux
- Check USB Device
- Install minicom Serial Tool
- ECM Dail-up
- Test Networking
- Configure DNS Server (Optional)
- Datasheets
- Related Application Case
- FAQ
- Internet Speed
- Question: Why is the actual internet speed not as fast as what is said online?
- Question: Why is the Raspberry Pi not as fast as a laptop using the same 5G cellular module, and the Internet speed on the computer is several times better than that of the Raspberry Pi?
- Question: Why is the downlink speed more than 10 times faster than the uplink speed?
- Question: SIM820X-M2 5G HAT does not recognize the SIM card, what should I do?
- Question: What should I do if my SIM820X Internet connection is slow?
- Question: Why does the Raspberry Pi with a 5G cellular module not reach the same Internet speed as the phone, even when using the same SIM card and testing at the same location?
- Network
- Question: Why does the NET light not flash after powering on for a while and cannot access the Internet?
- Question: You can register to 4G, but you can't register to 5G. There is no service on a fixed 5G network. Can the SIM card be registered to the 5G network when it is connected to the mobile phone?
- Question: How to fix a specific frequency band?
- Question: What should I do if the SIM820X module NDIS dial-up fails and the driver cannot be installed?
- Question: How can check the 4G/5G module is successfully connected to the devices such as Raspberry Pi?
- Question: Why is the module never registered with any local operator when trying to use the SIM card?
- Location
- Question: The SIM820X has so many antenna ports, do they have to be connected? What is the function?
- Question: What should I do if I can't receive the GPS signal and get the location information?
- Question: Should data be transmitted using SPI or USB?
- Question: Does Raspberry Pi control occupy the pins?
- Question: Why does the Raspberry Pi fail to load when running sudo ./install?
- Question: Can multiple 5G modules be used simultaneously?
- Question: Can the text message be saved to a location other than the SIM card?
- Question: Some SIM card operators require the VOLTE function to make calls. How to turn it on or off?
- Hardware
- Question: How to install a SIM card?
- Question: What should I do if the IPX4 antenna socket of the 5G module is removed?
- Question: Can the SIM8202G-M2 5G for Jetson Nano be used on Nano NX or Orin nano?
- Question: How to determine if a module is recognized when using Linux?
- Question: Why is the fan noise noticeable after a period of use?
- Question: Can the 5G board be used with other M.2 B KEY interface modules?
- Question: What is the power consumption of the 5G module?
- Applications
- Support